1. はじめに
This manual provides comprehensive instructions for the installation, operation, and maintenance of the Coliao W3230 Digital Temperature Controller. The W3230 is a versatile digital thermostat switch designed for precise temperature control in various applications, offering both heating and cooling functionalities. It features a clear LED display and a waterproof probe for reliable performance.
2.製品オーバーview
The Coliao W3230 Digital Temperature Controller is a high-precision device equipped with a digital LED display for enhanced readability. It supports a wide temperature measuring range and offers high control precision of 0.1°C. All parameter settings are saved automatically after a short circuit or power cycle. The unit features a relay output for controlling external heating or cooling devices.
2.1 主な特徴
- Clear digital LED display for actual and set temperatures.
- Wide temperature control range: -50°C to 120°C.
- High control precision: 0.1°C.
- Programmable heating or cooling control modes.
- NTC10K waterproof sensor probe (1 meter wire).
- Relay output with contact capacity up to 20A.
2.2 コンポーネント
- W3230 Digital Temperature Controller Module
- NTC10K Waterproof Sensor Probe (1 meter)

Figure 1: Two Coliao W3230 Digital Temperature Controllers with connected probes.
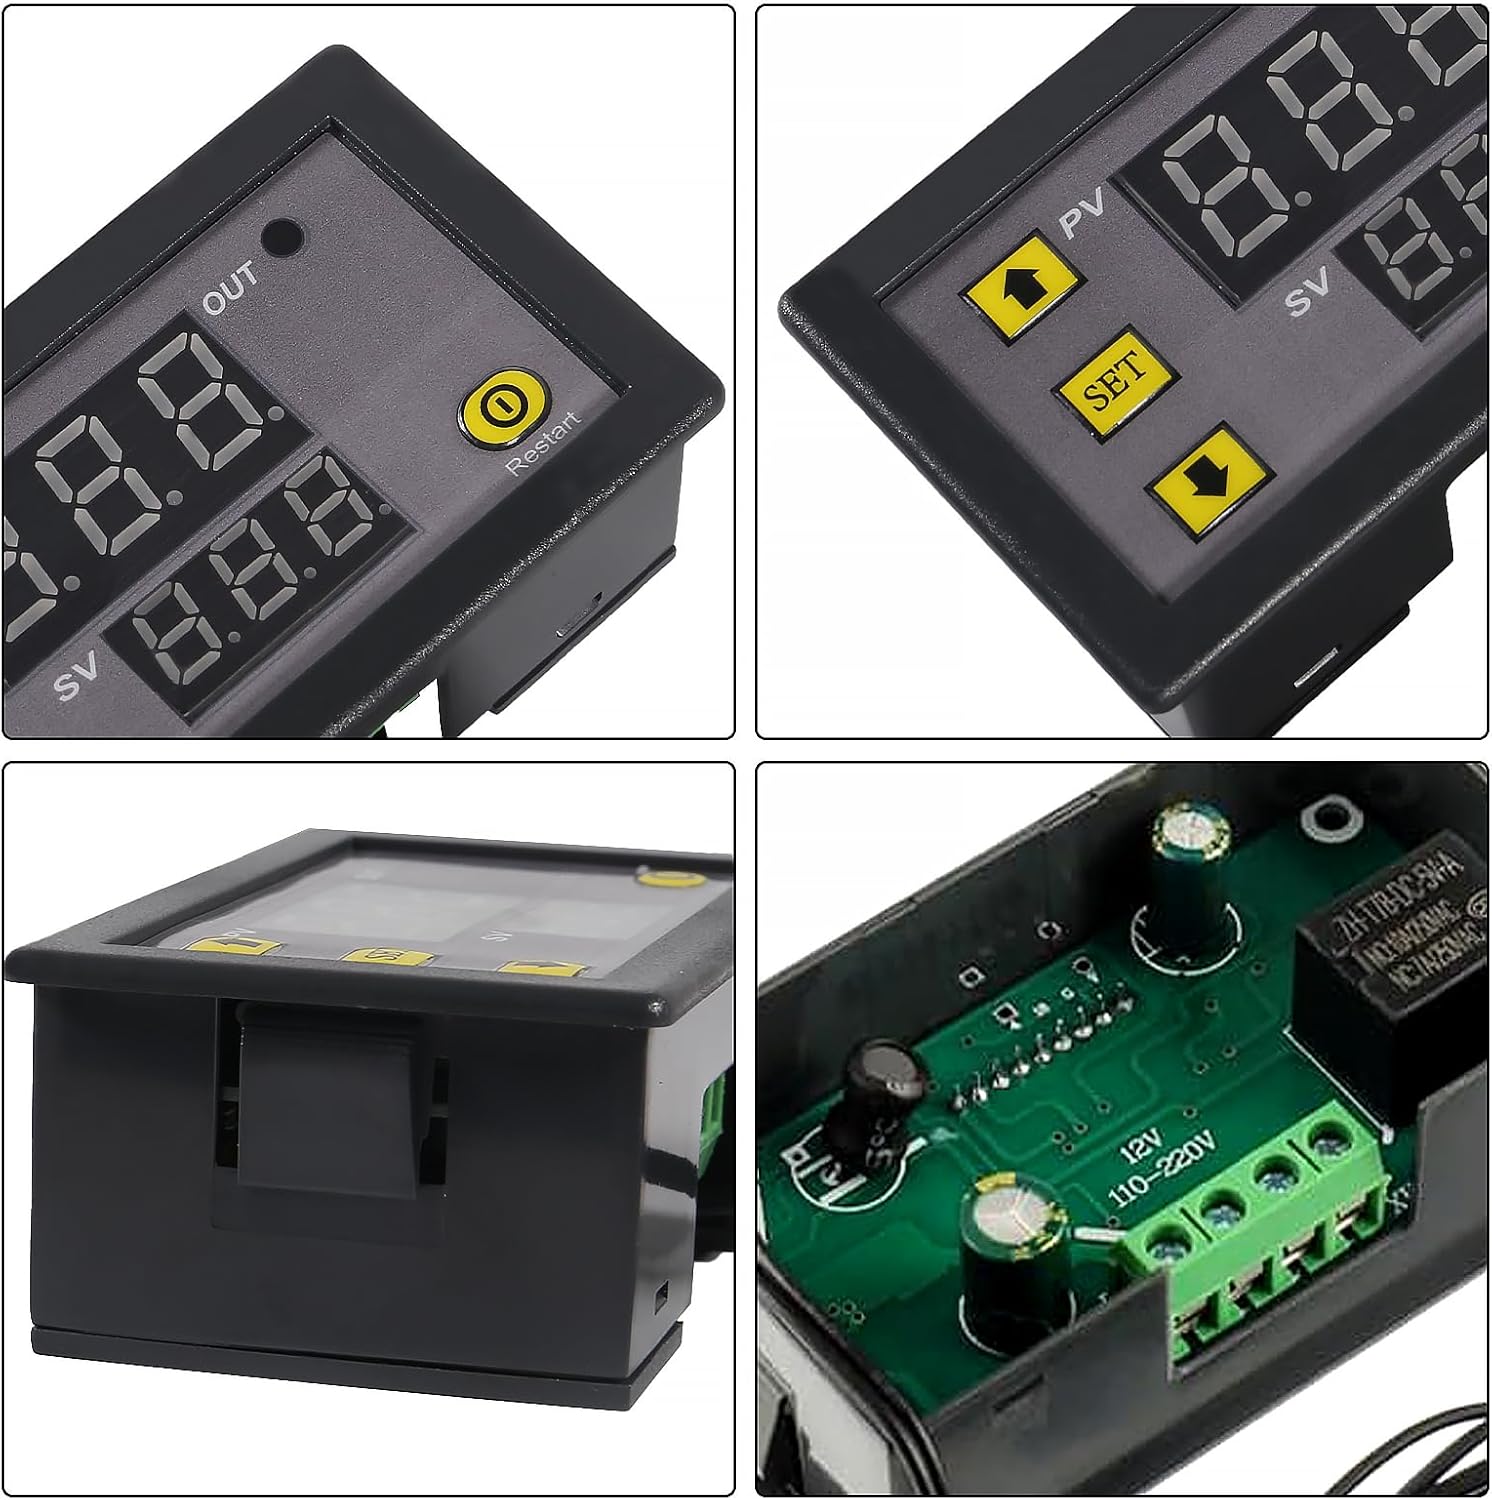
図2:詳細 views of the W3230 controller, highlighting the display, control buttons, and internal relay.
3. 仕様
| パラメータ | 価値 |
|---|---|
| 電源 | DC 12V / DC 24V / AC 110V~220V (model dependent) |
| 温度制御範囲 | -50°C ~ 120°C |
| 解像度比 | 0.1°C (-9.9 ~ 99.9°C); 1°C (その他の範囲) |
| 温度制御精度 | 0.1℃ |
| 測定精度 | ±0.1℃ |
| Return Precision | 0.1℃ |
| センサー | NTC10K waterproof sensor; Wire: 1 meter |
| 出力 | Relay Contact Capacity: 10A 220V / 20A 12V / 20A 24V |
| 環境要件 | -10°C to 60°C, humidity 20%-85%RH |
| LED Displaying Color | Red (PV) / Blue (SV) |
| 寸法(約) | 78mm x 42mm x 21mm (3.07インチ x 1.65インチ x 0.82インチ) |

Figure 3: Product dimensions of the W3230 Digital Temperature Controller.

Figure 4: Product details and a code table for parameter settings.
4. セットアップと配線
重要: 電源のボリュームを確認してくださいtage matches the label on the product. Incorrect voltage can damage the module. Always disconnect power before wiring.
4.1 配線図
The W3230 controller has terminals for power input (+VCC, -GND), sensor input (S1, S2), and relay output (LOAD). Connect the power supply to +VCC and -GND. Connect the NTC sensor to S1 and S2. The load (heating or cooling device) should be connected to the relay output terminals, ensuring it is within the relay's specified current and voltag容量。

Figure 5: Wiring diagram for the W3230 Digital Temperature Controller. Connect +VCC and -GND for power, S1 and S2 for the sensor, and the LOAD to the relay output.
5. 操作
5.1 表示インジケータ
- Output Indicator (OUT):
- 点滅: Indicates cooling or heating start-up delay is active.
- 定常光: Indicates the relay is closed (output is active).
- 光なし: Indicates the relay is disconnected (output is inactive).
- PV Digital Tube (Red Display): Shows the actual measured temperature.
- SV Digital Tube (Blue Display): Shows the set temperature value (relay on/off threshold).
5.2 設定温度
希望の温度を設定するには:
- Press the "SET" button once. The SV digital tube (blue display) will flash.
- Use the "Up" (▲) and "Down" (▼) arrow buttons to adjust the temperature value.
- Press "SET" again to confirm the setting, or wait 8 seconds for automatic confirmation and return to normal display.
5.3 Main Menu Settings (P0-P8)
To access and configure advanced parameters:
- Long press the "SET" button for 3 seconds to enter the main menu. The display will show "P0".
- Press "SET" repeatedly to cycle through modes P0 to P8.
- When the desired mode (e.g., P0) is displayed, use the "Up" (▲) and "Down" (▼) arrow buttons to adjust its value.
- Long press "SET" for 3 seconds, or wait 8 seconds without any key action, to automatically confirm the setting and exit the menu.
5.4 電源スイッチ
- Turn Off Display/Relay: Long press the "Restart" button for 1.5 seconds.
- Turn On Display/Relay: Press the "Restart" button again for 1.5 seconds.
6. Parameter Settings (Code Table)
The following table details the various programmable parameters (P0-P8) and their functions.
| コード | 関数 | 範囲を設定する | デフォルト |
|---|---|---|---|
| P0 | 加熱/冷却モード | H / C | C(冷却) |
| P1 | リターン差(ヒステリシス) | 0.1〜15℃ | 2℃ |
| P2 | 上限を設定する | 120℃ | 120℃ |
| P3 | 下限を設定する | -50℃ | -50℃ |
| P4 | 温度補正 | -7.0~7.0℃ | 0℃ |
| P5 | 開始時間を遅らせる | 0~10分 | 0 minutes |
| P6 | 高温警報 | OFF / 120°C | オフ |
| P7 | データロック | オン/オフ | オフ |
| P8 | 工場出荷時設定にリセット | オン/オフ | オフ |
7. Troubleshooting (Warning Codes)
The display may show specific codes to indicate abnormal conditions. Refer to the table below for explanations and solutions.
| コード | エラーの理由 | 解決 |
|---|---|---|
| うーん | Temperature exceeds alarm temperature or maximum measuring range. | The temperature drops below the alarm temperature and returns to normal. If it exceeds the maximum measuring range, the relay is forced to disconnect. |
| LLL | No temperature sensor detected or sensor open circuit. | Replace or reconnect the temperature sensor. |
| ---- | Setting of high-temperature alarm exceeds the maximum value. | Adjust the P6 (High Temperature Alarm) setting to a valid range. |

Figure 6: Excerpt from the W3230 instruction manual detailing warning codes and basic operation.
8. アプリケーション
The W3230 Digital Temperature Controller is suitable for a wide range of temperature-controlled systems, including but not limited to:
- Domestic freezers and refrigerators
- Water tanks and aquariums
- Industrial chillers and steamers
- Greenhouses and agricultural settings
- Industrial equipment requiring precise temperature regulation

図7:例amples of common applications for the W3230 Digital Temperature Controller.
9. メンテナンス
To ensure optimal performance and longevity of your W3230 Digital Temperature Controller:
- デバイスを清潔に保ち、ほこりや湿気を避けてください。
- Avoid exposing the controller to extreme temperatures or direct sunlight beyond its specified environmental requirements.
- 配線接続の安全性と整合性を定期的に確認してください。
- Ensure the sensor probe is clean and properly positioned for accurate readings.
10. 保証とサポート
For warranty information or technical support, please refer to the documentation provided with your purchase or contact Coliao customer service directly. Keep your purchase receipt as proof of purchase.