
1. はじめに
This manual provides comprehensive instructions for the safe and effective operation, maintenance, and troubleshooting of your GOYERRNES GR-CA-7200B-YC-NEW Clamp Meter Multimeter. Please read this manual thoroughly before using the device to ensure proper function and to prevent potential hazards.
The GOYERRNES GR-CA-7200B-YC-NEW is a True RMS (TRMS) digital clamp meter designed for accurate measurement of AC/DC amp時代、AC/DCボリュームtage, resistance, frequency, capacitance, continuity, diode, and temperature. It also features Non-Contact Voltage (NCV) detection and continuous data logging capabilities, making it a versatile tool for electrical diagnostics in various applications.
2. 安全情報
電気試験機器を使用する際は、火災、感電、または人身傷害のリスクを軽減するため、必ず基本的な安全上の注意事項を守ってください。このマニュアルは、今後の参考のために保管してください。
- すべての指示をお読みください: Understand the operation and safety warnings before use.
- デバイスを検査します。 Before each use, check the meter, test leads, and accessories for any damage. Do not use if damaged.
- Do not exceed ratings: volを適用しないでくださいtage or current that exceeds the maximum specified ratings for the meter.
- Avoid live circuits: Do not measure current on live circuits without proper insulation and safety gear.
- Use proper terminals: 目的の測定に対して、テスト リードが正しい入力端子に接続されていることを確認します。
- 高いボラティリティに注意tage: volを使用する場合は、細心の注意を払ってくださいtag30V AC RMS、42Vピーク、または60V DCを超える電圧。これらの電圧はtag感電の危険があります。
- Do not operate in explosive environments: Do not use the meter in environments with explosive gas, vapor, or dust.
- Maintain dry conditions: Keep the meter dry. Do not operate in wet or damp 条件。
- Service by qualified personnel: Repairs or servicing should only be performed by qualified service personnel.
3 製品の特徴
The GOYERRNES GR-CA-7200B-YC-NEW Clamp Meter Multimeter offers a range of features for comprehensive electrical testing:
- 多用途測定: Accurately measures AC/DC Amperage, AC/DC Voltage, Resistance, Frequency or Duty Cycle, Capacitance, and Temperature (℃/℉).
- 非接触巻tage (NCV) 検出: Provides a safe method for detecting AC voltag直接接触することなく。
- Diode and Continuity Tests: Essential functions for circuit diagnostics.
- Continuous Data Logging: Displays AC/DC amps, volts, ohms, capacitance, Hz, and temperature in Max/Min/Avg on the same interface with real-time readings. Includes a curve graph for visual trend analysis.
- 高精度: 特徴 0.1 amp resolution for 0.1 ~ 60A AC/DC current and 1A for 60 ~ 400A, supporting precise current measurements.
- 大型デジタルディスプレイ: Backlit LCD ensures visibility in dimly lit areas.
- 広い温度範囲: Extensible thermocouple probe supports temperature measurements from -4 to 1832℉ (-20 to 1000℃).
- Jaw Caliber Size: 1.77 inches (45mm) for clamp指揮者の周りにいる。
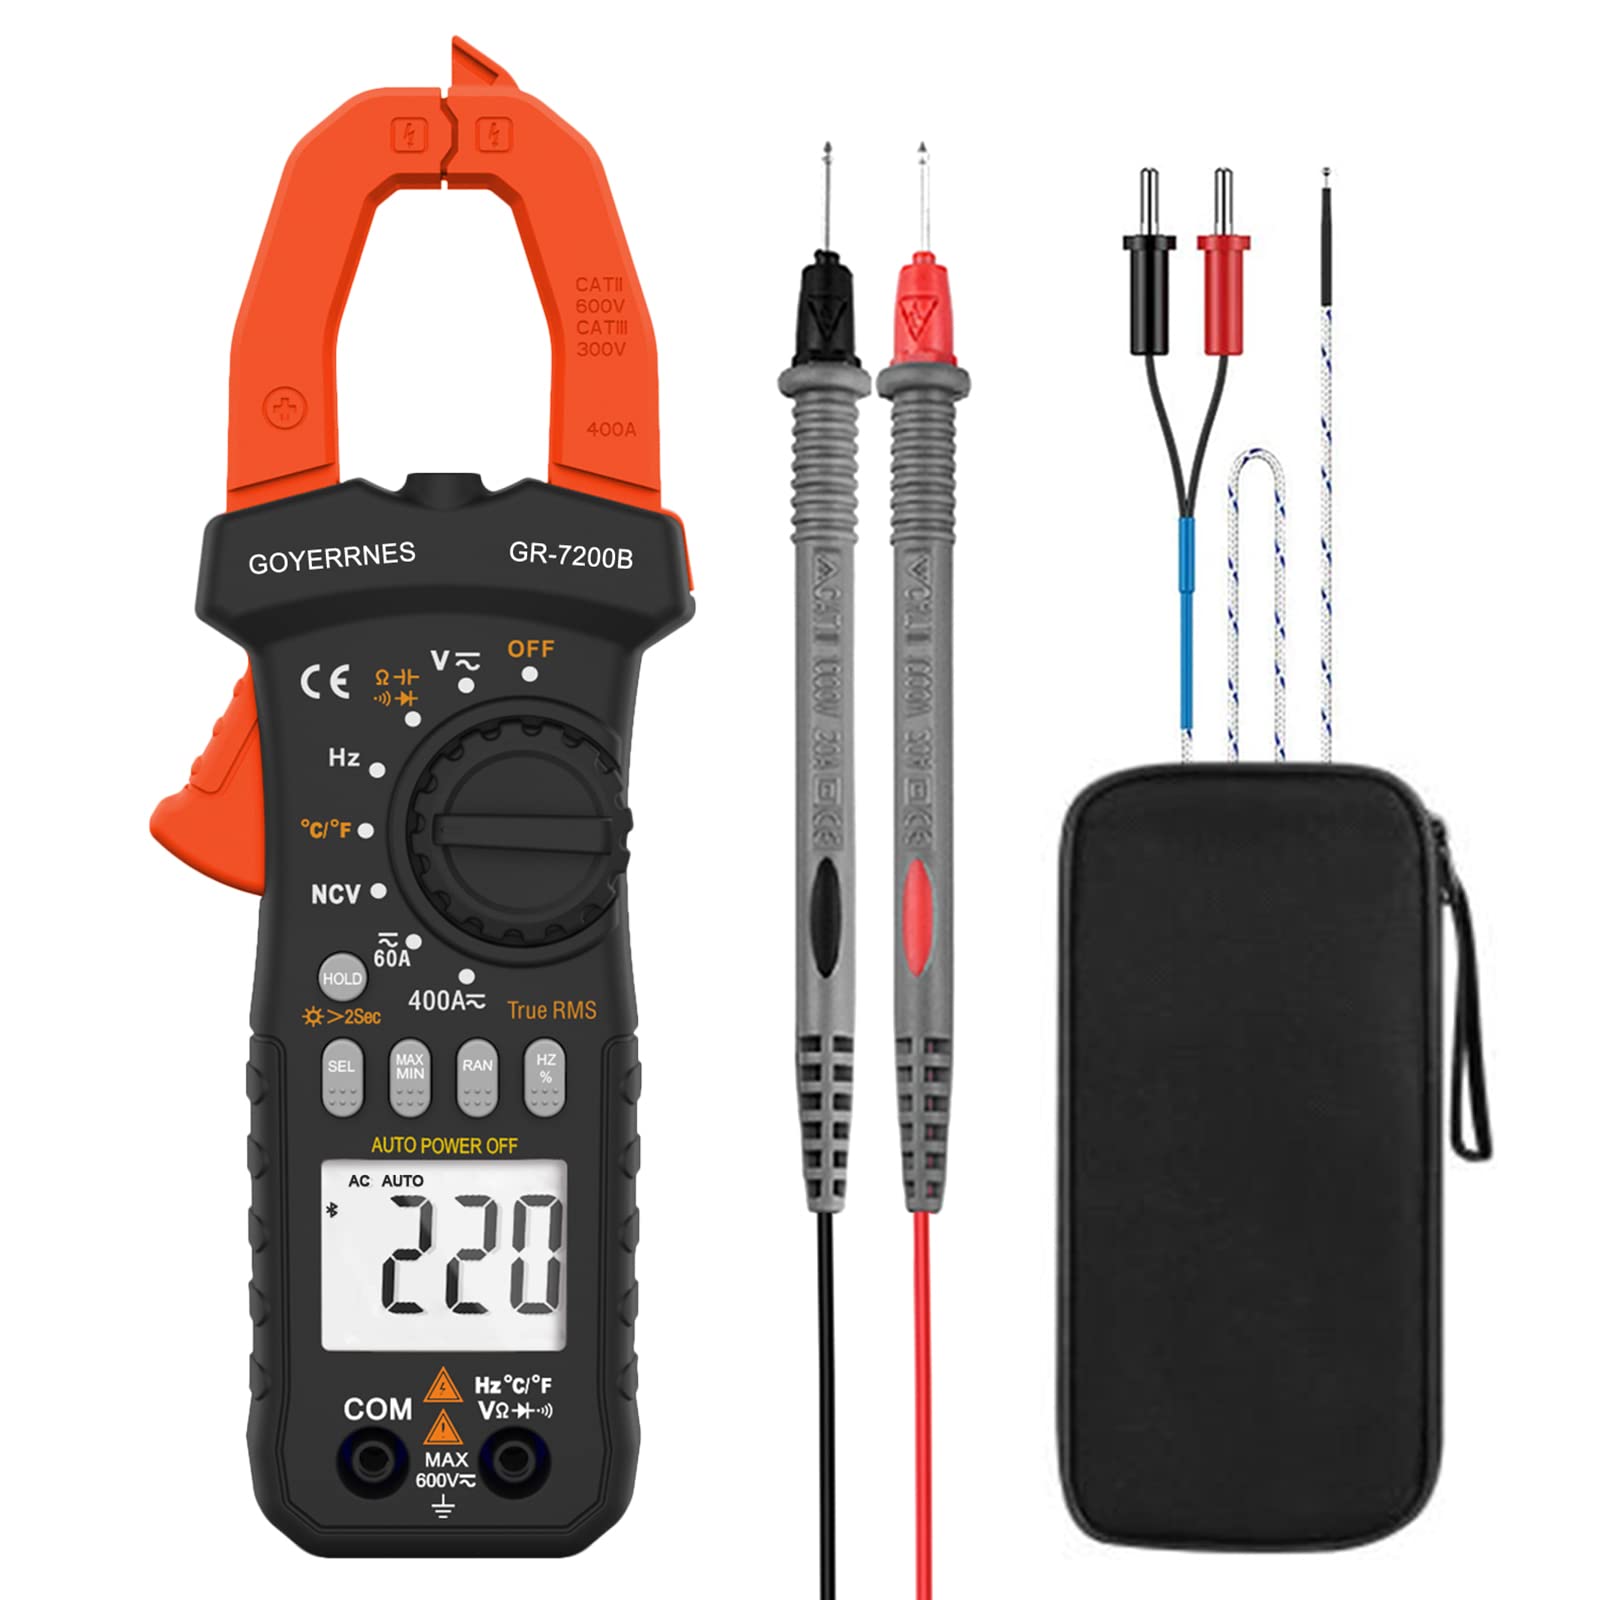
図1: 前面 view of the GOYERRNES GR-CA-7200B-YC-NEW Clamp Meter Multimeter, showing the display, function dial, and current clamp あご。
4. デバイスのレイアウト
Familiarize yourself with the main components of your clamp メートル:
- 現在のClamp あご: 非接触AC/DC電流測定に使用します。
- 機能ダイヤル: 希望する測定モードを選択します(例:Voltage、レジスタンス、 Amperage)。
- LCDディスプレイ: Shows measurement readings, units, and various indicators. Backlit for low-light conditions.
- 入力ジャック: Terminals for connecting test leads for voltag例えば、抵抗、静電容量、ダイオード、導通、温度の測定などです。
- ホールド/バックライトボタン: ディスプレイ上の現在の読み取り値を固定し、バックライトをオン/オフにします。
- Range/Mode Button: Switches between auto-ranging and manual ranging, or selects sub-functions within a mode (e.g., AC/DC voltage)。
- NCVセンサー: 非接触ボリュームメーターの上部に配置tage検出。
図2:詳細 view clのamp meter, highlighting the display, function dial, and input terminals.
5. セットアップ
5.1 バッテリーの取り付け
- メーターの電源がオフになっていることを確認してください。
- メーターの背面にある電池ボックスのカバーを見つけます。
- ドライバーを使用してネジを緩め、カバーを取り外します。
- Insert new batteries, observing the correct polarity (+ and -).
- 電池ボックスのカバーを元に戻し、ネジで固定します。
5.2 初期チェック
Before first use, and periodically thereafter, perform the following checks:
- Verify that the meter and test leads are free from any physical damage.
- バッテリーが正しく取り付けられており、十分に充電されていることを確認してください。
- Test the continuity function on a known good conductor to confirm basic operation.
6. 操作手順
6.1 電源オン/オフ
Rotate the function dial from the "OFF" position to any desired measurement function to power on the meter. To power off, rotate the dial back to the "OFF" position.
6.2 AC/DC ボリュームtag測定
- 赤いテストリードを「VΩHz」ジャックに挿入し、黒いテストリードを「COM」ジャックに挿入します。
- Rotate the function dial to the "V~" (AC Voltage) または「V-」(DC Voltage) 位置。
- 測定する回路またはコンポーネントにテストプローブを並列に接続します。
- 巻を読むtagLCDディスプレイのe値。
6.3 AC/DC電流測定(Clamp 関数)
Important Safety Note: To measure current with the clamp function, you MUST separate the hot and neutral conductors and clamp around only the LIVE wire. Clamping around both wires will result in a zero amp reading as the currents cancel each other out. For convenience without stripping wires, use an AC Line Splitter.
- Rotate the function dial to the "A~" (AC Current) or "A-" (DC Current) position.
- ジョートリガーを押してclを開きますamp あご。
- Enclose a single conductor (live wire) within the clamp あご。
- トリガーを放して、導体の周りにジョーをしっかりと閉じます。
- LCDディスプレイで現在の値を読み取ります。
6.4抵抗測定
- 赤いテストリードを「VΩHz」ジャックに挿入し、黒いテストリードを「COM」ジャックに挿入します。
- Rotate the function dial to the "Ω" (Resistance) position.
- テスト対象の回路またはコンポーネントの電源が切断されていることを確認します。
- テスト プローブをコンポーネント全体に接続します。
- LCD ディスプレイで抵抗値を読み取ります。
6.5静電容量の測定
- 赤いテストリードを「VΩHz」ジャックに挿入し、黒いテストリードを「COM」ジャックに挿入します。
- Rotate the function dial to the "CAP" (Capacitance) position.
- メーターの損傷を防ぐため、テストの前にコンデンサが完全に放電されていることを確認してください。
- テストプローブをコンデンサ端子間に接続します。
- LCD ディスプレイの静電容量値を読み取ります。
6.6 周波数/デューティサイクル測定
- 赤いテストリードを「VΩHz」ジャックに挿入し、黒いテストリードを「COM」ジャックに挿入します。
- Rotate the function dial to the "Hz" (Frequency) position.
- Connect the test probes in parallel to the circuit where you want to measure frequency or duty cycle.
- Read the frequency (Hz) or duty cycle (%) value on the LCD display.
6.7ダイオードテスト
- 赤いテストリードを「VΩHz」ジャックに挿入し、黒いテストリードを「COM」ジャックに挿入します。
- Rotate the function dial to the "Diode" position.
- 赤いプローブをダイオードのアノードに接続し、黒いプローブをカソードに接続します。
- ディスプレイには前進ボリュームが表示されますtag電圧降下。プローブを逆向きに差し込むと、正常なダイオードの場合はディスプレイに「OL」(オープンループ)と表示されるはずです。
6.8導通テスト
- 赤いテストリードを「VΩHz」ジャックに挿入し、黒いテストリードを「COM」ジャックに挿入します。
- Rotate the function dial to the "Continuity" position (often shared with resistance or diode).
- テスト プローブを回路またはコンポーネントに接続します。
- If continuity exists (low resistance), the meter will emit an audible beep and display a low resistance value.
6.9非接触巻tage (NCV) 検出
- Rotate the function dial to the "NCV" position.
- Move the NCV sensor (located at the top of the meter) close to the conductor or outlet you suspect has AC voltage.
- メーターはACボリュームの存在を表示しますtage through audible beeps and/or visual indicators on the display.
6.10温度測定
- Insert the thermocouple probe into the designated temperature input jacks (usually marked with "TEMP" or similar, or shared with VΩHz/COM with specific polarity).
- Rotate the function dial to the "TEMP" (Temperature) position.
- Place the tip of the thermocouple probe on or near the object whose temperature you wish to measure.
- Read the temperature value (in ℃ or ℉) on the LCD display.
6.11 Data Logging (Max/Min/Avg)
This meter supports continuous data logging, displaying maximum, minimum, and average readings on the same interface. A curve graph visually represents changes over time. Refer to the specific button on your device (often labeled "MAX/MIN" or similar) to activate and cycle through these modes. Data logging rates may be adjustable.
7. メンテナンス
7.1 クリーニング
メーターのcを拭くasin広告付きgamp 布と中性洗剤で拭いてください。研磨剤や溶剤は使用しないでください。使用前にメーターが完全に乾いていることを確認してください。
7.2 ストレージ
長期間使用しない場合は、液漏れを防ぐため電池を取り外してください。メーターは直射日光や極端な温度を避け、涼しく乾燥した場所に保管してください。
7.3 電池の交換
When the low battery indicator appears on the display, replace the batteries as described in Section 5.1. Use only the specified battery type.
8。 トラブルシューティング
clで問題が発生した場合amp メーターについては、次の一般的な問題と解決策を参照してください。
- No Display/Meter Not Powering On:
- 電池の取り付けと極性を確認してください。
- 新しい電池と交換してください。
- Ensure the function dial is not in the "OFF" position.
- 間違った読み方:
- 正しい測定機能が選択されていることを確認します。
- テスト リードが正しい入力ジャックに正しく接続されていることを確認します。
- For current measurement, ensure the clamp is around a single live conductor only.
- 損傷したテスト リードまたはプローブがないか確認します。
- 「OL」(オーバーロード)表示:
- The measured value exceeds the meter's range for the selected function. Select a higher range if available, or ensure the input is within the meter's specifications.
- NCV検出なし:
- Ensure the NCV function is selected and the sensor is close enough to the AC voltag電子ソース。
- 巻tage may be too low to detect.
9. 仕様
| 仕様 | 価値 |
|---|---|
| ブランド | ゴイェルネス |
| モデル番号 | GR-CA-7200B-YC-NEW |
| 測定タイプ | Ammeter (Multimeter functions included) |
| 電源 | 電池駆動 |
| Upper Temperature Rating (Thermocouple) | 華氏1832度(摂氏1000度) |
| ジョー口径サイズ | 1.77インチ(45mm) |
| AC/DC Current Resolution (0.1-60A) | 0.1A |
| AC/DC Current Resolution (60-400A) | 1A |
| 仕様が満たされました | CSAA の |
| 含まれるコンポーネント | Clamp メートル |
10. 保証とサポート
10.1 保証情報
This GOYERRNES Clamp Meter Multimeter is covered by a 2年 warranty from the date of purchase. This warranty covers defects in materials and workmanship under normal use. It does not cover damage resulting from misuse, abuse, accident, unauthorized alteration, or improper installation.
10.2 カスタマーサポート
For technical assistance, warranty claims, or product inquiries, please contact GOYERRNES customer support through the retailer's platform or the official GOYERRNES website. Please have your model number (GR-CA-7200B-YC-NEW) and purchase date available when contacting support.