
1.製品オーバーview
The Raddy AG7 is a comprehensive wireless weather station designed to provide accurate monitoring of various environmental conditions. It features a 7.4-inch digital display for clear readability and includes an atomic clock for precise timekeeping. The system monitors indoor and outdoor temperature, humidity, wind speed and direction, and precipitation. It also offers 12-hour weather forecasts and displays barometric pressure.
- プロフェッショナルモニタリング: Tracks temperature, humidity, wind, and precipitation.
- 拡張可能なシステム: Supports up to three additional R5 sensors for monitoring up to five zones.
- Precise Outdoor Sensor: Equipped with a rain funnel, wind vane, anemometer, thermo-hygrometer with anti-radiation shield, and a solar panel. Offers a range of up to 100 meters.
- 大型ディスプレイ: 7.4-inch screen shows indoor/outdoor temperature/humidity, precipitation, atmospheric pressure, wind speed/direction, dew point, felt temperature, 12-hour forecast, and daily max/min values.
- 簡単なインストール: Clear instructions and diagrams facilitate quick setup.
2。 構成部品
The Raddy AG7 weather station includes the main display console and a multi-sensor outdoor unit. The outdoor unit integrates several instruments for comprehensive weather data collection.
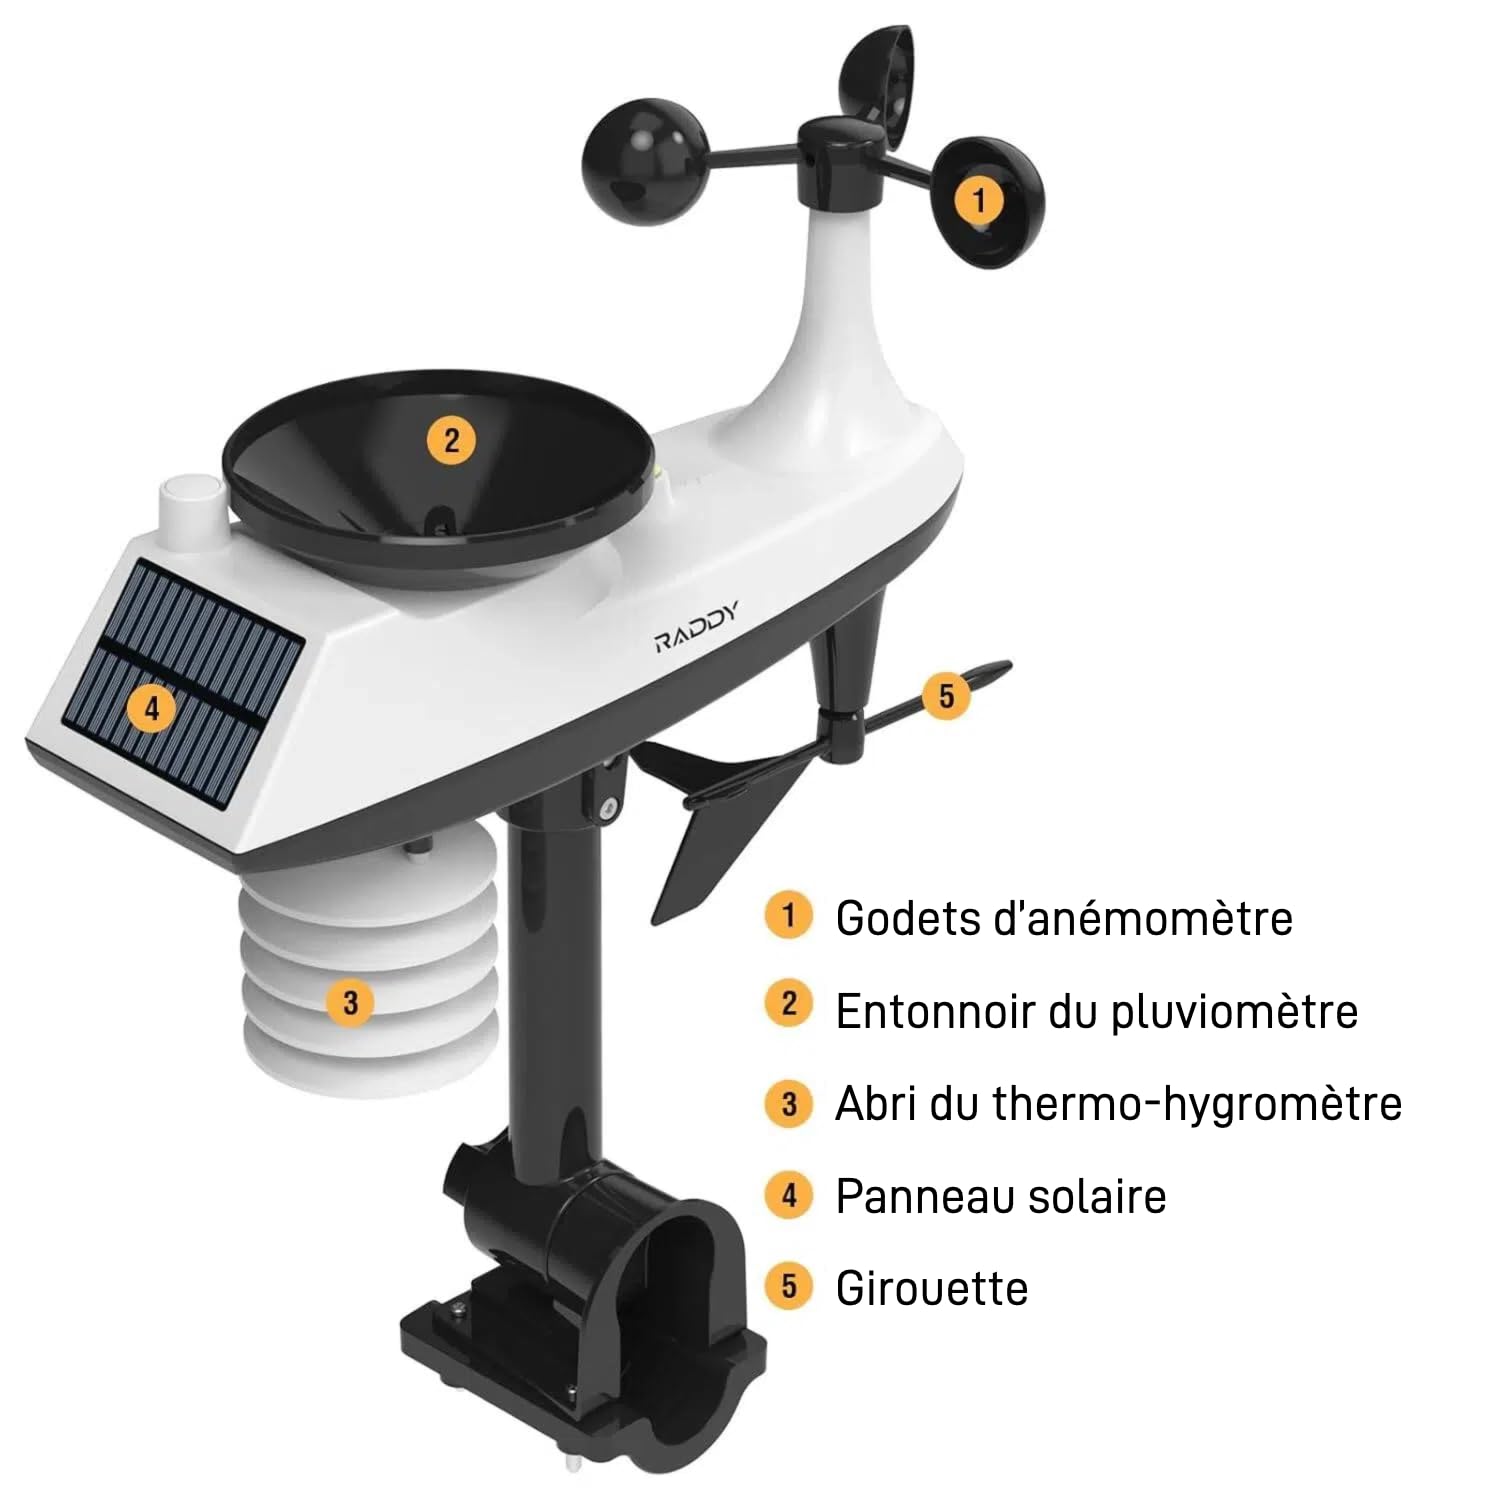
画像: 詳細 view of the Raddy AG7 outdoor sensor unit, highlighting its key components.
- 1. Anemometer Cups: 風速を測定します。
- 2. Rain Gauge Funnel: Collects precipitation for measurement.
- 3. Thermo-Hygrometer Shield: Protects temperature and humidity sensors from direct sunlight and radiation.
- 4. ソーラーパネル: Powers the outdoor sensor and charges its internal battery.
- 5. Wind Vane: 風向を決定します。
3. セットアップとインストール
3.1. 屋外センサーの設置
Proper placement of the outdoor sensor is crucial for accurate readings. Choose an open location away from obstructions like buildings or trees that could interfere with wind or rain measurements. Ensure the solar panel receives adequate sunlight.

画像: Diagram illustrating various mounting options for the outdoor sensor, including top and side pole mounting. This image also shows the battery compartment and reset button for the sensor.
- 取り付けオプション: The sensor can be mounted on top of a pole or to the side of a pole using the provided hardware.
- ポール直径: For pole installation, it is recommended that the pole has a minimum diameter of 2.4 cm (0.9 inches).
- オリエンテーション: Ensure the wind vane is oriented correctly (usually pointing North) for accurate wind direction readings.
3.2. ディスプレイコンソールの設定
The display console can be placed on a table or mounted on a wall.

画像: The display console shown on a table stand and mounted on a wall, demonstrating flexible placement.
- 電源: The console can be powered by AAA batteries for economy mode or an adapter for continuous display.
- 最初の電源投入: Insert batteries or connect the power adapter. The console will automatically search for the outdoor sensor.
- Atomic Clock Synchronization: The atomic clock feature (DCF) will attempt to synchronize automatically. Ensure the console is placed in a location where it can receive the signal.
4. 操作手順
4.1. 情報を表示する
The 7.4-inch display provides a wealth of information at a glance.

画像: The Raddy AG7 display showing various weather parameters and time, illustrating its multifunctionality.
- 屋内/屋外の温度と湿度: 両方の環境の現在の読み取り値。
- 降水量: 降雨量データを表示します。
- 天気予報: 12-hour forecast icons.
- 時間とカレンダー: Atomic clock synchronized time and date.
- 風向と風速: 現在の風の状況。
- Dew Point & Felt Temperature: Additional comfort indicators.
- 大気圧: Current barometric pressure.
- 最高/最低温度: Daily maximum and minimum temperature records.
4.2. バックライト調整
ディスプレイには、最適な4段階のバックライトレベル調整機能が搭載されています。 viewさまざまな照明条件で使用します。

画像: 4人の元amples of the display with different backlight levels (LV0 to LV3), demonstrating the adjustability.
Refer to the specific buttons on your console (usually labeled "LIGHT" or similar) to cycle through the backlight levels.
4.3.アラーム設定
The AG7 allows setting high/low alerts for various parameters and dual alarms for weekdays and weekends. Consult the detailed instructions in the included manual for specific button functions and navigation to set these alarms.
4.4. Multi-Zone Monitoring
The system can connect with up to three additional R5 sensors (sold separately) to monitor up to five distinct zones (one outdoor, one indoor from main console, and three additional indoor/outdoor zones).
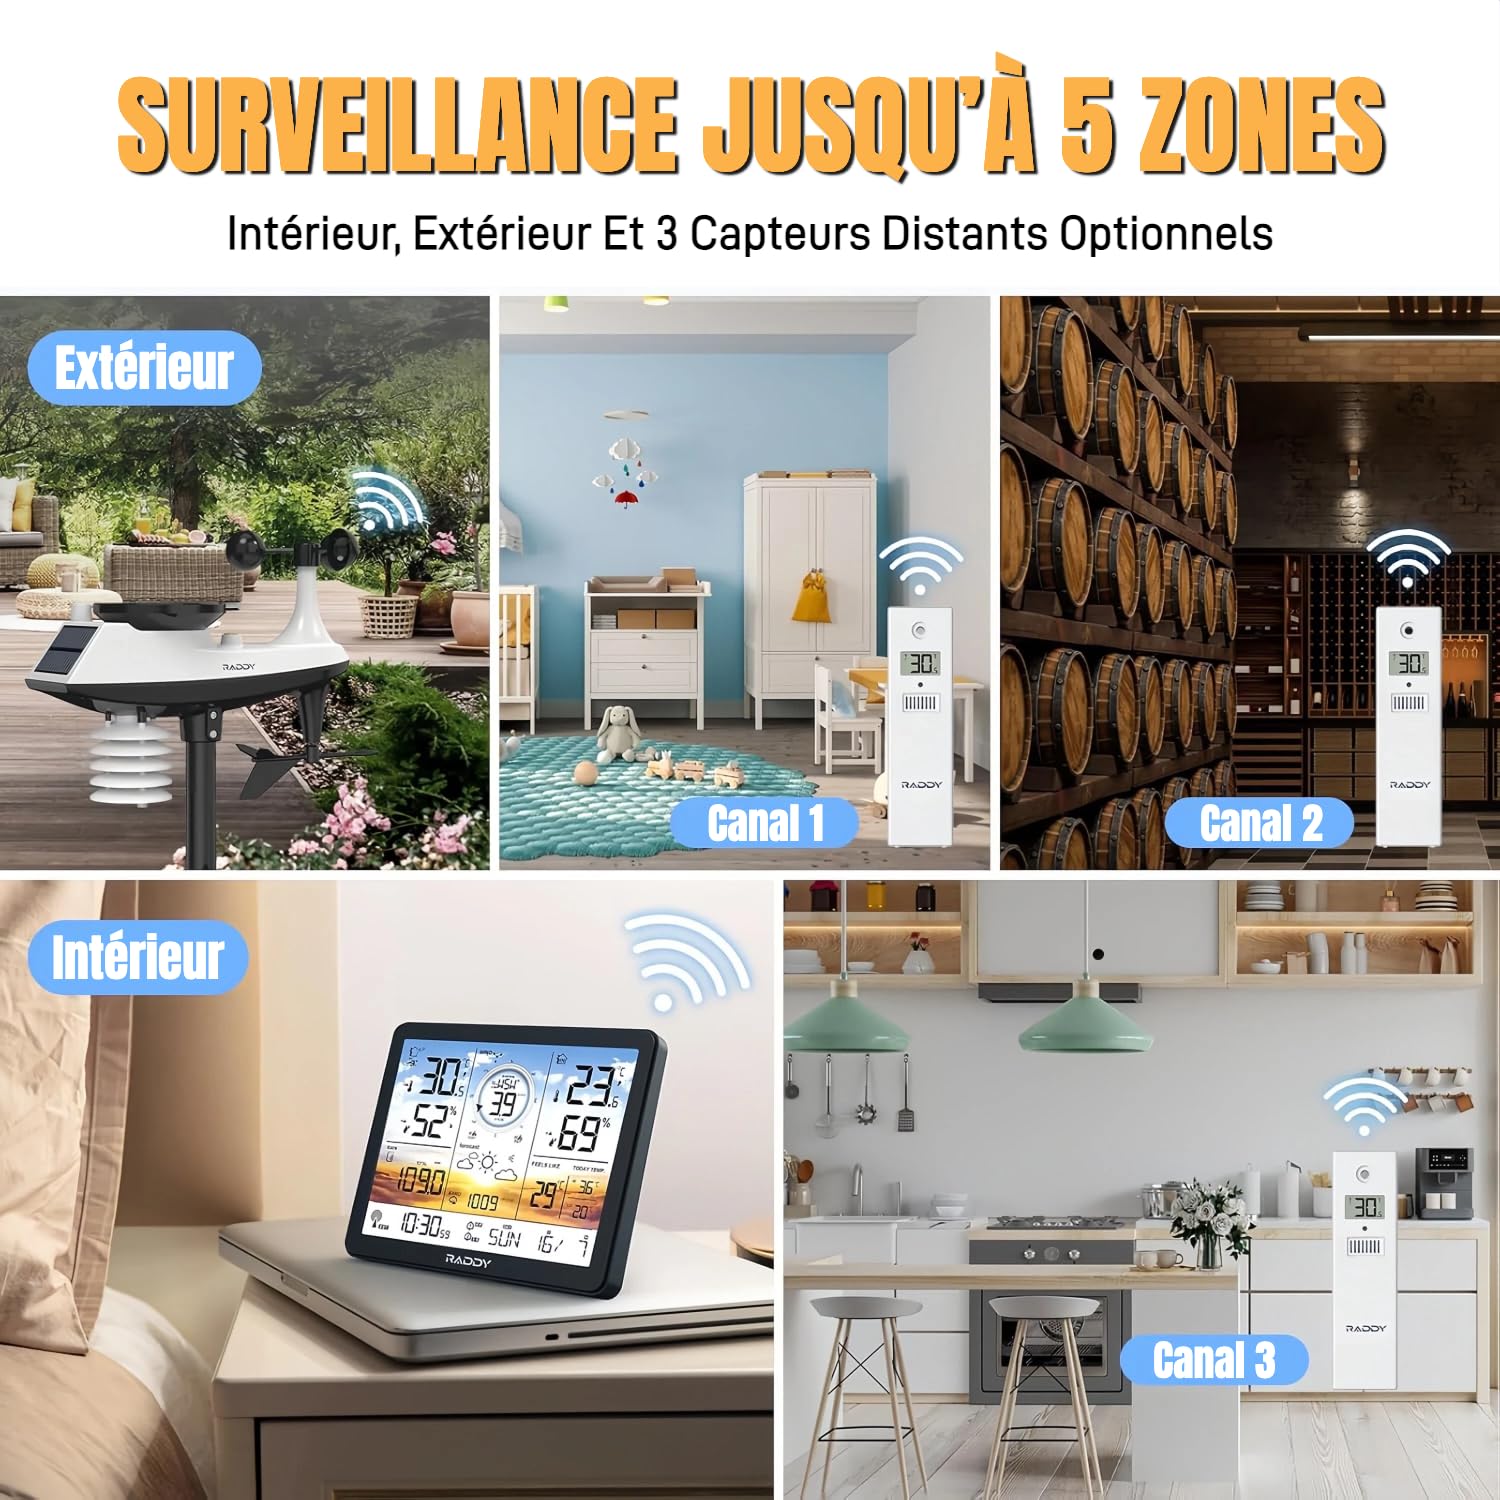
画像: Visual representation of the weather station monitoring multiple zones, including outdoor, indoor, and three additional channels with R5 sensors.
To add R5 sensors, follow the pairing instructions provided with the R5 sensors and the main AG7 manual. Each R5 sensor will transmit data to a specific channel on your main display.
5. メンテナンス
5.1. バッテリーの交換
The display console uses AAA batteries (not included). The outdoor sensor is solar-powered with a backup battery. Replace batteries when the low battery indicator appears on the display.
画像: 詳細な view of the outdoor sensor's underside, showing the battery compartment (labeled 4) and reset button (labeled 1).
- 屋外センサー: Access the battery compartment on the underside of the sensor. Ensure proper polarity when inserting new batteries.
- ディスプレイコンソール: The battery compartment is typically on the back of the unit.
5.2. 清掃
- 屋外センサー: Periodically clean the rain gauge funnel and anemometer cups to ensure accurate readings. Remove any debris or insects.
- ディスプレイコンソール: 画面を拭いてcasin柔らかく乾いた布で拭いてください。研磨剤入りの洗剤は使用しないでください。
6。 トラブルシューティング
- No Outdoor Sensor Data / Loss of Radio Contact:
- Ensure the outdoor sensor is within the 100-meter transmission range of the display console.
- Check for obstructions (thick walls, metal structures, large appliances) between the sensor and console.
- Replace batteries in both the outdoor sensor and display console with fresh ones.
- Perform a reset: Press the reset button on the outdoor sensor (often a small pinhole, labeled 1 in the sensor detail image) and then on the display console (refer to your manual for console reset location). Re-pair the units if necessary.
- Avoid placing the console near electronic devices that may cause interference.
- Inaccurate Readings (Wind/Rain):
- Verify the outdoor sensor is installed in an open area, free from obstructions.
- Clean the rain gauge funnel and anemometer cups to remove any debris.
- Ensure the wind vane is correctly oriented.
- Display Not Visible / Dim:
- バッテリーレベルを確認し、必要に応じて交換してください。
- If using an adapter, ensure it is properly connected and functioning.
- Adjust the backlight level (refer to section 4.2).
- 原子時計が同期しない:
- Ensure the console is placed near a window or in an area with good signal reception.
- Avoid placing it near large metal objects or electronic devices that can block the signal.
- Allow sufficient time (up to 24 hours) for initial synchronization.
7. 仕様
| 特徴 | 詳細 |
|---|---|
| ブランド | ラディ |
| モデル | AG7 |
| 接続技術 | 433MHzワイヤレス |
| 表示タイプ | 液晶 |
| 電源(コンソール) | Battery (AAA, not included) or Power Adapter |
| 電源(屋外センサー) | バッテリーバックアップ付き太陽光発電 |
| 温度精度 | ±0.5 °C |
| 最高使用温度 | 60℃ |
| 特集 | Alarm, Atomic Clock (DCF), 4-level Backlight |
| 屋外センサー範囲 | 最大100メートル(330フィート) |
8. 保証とサポート
Raddy provides lifetime technical support for the AG7 weather station. If you encounter any issues or have questions regarding the product, please contact Raddy customer service for assistance.
For contact information, please refer to the packaging or the official Raddy webサイト。