1. はじめに
This manual provides essential information for the installation, operation, and maintenance of your Varstrom 36V 250W E-Bike Conversion Kit. This kit is designed to transform a standard bicycle into an electric bicycle, offering enhanced riding capabilities with a powerful rear hub motor and an intuitive LCD display. Please read this manual thoroughly before installation and use to ensure safe and optimal performance.
2. 安全情報
Always prioritize safety when operating an electric bicycle. Failure to follow safety guidelines can result in serious injury or damage to the product.
- ヘルメットを着用して: Always wear an approved bicycle helmet while riding.
- 乗車前チェック: Before each ride, check the brakes, tire pressure, and ensure all connections are secure.
- 交通法規を遵守してください: Follow all local traffic laws and regulations for bicycles and electric bicycles.
- 気象条件: 雨天時や悪天候時の走行には注意してください。
- 水への露出: Avoid submerging the motor or electrical components in water.
- 専門家による設置: If you are unsure about any installation steps, seek assistance from a qualified bicycle mechanic.
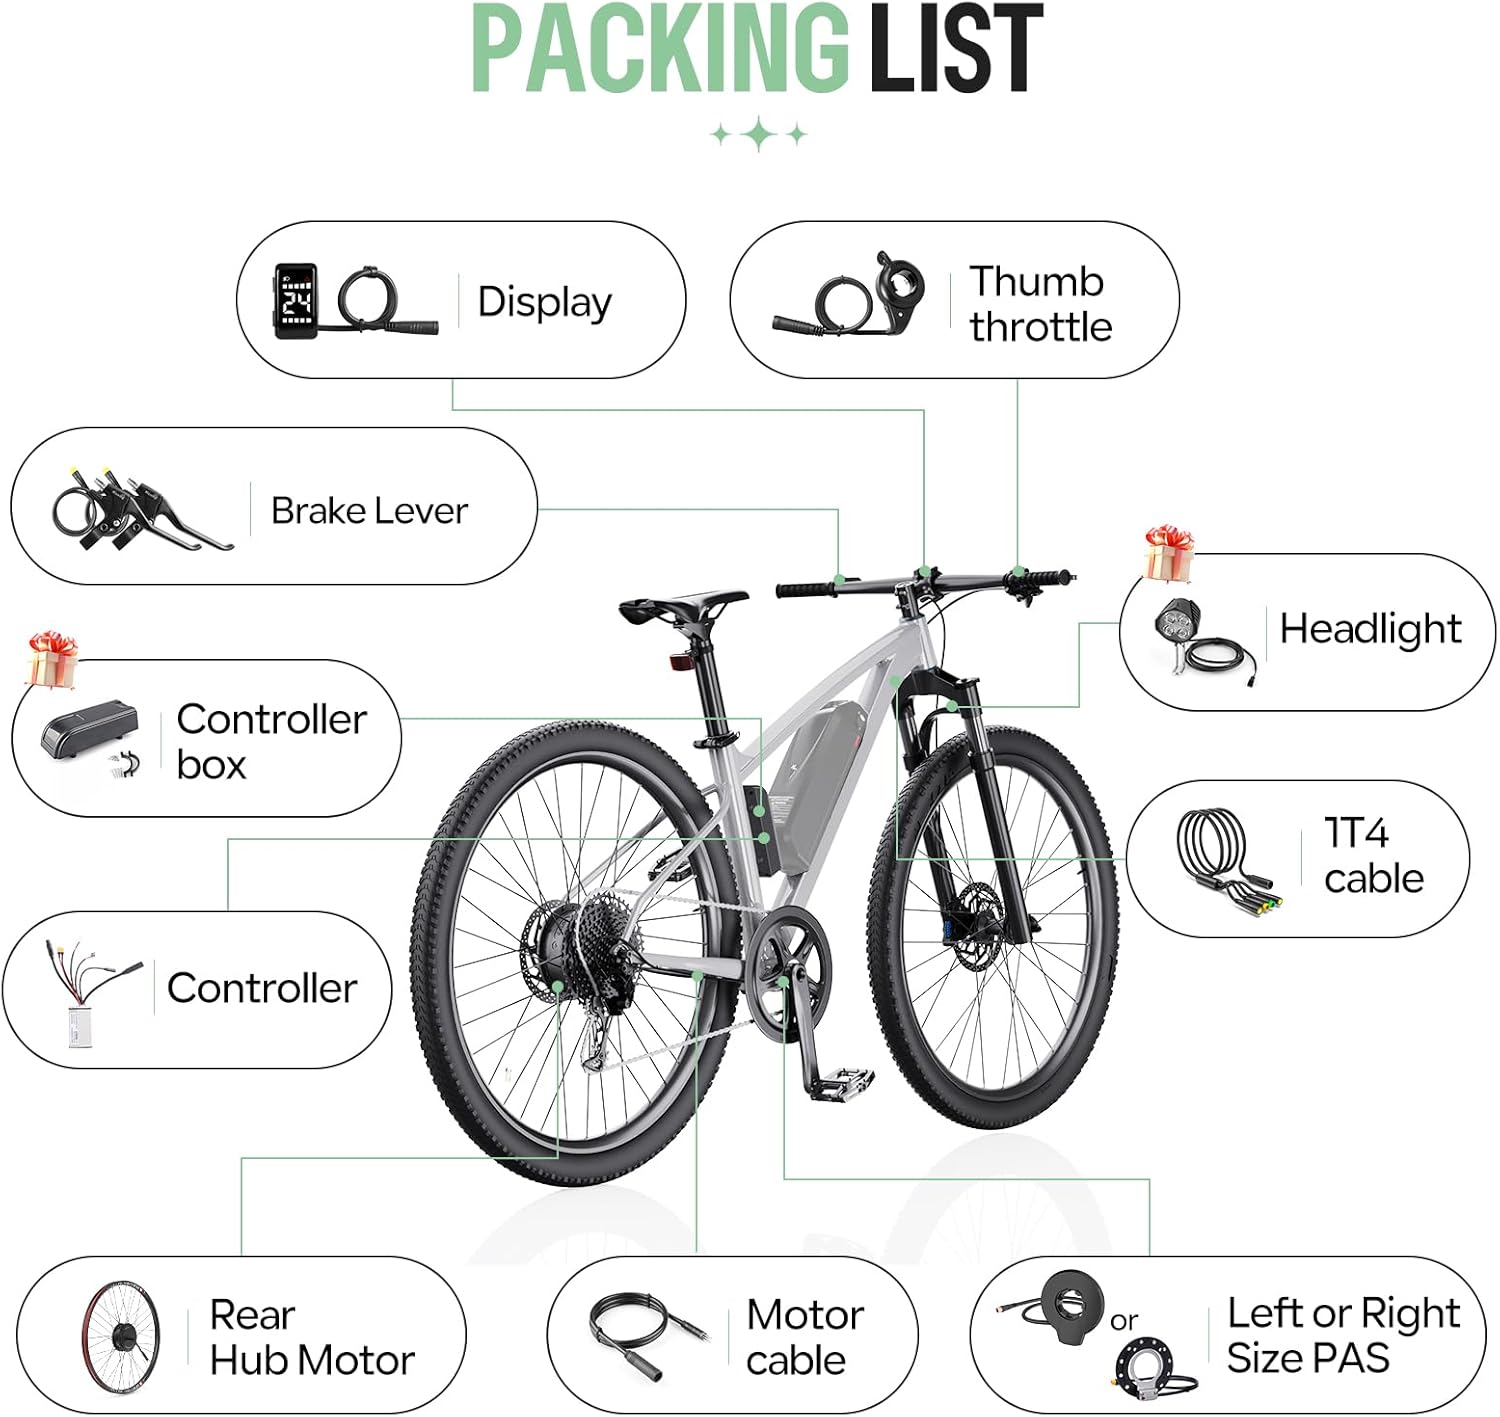
3. パッケージ内容
パッケージを開封したら、すべてのコンポーネントが揃っていて損傷がないことを確認してください。
- 1 x 36V 250W Rear Hub Motor
- 1のxコントローラ
- 1 x DZ40 LCD Display
- 1 x Pair of Hydraulic Brake Sensors (or Mechanical Brake Levers, depending on selection)
- サムスロットル x 1
- 1 x 1T4 Cable
- 1 x PAS Sensor (Left or Right side)
- Necessary mounting accessories
4. 仕様
4.1. モーター仕様
- 巻tage: 36V
- 力: 250W
- 最大トルク: 35Nm
- モータータイプ: Brushless Geared Hub Motor
- 効率: ≥78%
- 最高速度: Up to 30 km/h (470 rpm)
- ホイールサイズの互換性: 26", 27.5", 28"/29"/700C
4.2. コントローラーの仕様
- 巻tage: 36V
- 力: 250W
- 最大電流: 14A
4.3. DZ40 LCD Display Specifications
- 画面サイズ: 1.3インチ液晶
- 可視性: Clear visibility even in sunlight
- 機能: Displays speed, battery status, headlight indicators, PAS level (0-5)
- ハンドルバー直径: 22.2ミリメートル


5.インストールガイド
5.1. 互換性要件
- リアドロップアウト(旧): Your bicycle's rear dropout must be between 135-138 mm.
- ブレーキタイプ: Compatible with bicycles equipped with disc brakes.
- ホイールサイズ: Ensure you select the correct wheel size (26", 27.5", 28"/29"/700C) for your bicycle.

5.2. インストール手順
The conversion kit is designed for straightforward installation. Follow these general steps:
- 自転車の準備: Remove the existing rear wheel and any associated components that will be replaced.
- ハブモーターを取り付けます。 Mount the new rear hub motor wheel into the bicycle's rear dropout, ensuring it is securely fastened.
- コントローラーをマウントします。 Find a suitable location on your bike frame for the controller. Secure it using the provided mounting accessories.
- Install the DZ40 Display: Attach the DZ40 LCD display to your handlebar (22.2mm diameter).
- Install Brake Sensors/Levers: Replace your existing brake levers with the provided brake sensors or mechanical brake levers. Ensure they are properly aligned and functional.
- サムスロットルをインストールします。 Mount the thumb throttle on the handlebar in a comfortable position.
- PASセンサーをインストールします。 Attach the Pedal Assist Sensor (PAS) to the crank arm area, ensuring proper alignment with the magnet disc.
- 配線を接続: Use the 1T4 cable to connect the display, throttle, and brake sensors to the controller. Connect the motor cable to the controller. Ensure all connections are firm and waterproof.
- 安全なケーブル: Route and secure all cables neatly along the bicycle frame to prevent snagging or damage.

6. 操作手順
6.1.電源のオン/オフ
To power on the system, press and hold the power button on the DZ40 display. To power off, press and hold the power button again.
6.2. DZ40 Display Functions
The DZ40 display provides real-time information about your ride:
- スピード: 現在の走行速度。
- バッテリーの状態: バッテリー残量を表示します。
- Headlight Indicators: Shows if the headlights are on (if connected).
- PASレベル: Displays the current level of pedal assistance (0-5). Use the '+' and '-' buttons to adjust the PAS level.
6.3. ライディングモード
The Varstrom E-Bike Conversion Kit offers three flexible riding modes:
- 純電気モード: Engage the thumb throttle to propel the bicycle without pedaling.
- ペダルアシストモード(PAS): The motor provides assistance as you pedal. The level of assistance can be adjusted via the DZ40 display.
- フィジカルライディングモード: The motor is off, and the bicycle operates as a standard pedal bike.

7. メンテナンス
Regular maintenance ensures the longevity and safe operation of your e-bike conversion kit.
- モーター: The brushless motor design requires low maintenance, contributing to its durability. Keep the motor free from excessive dirt and debris.
- 接続: すべての電気接続部の締め付け具合や摩耗、腐食の兆候がないか定期的に確認してください。
- ブレーキ: Regularly inspect brake pads and cables (or hydraulic fluid) for wear and proper function. Adjust or replace as necessary.
- タイヤ: Maintain correct tire pressure as specified on your tire sidewall. Inspect tires for cuts or punctures.
- クリーニング: 広告でeバイクを掃除するamp 布で拭いてください。高圧洗浄機を電気部品に直接使用しないでください。
- ストレージ: When storing the e-bike for extended periods, ensure the battery is charged to approximately 50-70% and stored in a cool, dry place.
8。 トラブルシューティング
If you encounter issues with your e-bike conversion kit, refer to the following common problems and solutions:
| 問題 | 考えられる原因 | 解決 |
|---|---|---|
| モーターが作動しない | Loose electrical connection, low battery, PAS sensor issue, brake sensor engaged | Check all cable connections. Charge the battery. Ensure PAS sensor is correctly installed and not obstructed. Verify brake levers are fully released. |
| ディスプレイがオンにならない | Loose display cable, no power from battery, faulty display | Check display cable connection to controller. Ensure battery is connected and charged. If problem persists, contact support. |
| ペダルアシストの不安定さ | PAS sensor misalignment, dirty PAS sensor, incorrect PAS level setting | Check PAS sensor alignment and clean it. Adjust PAS level on the display. |
| ブレーキが効果的に機能しない | Worn brake pads, loose cables, air in hydraulic system (for hydraulic brakes) | Inspect and replace worn brake pads. Adjust brake cable tension. For hydraulic brakes, bleeding may be required by a professional. |
If you cannot resolve an issue using this guide, please contact Varstrom customer support for further assistance.
9. 保証とサポート
For warranty information and customer support, please refer to the documentation provided with your purchase or contact your retailer. Keep your proof of purchase for warranty claims.
Manufacturer: Shenzhen Yihang Cross-border E-commerce Co., Ltd.