
1.製品オーバーview
The AMIR Projection Alarm Clock is designed to provide clear time display and convenient alarm functions. It features a large 7.9-inch LED display, a 180-degree rotatable projector for displaying time on walls or ceilings, and adjustable brightness levels. The clock supports multiple alarm modes and a snooze function for flexible wake-up routines. It can be powered via USB or AAA batteries.

画像1.1:正面 view of the AMIR Projection Alarm Clock with icons indicating features like time, alarm, 12/24H, snooze, projection, 4-level brightness, temperature, and night mode.
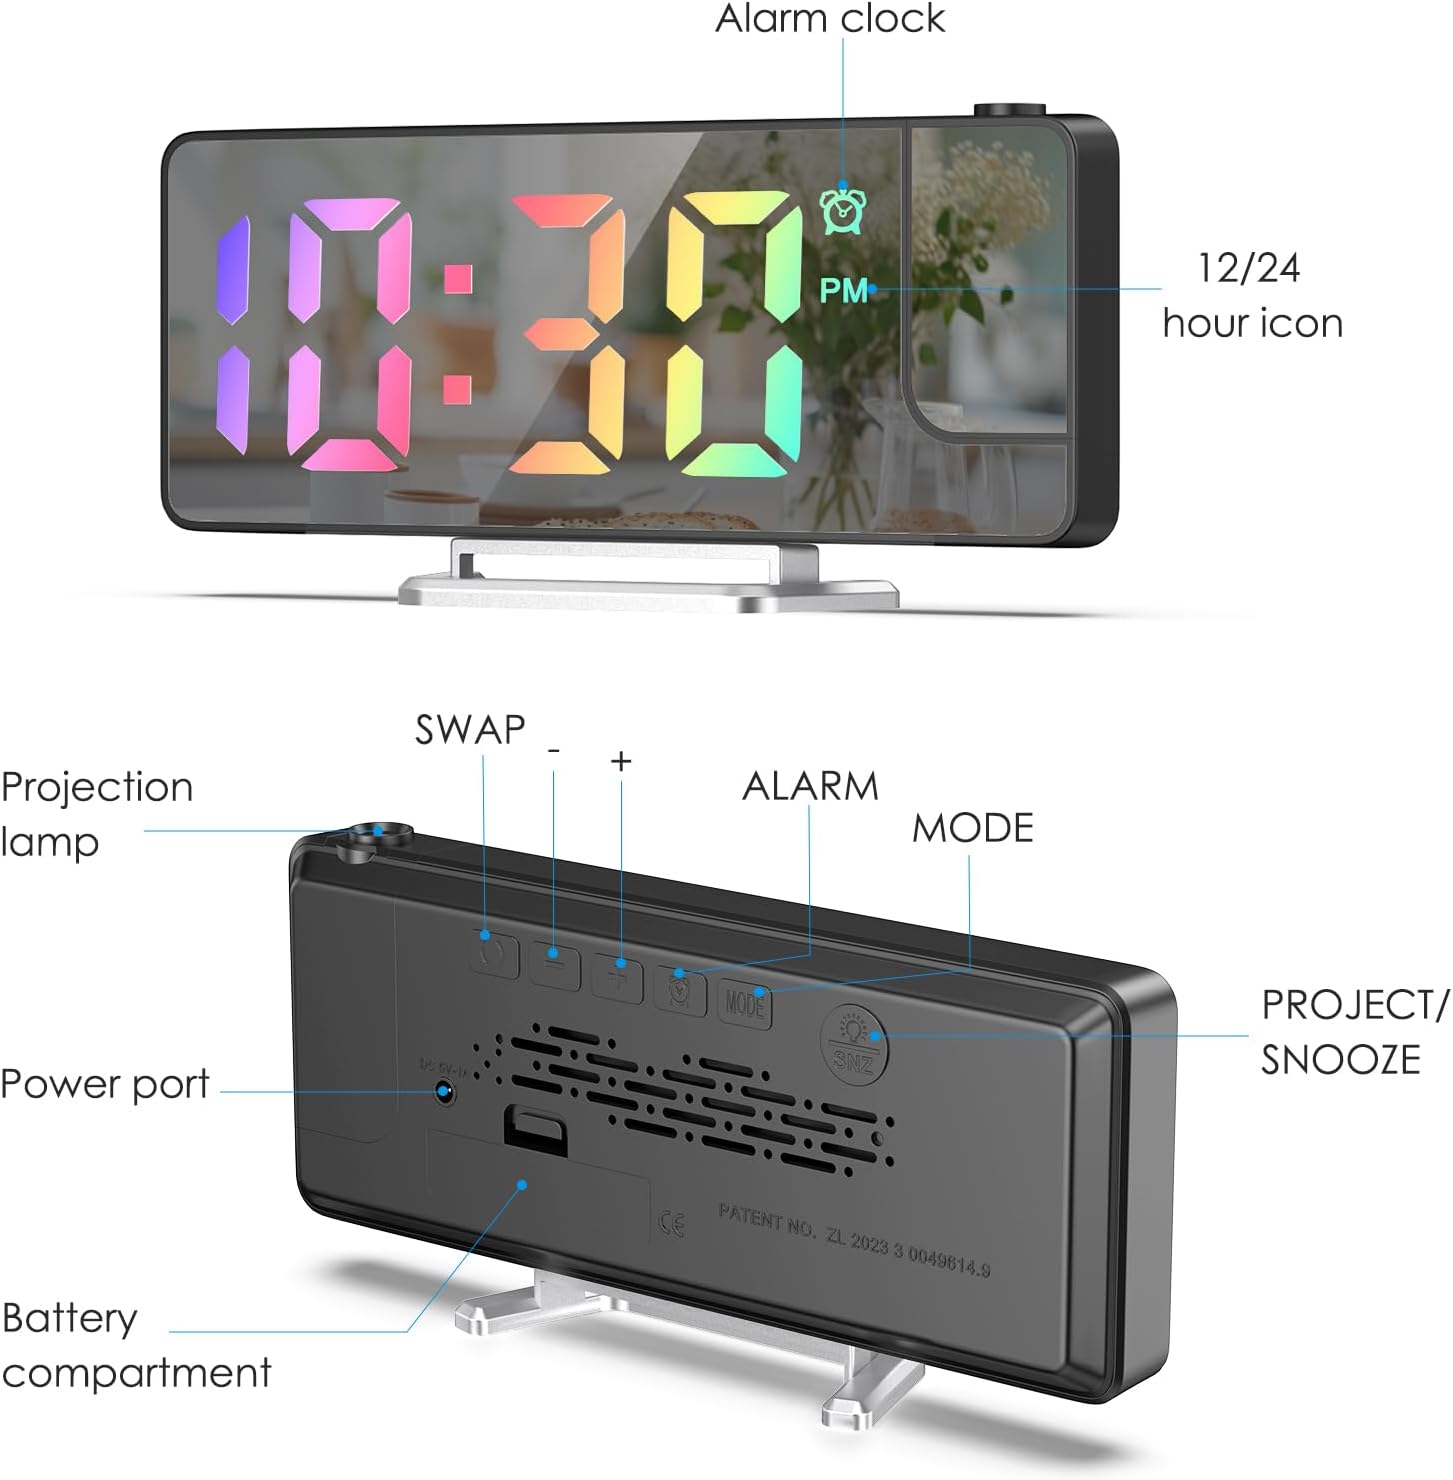
画像1.2:リア view of the alarm clock, detailing the projection lamp, power port, battery compartment, and control buttons (SWAP, +, -, ALARM, MODE, PROJECT/SNOOZE).
2. セットアップ手順
2.1 開梱と初期検査
Carefully remove all components from the packaging. Ensure the alarm clock, USB charging cable, and removable support block are present. Remove any protective film from the display screen before use.

Image 2.1: The AMIR Projection Alarm Clock, its packaging, USB cable, and stand, illustrating the items included in the box.
2.2 デバイスへの電源供給
The alarm clock offers two power options:
- USBケーブル電源: Connect the provided 1.5-meter USB cable to the power port on the back of the clock and to a USB power adapter (not included). The LED screen will remain continuously on when powered via USB.
- バッテリー電源: For backup or portable use, insert 3 AAA batteries (not included) into the battery compartment. Battery power retains settings during power outages but does not keep the LED screen continuously on.
2.3 Attaching the Support Block
Attach the removable support block to the bottom of the alarm clock to ensure stable placement on a flat surface.
3. 操作手順
3.1時間の設定
- を押し続けます モード ボタン。
- 使用 + or - buttons to adjust between 12-hour and 24-hour formats.
- シングルプレス モード to set the hour, then use + or - 調整する。
- シングルプレス モード もう一度押して分を設定し、 + or - 調整する。

Image 3.1: Visual guide for setting the time, including selecting 12/24H format, adjusting hours, and adjusting minutes using the MODE, + and - buttons.
3.2アラームの設定
- を押し続けます アラーム ボタンを3秒間押し続けます。
- 使用 + or - ボタンでアラーム時間を調整します。
- シングルプレス アラーム to set the alarm minutes, then use + or - 調整する。
- シングルプレス アラーム again to set the snooze time (1-60 minutes), then use + or - 調整する。
- シングルプレス アラーム once more to select the alarm mode:
- Monday to Friday (1-5)
- Monday to Saturday (1-6)
- Every day (1-7)

Image 3.2: Visual guide for setting the alarm, including adjusting hours, minutes, snooze duration, and selecting one of three alarm modes (Monday-Friday, Monday-Saturday, Everyday).
3.3スヌーズ機能
アラームが鳴ったら、を押します PROJECT/SNOOZE button to activate the snooze function. The alarm will temporarily stop and sound again after the set snooze interval (1-60 minutes).
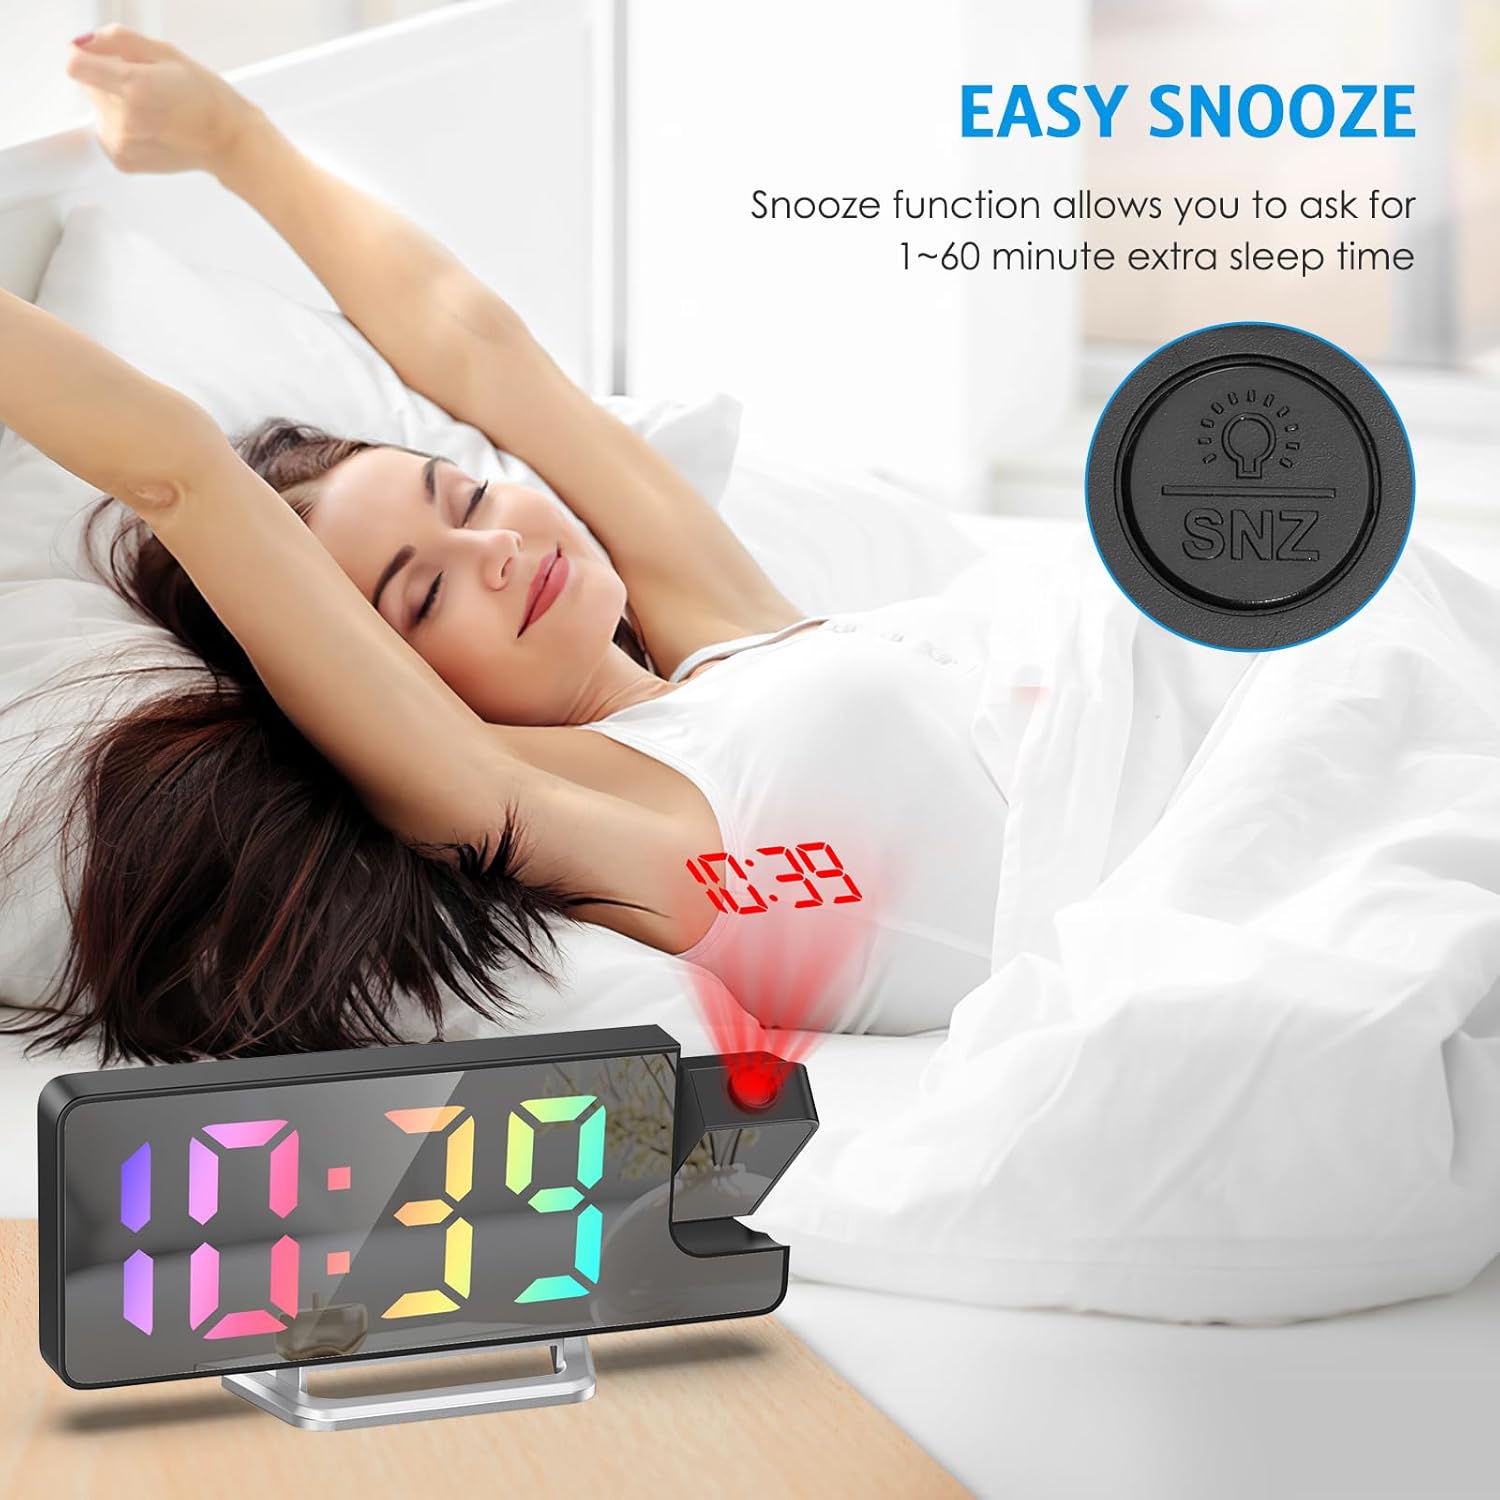
Image 3.3: A woman stretching in bed, with the alarm clock displaying time and projecting it onto the wall, illustrating the ease of using the snooze function.
3.4 ディスプレイの明るさの調整
The 7.9-inch LED display has 4 levels of brightness. Use the dedicated brightness control button (often labeled with a sun icon or integrated with +/- buttons) to cycle through bright, medium, low, and off settings.

Image 3.4: The alarm clock display shown at four different brightness levels: Bright Light, Medium Light, Low Light, and OFF, demonstrating the adjustable display intensity.
3.5 投影関数
- 有効化/無効化: The projector can be turned on or off by adjusting the projection lamp.
- 投影角度の調整: The 180-degree rotatable projector allows you to adjust the angle to project the time onto a wall or ceiling.
- Projection Flip: If the projected digits appear upside down, press the dedicated flip button (often a circular arrow icon) to correct the orientation.
- Optimal Projection Distance: The optimum projection distance is between 1.6 feet and 16 feet for clear visibility.

Image 3.5: The alarm clock projecting time onto a wall, illustrating the projection distance range of 1.6-16 feet and the 180-degree flip projection feature.

Image 3.6: The alarm clock demonstrating its 180-degree flip projection capability, allowing the projected time to be viewed correctly from various angles.
3.6ナイトモード
Activate Night Mode for automatic dimming of the display. When enabled, the display brightness will automatically reduce to a low-light state from 18:00 (6 PM) to 6:00 (6 AM) by default, conserving energy and reducing light disturbance during sleep.

Image 3.7: The alarm clock in a bedroom setting at night, with the display dimmed and time projected, illustrating the Night Mode feature.
3.7 Time, Date, and Temperature Display Rotation
The multi-function display can show time, date, and temperature in rotation. This feature keeps you informed at a glance. The display can also be switched between 12-hour and 24-hour formats.

Image 3.8: The alarm clock displaying both 12-hour and 24-hour time formats, highlighting the flexibility to switch between them based on user preference.
Video 3.9: This video demonstrates the AMIR Projection Alarm Clock's features, including its 3 levels of brightness adjustment, rotation through time, date, and temperature, and manual adjustment of the projection angle. It also shows the one-touch on/off projection and 180-degree projection rotation.
4. メンテナンス
4.1デバイスのクリーニング
To clean the alarm clock, gently wipe the surfaces with a soft, dry cloth. Avoid using abrasive cleaners, solvents, or chemical sprays, as these can damage the display and casing.
4.2 電池の交換
If using AAA batteries for backup, replace them when the display or functions become erratic. Open the battery compartment on the back of the unit, remove old batteries, and insert new ones, ensuring correct polarity.
5。 トラブルシューティング
- ディスプレイがオンになっていません: Ensure the USB cable is securely connected to a power source, or that fresh AAA batteries are installed. The LED screen is continuously on only when charged via USB.
- Projection Upside Down: Press the dedicated flip button (circular arrow icon) on the back of the clock to rotate the projection 180 degrees.
- Time Not Holding: If the time resets frequently, ensure the device is consistently powered via USB or that the backup AAA batteries are fresh.
- 投影が不明瞭: Adjust the distance of the clock from the projection surface (optimal 1.6-16ft). Ensure the projection lens is clean.
- アラームが鳴らない: Verify that the alarm is set correctly, the volume is not muted, and the correct alarm mode (1-5, 1-6, or 1-7) is selected for the desired days.
6. 製品仕様
| ブランド | アミール |
| モデル番号 | WA146B&C-AMUS |
| 表示タイプ | デジタルLED |
| 表示サイズ | 7.9インチ |
| 投影 | 180° Rotatable, 1.6-16ft distance |
| 明るさレベル | 4段階調節可能 |
| アラームモード | Monday-Friday, Monday-Saturday, Everyday |
| スヌーズ機能 | 調整可能(1~60分) |
| 電源 | USB Cable (main), 3x AAA Batteries (backup) |
| 寸法(幅×高さ) | 幅4.13インチ x 高さ1.25インチ |
| 重さ | 0.21キログラム |
| 材料 | アクリロニトリルブタジエンスチレン(ABS) |
7. 保証とサポート
7.1 保証情報
This AMIR Projection Alarm Clock comes with a 生涯保証保証請求のために購入証明書を保管してください。
7.2 カスタマーサポート
For any questions, technical assistance, or warranty claims, please contact AMIR customer support through the retailer where the product was purchased or refer to the official AMIR web連絡先の詳細についてはサイト。