FLASHFORGE Camera Kit for Adventurer 5M/Pro/AD5X
FLASHFORGE Camera Kit User Manual
For Adventurer 5M, Adventurer 5M Pro, and AD5X 3D Printers
1. はじめに
This user manual provides detailed instructions for the installation, operation, and maintenance of your FLASHFORGE Camera Kit. Designed for seamless integration with FLASHFORGE Adventurer 5M, Adventurer 5M Pro, and AD5X 3D printers, this camera enables real-time and remote monitoring of your printing process, enhancing convenience and control.
2. パッケージ内容
パッケージにすべてのコンポーネントが含まれていることを確認します。
- カメラモジュール
- カメラケーブル
- M3.5 * 8ネジ
- 2.5mm六角レンチ
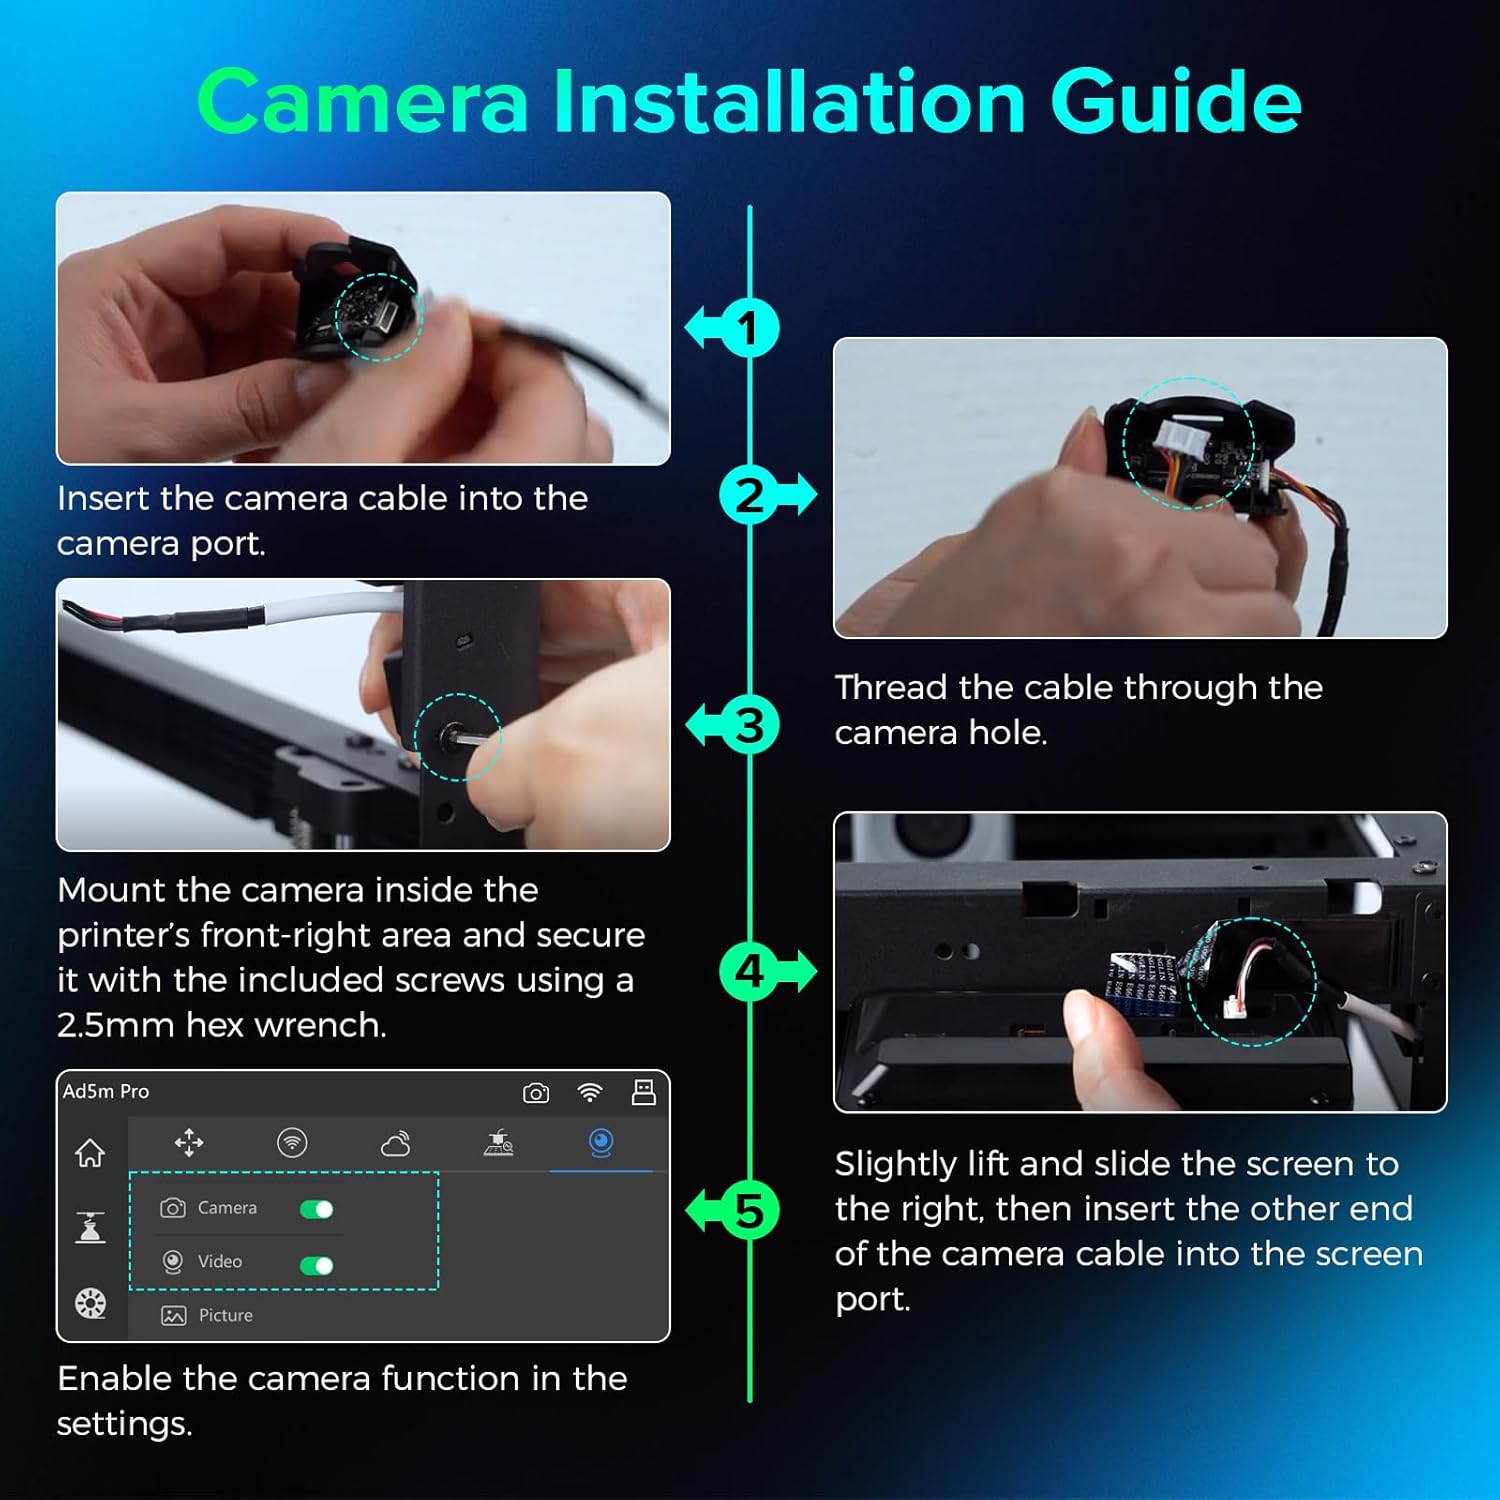
Image: Components of the FLASHFORGE Camera Kit.
3. セットアップとインストール
Follow these steps to install the camera module on your 3D printer.
3.1 ハードウェアのインストール
- Prepare the Camera Module: Insert the smaller end of the camera cable into the camera port. Thread the camera cable out through the hole of the camera module.

Image: Detailed steps for camera cable insertion and threading.
- カメラを取り付ける: Install the camera on the inner side of the printer's front-right area. Ensure the protrusions on both sides of the camera fit into the locating holes.
- カメラを固定する: Use the provided 2.5mm Allen wrench to tighten the M3.5*8 screw into the hole, securing the camera in place.
- Connect to Screen: Gently lift and slide the printer's screen to the right to detach it. Remove the upper port cover on the screen. Insert the other end of the camera cable into the designated port on the screen.
- Reattach Screen: Carefully reattach the screen to the printer, ensuring all connections are secure.
Video: Official guide on how to install the camera module on your Adventurer 5M 3D printer.
3.2 ソフトウェアのアクティベーション
- アクセス設定: On the printer's touchscreen, navigate to the settings menu (gear icon).
- カメラを有効にする: Within the settings, locate the camera icon. Turn on both the "Camera" and "Video" functions to enable the camera.
4. 操作手順
4.1 Real-time and Remote Monitoring
The FLASHFORGE Camera Kit allows you to monitor your 3D prints in real-time from anywhere using the compatible Flash Maker App or Orca-Flashforge slicing software.
- Flash Maker App: Download and install the Flash Maker App on your mobile device. Connect the app to your 3D printer to view a live stream of your print progress and control basic printer functions remotely.
- Orca-Flashforge Slicing Software: For desktop monitoring, use the Orca-Flashforge slicing software. After sending a print job to your printer, you can access a live camera feed within the software interface.

Image: Remote monitoring of a 3D print via a mobile application.

Image: Print monitoring setup with desktop software and mobile app.
4.2 Time-Lapse Video Recording
The camera module supports time-lapse video recording of your entire printing process. These videos are stored on the printer's internal memory and can be downloaded after the print job is complete.
- Access Time-Lapse: After a print job finishes, navigate to the "Device Status" section in the Flash Maker App or Orca-Flashforge software.
- Download Video: Select the completed print job and choose the option to download the time-lapse video.

Image: Camera capturing a time-lapse video of the 3D printing process.
5. メンテナンス
5.1ファームウェアアップデート
Regular firmware updates are provided to maintain a reliable and seamless connection for your camera kit. Ensure your printer's firmware is always up-to-date for optimal performance.
- アップデートの確認: Periodically check for new firmware versions through your printer's settings menu or the Flash Maker App.
- アップデートをインストールします。 Follow the on-screen prompts to download and install any available firmware updates.

Image: Firmware update notification on the 3D printer's display.
5.2 クリーニング
To ensure clear image quality, regularly clean the camera lens with a soft, dry, lint-free cloth. Avoid using abrasive cleaners or solvents.
6。 トラブルシューティング
- カメラフィードなし:
- Ensure the camera module is correctly installed and securely connected to the screen.
- Verify that the "Camera" and "Video" functions are enabled in the printer's settings.
- Check your network connection for both the printer and your monitoring device.
- Update the printer's firmware to the latest version.
- 画質が悪い:
- カメラのレンズは柔らかく乾いた布で拭いてください。
- Ensure adequate lighting within the printer's build chamber.
- Time-Lapse Not Recording:
- Confirm that the "Video" function is enabled in the printer's settings.
- Ensure there is sufficient internal storage on the printer for time-lapse videos.
7. 仕様
| パッケージ寸法 | 3.54 x 2.8 x 2.09インチ |
| アイテム重量 | 1.44オンス |
| メーカー | Zhejiang Flashforge 3D Technology Co.、Ltd。 |
| ASIN | B0D2VSLKTX |
| 初回利用可能日 | 28年2024月XNUMX日 |
| 互換性 | FLASHFORGE Adventurer 5M, Adventurer 5M Pro, AD5X 3D Printers |
8. 保証とサポート
For warranty information and technical support, please refer to the warranty card included with your product or visit the official FLASHFORGE website. You can also contact FLASHFORGE customer service directly for assistance.
FLASHFORGE Official Store: ストアを訪問
関連文書 - Camera Kit for Adventurer 5M/Pro/AD5X
 |
FlashForge AD5X ユーザーガイド FlashForge AD5X 3Dプリンターのユーザーガイド。セットアップ、ソフトウェア、プリント、メンテナンス、トラブルシューティングを網羅しています。AD5Xを最適な状態で使用するための操作方法を学びましょう。 |
 |
Impressora 3D Flashforge AD5X の使用例 インプレッサー 3D Flashforge AD5X、初期設定、ソフトウェア、Wi-Fi および USB 経由のインプレッション、フィラメントの管理、サポートの管理、問題の解決を行うためのマニュアルです。 |
 |
Flashforge AD5X 3Dプリンター ユーザーガイドとマニュアル Flashforge AD5X 3D プリンターの包括的なユーザー ガイド。セットアップ、ソフトウェアのインストールと使用、フィラメントのロードと管理、Wi-Fi および USB 経由の印刷手順、メンテナンス、トラブルシューティング、サポート情報などを網羅しています。 |
 |
Flashforge AD5X の使用方法: 構成、使用方法、管理方法 3D Flashforge AD5X のインストールが完了しました。初期設定、ソフトウェア (Flash Maker、Orca-Flashforge) の使用、印象、カーガ/フィラメントの管理、予防策、問題の解決策、および技術的な問題を解決します。安全な機能と効率的な処理を確保します。 |
 |
Flashforge AD5X ユーザーガイド Flashforge AD5X 3D プリンターの包括的なユーザー ガイド。セットアップ、ソフトウェア、フィラメントのロード、印刷、メンテナンス、トラブルシューティング、サポートについて説明しています。 |
 |
Flashforge AD5X クイックスタートガイド Flashforge AD5X 3Dプリンターの包括的なクイックスタートガイド。開梱、セットアップ、最初の印刷、ソフトウェアの説明が含まれています。view使いやすさと最適なパフォーマンスを実現するように設計されています。 |