
1. はじめに
ご購入ありがとうございますasing the RAF Essential Air Fryer Model R.5332. This appliance is designed to cook your favorite foods with little to no oil, providing a healthier alternative to traditional frying. Please read this instruction manual carefully before using the appliance to ensure safe and optimal performance. Keep this manual for future reference.
2. 重要な安全上の注意事項
電気製品を使用するときは、次のような基本的な安全上の注意事項を必ず守ってください。
- 使用前にすべての指示をお読みください。
- 熱い表面に触れないでください。ハンドルまたはノブを使用してください。
- 感電防止のため、コード、プラグ、本体を水などの液体に浸さないでください。
- いかなる機器も、子供が使用したり、子供の近くで使用したりする場合には、厳重な監視が必要です。
- 使用していないときや清掃する前には、コンセントからプラグを抜いてください。部品の取り付けや取り外しは、冷めてから行ってください。
- コードやプラグが損傷している機器、または機器が故障したり何らかの損傷を受けたりした後は、機器を操作しないでください。
- 機器メーカーが推奨していない付属品を使用すると、けがをする可能性があります。
- 屋外では使用しないでください。
- コードをテーブルやカウンターの端から垂らしたり、熱い表面に触れたりしないでください。
- 高温のガスバーナーや電気バーナーの上や近く、または加熱されたオーブンの中に置かないでください。
- 熱い油やその他の熱い液体が入った器具を移動させるときは、細心の注意を払う必要があります。
- 必ず最初にプラグを機器に接続し、次にコードを壁のコンセントに差し込んでください。取り外すには、いずれかのスイッチを「オフ」にしてから、プラグを壁のコンセントから抜いてください。
- 本来の用途以外には機器を使用しないでください。
- 機器が安定した耐熱性の表面に設置されていることを確認してください。
- 通気口を塞がないでください。
3.製品オーバーview
Familiarize yourself with the components of your RAF Essential Air Fryer.
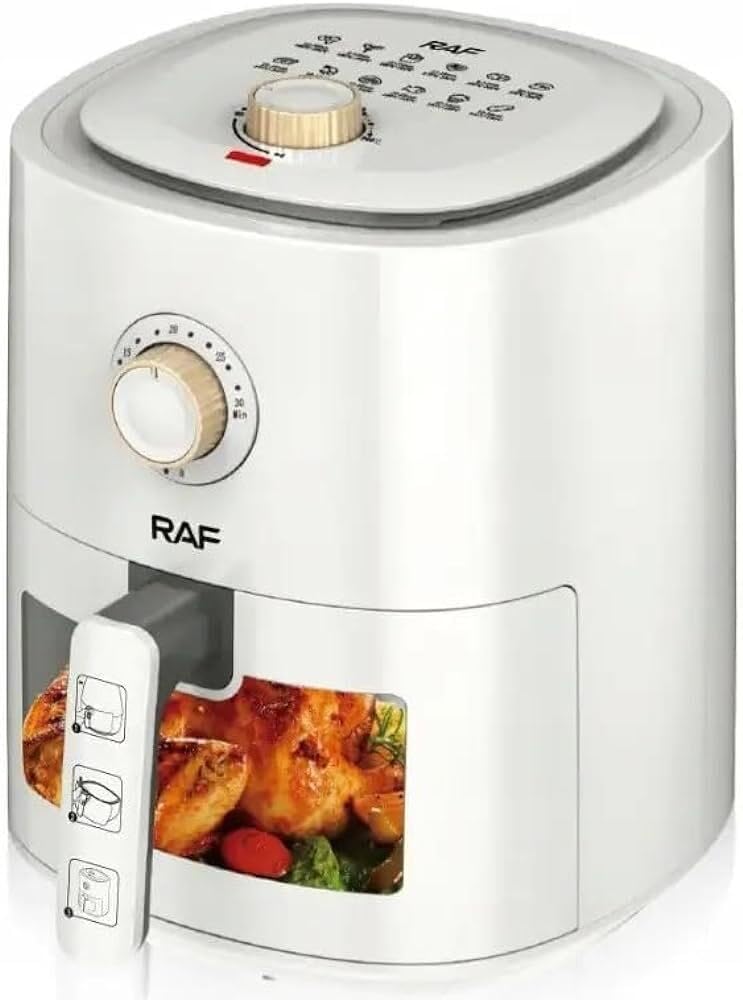
図1: The RAF Essential Air Fryer R.5332 main unit. This image shows the overall design of the air fryer, including the control panel and the removable basket handle.

図2: RAF Essential Air Fryer R.5332 highlighting key features. This diagram illustrates features such as 1500W power, multi-purpose functionality, easy cleaning, 360° air circulation, and up to 80% oil reduction.
コンポーネント:
- 本体: 加熱要素とファンを収容します。
- コントロールパネル: For setting temperature and time. (Features temperature control as per specifications)
- 取り外し可能なバスケット: 調理中に食材を保管するため。
- バスケットハンドル: For safe removal and insertion of the basket.
- 空気入口/出口: 適切な空気循環のため。
4. セットアップと初回使用
- 開梱: エアフライヤーからすべての梱包材とステッカーを慎重に取り除きます。
- クリーニング: 機器の外側を洗剤で拭きますamp cloth. Wash the removable basket and any other removable parts with hot water, dish soap, and a non-abrasive sponge. Rinse thoroughly and dry completely.
- 配置: Place the air fryer on a stable, level, and heat-resistant surface. Ensure there is at least 10 cm (4 inches) of free space around the back and sides of the appliance to allow for proper ventilation. Do not place it directly against a wall or under cabinets.
- 電源接続: 電源コードをアース付きの壁コンセント (220V、50Hz) に差し込みます。
- 予熱(オプション): For the first use, it is recommended to run the air fryer for about 10-15 minutes at 180°C (350°F) without any food inside. This helps to burn off any manufacturing residues and eliminate initial odors. Ensure the area is well-ventilated during this process.
5. 操作手順
一般的な操作:
- 食べ物を用意します: エアフライヤーのバスケットに材料を入れます。均一に火が通るように、バスケットに材料を入れすぎないようにしてください。
- バスケットを挿入: カチッと音がするまでバスケットを本体に戻します。
- 設定温度: Use the temperature control knob to set the desired cooking temperature. The air fryer features temperature control.
- 時間設定: タイマーノブを使用して、希望の調理時間を設定します。
- 調理を開始します: The air fryer will begin heating. The indicator light will illuminate.
- シェイクバスケット(オプション): For some foods, especially smaller items, shaking the basket halfway through the cooking process helps ensure even browning. Carefully pull out the basket, shake it, and then slide it back in. The air fryer will resume cooking.
- 調理終了: When the timer reaches zero, the air fryer will automatically turn off and a bell will sound.
- 食べ物を取り除く: Carefully pull out the basket using the handle. Place it on a heat-resistant surface. Use tongs to remove the cooked food.
- クールダウン: 清掃または保管する前に、機器が完全に冷めるまで待ってください。
調理のヒント:
- 最良の結果を得るには、食品を追加する前にエアフライヤーを 3 ~ 5 分間予熱してください。
- Lightly spray or brush food with oil for a crispier finish, especially for fresh vegetables or homemade fries.
- バスケットに食材を詰め込みすぎないでください。必要に応じて、数回に分けて調理してください。
- さまざまな食品の具体的な調理時間と温度については、信頼できるエアフライヤーのレシピ ガイドを参照してください。
6.クリーニングと保管
定期的に清掃することで、エアフライヤーの寿命が長くなり、最適なパフォーマンスが保たれます。
クリーニング:
- プラグを抜いて冷やす: 清掃する前に必ずエアフライヤーを電源コンセントから抜き、完全に冷めるまで待ってください。
- バスケットとパンを掃除する: The removable basket and pan are non-stick. Wash them with hot water, dish soap, and a non-abrasive sponge. For stubborn food residues, soak them in hot water for about 10 minutes before cleaning. They may also be dishwasher safe (check product specific instructions if available, otherwise hand wash is safest).
- きれいな内装: 家電製品の内部を広告で拭きますamp cloth. For stubborn grease, use a mild detergent. Avoid abrasive cleaners or metal scouring pads.
- きれいな外観: エアフライヤーの外側を広告で拭きますamp 布。
- 加熱要素: クリーニングブラシを使用して加熱部分を掃除し、食べ物の残留物を取り除きます。
- 完全に乾かす: 再組み立てまたは保管する前に、すべての部品が完全に乾燥していることを確認してください。
ストレージ:
洗浄・乾燥後のエアフライヤーは、涼しく乾燥した場所に保管してください。電源コードはきちんと巻き付け、よじれていないことを確認してください。
7。 トラブルシューティング
エアフライヤーで問題が発生した場合は、次の表で一般的な問題と解決策を参照してください。
| 問題 | 考えられる原因 | 解決 |
|---|---|---|
| エアフライヤーの電源が入らない。 | アプライアンスが接続されていません。 電源コンセントが機能しない。 バスケットが正しく挿入されていません。 | 電源コードがアース付きコンセントにしっかりと差し込まれていることを確認してください。 別のアプライアンスでコンセントをテストします。 カチッと音がするまでバスケットを本体にしっかりと押し込んでください。 |
| 食べ物は均一に調理されていません。 | バスケットが混雑しています。 食べ物を振ったりひっくり返したりしないでください。 | 食べ物は少量ずつに分けて調理しましょう。 調理の途中で食品を振ったりひっくり返したりします。 |
| 食べ物はカリカリではありません。 | 油が足りない(特定の食品の場合)。 温度が低すぎる。 調理時間が短すぎます。 | 少量の油を食品に軽く塗るか、スプレーします。 温度を上げます。 調理時間を延長します。 |
| アプライアンスから出る白い煙。 | 前回の使用によるグリース残留物。 High-fat food being cooked. | 使用後は毎回バスケットと内部を徹底的に清掃してください。 脂肪分の多い食品の場合は、調理中にバスケットから余分な脂肪を排出してください。 |
| 初めて使用するときに機器に臭いがします。 | 製造残留物の焼却。 | 最初の数回の使用では、これは正常な現象です。換気を十分に行ってください。臭いは徐々に消えます。 |
8. 仕様
| 特徴 | 詳細 |
|---|---|
| ブランド | イギリス空軍 |
| モデル番号 | R.5332 |
| 色 | 白 |
| 製品寸法(長さ x 幅 x 高さ) | 40 x 40 x 40 cm |
| 容量 | 6リットル |
| 力 | 1500ワット |
| 巻tage | 220ボルト |
| 材料 | アルミニウム |
| 特集 | 温度制御 |
| アイテム重量 | 4キログラム |
| 推奨用途 | Frying, Roasting, Baking |
9. 保証とサポート
保証情報については、ご購入時に同梱されている保証書をご参照いただくか、販売店にお問い合わせください。保証請求の際に必要となるため、購入証明書は保管してください。
For technical support or service inquiries, please contact the RAF customer service department through the contact information provided on the product packaging or the official RAF webサイト。