1. はじめに
This user manual provides detailed instructions for the LKTOP 200W Air 3/Air 3S Battery Fast Charger Hub. This versatile charging hub is designed to efficiently charge multiple DJI Air 3 and Air 3S intelligent flight batteries simultaneously, offering various charging modes and smart features to optimize battery health and flight readiness. It also functions as a power bank for other USB-C devices.
2. 安全情報
- Always use the recommended power adapters (two 100W USB-C chargers are recommended for optimal performance).
- 充電ハブを水、湿気、または極端な温度にさらさないでください。
- デバイスを落としたり、強い衝撃を与えたりしないでください。
- お子様の手の届かない場所に保管してください。
- Ensure proper ventilation during charging to prevent overheating. The built-in fan assists with heat dissipation.
- 充電ハブを分解したり改造したりしないでください。
3. 箱の中身
The package for your LKTOP 200W Air 3/Air 3S Battery Fast Charger Hub includes the following items:
- LKTOP 200W Air 3/Air 3S Battery Fast Charger Hub
- 0.5M USB-C to USB-C Cable (65W, primarily for output mode)
- 取扱説明書(本書)
4.製品オーバーview
4.1 デバイスのレイアウト
The LKTOP 200W Air 3/Air 3S Battery Fast Charger Hub features a compact design with multiple ports and an intuitive display for easy operation.

画像: 正面 view of the LKTOP 200W Air 3/Air 3S Battery Fast Charger Hub with three batteries inserted. The integrated LED display shows detailed battery information.
The hub includes three battery slots for DJI Air 3/Air 3S batteries, two USB-C input ports (C1/C2) for power adapters, and one USB-C output port for charging external devices. Control buttons are located next to the LED display for navigation and mode selection.
4.2 LED Display Screen
The integrated LED display screen provides real-time information about each connected battery, allowing for precise management of your intelligent flight batteries.

画像: 詳細 view of the LED display, illustrating the various parameters shown for each battery.
ディスプレイには次のように表示されます:
- C/V: 巻tage of Battery Cells
- 郵便番号: バッテリー容量 (mAh)
- 温度: Battery Temperature (°C/°F)
- PWR: Current Battery Power (W)
- サイク: Battery Cycle Count
5. セットアップ
5.1 電源の接続
To power the charging hub, connect one or two USB-C power adapters to the input ports (C1 and C2) on the hub. For maximum 200W input power and fastest charging, it is recommended to use two LKTOP 100W Battery Chargers.

Image: The charging hub connected to two 100W power adapters, demonstrating simultaneous charging of batteries and a remote controller.
5.2初期電源オン
Once connected to a power source, the charging hub will automatically power on. Insert your DJI Air 3/Air 3S intelligent flight batteries into the designated slots. The LED display will activate, showing the current status of each battery.
6. 操作手順
6.1つの充電モード
The charging hub offers three distinct charging modes to suit your needs. To switch between modes, long press the function key for 3 seconds, then short press the switch key to select the desired mode.

Image: Visual representation of the three charging modes and their respective charging durations.
- 60% Storage Mode: Charges batteries to approximately 60% capacity. This mode is ideal for long-term battery storage, helping to maintain battery health and prevent degradation.
- 100% Standard Charge Mode: Charges batteries to full capacity (100%). This is the standard charging mode for regular use.
- 95% Fast Charge Mode: Charges batteries to approximately 95% capacity at an accelerated rate. This mode is designed for quick turnaround times, allowing a single battery to be fully charged in about 40 minutes.
Video: Demonstration of the charging hub's compactness, heat dissipation features, and various charging modes, including simultaneous charging.
6.2 バッテリー管理機能
The charging hub includes intelligent battery management features to optimize battery usage and storage.
- Collect Battery Level Function: This feature consolidates the remaining power from multiple low-power batteries into the battery with the highest remaining power. This allows you to create one fully charged battery from several partially charged ones, enabling an additional flight.
- Balance Battery Level Function: This function ensures consistent battery levels across all connected batteries. Power from high-capacity batteries is distributed to lower-capacity batteries, ensuring all batteries have a similar power level. This promotes efficient energy circulation and is beneficial for long-term storage and air transportation.

Image: The 'Gather Electricity' function, showing power transfer to consolidate charge into one battery.
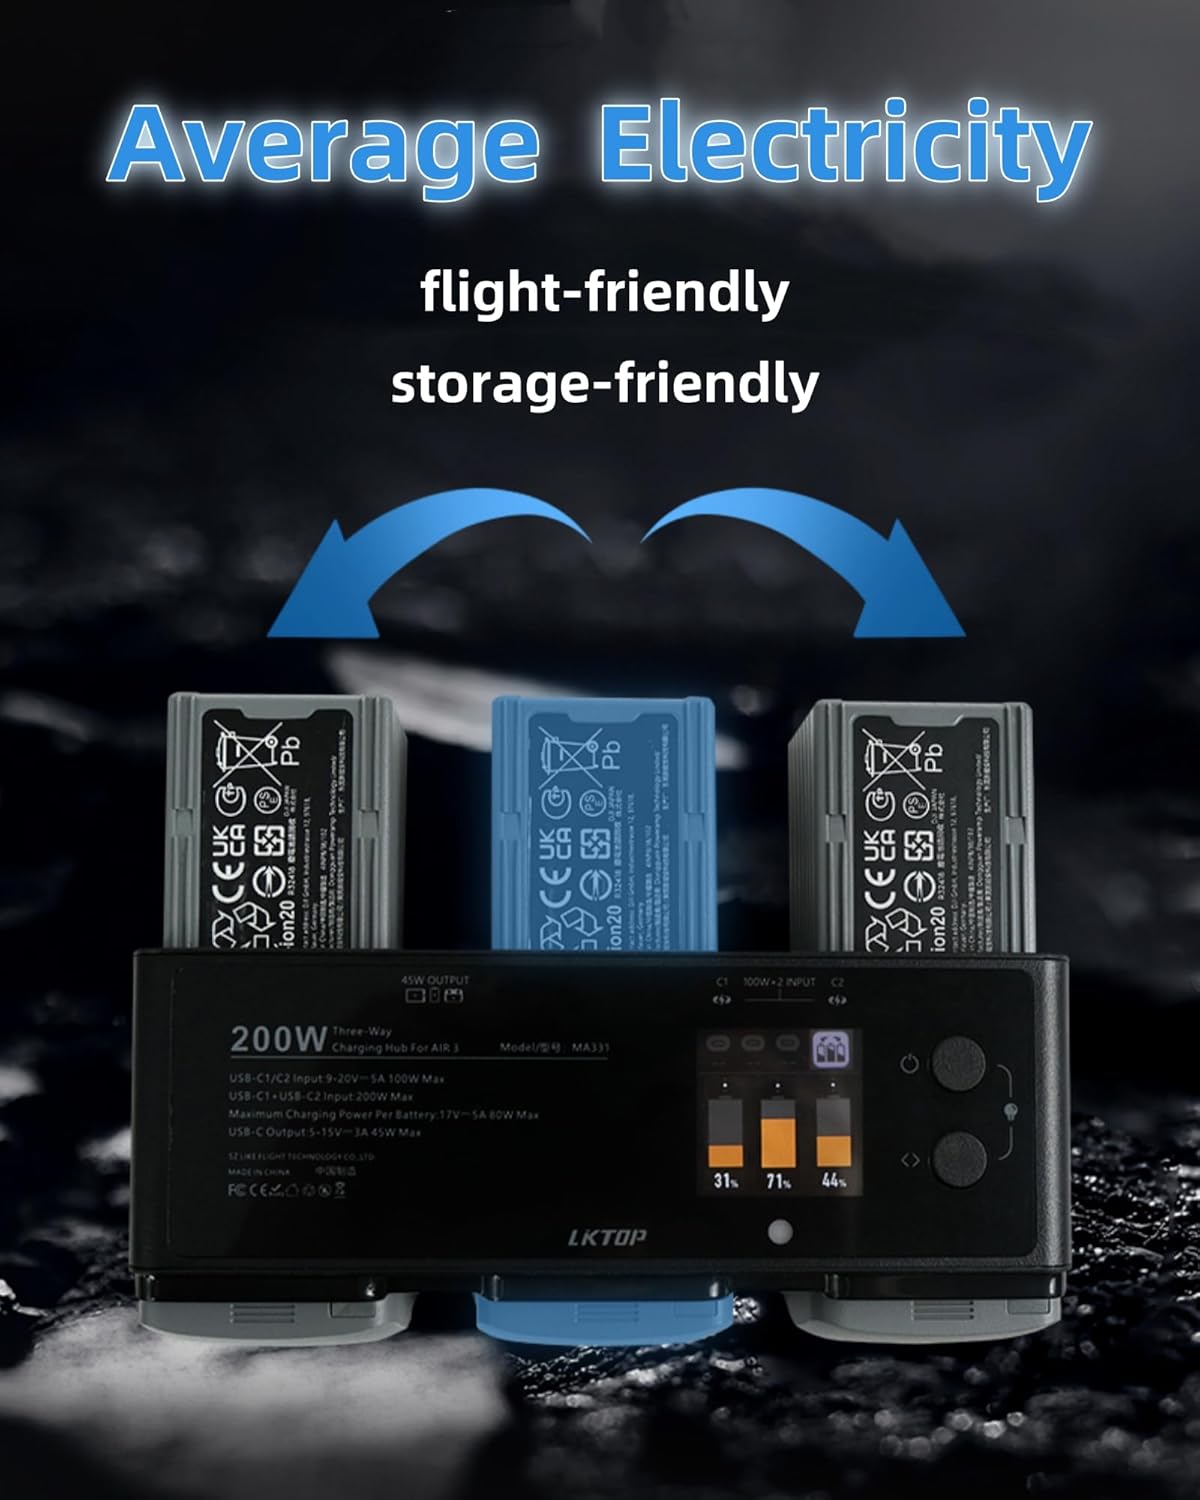
Image: The 'Average Electricity' function, demonstrating power distribution for balanced battery levels.
Video: Demonstration of the 'Collect Battery Level' and 'Balance Battery Level' functions of the charging hub.
6.3 Output Mode (Power Bank Function)
The Air 3/Air 3S Charging Hub can also serve as a power supply to charge your phone or other devices with a USB-C port. Simply connect your device to the USB-C output port on the hub using a compatible cable.

Image: The charging hub in output mode, charging various USB-C compatible devices such as a smartphone, remote controller, Osmo Action, and Osmo Pocket.
6.4 Emergency Functions (LED & Alarm)
The charging hub features built-in LED lights and an alarm function for enhanced utility in various scenarios.

Image: Instructions for activating the lighting and alarm functions.
To activate these functions, simultaneously short press the function key and the switch key. Select the corresponding LED/Alarm key to activate. To deactivate, short press the function key and switch key simultaneously again. These features provide reliable support for outdoor adventures, emergency rescue, and night flights.
7. Smart App Operation & Firmware Update
The LKTOP charging hub can be managed and updated via a dedicated smart application, providing additional control and monitoring capabilities.

Image: Guide for connecting the charging hub to the Polying app and initiating a firmware update.
7.1 アプリのダウンロードと接続
Scan the QR code in the image above or visit https://www.isdt.co/down/appJumplink/index_new.html to download the Polying app. Power on the charging hub and ensure Bluetooth is enabled on your mobile device. Open the app, add the device (MA331), and follow the prompts to connect.
7.2 ファームウェアアップデート
It is crucial to keep the charging hub's firmware updated, especially if you are experiencing issues such as the