
1. はじめに
This manual provides essential instructions for the safe and efficient operation, maintenance, and troubleshooting of your KIMO Electric Tacker, Model QM-9418. This cordless tool is designed for various fastening tasks, offering both finish nailing and stapling capabilities. Please read this manual thoroughly before initial use and retain it for future reference.

Figure 1: KIMO Electric Tacker QM-9418 and included accessories.
2. 安全情報
電動工具を使用する際は、常に安全を最優先にしてください。これらの指示に従わないと、怪我をしたり、工具が損傷したりする可能性があります。
- 個人用保護具(PPE)を着用する: Always wear safety glasses, hearing protection, and gloves when operating the tacker.
- 作業エリアの安全性: 作業エリアを清潔に保ち、明るくしてください。雑然とした場所や暗い場所は事故を招きます。
- Mis-fire Prevention Device: The tool is equipped with a mis-fire prevention mechanism. It will only fire when the contact arm is fully pressed against the workpiece. Do not attempt to bypass this safety feature.
- Three-Step Operation: For precise and safe nailing, follow the three-step process: 1) Press the nailer front against the material, 2) Press the cartridge, 3) Lock with the lock lever.
- Empty Shot Prevention: The tool features an empty shot prevention function, which prevents firing when the magazine is empty, reducing wear and tear and preventing damage to the workpiece.
- バッテリーの安全性: Use only KIMO-approved batteries and chargers. Do not expose batteries to extreme temperatures or moisture.
- ツールの取り扱い: Always hold the tool firmly with both hands during operation. Keep fingers away from the firing mechanism.
3.製品オーバーview
The KIMO Electric Tacker QM-9418 is a versatile cordless tool designed for various fastening applications. It combines the functionality of a finish nailer and a stapler.
3.1 コンポーネント
- KIMO Electric Tacker Main Unit
- 20V/2.0Ah Lithium-ion Battery (x2)
- バッテリー充電器
- 保護ケース
- Finish Nails (700 pieces, 20-50mm)
- Staples (300 pieces, 4x19-40mm)
- Allen Wrench (for jam clearing)
- 取扱説明書
3.2 主な特徴
- コードレス操作: Powered by 20V 2.0Ah lithium-ion batteries, eliminating the need for air compressors or power cords.
- 2-in-1 機能: Supports both finish nails (20-50mm) and staples (4x19-40mm).
- 深さ調整: Easily adjust the nailing depth to suit different materials and desired finishes.
- デュアル発射モード: Switch between single-shot mode for precision and continuous-shot mode for rapid fastening (up to 80 nails/minute).
- 統合された LED ライト: 作業領域を照らし、薄暗い場所でも視認性を向上させます。
- 人間工学に基づいたデザイン: Lightweight (2.8kg main unit) and compact with a comfortable grip for extended use.
- 安全ロック: 誤射を防止します。
- 高効率放熱: Designed for stable performance during continuous operation.
4. セットアップ
4.1 バッテリーの充電と取り付け
- Ensure the battery is fully charged before use. Connect the charger to a power outlet and insert the battery. The charger indicator will show the charging status.
- Once charged, slide the battery into the battery slot at the base of the tacker until it clicks securely into place.
- バッテリーを取り外すには、リリースボタンを押してバッテリーをスライドさせて取り出します。

Figure 2: Battery installation and charge indicator.
4.2 Loading Nails or Staples
The KIMO Electric Tacker supports both finish nails and staples. Follow these steps to load fasteners:
- Release the Magazine: Operate the lever to release the magazine.
- ファスナーを挿入: Place the strip of nails or staples into the magazine, ensuring they are oriented correctly with the points facing forward.
- 雑誌を確保する: Push the magazine back until the snap lock securely engages.

Figure 3: Three-step fastener loading process.
4.3 Adjusting Nailing Depth
The nailing depth can be adjusted to prevent damage to the material surface and achieve the desired finish.
- ツール上の深さ調整ダイヤルまたはレバーを見つけます。
- Rotate the dial or move the lever to increase or decrease the nailing depth. Test on a scrap piece of material to ensure the correct depth is set.
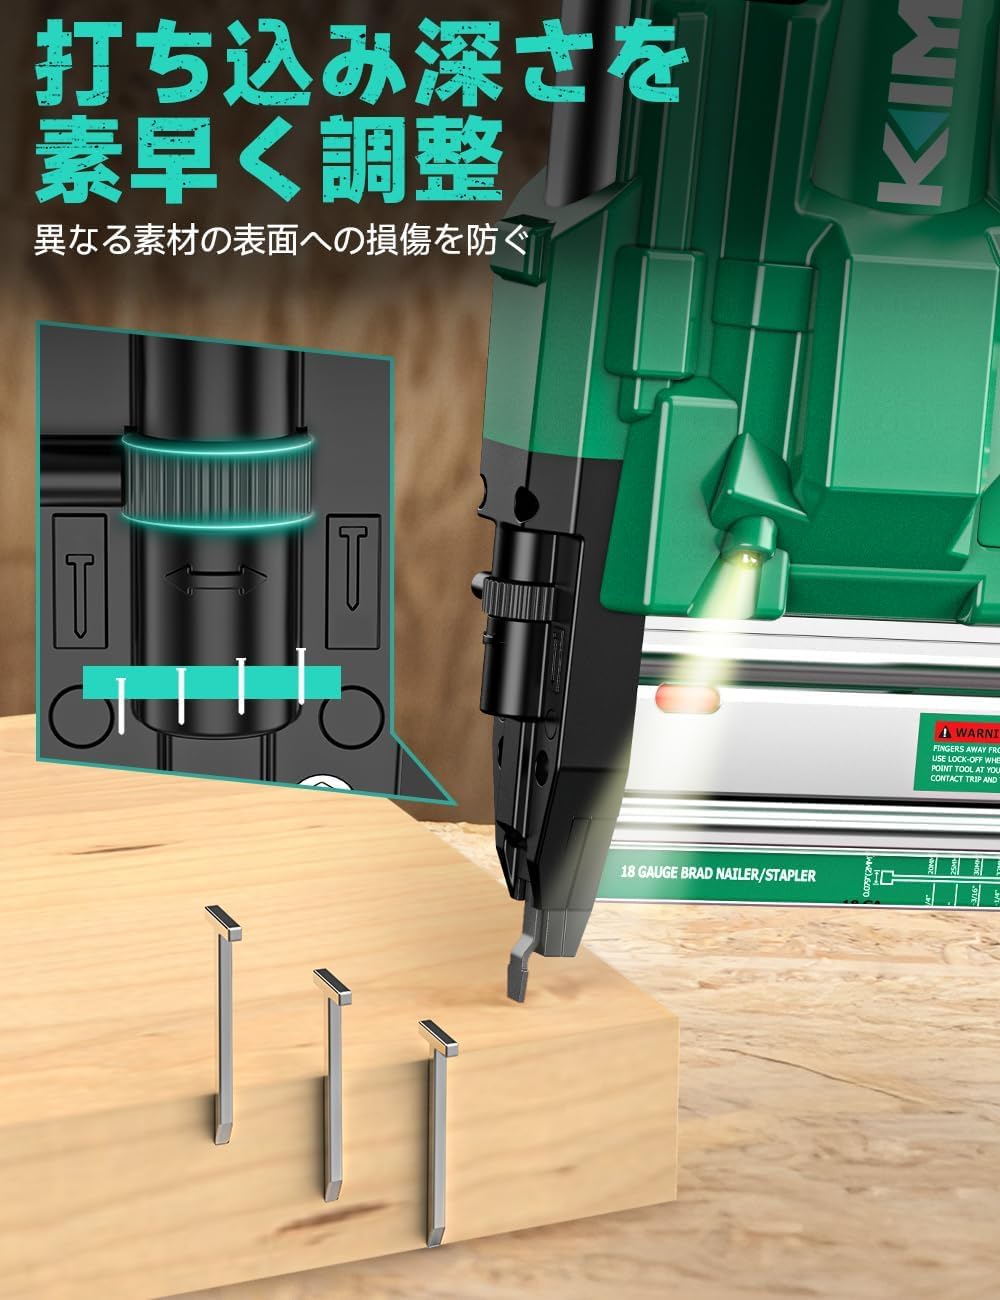
Figure 4: Depth adjustment mechanism.
5. 操作手順
5.1 発射モードの選択
The tacker offers two firing modes: single-shot and continuous-shot.
- Locate the mode selection switch on the tool.
- スイッチを希望のモードに移動します。
- Single-Shot Mode: For precise fastening, one fastener is driven per trigger pull.
- Continuous-Shot Mode: For rapid fastening, fasteners are driven continuously as long as the trigger is held and the contact arm is pressed.
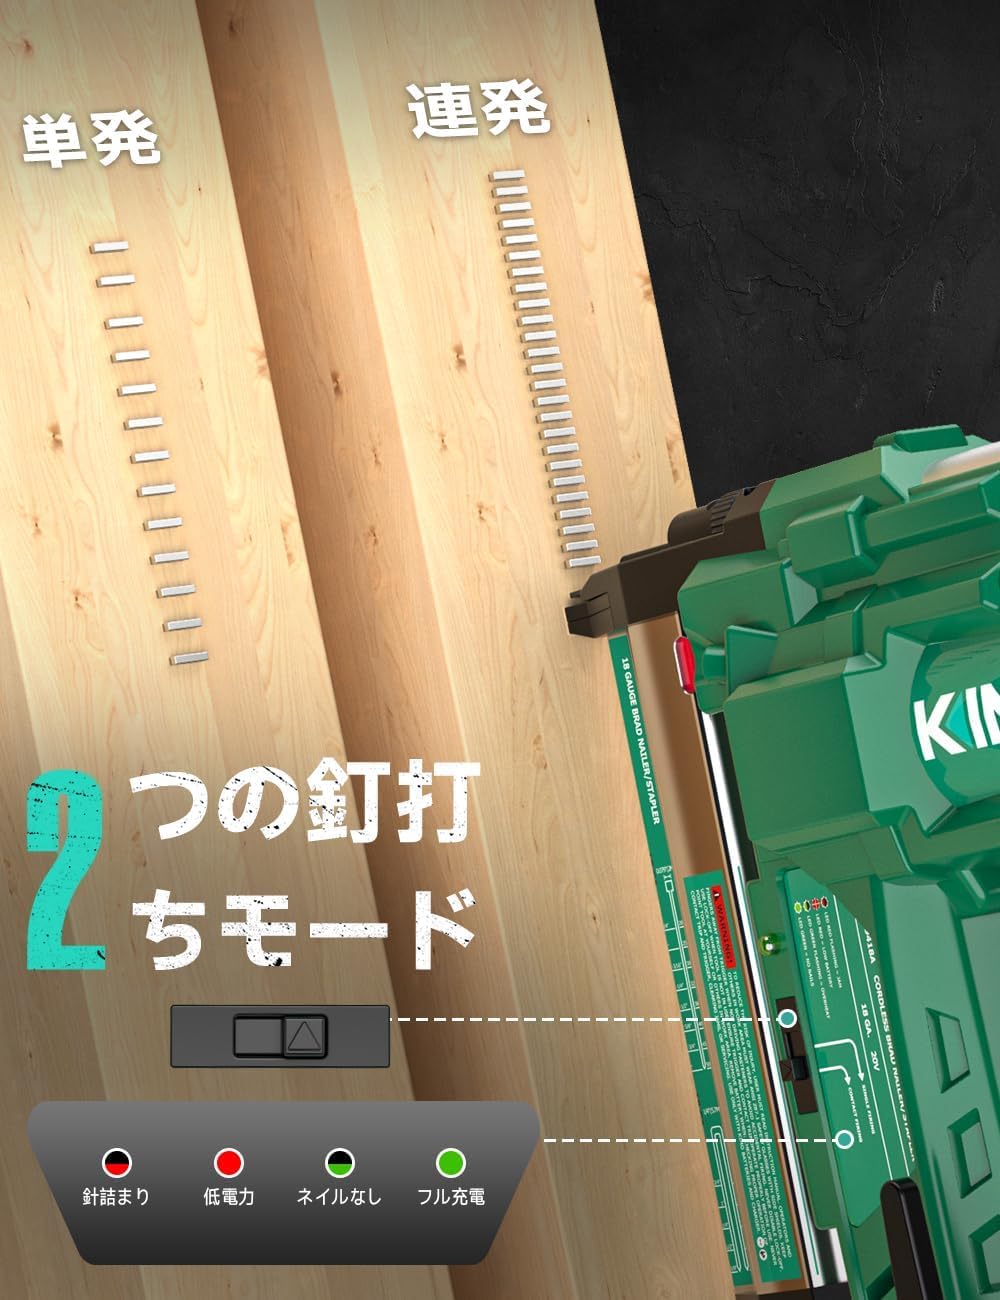
Figure 5: Firing mode selection switch.
5.2 釘打ち手順
- バッテリーが取り付けられており、留め具が取り付けられていることを確認します。
- Select the appropriate firing mode.
- Place the nose of the tacker firmly against the workpiece where the fastener is to be driven. Ensure the contact arm is fully depressed.
- 引き金を引いて留め具を動かします。
- トリガーを放し、ツールをワークピースから持ち上げます。
5.3LED作業用ライト
The integrated LED light automatically illuminates the work area when the tool is in operation, providing better visibility in low-light conditions.
5.4 Applicable Materials and Uses
This tacker is suitable for a wide range of materials and applications, including:
- Woodworking (e.g., furniture assembly, decorative trim)
- Construction (e.g., securing plasterboard, insulation, temporary fixtures)
- DIYプロジェクト
- 室内装飾
- Cardboard pallet reinforcement
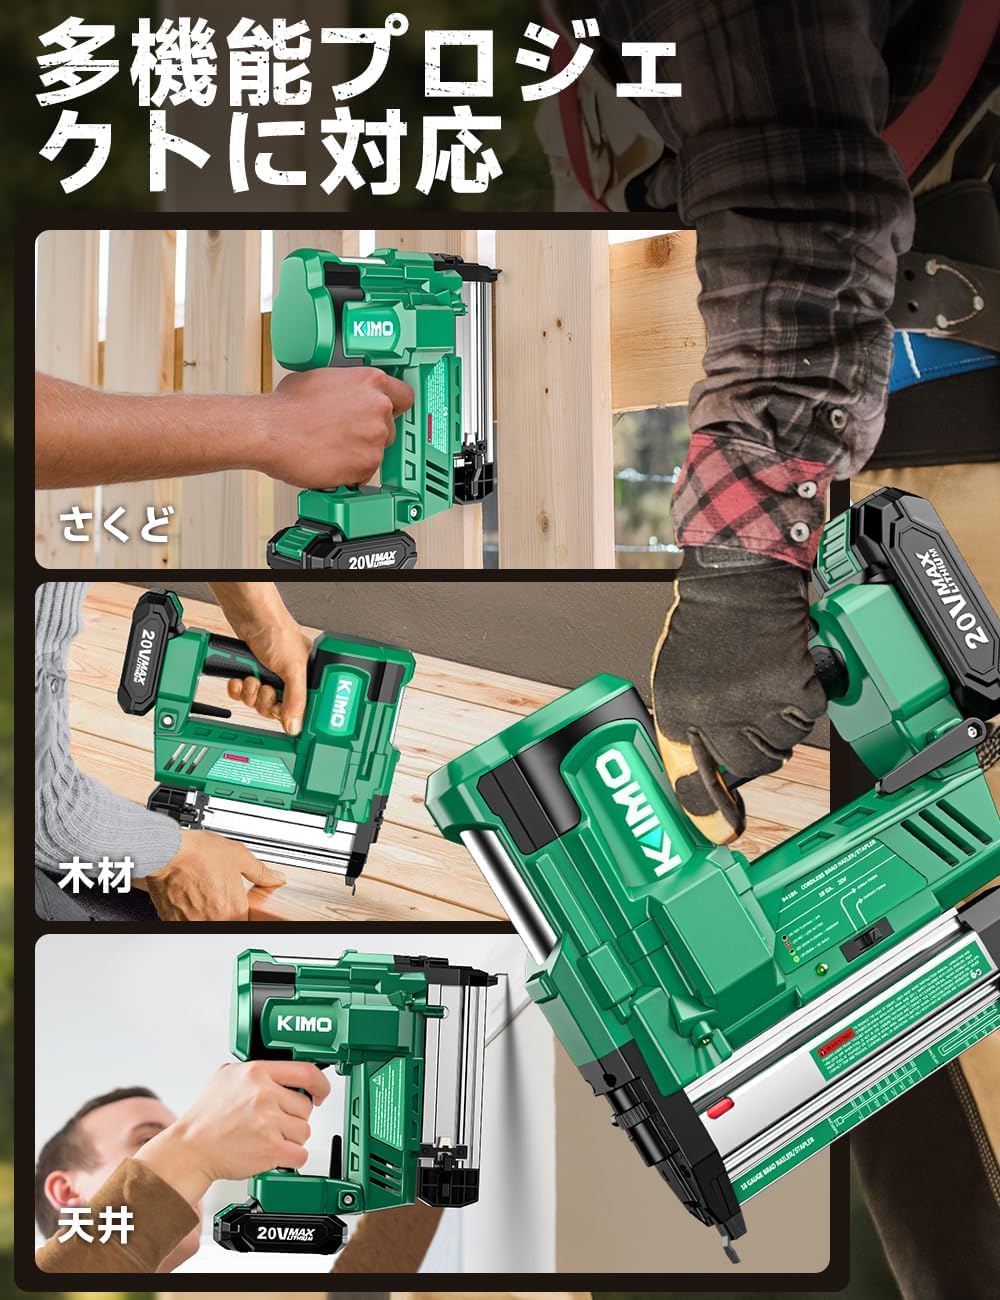
図6:例amples of tacker applications.
6. メンテナンス
6.1 ファスナーの詰まりの解消
In the event of a fastener jam, follow these steps:
- 電源を切る: Always remove the battery before attempting to clear a jam.
- Open the Magazine: Release the magazine as if loading new fasteners.
- Remove Jammed Fastener: Use the provided Allen wrench or pliers to carefully remove any jammed nails or staples from the firing mechanism or magazine. Do not force them out.
- 検査: Check for any damage to the magazine or firing pin.
- 雑誌を閉じる: Securely close the magazine.
6.2 一般的な清掃と保管
- ツールを清潔に保ち、ほこりやゴミが付かないようにしてください。外側は乾いた布で拭いてください。
- Store the tool and batteries in a dry, cool place, away from direct sunlight and moisture.
- Remove the battery from the tool when not in use for extended periods.
7。 トラブルシューティング
This section addresses common issues you might encounter with your KIMO Electric Tacker.
| 問題 | 考えられる原因 | 解決 |
|---|---|---|
| ツールが起動しない | バッテリーが取り付けられていないか放電している Contact arm not fully depressed Magazine empty (empty shot prevention) ファスナー詰まり | バッテリーの取り付け/充電 ツールをワークピースにしっかりと押し付けます 荷重ファスナー Clear jam (see Section 6.1) |
| Fasteners not driven fully | Nailing depth set too shallow バッテリー残量が少ない Incorrect fastener size for material | 深度設定をさらに深く調整する バッテリーを充電する Use appropriate fastener size |
| ファスナーが頻繁に詰まる | 破損したファスナー ファスナーのサイズが間違っている Magazine or firing mechanism dirty | 新品で損傷のない留め具を使用する Ensure correct fastener size Clean magazine and firing area |
| ツールが過熱する | 長期間の連続使用 | Allow the tool to cool down. The high-efficiency heat dissipation design helps manage temperature, but breaks are recommended during extended use. |
If you encounter a problem not listed here or if the issue persists after attempting the solutions, please contact KIMO customer support.
8. 仕様
| 特徴 | 詳細 |
|---|---|
| ブランド | キモ |
| モデル番号 | QM-9418 |
| バッテリー巻tage | 20V |
| バッテリー容量 | 2.0Ah Lithium-ion (x2 included) |
| Finish Nail Length | 20mm - 50mm (700 pcs included) |
| ステープルサイズ | Width 4mm, Length 19mm - 40mm (300 pcs included) |
| Max Firing Speed | 80 nails/minute (continuous mode) |
| Tool Weight (main unit) | 2.8キロ |
| 認証 | PSE認証 |
| 欧州連合 | 731029251059 |
9. 保証とサポート
9.1 製造元の保証
The KIMO Electric Tacker QM-9418 comes with a 1-year manufacturer's warranty. This warranty covers defects in materials and workmanship under normal use. Please retain your proof of purchase for warranty claims.
If a battery becomes unusable within one year of purchase, contact after-sales service for a replacement.
9.2 カスタマーサポート
For any questions, technical assistance, or warranty claims, please contact KIMO customer support through the retailer where the product was purchased or visit the official KIMO web連絡先情報のサイト。