1. はじめに
Thank you for choosing the Conentool 21V Cordless Impact Drill/Driver Kit. This tool is designed for various drilling and screwdriving tasks in wood, metal, plastics, and masonry. Please read this manual carefully before operating the tool to ensure safe and efficient use. Keep this manual for future reference.

Image 1.1: The Conentool 21V Cordless Impact Drill/Driver Kit, including the drill, two 2500mAh batteries, charger, and a variety of drill bits and accessories in a carrying case.
2.一般的な安全上の注意
警告:この電動工具に付属しているすべての安全上の警告、指示、図、および仕様をお読みください。 下記の指示に従わないと、感電、火災、重傷を負う可能性があります。
2.1作業エリアの安全性
- 作業エリアを清潔に保ち、明るくしてください。雑然とした場所や暗い場所は事故を招きます。
- 可燃性の液体、ガス、粉塵などがある爆発性雰囲気では電動工具を操作しないでください。電動工具は火花を発し、粉塵や煙に引火する可能性があります。
- 電動工具を操作するときは、子供や傍観者を近づけないでください。注意散漫になると制御不能になる可能性があります。
2.2 電気安全
- 電動工具のプラグはコンセントに適合している必要があります。プラグを改造しないでください。
- パイプ、ラジエーター、レンジ、冷蔵庫など、アースされた表面との身体の接触を避けてください。身体がアースされている場合、感電の危険性が高まります。
- 電動工具を雨や湿気の多い場所に放置しないでください。電動工具に水が入ると感電の危険性が高まります。
2.3 個人の安全
- 必ず目の保護具を着用してください。安全メガネ、ゴーグル、またはフェイスシールドを使用してください。
- ツールを長時間操作する場合は、聴覚保護具を着用してください。
- 適切な服装をしてください。ゆったりとした服や宝石は身につけないでください。髪の毛や服が可動部分に触れないようにしてください。
- 電動工具を操作するときは、常に注意し、作業に注意し、常識を働かせてください。
3. パッケージ内容
下記のすべての品目がパッケージに含まれていることをご確認ください。不足または破損している品目がある場合は、カスタマーサポートまでご連絡ください。
- 1 x Conentool 21V Cordless Impact Drill/Driver
- 2500mAhリチウムイオン電池2個
- 1 xバッテリー充電器
- 1 x Flexible Shaft Extension
- Various Drill Bits (for wood, metal, masonry)
- Various Screwdriver Bits
- ソケットアダプター
- キャリングケース
- ユーザーマニュアル

Image 3.1: A complete overview of the kit contents, including the drill, two batteries, charger, flexible shaft, various drill bits, screwdriver bits, and socket adapters, all neatly arranged.
4.製品オーバーview
Familiarize yourself with the main components of your drill/driver:
- チャック: Holds drill bits and screwdriver bits.
- トルク調整リング: Selects the desired torque setting.
- モードセレクターリング: Switches between screwdriving, drilling, and impact drilling modes.
- スピードセレクタースイッチ: Changes between high and low-speed gears.
- トリガースイッチ: Activates the tool and controls speed (variable speed).
- 前進/後進セレクター: 回転方向を変更します。
- LED作業灯: 作業領域を照らします。
- バッテリーパック: ツールに電力を供給します。
- バッテリーリリースボタン: バッテリーの取り外しに。
- ハンドル: 人間工学に基づいたグリップで快適に使用できます。

図4.1: 内部 view highlighting the brushless motor, which provides increased power, efficiency, and a quieter operation with no sparks.
5. セットアップ
5.1 バッテリーの充電
The battery pack is not fully charged at the time of purchase. It is recommended to fully charge the battery before first use.
- 充電器を標準の電源コンセントに接続します。
- バッテリーパックを充電器のベースに差し込みます。カチッと音がするまでしっかりと固定されていることを確認してください。
- The charger indicator light will show the charging status. A red light typically indicates charging, and a green light indicates a full charge.
- 完全に充電されたら、充電器を電源コンセントから外し、バッテリーを取り外します。

Image 5.1: The battery charger connected to a wall outlet, with a battery pack inserted for charging. The red light indicates charging, and the green light indicates a completed charge.
5.2バッテリーの取り付けと取り外し
- インストールするには: バッテリー パックをツール ハンドルのベースに合わせて、カチッと音がしてしっかりと固定されるまでスライドさせます。
- 削除するには: Press the battery release button (usually located at the front of the battery) and slide the battery pack out of the tool.

図5.2: 断面図 view of the 2500mAh battery pack, illustrating its internal lithium-ion cells and power management system, designed for up to 90 minutes of use per battery.
5.3 Installing and Removing Drill/Screwdriver Bits
- インストールするには: Rotate the chuck counter-clockwise to open the jaws. Insert the desired bit into the chuck as far as it will go. Rotate the chuck clockwise to tighten the jaws firmly around the bit.
- 削除するには: チャックを反時計回りに回転させてジョーを緩め、ビットを引き抜きます。
Ensure the bit is securely fastened to prevent it from slipping during operation.
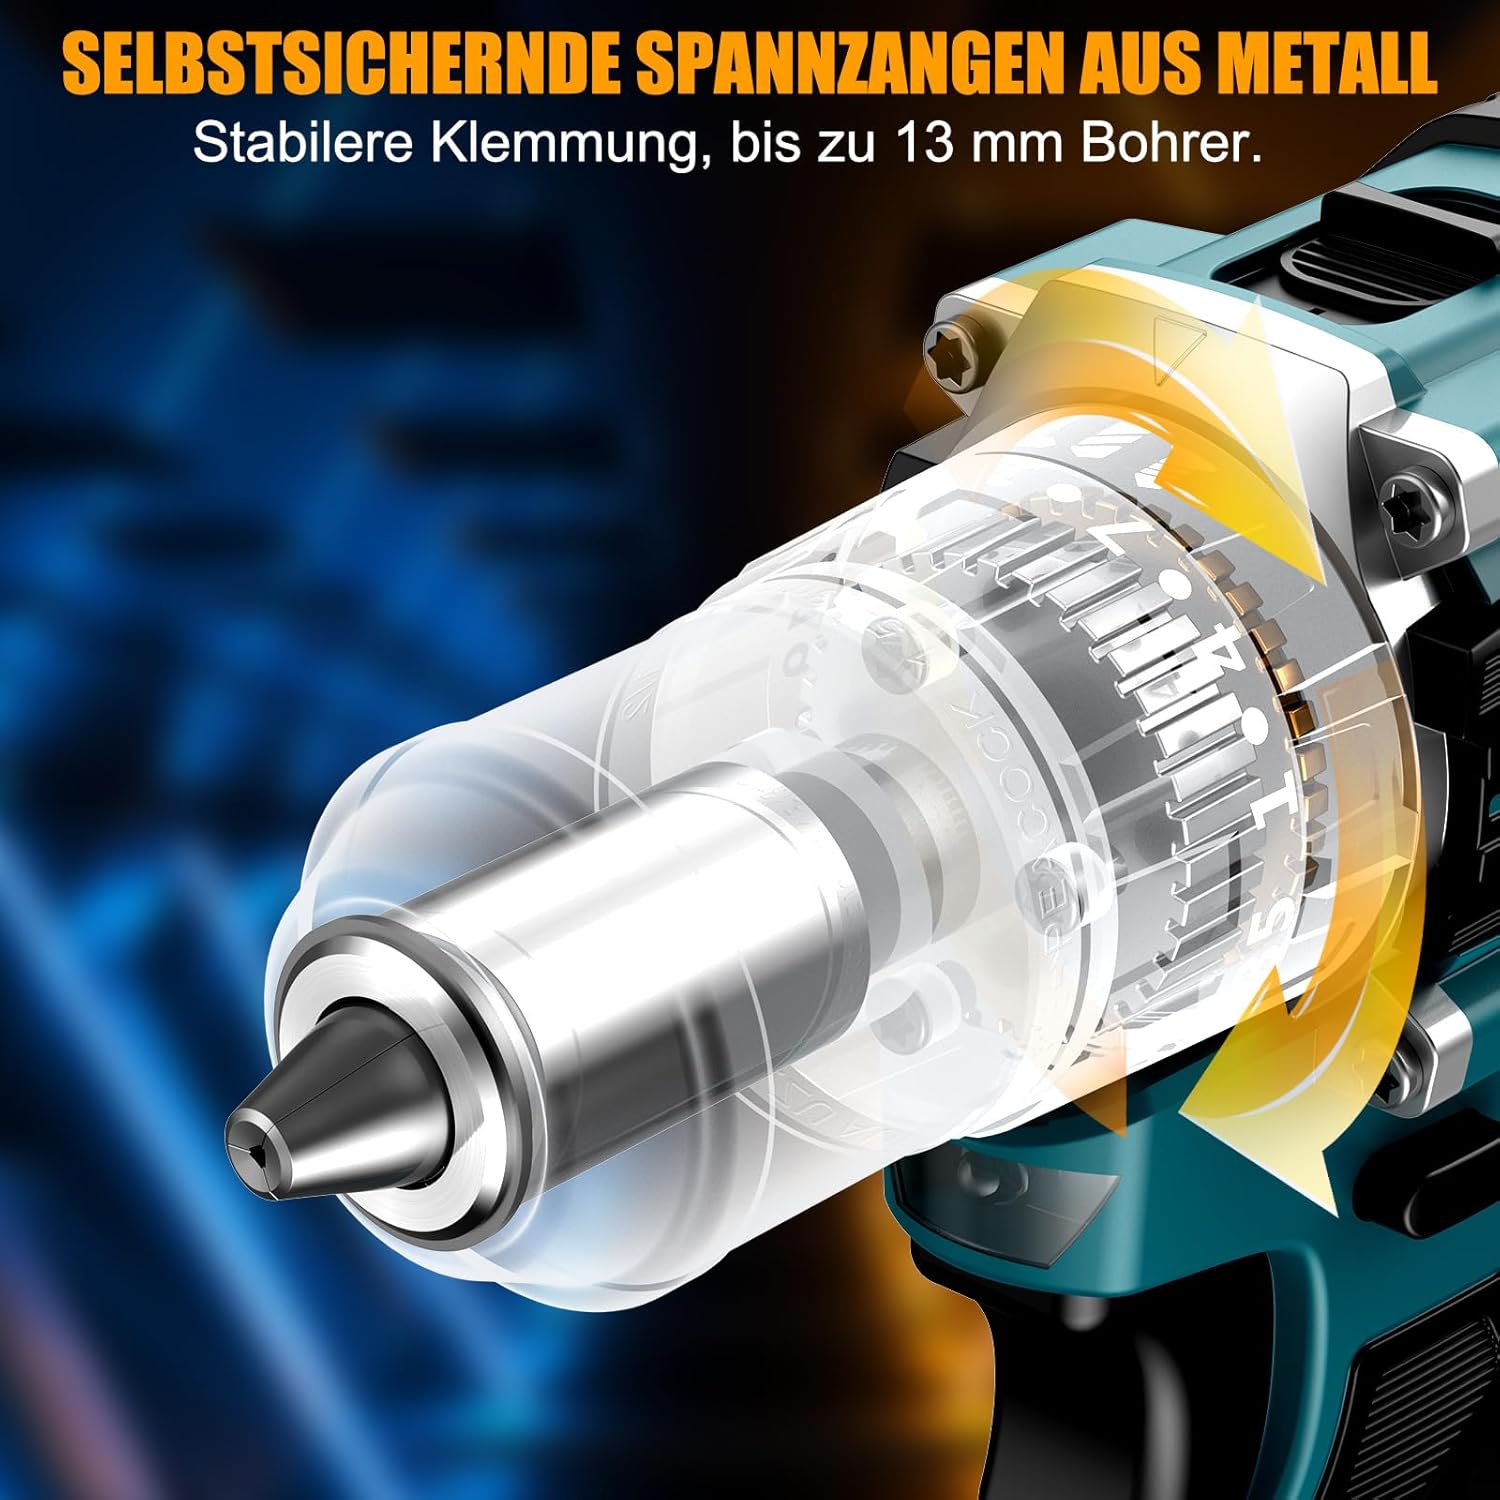
画像5.3: 詳細な view of the self-locking metal chuck, demonstrating its stable clamping mechanism capable of holding drill bits up to 13mm securely.
6. 操作手順
6.1 電源のオン/オフと速度制御
- To turn the tool ON, press the trigger switch. The speed is variable; press the trigger further for higher speed.
- ツールをオフにするには、トリガー スイッチを放します。
- The integrated LED work light will illuminate when the trigger is pressed, providing visibility in dimly lit areas.
6.2 正転/逆転
The forward/reverse selector switch is located above the trigger. Push it to the left for forward rotation (for screwdriving and drilling) and to the right for reverse rotation (for removing screws or freeing jammed bits). Ensure the tool is stopped before changing direction.
6.3 Speed Gear Selection
The drill features a 2-speed gear selector switch on top of the tool:
- ギア1(低速、0~650 RPM): Ideal for high-torque applications like driving large screws or drilling large holes.
- ギア2(高速、0~1850 RPM): Suitable for fast drilling in softer materials and smaller diameter holes.
Always select the appropriate gear for the task. Change gears only when the tool is completely stopped.
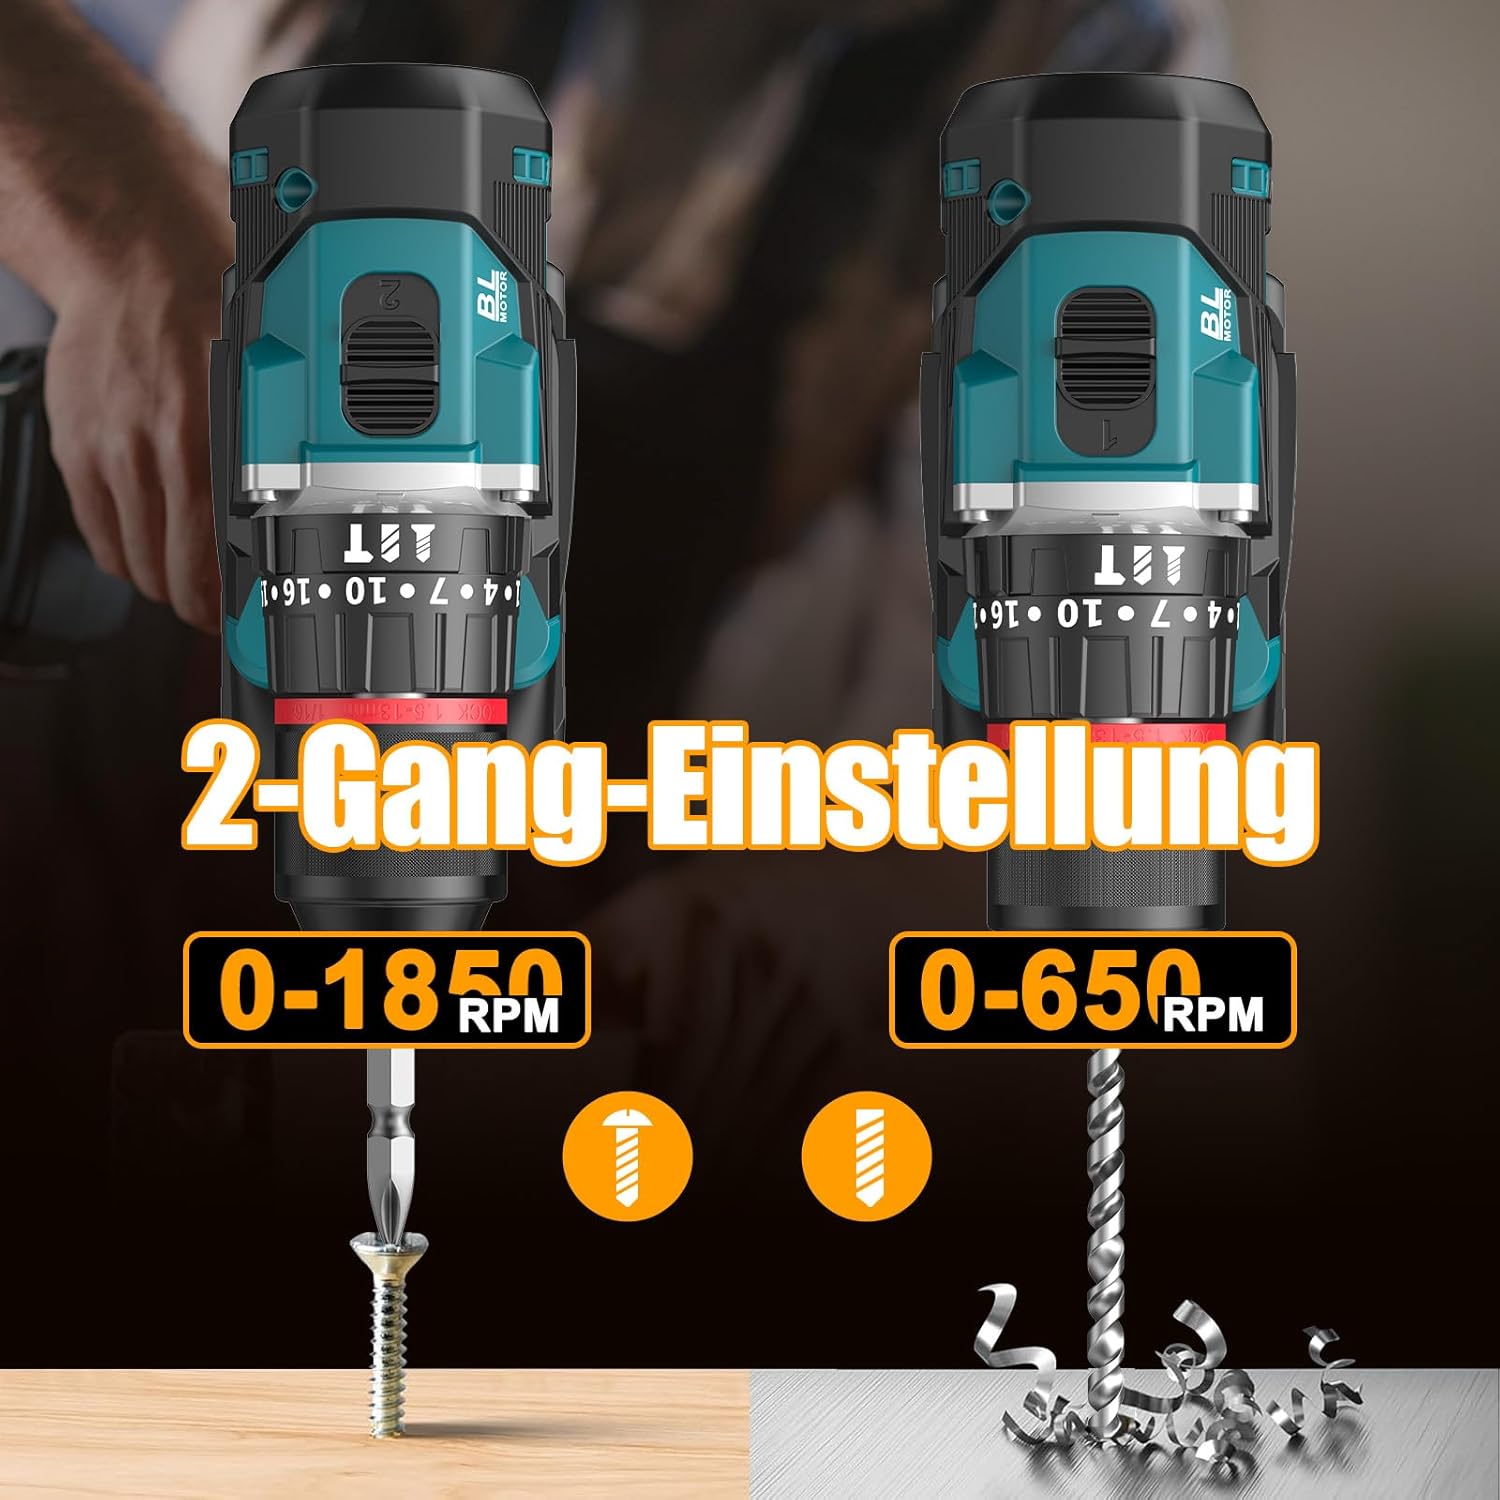
Image 6.1: An illustration demonstrating the two-speed gear settings: Gear 1 (0-650 RPM) for screwdriving and Gear 2 (0-1850 RPM) for drilling, allowing for optimal performance based on the application.
6.4 トルク調整とモード選択
The torque adjustment ring allows you to set the desired torque for screwdriving applications, preventing overtightening or stripping screws. The mode selector ring allows you to switch between different operating modes.
- Screwdriving Mode (Torque Settings 1-35): Use these settings to match the torque to the screw size and material. Lower numbers for smaller screws/softer materials, higher numbers for larger screws/harder materials.
- 掘削モード(ドリルビットアイコン): For general drilling without impact. The clutch is disengaged, providing maximum torque.
- インパクトドリリングモード(ハンマーアイコン): For drilling into masonry or concrete, providing a hammering action in addition to rotation.
The drill offers 35+3 settings, including 35 torque settings for screwdriving and 3 modes (screwdriving, drilling, impact drilling).

Image 6.2: A visual representation of the 35+3 torque and mode settings, indicating precise power control and a maximum torque of 55 N.m, suitable for various materials like wood, brick, plastic, and metal.
7. メンテナンス
7.1 クリーニング
- 清掃やメンテナンスを行う前に、必ずバッテリー パックを外してください。
- 過熱を防ぐために、ツールの通気口を清潔に保ってください。
- 柔らかくてamp ツールを清掃するための布asing. 強力な化学薬品や研磨剤入りの洗剤は使用しないでください。
7.2 ストレージ
- ツールと電池は、直射日光や湿気を避け、涼しく乾燥した場所に保管してください。
- ツールをほこりや損傷から保護するために、キャリングケースに保管してください。
- お子様の手の届かない場所に保管してください。

Image 7.1: A person carrying the Conentool drill kit in its durable black carrying case, designed for convenient storage and transport of the tool and its accessories.
7.3バッテリーケア
- Do not store batteries in a discharged state. Recharge them regularly, especially if not used for extended periods.
- バッテリーを極端な温度にさらさないでください。
- 電池パックを分解したり改造したりしないでください。
8。 トラブルシューティング
| 問題 | 考えられる原因 | 解決 |
|---|---|---|
| ツールが起動しない | バッテリーが充電されていないか、正しく取り付けられていません。 | バッテリーが完全に充電され、正しく挿入されていることを確認してください。 |
| パワーまたはスピードの低下 | バッテリーの充電量が少なくなっています。 | バッテリーを充電してください。 |
| ビットがチャック内で滑る | チャックが十分に締められていない。 | Tighten the chuck firmly around the bit. Ensure the bit shank is clean. |
| 過熱 | 通気口が塞がれている、継続的に頻繁に使用される。 | 通気口を清掃してください。長時間使用する場合は、ツールが冷めるまでお待ちください。 |
9. 仕様
| 特徴 | 仕様 |
|---|---|
| モデル番号 | ebvc-sd-de |
| 巻tage | 21ボルト |
| 電池のタイプ | リチウムイオン |
| バッテリー容量 | 2500mAh(各) |
| 最大トルク | 55ナノメートル |
| トルク設定 | 35 + 3 Modes (Screwdriving, Drilling, Impact Drilling) |
| 無負荷速度(ギア1) | 0-650 回転 |
| 無負荷速度(ギア2) | 0-1850 回転 |
| チャックサイズ | 13 mm (3/8インチ) キーレス |
| 製品寸法 | 35 x 31 x 10 cm |
| 重量(バッテリー含む) | 1.5キログラム |
10. 保証とサポート
Conentool products are manufactured to high-quality standards. In the unlikely event of a defect due to material or manufacturing fault, please contact your retailer or Conentool customer service. Please retain your proof of purchase for warranty claims.
For further assistance, technical support, or to inquire about spare parts, please refer to the contact information provided with your purchase or visit the official Conentool webサイト。