
1. 重要な安全情報
Please read all instructions carefully before using the EVTSCAN Projection Clock. Keep this manual for future reference.
- デバイスを極端な温度、直射日光、高湿度にさらさないでください。
- 時計を落としたり、強い衝撃を与えたりしないでください。
- ご自身でデバイスの分解や修理を試みないでください。資格のあるサービス担当者にご連絡ください。
- Use only the specified power adapter (DC 5.0V, 1.2A) or appropriate batteries (2xAAA, not included).
- お子様の手の届かない場所に保管してください。
2.製品オーバーview
The EVTSCAN Projection Clock is a versatile digital alarm clock featuring a 3-inch backlit LCD screen that displays time, date, day of the week, temperature, and humidity. It includes a projection function to display time and temperature on a wall or ceiling, dual alarms with snooze, and a USB port for charging mobile phones.
主な特徴:
- 12/24-hour time format display.
- Date and day of the week display (7 languages for week).
- Temperature detection (-9℃ to +50℃) and humidity detection (20% to 95%).
- Projection function with 180-degree rotation for time and temperature.
- Dual alarm clocks with slowly increasing ボリューム。
- 5分間のスヌーズ機能。
- モバイルデバイス用のUSB充電ポート。
- Adjustable backlight with 4 levels (high, medium, low, off).

図2.1: フロント view of the EVTSCAN Projection Clock, showing the LCD display and projection lens.
3. パッケージ内容
開梱の際には、以下に挙げる品目がすべて揃っており、良好な状態であることを確認してください。
- 1 x EVTSCAN Projection Clock
- USBケーブル1本
- 英語ユーザーマニュアル x 1
Note: 2xAAA batteries are required for battery power and are not included in the package.
4. セットアップ
4.1 デバイスへの電源供給
The EVTSCAN Projection Clock can be powered by either AAA batteries or via the included USB cable.
4.1.1 バッテリーの取り付け
- 時計の背面にある電池ケースのカバーを見つけます。
- Slide open the cover.
- 正しい極性(+/-)を確認して、単4電池2本を挿入します。
- 電池カバーをしっかりと閉じてください。
Note: When powered by batteries, the backlight will only light up for 8 seconds when activated to conserve power. The projection lamp will also light up for 8 seconds.
4.1.2 USB電源接続
- Connect the small end of the provided USB cable to the DC 5.0V 1.2A input port on the back of the clock.
- USB ケーブルの大きい方の端を、互換性のある USB 電源アダプタ (別売) または電源が供給されている USB ポートに接続します。
Note: When powered by USB, the backlight and projection lamp can remain continuously on, with adjustable brightness for the backlight.
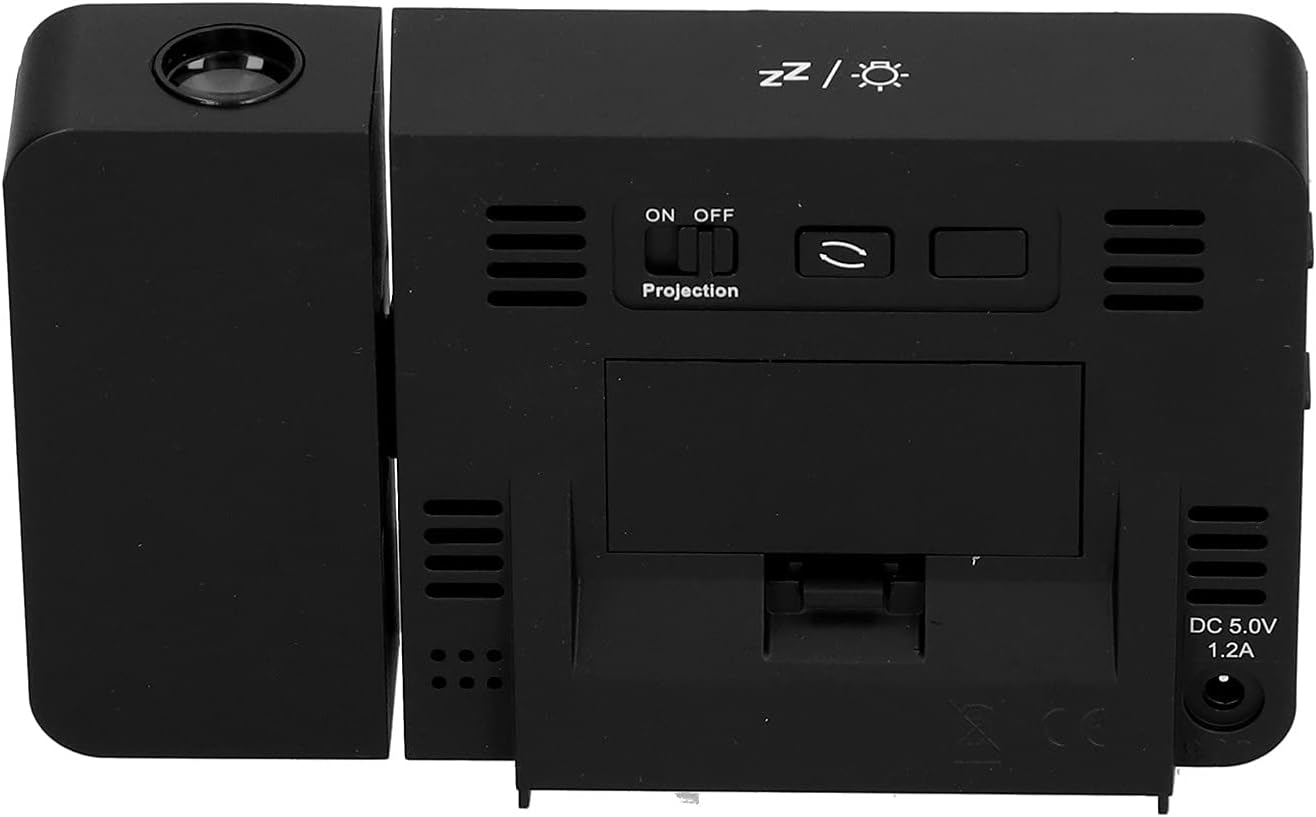
図4.1: 後方 view of the clock, indicating the battery compartment and DC 5.0V 1.2A power input.
5. 操作手順
5.1 ボタンの機能
Familiarize yourself with the control buttons located on the front and sides of the clock:
- 時間: 時刻設定モードに入ります。
- 警報: アラーム設定モードに入ります。
- +: Increases values, switches 12/24HR format, adjusts backlight.
- -: Decreases values, switches temperature units (℃/℉).
- Projection ON/OFF Switch: Activates or deactivates the projection. (Located on the back/side)
- Alarm 1 ON/OFF Switch: Activates or deactivates Alarm 1. (Located on the side)
- Alarm 2 ON/OFF Switch: Activates or deactivates Alarm 2. (Located on the side)
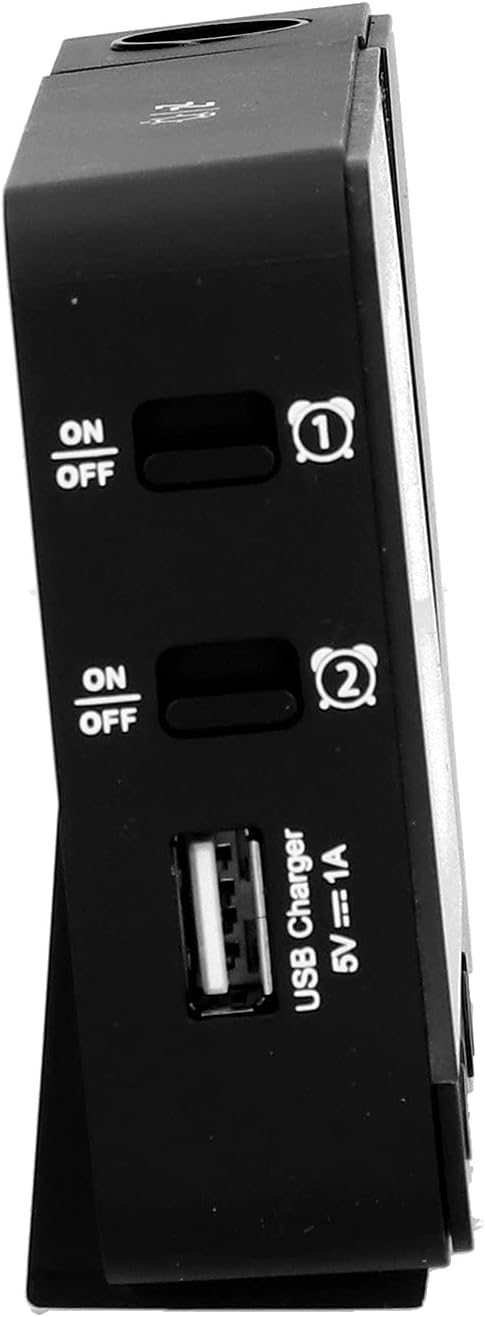
図5.1: 側 view showing Alarm 1 and Alarm 2 ON/OFF switches, and the USB charging port.
5.2 時刻と日付の設定
- を押し続けます 時間 ボタンを押して時刻設定モードに入ります。時間表示が点滅します。
- 使用 + or - 時間を調整するボタン。
- プレス 時間 もう一度押して時間を確定し、分の設定に進みます。 + or -.
- 押し続ける 時間 to cycle through setting year, month, and day. Adjust each with + or -.
- 日付を設定したら、 時間 最後にもう一度押して設定モードを終了します。
- 12時間形式と24時間形式を切り替えるには、 + 通常の時刻表示中にボタンを押します。
- To switch between Celsius (℃) and Fahrenheit (℉) for temperature, press the - 通常の時刻表示中にボタンを押します。
5.3 アラームの設定
時計には 2 つの独立したアラーム (アラーム 1 とアラーム 2) が搭載されています。
- を押し続けます アラーム button to enter Alarm 1 setting mode. The Alarm 1 hour display will flash.
- 使用 + or - ボタンでアラーム時間を調整します。
- プレス アラーム again to confirm the hour and move to Alarm 1 minute setting. Adjust with + or -.
- プレス アラーム again to move to Alarm 2 hour setting, and repeat the process for Alarm 2.
- After setting Alarm 2 minutes, press アラーム 最後にもう一度押して設定モードを終了します。
- To activate or deactivate an alarm, use the corresponding アラーム1オン/オフ or アラーム2オン/オフ switch on the side of the clock. An alarm icon will appear on the display when active.
5.3.1スヌーズ機能
When an alarm sounds, press any button (except the alarm ON/OFF switch) to activate the 5-minute snooze function. The alarm will sound again after 5 minutes. To turn off the alarm completely, slide the corresponding alarm ON/OFF switch to OFF.
5.4 投影関数
The clock can project the time and temperature onto a wall or ceiling.
- 見つける 投影のオン/オフ switch on the back of the clock. Slide it to ON to activate the projection.
- Adjust the angle of the projection arm (the part with the lens) to direct the projection as desired. The arm can rotate nearly 180 degrees.
- The projection will display the current time and temperature in a soft red color.

図5.2: 側 view showing the projection arm extended and ready for use.

図5.3: The clock projecting time and temperature onto a wall in a bedroom setting.
5.5 バックライトの調整
When the clock is powered by USB, the backlight can be adjusted to four levels: high, medium, low, or off. Repeatedly press the + button during normal time display to cycle through the brightness levels.
When powered by batteries, the backlight will illuminate for 8 seconds when any button is pressed, then turn off to conserve power.
5.6USB充電ポート
The clock features a USB charging port (5V=1A) on its side. You can use this port to charge your mobile phone or other small electronic devices while the clock is connected to USB power.
Note: The USB charging port only functions when the clock is powered via the USB cable. It does not work when the clock is running on battery power.
6. メンテナンス
6.1 クリーニング
- 時計の表面を柔らかく乾いた布で拭いてください。
- 研磨剤入りのクリーナー、溶剤、化学スプレーは使用しないでください。仕上げや電子部品が損傷する可能性があります。
- Keep the projection lens clean for clear projection. Use a soft, lint-free cloth.
6.2 電池の交換
When the display becomes dim or the clock functions erratically while on battery power, it's time to replace the AAA batteries. Refer to Section 4.1.1 for battery installation instructions. Always replace both batteries at the same time with new ones.
7。 トラブルシューティング
| 問題 | 考えられる原因 | 解決 |
|---|---|---|
| 時計の表示が空白または暗い。 | No power, low batteries, or USB cable not connected. | Check battery installation and replace if necessary. Ensure USB cable is securely connected to a power source. |
| Projection is unclear or not visible. | Projection switch is OFF, lens is dirty, or projection distance is too far/close. | Ensure Projection switch is ON. Clean the projection lens. Adjust the clock's distance from the projection surface. |
| アラームは鳴りません。 | アラームが設定されていないか、無効になっています。 | Verify alarm time is set correctly. Ensure the corresponding Alarm ON/OFF switch is in the ON position. |
| USB充電ポートが機能しません。 | Clock is running on battery power, or USB cable is not connected to a power source. | Ensure the clock is powered via the USB cable and connected to a functional power adapter. |
| 時刻/日付が正しくありません。 | 時刻/日付が正しく設定されていません。 | 時刻と日付をリセットするには、セクション 5.2 を参照してください。 |
8. 仕様
| モデル: | B0CLGDFCGX |
| ブランド: | EVTSCAN |
| 材料: | ABS(アクリロニトリルブタジエンスチレン) |
| 製品寸法: | 約13.5 x 8 x 2.5 cm (5.3 x 3.1 x 1.0インチ) |
| 重さ: | 約242g(8.5オンス) |
| 表示タイプ: | バックライト付きデジタルLCD |
| 電源: | 2xAAA batteries (not included) or DC 5.0V 1.2A via USB cable |
| USB充電出力: | 5V = 1A |
| 温度検出範囲: | -9℃ to +50℃ (1℃ resolution) |
| 湿度検出範囲: | 20% to 95% (1% resolution) |
| Temperature/Humidity Calibration Time: | 30秒 |
| バックライトレベル: | 4 levels (High, Medium, Low, Off) when USB powered; 8s illumination when battery powered. |
| プロジェクションLamp: | Always on when USB powered; 8s illumination when battery powered. |

図8.1: Product dimensions: 5.3 inches wide by 3.1 inches high.
9. 保証とサポート
EVTSCAN products are manufactured to high quality standards. For specific warranty information, please refer to the warranty card included with your purchase or contact your retailer.
If you encounter any issues or have questions regarding your EVTSCAN Projection Clock, please contact the seller or EVTSCAN customer support for assistance. Please have your model number (B0CLGDFCGX) ready when contacting support.
さらに詳しいサポートが必要な場合は、 EVTSCAN Store on Amazon.