
1. はじめに
Thank you for choosing the techno line WT2600 Digital Calendar. This device provides accurate time, date, indoor temperature, and humidity readings, along with alarm functions. This manual will guide you through the setup, operation, and maintenance of your new digital calendar.
2. 安全情報
- デバイスを極端な温度、直射日光、高湿度にさらさないでください。
- デバイスを落としたり、強い衝撃を与えたりしないでください。
- ご自身でユニットを分解したり修理したりしないでください。資格のあるサービス担当者にご相談ください。
- 使用済みバッテリーは地域の規制に従って責任を持って廃棄してください。
- デバイスを子供の手の届かない場所に保管してください。
3. パッケージ内容
パッケージ内にすべてのアイテムが揃っていることを確認してください:
- techno line WT2600 Digital Calendar Unit
- ユーザーマニュアル(このドキュメント)
- Batteries (may be included depending on region)
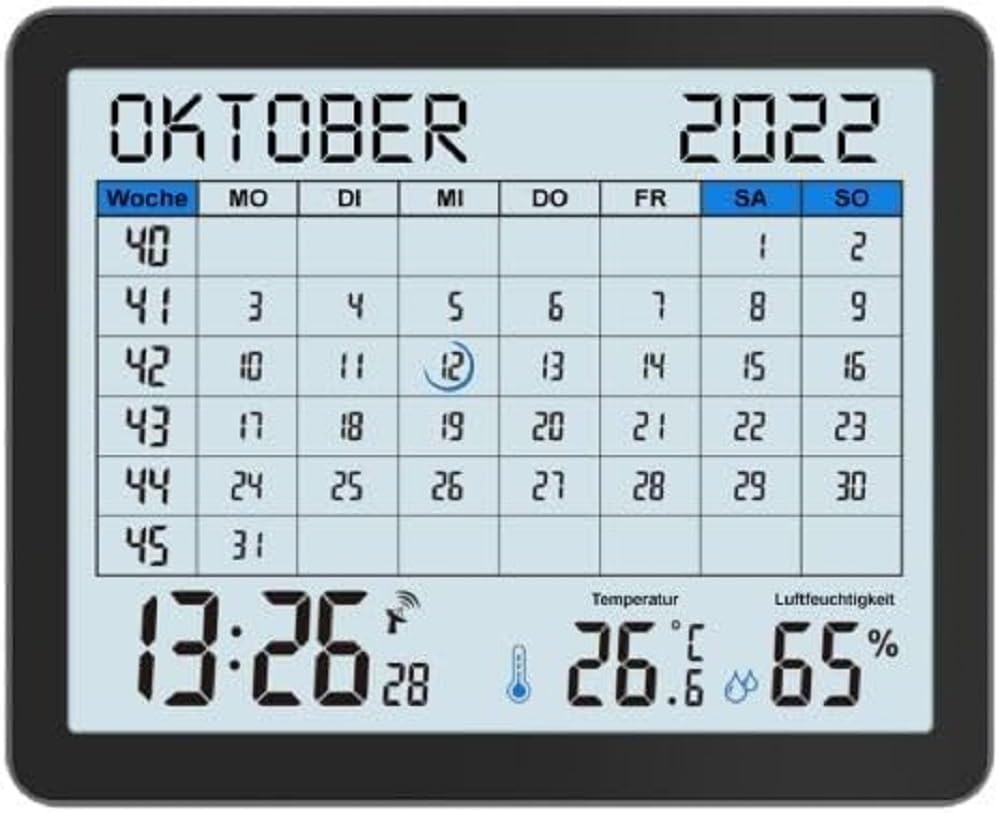
Image of the techno line WT2600 Digital Calendar packaging, showing the device and its key features.
4 製品の特徴
The techno line WT2600 Digital Calendar offers the following key features:
- DCF-77 Radio-Controlled Clock: Automatic time synchronization for precise timekeeping, with an option for manual setting.
- 12/24時間表示: 希望する時間形式を選択します。
- カレンダー表示: 現在の日付、曜日、月を表示します。
- 7-Language Month Display: Choose from seven languages for the month display.
- 室内温度表示: 室内温度を摂氏 (°C) または華氏 (°F) で表示します。
- Indoor Humidity Display: Displays the current indoor humidity level.
- MIN/MAX Display: Records and displays the minimum and maximum temperature and humidity values.
- スヌーズ機能付きデュアルアラーム: Set two independent alarms with a convenient snooze function.
- 低バッテリーインジケーター: 電池の交換が必要になると警告します。
- 多彩な配置: Designed for both wall mounting and table standing.

フロント view of the techno line WT2600 Digital Calendar display, showing the calendar grid, current time, temperature, and humidity.
5. セットアップ
5.1 バッテリーの取り付け
- ユニットの背面にある電池ボックスを見つけます。
- 電池ボックスのカバーを開きます。
- Insert the required batteries (e.g., 2 x AAA, not specified in data, common for such devices) according to the polarity markings (+ and -).
- 電池カバーをしっかりと閉じてください。
5.2 Initial Power On and DCF-77 Signal Reception
Upon battery insertion, the device will power on and automatically begin searching for the DCF-77 radio signal. This process may take several minutes. For optimal reception, place the unit near a window and away from electronic interference.
- A signal icon (e.g., an antenna symbol) will flash during signal search.
- Once the signal is received, the time and date will be set automatically, and the signal icon will become solid.
- If no signal is received after 10-15 minutes, try repositioning the unit.
5.3 手動の時刻と日付の設定
If automatic synchronization is not desired or unsuccessful, you can set the time and date manually.
- Press and hold the 'SET' button (or similar, refer to device buttons) for a few seconds to enter manual setting mode.
- 「+」または「-」ボタンを使用して、点滅している値(時間、分、年、月、日など)を調整します。
- Press 'SET' again to confirm the current setting and move to the next adjustable parameter.
- すべての設定が完了するまで繰り返します。
5.4 言語設定
To change the display language for the month:
- Enter the setting mode (e.g., by pressing 'SET').
- Navigate through the settings until the language option appears.
- Use the '+' or '-' buttons to cycle through the available 7 languages.
- 選択内容を確認してください。
6.運用
6.1 View時間、日付、温度、湿度
The main display continuously shows the current time, date, indoor temperature, and indoor humidity. You can switch between 12-hour and 24-hour time formats by pressing a dedicated button (e.g., '12/24H' or 'MODE').
6.2 アラームの設定
The device features two independent alarms.
- Press the 'ALARM' button (or similar) to view アラーム1回。
- Press and hold 'ALARM' to enter Alarm 1 setting mode.
- Use '+' or '-' to adjust the hour and minute, pressing 'ALARM' to confirm each.
- Repeat for Alarm 2.
- To activate/deactivate an alarm, press 'ALARM' repeatedly until the alarm icon appears/disappears.
6.3 スヌーズの使用
When an alarm sounds, press the 'SNOOZE' button (or similar, often a large button on top) to temporarily silence the alarm. The alarm will sound again after a few minutes (typically 5-10 minutes). To stop the alarm completely, press any other button.
6.4 MIN/MAX Display Function
The device records the minimum and maximum temperature and humidity values since the last reset.
- Press the 'MIN/MAX' button (or similar) once to view 記録された最大値。
- もう一度押すと view 記録された最小値。
- To reset the MIN/MAX records, press and hold the 'MIN/MAX' button while viewレコードを作成します。

Close-up of the techno line WT2600 Digital Calendar display, highlighting the time, temperature, and humidity readings.
7. メンテナンス
7.1 クリーニング
ソフトでデバイスを拭いてください、damp 布で拭いてください。研磨剤入りの洗剤や溶剤はディスプレイやコンピューターを損傷する恐れがあるため使用しないでください。asing.
7.2 電池の交換
When the low battery indicator appears on the display, replace all batteries with new ones of the same type. Follow the battery installation steps in Section 5.1.
8。 トラブルシューティング
- 表示なし: 電池の極性を確認し、電池が新しいものであることを確認します。
- 時刻/日付が正しくありません: Ensure the DCF-77 signal icon is solid. If not, reposition the unit or set the time manually (Section 5.3). Check your time zone setting if applicable (not explicitly mentioned in data, but common).
- 温度/湿度の測定値が不正確であると思われる場合: Ensure the unit is placed in a location with good air circulation, away from direct heat sources or drafts. Allow some time for readings to stabilize after initial setup or relocation.
- アラームが鳴らない: Verify that the alarm is activated (alarm icon displayed) and the alarm time is set correctly.
9. 仕様
| 特徴 | 仕様 |
|---|---|
| モデル番号 | WT2600 |
| 寸法(長さ×幅×高さ) | 17.3 x 3.81 x 14 cm |
| 重さ | 380グラム |
| 色 | 黒 |
| 材料 | プラスチック |
| 電源 | 電池駆動 |
| 表示タイプ | デジタル |
| 屋内/屋外での使用 | 屋内 |
10. 保証とサポート
Information regarding product warranty and customer support was not available in the provided product data. Please refer to the retailer or manufacturer's official web保証範囲とサポート オプションの詳細については、サイトをご覧ください。