EBTOOLS EBTOOLSpxvk7fmb38
EBTOOLS LGA 1155 Motherboard User Manual
Model: EBTOOLSpxvk7fmb38
製品終了view
The EBTOOLS LGA 1155 Motherboard is designed for desktop PC systems, offering robust performance and extensive connectivity. It features a multiphase power chipset for stable CPU performance and supports 2nd/3rd generation LGA1155 Pin Series Processors. This Mini ITX motherboard provides a high-definition visual experience through its VGA and HD Multimedia Interface outputs.
主な機能は次のとおりです。
- LGA 1155 CPU Slot: Designed for stable performance with compatible processors.
- Multiphase Power: Ensures stable and accurate power delivery to the CPU.
- HD Interfaces: Equipped with VGA and HD Multimedia Interface for digital HD video output.
- Channel DDR3: Features a DDR3 memory slot to enhance motherboard performance.
- 広範な接続性: Includes 6 USB2.0 interfaces and 4 SATA2.0 interfaces for various peripherals and storage devices.
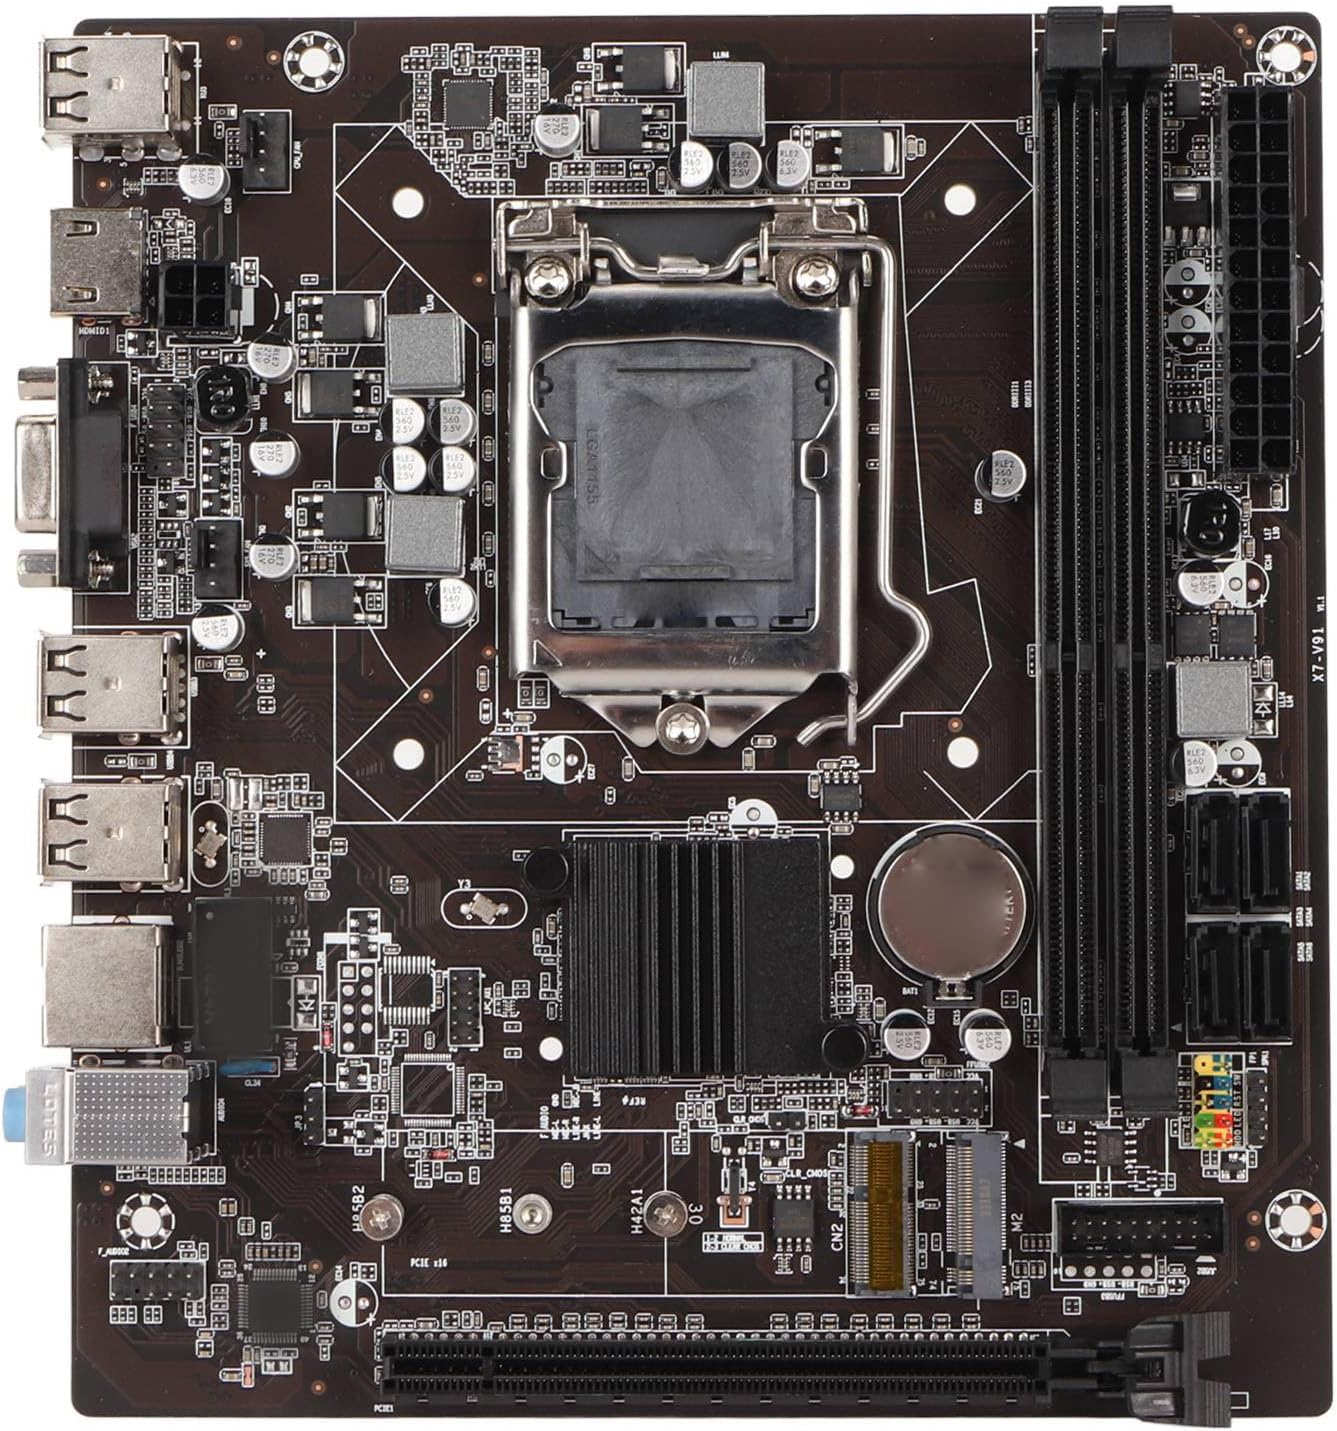
図1: トップダウン view of the EBTOOLS LGA 1155 Motherboard, showing the CPU socket, RAM slots, and various ports.
セットアップとインストール
This section provides instructions for installing your EBTOOLS LGA 1155 Motherboard into a compatible PC case and connecting essential components.
パッケージ内容
Before beginning installation, ensure all components listed below are present in your package:
- 1 x LGA 1155 Motherboard
- 金属I/Oプレート×1
- 1 x Connecting Wire (likely SATA data cable)

Figure 2: The motherboard alongside its included metal I/O plate and a connecting wire, typically a SATA data cable.
インストール手順
- ケースを準備する: Ensure your PC case is compatible with Mini ITX motherboards. Install the metal I/O plate into the designated slot at the rear of the case.
- CPU をインストールします。 Carefully open the CPU socket retention arm. Align the triangular marker on your LGA 1155 processor with the corresponding marker on the motherboard's socket. Gently place the CPU into the socket, ensuring it sits flush. Close the retention arm to secure the CPU.
- CPU クーラーを取り付けます。 Apply thermal paste to the CPU (if not pre-applied on the cooler). Mount your compatible LGA 1155 CPU cooler according to its manufacturer's instructions.
- RAMをインストールします: Open the clips on the DDR3 memory slots. Align the notch on your DDR3 RAM module with the key in the slot. Press firmly on both ends of the RAM module until the clips snap into place. This motherboard supports 2 x DDR3 slots.
- マザーボードをマウントします。 Carefully place the motherboard into the PC case, aligning the screw holes on the motherboard with the standoffs in the case. Secure the motherboard with screws.
- 接続電源: Connect the 24-pin ATX power connector from your power supply to the motherboard. Connect the 4-pin or 8-pin CPU power connector (if applicable) to the motherboard.
- ストレージデバイスを接続する: Use the provided connecting wire (SATA cable) to connect your SATA storage devices (HDD/SSD) to the SATA2.0 ports on the motherboard. This motherboard has 4 SATA2.0 interfaces.
- フロントパネルケーブルを接続します。 Connect the power button, reset button, USB ports, and audio jacks from your PC case's front panel to the corresponding headers on the motherboard. Refer to your case manual for specific pin layouts.
- 拡張カードをインストールします。 If using a dedicated graphics card or other expansion cards, insert them into the PCIE X16 slot or other extended interfaces (1 x , 1 x M.2) as needed.
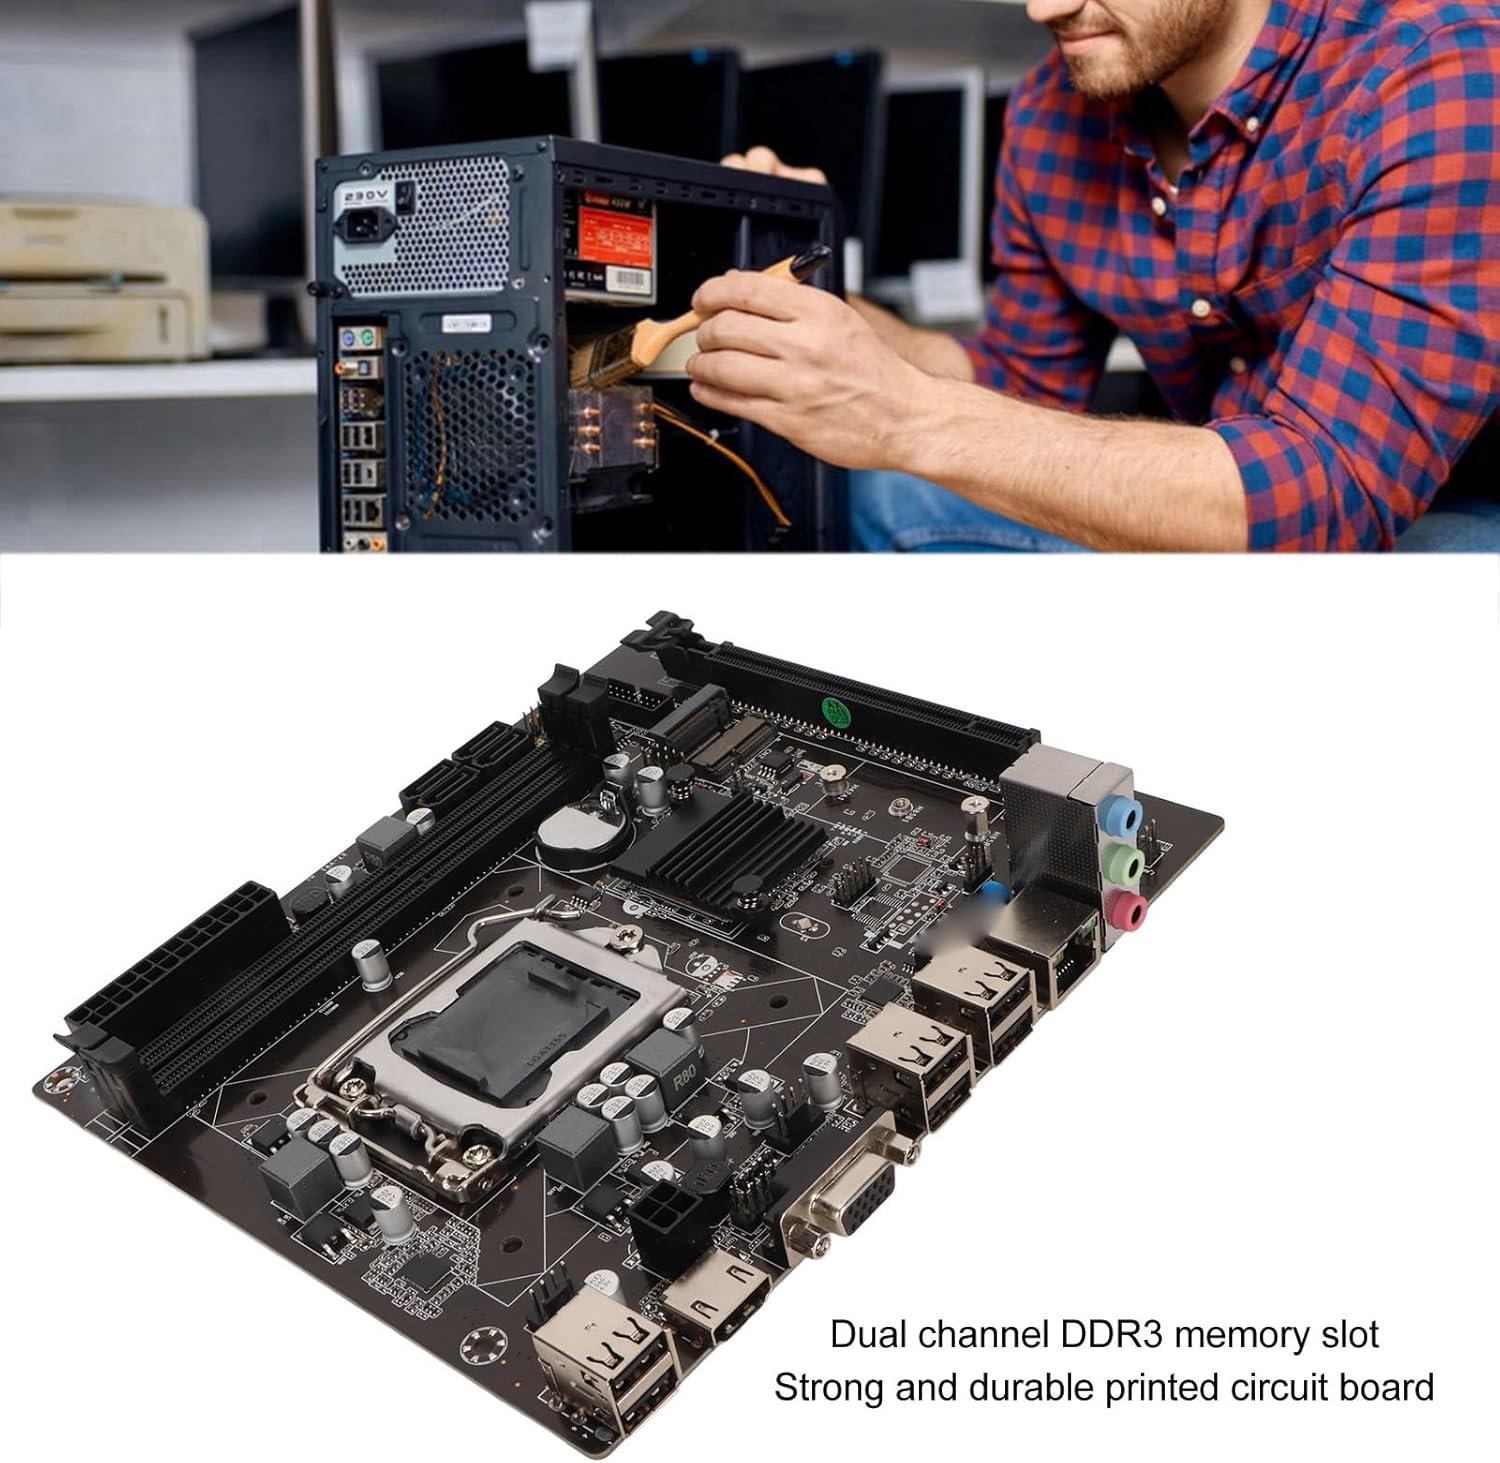
Figure 3: A user performing an installation within a PC case, demonstrating the typical environment for motherboard setup.

図4:詳細 view of the LGA 1155 CPU socket and adjacent DDR3 memory slots, crucial areas for component installation.
運用ガイドライン
Once the motherboard and other components are installed, the system is ready for operation. This motherboard supports various operating systems compatible with 2nd/3rd Gen LGA1155 processors.
BIOS/UEFI構成
Upon first boot, you may need to enter the BIOS/UEFI setup to configure boot order, system time, and other settings. Typically, you can access the BIOS by pressing 削除 or F2 during the initial boot screen.
ドライバーのインストール
After installing your operating system, it is essential to install the necessary drivers for the motherboard's components, including chipset, network card, and integrated graphics (if used). These drivers are usually provided on a CD/DVD with the motherboard or can be downloaded from the manufacturer's webサイト。
接続性
Utilize the available ports for your peripherals:
- USB 2.0ポート: For connecting keyboards, mice, external drives, and other USB devices.
- VGA/HD Multimedia Interface: ディスプレイを接続します。
- イーサネットポート: For wired network connectivity (100M Netword Card).
- オーディオジャック: スピーカー、ヘッドフォン、マイク用。
メンテナンス
適切なメンテナンスを行うことで、マザーボードの寿命が延び、安定したシステムパフォーマンスが確保されます。
- 清潔に保つ: Regularly clean dust from inside your PC case, especially from the motherboard and CPU cooler fins, using compressed air. Dust accumulation can lead to overheating.
- 適切な空気の流れを確保します。 Make sure your PC case has adequate ventilation and that fans are functioning correctly to prevent heat buildup.
- BIOS アップデート: 定期的にメーカーの webBIOS/UEFIアップデートについては、こちらのサイトをご覧ください。アップデートにより、互換性、安定性、パフォーマンスが向上する場合があります。アップデート手順をよく読んでください。
- ドライバーの更新: 最適なパフォーマンスと新しいソフトウェアおよびハードウェアとの互換性を確保するために、システム ドライバーを最新の状態に保ってください。
- CMOSバッテリー: The motherboard uses a CR2032 battery for CMOS settings. If your system consistently loses time or BIOS settings, the battery may need replacement.
トラブルシューティング
このセクションでは、マザーボードで発生する可能性のある一般的な問題について説明します。
- 電源なし/起動なし:
- すべての電源接続(24 ピン ATX、CPU 電源)を確認します。
- 電源が機能しており、オンになっていることを確認します。
- フロントパネルの電源ボタンとマザーボードの接続を確認します。
- 表示なし:
- Ensure the monitor is connected to the correct video output (VGA or HD Multimedia Interface).
- Reseat RAM modules. Try booting with one RAM stick if you have multiple.
- Reseat the CPU and check for bent pins (handle with extreme care).
- 専用のグラフィック カードを使用している場合は、カードが正しく装着され、電源が供給されていることを確認してください。
- システムの不安定性/クラッシュ:
- CPUとGPUの温度を確認し、適切な冷却を確保してください。
- メモリ診断ツールを実行して、障害のある RAM がないか確認します。
- すべてのドライバーが正しくインストールされ、最新であることを確認します。
- Check for loose connections or components.
- USBデバイスが認識されない:
- USB ドライバーがインストールされていることを確認します。
- 別の USB ポートを試してください。
- Check BIOS settings for USB controller enablement.
仕様
Detailed technical specifications for the EBTOOLS LGA 1155 Motherboard:
| 特徴 | 仕様 |
|---|---|
| アイテムタイプ | LGA 1155 マザーボード |
| 材料 | プリント基板、金属 |
| 内蔵バッテリー | CR2032 x 1 (240mAh) |
| CPU サポート | 2nd/3rd Gen LGA1155 Pin Series Processors (for Celeron, for , for Core) |
| チップセット | H61 Chipset Series |
| メモリスロット | DDR2 x 3 |
| 最大メモリ容量 | 16GB |
| USBインターフェース | 6 x USB2.0, USB Pin x 1 |
| SATAインターフェース | 4 x SATA2.0 |
| ネットワークカード | 100M Network Card |
| グラフィックカードスロット | 1 x PCIE X16 |
| 拡張インタフェース | 1 x , 1 x M.2 |
| パッケージ寸法 | 10.2 x 7.83 x 2.05インチ |
| アイテム重量 | 1.16ポンド |
| モデル番号 | EBTOOLSpxvk7fmb38 |
| ASIN | B0CKVL89BD |

Figure 5: An angled perspective of the motherboard, showcasing its compact Mini ITX form factor and port layout.
保証とサポート
For warranty information and technical support, please refer to the official EBTOOLS web購入サイトをご覧いただくか、カスタマーサービスまでお問い合わせください。購入証明書としてレシートを保管してください。
While specific warranty details are not provided in this manual, general product warranties typically cover manufacturing defects for a limited period from the date of purchase.
追加の保護については、利用可能な保護プランを検討してください。
- 3年間の保護プラン
- 4年間の保護プラン
- コンプリートプロテクト(月額プラン)
These plans are offered separately and provide extended coverage beyond the standard manufacturer's warranty.
メーカー: EBTOOLS
発売日: 11年2023月XNUMX日
公式製品ビデオ
現時点ではこの製品について販売者からの公式製品ビデオはありません。