1. はじめに
The LIONWEI USB C Docking Station is a versatile 10-in-1 hub designed to expand the connectivity of your laptop, whether it features a USB-C or USB-A port. This docking station allows for dual HDMI display extension, high-speed data transfer, reliable network connectivity, and power delivery, enhancing your productivity and multimedia experience.

Image: The LIONWEI USB C Docking Station, showcasing its various ports and connectivity options including dual HDMI, USB 3.0, USB 2.0, SD/Micro SD card slots, Gigabit Ethernet, and a 3.5mm audio/mic jack.
2 製品の特徴
This docking station offers a comprehensive set of ports to meet diverse connectivity needs:
- 10-in-1接続: Includes 2 HDMI ports, 2 USB 3.0 ports, 1 USB 2.0 port, 100W USB-C Power Delivery (PD), Gigabit Ethernet, SD & Micro SD card slots, and a 3.5mm audio/mic jack.
- デュアルHDMIディスプレイ: Supports extended dual HDMI displays with different content simultaneously, compatible with both macOS (M1/M2/M3 chips included) and Windows systems.
- ユニバーサル互換性: Features both USB-C and USB-A interfaces, allowing connection to a wide range of laptops including MacBook Pro/Air, Dell, HP, and Lenovo.
- 高速データ転送: Equipped with 2 USB 3.0 ports offering 5Gbps data transfer speeds, and dedicated SD/Micro SD slots for fast file 転送。
- ギガビットイーサネット: Provides a stable and fast wired network connection up to 1000Mbps, ideal for streaming and gaming.
- 電力供給: The USB-C PD 3.0 port supports up to 100W input, delivering up to 85W output to charge compatible laptops, tablets, or smartphones.

画像: 詳細な view of the LIONWEI USB C Docking Station, labeling each of its 10 ports including PD 3.0, Audio/Mic, HDMI 2, HDMI 1, RJ45, USB 2.0, USB A 3.0/USB C 3.0, and SD & Micro SD slots.
3. セットアップとドライバーのインストール
This docking station requires driver installation for full functionality, especially for dual monitor display. Please follow the steps below based on your operating system.
3.1 ドッキングステーションの接続
The LIONWEI USB C Docking Station is compatible with both USB-C and USB-A enabled laptops. Use the appropriate connector for your device.

Image: The docking station connected to a MacBook via USB-C and another laptop via USB-A, demonstrating its broad compatibility.
3.2 ドライバのインストール
The necessary drivers can be downloaded from the official webサイト: www.mct.com.tw/

Image: A diagram outlining the three main steps for driver installation: visit the website, select your operating system, and then install and restart your laptop.
macOS システムの場合:

Image: A visual guide titled 'How to install the Driver for macOS', showing a laptop connected to two external monitors.
- ステップ1: Open the downloaded driver file (e.g., .pkg document) and double-click it to begin the installation process.
- ステップ2: Follow the on-screen prompts to install the driver. This typically involves clicking 'Continue' and 'Install' through several screens.
- ステップ3: After the installation is successful, please restart your laptop.
- ステップ4: After restarting, you may need to allow the driver to load software. Go to 設定 > プライバシーとセキュリティ, find the blocked system software message, and click 'Allow'.
- ステップ5: To enable screen recording for display functionality, go to 設定 > プライバシーとセキュリティ > スクリーン録画, and grant permission to the USB Display application.

Image: Screenshot of a macOS Finder window showing the downloaded driver file, with an arrow pointing to double-click it.

Image: A collage of screenshots showing the macOS driver installation wizard, guiding the user through introduction, read me, installation type, and installation steps.

Image: A screenshot of the macOS installer showing a successful installation message and a prompt to restart the Mac.

Image: A screenshot of macOS System Settings, Privacy & Security section, highlighting where to allow system software from 'USB Display Device Driver'.

Image: Screenshots illustrating how to activate/update the driver system extension and grant 'Screen Recording' access to 'USB Display' in macOS Privacy & Security settings.
Windows システムの場合:

Image: A visual guide titled 'How to install the Driver for Windows', showing a laptop connected to two external monitors.
- ステップ1: Open the downloaded driver file (e.g., .exe document) and double-click it to start the installation wizard.
- ステップ2: Follow the instructions in the InstallShield Wizard to complete the driver installation. This typically involves accepting the license agreement and proceeding with the installation.
- ステップ3: Once the installation is complete, please restart your laptop for the changes to take effect.

Image: A screenshot of the Windows installer preparing to launch the setup wizard for the USB Graphics Device & GigaLAN driver.

Image: A series of screenshots from the Windows InstallShield Wizard, showing the welcome screen, license agreement, and installation progress for the USB Graphics Device & GigaLAN driver.
Image: A screenshot of the Windows InstallShield Wizard indicating that the installation is complete and prompting the user to restart their computer.
4. 操作手順
4.1 Dual Monitor Display
The docking station supports extending your desktop across two external monitors, allowing for a multi-display setup. Ensure drivers are installed as per Section 3.2.
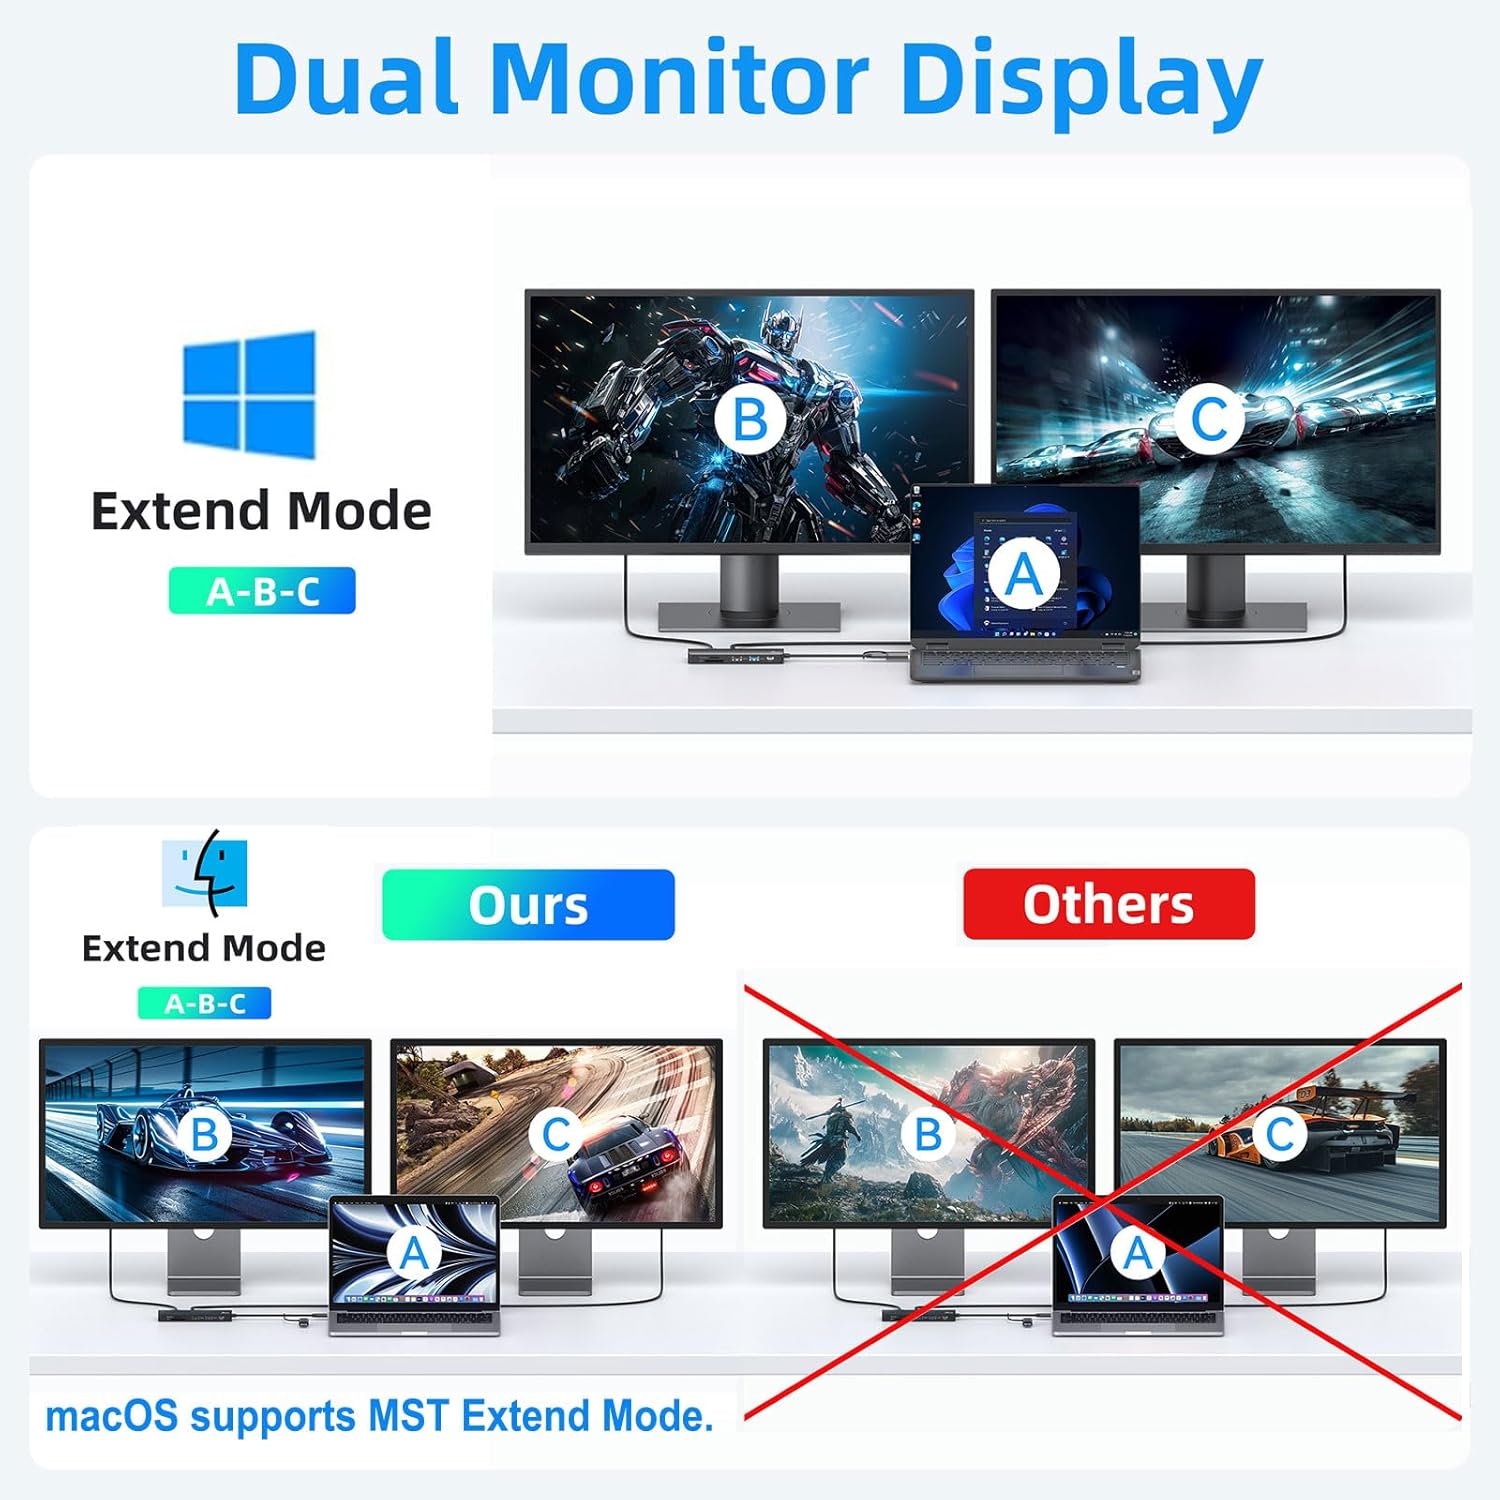
Image: An illustration of a laptop connected to two external monitors, demonstrating the extended display mode (A-B-C) for both Windows and macOS systems.
macOSの場合:
After driver installation and granting screen recording permissions, connect your HDMI monitors to the docking station. macOS will automatically detect the displays. You can arrange them in システム設定 > ディスプレイ.

Image: A MacBook connected to two external monitors, illustrating a dual display setup for macOS, with a note indicating driver installation is needed.
Windowsの場合:
Connect your HDMI monitors to the docking station. Right-click on your desktop and select 表示設定 to configure your displays (Extend, Duplicate, or Second screen only).

Image: A Windows laptop connected to two external monitors, illustrating a dual display setup for Windows, with a note indicating driver installation is needed.
4.2 電力供給(PD)
Connect your laptop's power adapter (above 65W recommended) to the USB-C PD port on the docking station to charge your laptop while using the hub. The docking station supports up to 100W input and 85W output.
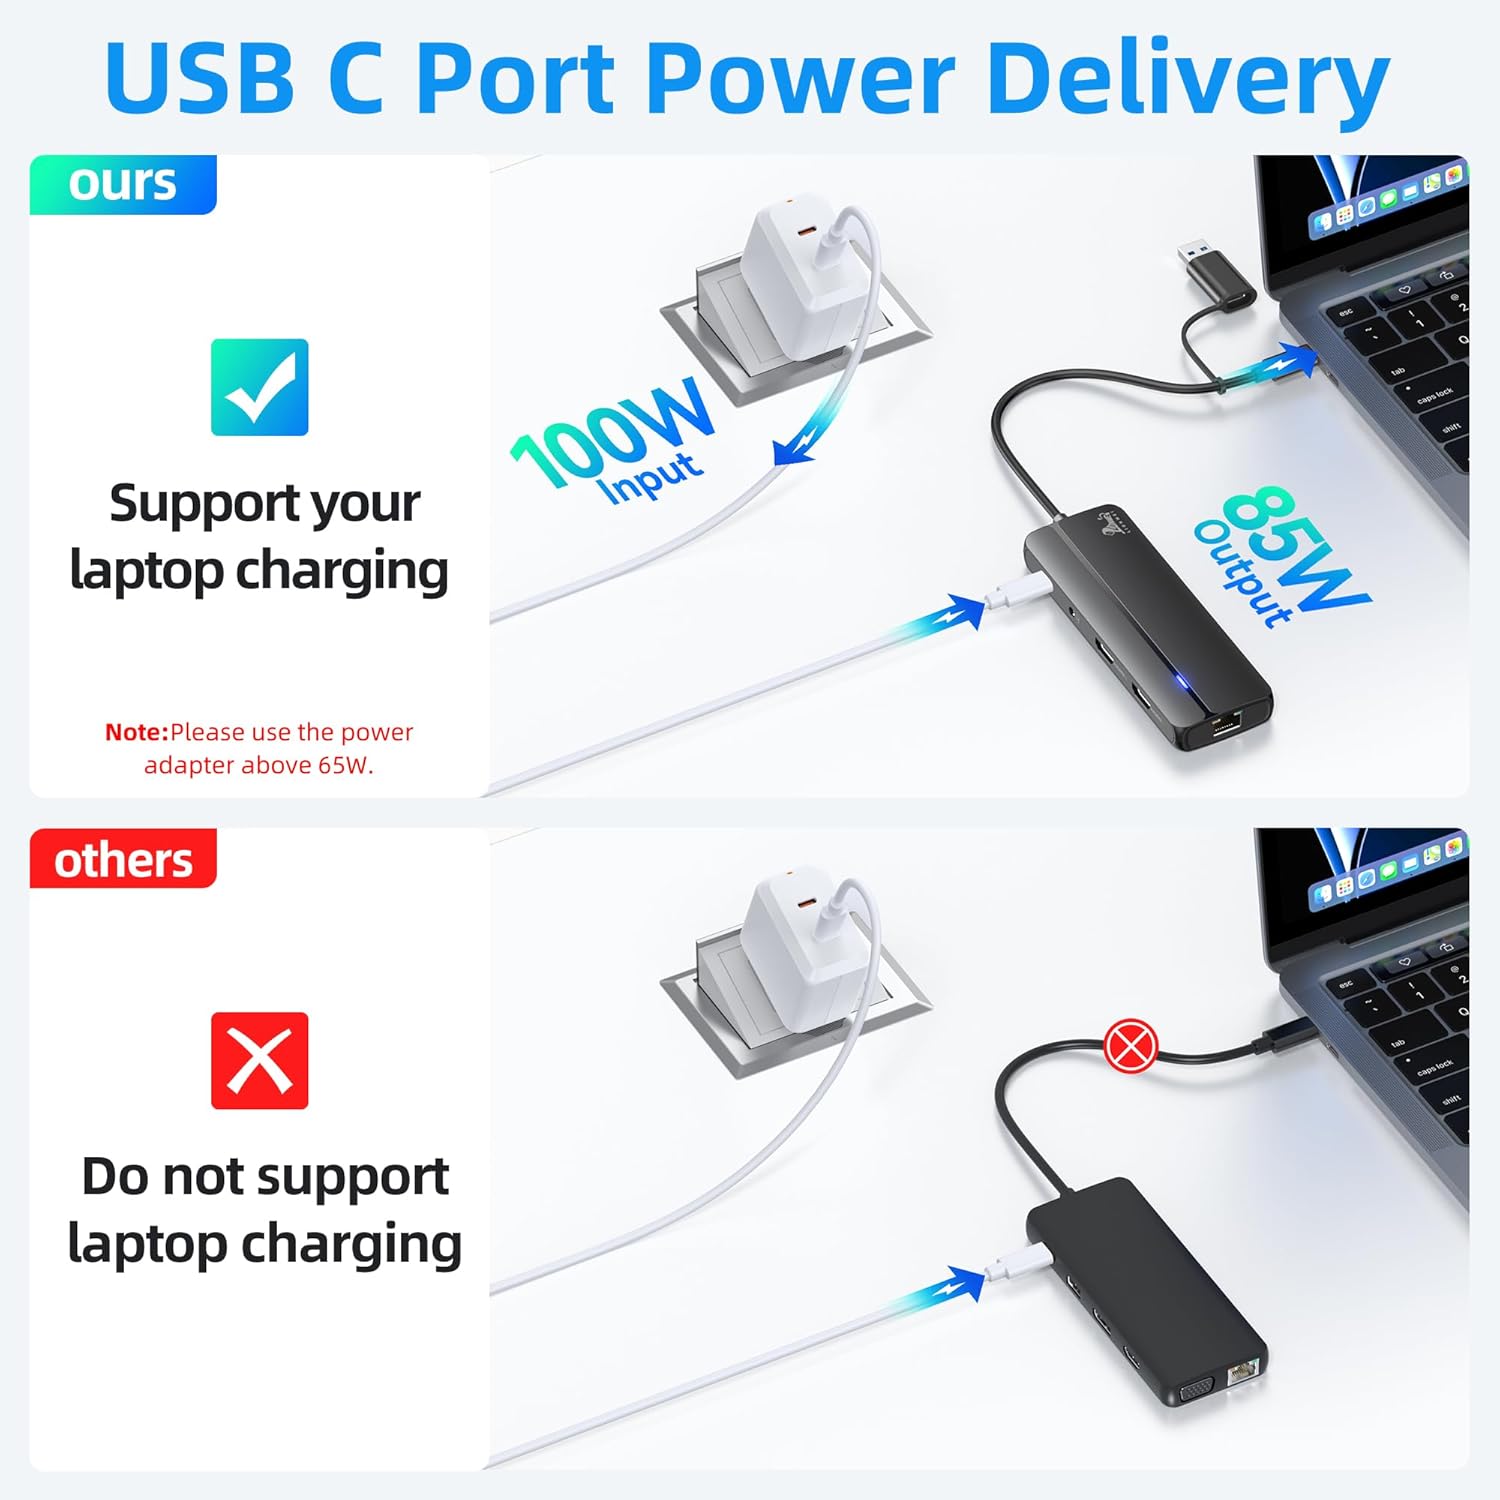
Image: An illustration showing a power adapter connected to the docking station, which then charges a laptop, demonstrating 100W input and 85W output power delivery.

Image: A visual representation of the USB-C Power Delivery feature, showing power flowing from a wall adapter through the docking station to a laptop, with a note that the power adapter is not included.
4.3データ転送
Utilize the USB 3.0 ports for high-speed data transfer up to 5Gbps, perfect for external hard drives, SSDs, and flash drives. The SD and Micro SD card slots allow for quick access to media files.

Image: A laptop connected to the docking station, which is then connected to a USB flash drive and an SD card, illustrating multi-data transmission at 5Gbps.

Image: A visual representation of the docking station facilitating multiple and faster data transfers, showing connections to a smartphone, HDD enclosure, printer, mouse, USB flash drive, and keyboard.
4.4 Gigabit Ethernet & Audio/Mic
Connect an Ethernet cable to the RJ45 port for a stable and fast wired internet connection. The 3.5mm audio/mic jack allows you to connect headphones or speakers for audio output and a microphone for input.

Image: A laptop connected to the docking station, which is then connected to an Ethernet cable for 1000Mbps network speed and headphones for audio, highlighting the Gigabit Ethernet and 3.5mm Audio/Mic features.
Image: A laptop connected to the docking station, which is then connected to an Ethernet cable, illustrating reliable RJ45 Ethernet connectivity at 1000Mbps.
5. 仕様
| 特徴 | 詳細 |
|---|---|
| パッケージ寸法 | 7.95 x 2.36 x 0.75インチ |
| アイテム重量 | 3.52オンス |
| ASIN | B0CF1SM74M |
| ブランド | ライオンウェイ |
| 色 | 銀 |
| ハードウェアインターフェイス | 3.5mm Audio, Ethernet, HDMI, MicroSD, USB 2.0, USB 3.0 |
| 対応デバイス | Dell Latitude, HP EliteBook, Laptops, MacBook Air, MacBook Pro |
| USBポート合計 | 3 |
| ポート数 | 10 |
| 合計HDMIポート | 2 |
| メーカー | ライオンウェイ |
| 初回利用可能日 | 13年2024月XNUMX日 |
6。 トラブルシューティング
- No Display/Monitors Not Lighting Up:
- Ensure the necessary drivers are installed correctly for your operating system (refer to Section 3.2).
- After driver installation, a system reboot is often required for the displays to function properly.
- Verify that the HDMI cables are securely connected to both the docking station and the monitors.
- Check your laptop's display settings to ensure the external monitors are detected and configured for 'Extend' or 'Duplicate' mode.
- Driver Installation Blocked (macOS):
- If macOS blocks the driver, go to システム設定 > プライバシーとセキュリティ and allow the system software from 'USB Display Device Driver' to load (refer to Section 3.2, Step 4 for macOS).
- Ensure 'Screen Recording' permission is granted to the USB Display application in システム設定 > プライバシーとセキュリティ > スクリーン録画 (refer to Section 3.2, Step 5 for macOS).
- Headphone Jack Emits Static Noise:
- Ensure the audio cable is fully inserted into the 3.5mm jack.
- Test with different headphones or speakers to rule out issues with the audio device.
- Check your computer's audio settings to ensure the correct output device is selected (e.g., 'USB Audio Device').
- コンピュータを再起動してみてください。
- データ転送速度が遅い:
- Ensure you are using the USB 3.0 ports for high-speed devices. The USB 2.0 port offers slower speeds.
- Verify that the connected device (e.g., external hard drive) supports USB 3.0 speeds.
- PDポート経由でノートパソコンが充電されない:
- 電源アダプターがドッキング ステーションの PD ポートに接続されていることを確認します。
- 電源アダプターが十分な電力を供給していることを確認してくださいtage (above 65W is recommended).
- ノートパソコンが USB-C Power Delivery をサポートしていることを確認してください。
7. お手入れとメンテナンス
To ensure the longevity and optimal performance of your LIONWEI USB C Docking Station, please follow these care and maintenance guidelines:
- クリーニング: Use a soft, dry cloth to wipe the surface of the docking station. Avoid using liquid cleaners, aerosols, or harsh chemicals, as they may damage the device.
- ストレージ: ドッキング ステーションは、直射日光や極端な温度を避け、涼しく乾燥した場所に保管してください。
- 取り扱い: Avoid dropping or subjecting the docking station to strong impacts. Do not attempt to disassemble or modify the device, as this will void the warranty and may cause damage.
- ポート保護: When not in use, consider covering the ports to prevent dust and debris accumulation.
8. 保証とサポート
LIONWEI products are designed for reliability and performance. This product comes with an 18ヶ月保証 購入日から製造上の欠陥をカバーします。
For technical support, troubleshooting assistance, or warranty claims, please contact LIONWEI customer service. We offer 24時間オンラインサービス お問い合わせの対応をさせていただきます。
You can find more information and contact details on the official LIONWEI store page: LIONWEI Amazon Store