1. はじめに
This manual provides detailed instructions for the safe and efficient operation of your Weytoll 4-in-1 MIG/MMA/MAG/TIG 160A Welding Machine. Please read this manual thoroughly before using the equipment to ensure proper setup, operation, and maintenance. Keep this manual for future reference.
2. 安全に関する注意事項
警告:溶接作業は危険を伴います。怪我や死亡事故を防ぐため、必ず安全上の注意事項を守ってください。
- 目の保護: アーク光線から目を保護するために、必ず適切な遮光レンズを備えた溶接用ヘルメットを着用してください。
- 身体保護: 火花、熱、感電から身を守るために、耐火性の衣服、手袋、安全靴を着用してください。
- 換気: 健康に有害な溶接煙やガスを除去するために十分な換気を確保してください。
- 防火: 消火器を近くに置いてください。溶接エリアから可燃性物質をすべて除去してください。
- 電気安全: 溶接機が適切に接地されていることを確認してください。濡れた状態では操作しないでください。使用する前に、ケーブルに損傷がないか点検してください。
- ガスシリンダー: If using shielding gas, secure cylinders properly and handle them with care.
- 子供と傍観者: 溶接エリアに子供や関係者以外の人を近づけないでください。
3. パッケージ内容
開梱後、下記のすべての品目が揃っていること、また損傷がないことをご確認ください。不足または損傷のある品目がある場合は、直ちに販売店にご連絡ください。

図 3.1: 溶接機に付属するアクセサリ。
- 1 x Weytoll Welding Machine
- 電極ホルダー×1
- 1 x 300A Welding Clamp (グラウンドClamp)
- 1 x Roll of Welding Wire
- 1 x Welding Mask
- スチールブラシ×1
- ユーザーガイド(このマニュアル)1冊
4 製品の特徴
The Weytoll 4-in-1 Welding Machine is designed for versatility and performance, offering multiple welding processes in a compact unit.

図4.1:以上view of the welding machine's key features.
- Multifunctional Welding: Supports MIG (Gas & Gasless), MMA (Stick), MAG, and TIG welding processes.
- デジタルディスプレイ: Large digital screen for clear display of welding current/voltage and convenient operation.
- 調整可能なパラメータ: 溶接voltage and wire feed speed are adjustable to match material thickness.
- 複数の保護: Equipped with over-temperature, over-current, and over-voltage protection for enhanced safety and reliability.
- IGBTテクノロジー: Utilizes IGBT high-frequency inverter technology for stable electric arc, minimal splashing, and strong welding ability.
- 効率的な冷却: Features multiple exhaust holes and a built-in high-efficiency cooling fan to dissipate heat and extend machine lifespan.
5. セットアップ
5.1電源接続
- 機械の電源スイッチが「オフ」の位置にあることを確認してください。
- Connect the power cable to a suitable 220V power outlet. The machine requires a stable power supply.
5.2 グラウンドClamp 繋がり
- アース線を接続するamp cable to the appropriate terminal on the front panel of the welding machine.
- 地面を取り付けるclamp ワークピースまたは溶接テーブルにしっかりと固定し、良好な電気的接触を確保します。
5.3 溶接ワイヤの取り付け (MIG/MAG)
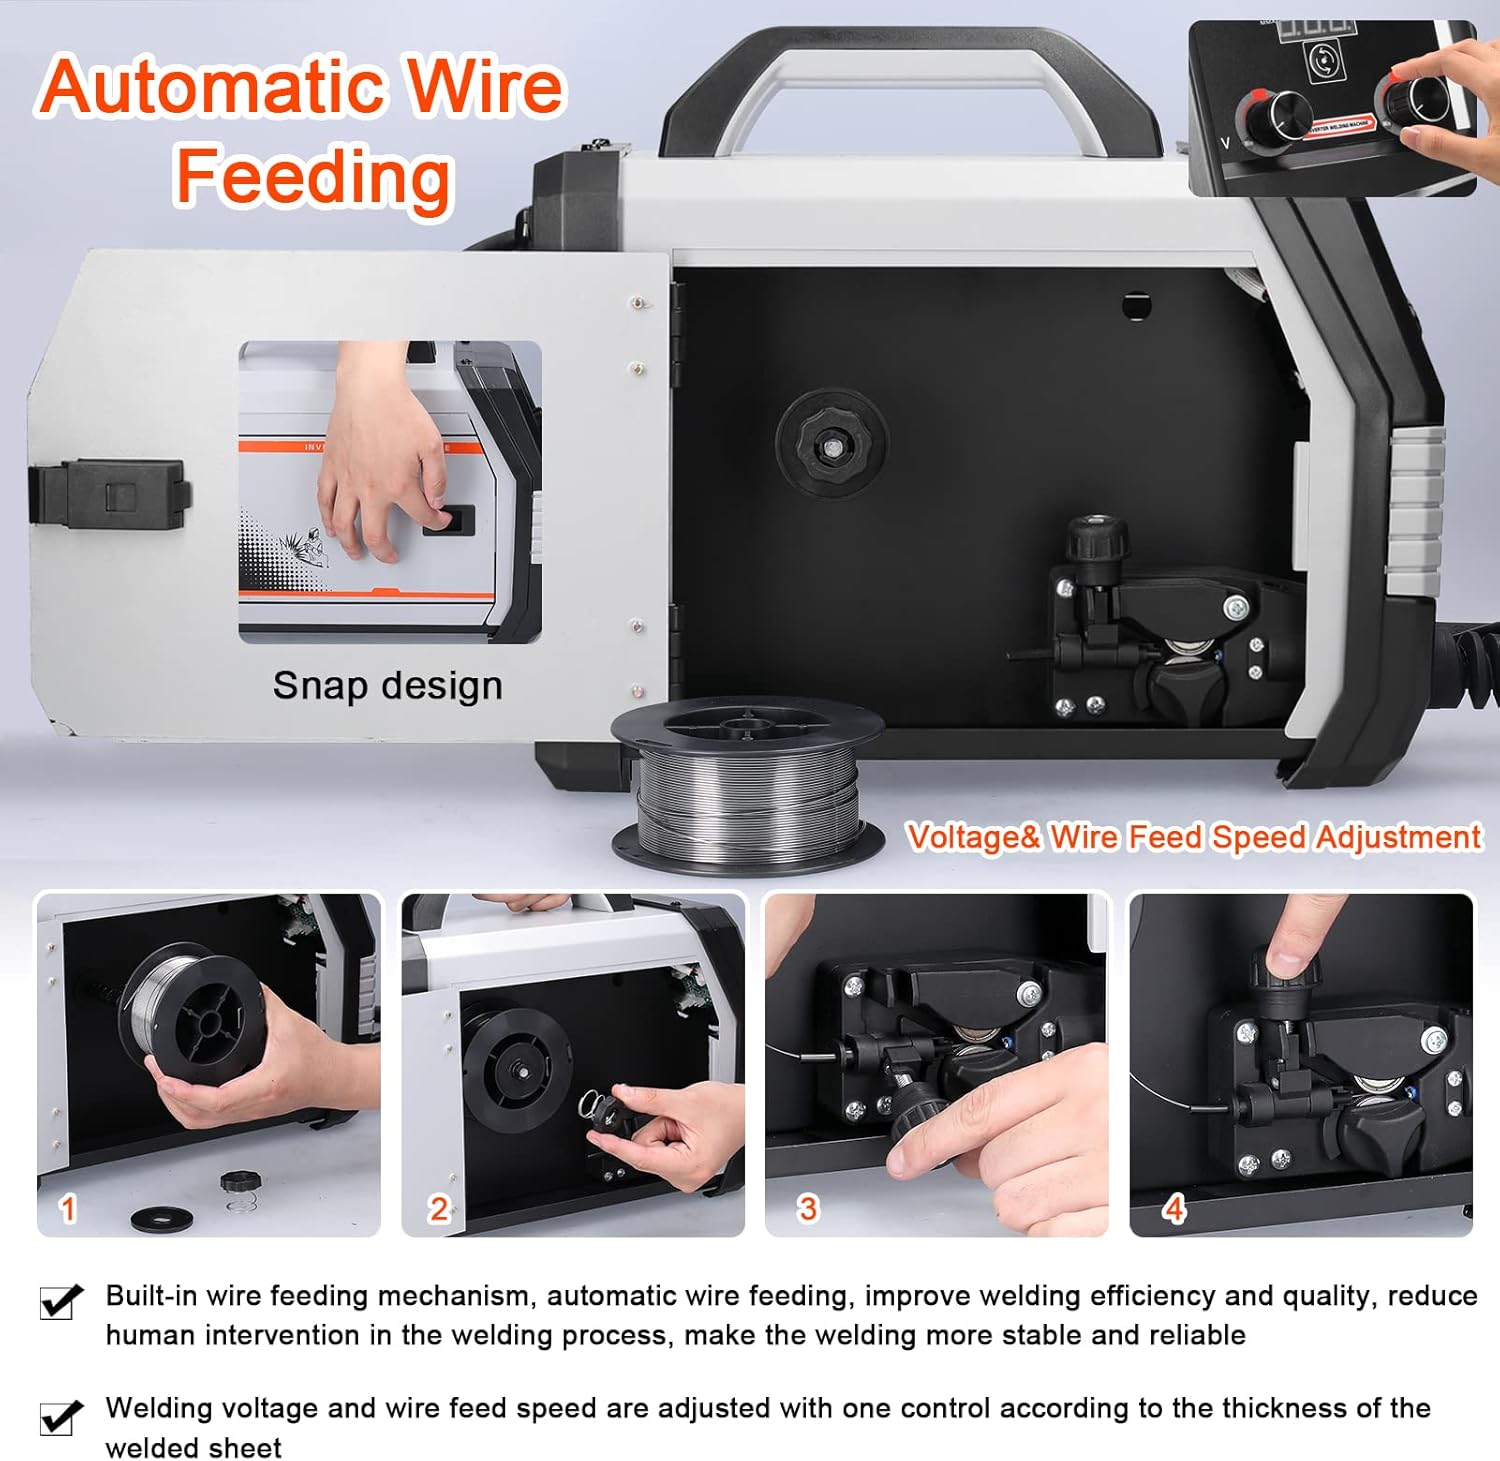
Figure 5.1: Automatic wire feeding mechanism and installation steps.
- Open the side cover of the machine to access the wire feeder compartment.
- 溶接ワイヤスプールをスピンドルに置き、自由に回転することを確認します。
- Thread the welding wire through the wire feeder mechanism, ensuring it passes through the drive rollers and into the liner.
- Adjust the tension of the drive rollers to prevent slipping or crushing of the wire.
- サイドカバーを閉じます。
5.4 Gas Connection (MIG/MAG with Gas)
- Connect the gas hose from your shielding gas cylinder (e.g., CO2 for MIG solid wire) to the gas input port on the rear of the welding machine.
- ガス漏れを防ぐために、すべての接続がしっかりと締まっていることを確認してください。
- Open the gas cylinder valve and adjust the flow rate using a regulator.
6. 操作手順
6.1 電源の投入とモードの選択

Figure 6.1: Front and rear panel controls.
- Turn the power switch to the "ON" position. The digital display will illuminate.
- Use the mode selection button (often labeled "MMA-TIG one piece switching" or similar) to choose your desired welding process: MIG, MMA, MAG, or TIG.
6.2 パラメータ調整

Figure 6.2: One-click mode conversion and weld exampレ。
- 現在/巻tage: Use the control knobs on the front panel to adjust the welding current (A) and voltage (V) according to the material thickness and welding process. The digital display will show the current settings.
- Wire Feed Speed (MIG/MAG): Adjust the wire feed speed knob. This is often linked to voltage for optimal MIG/MAG performance.
6.3 溶接プロセスの詳細
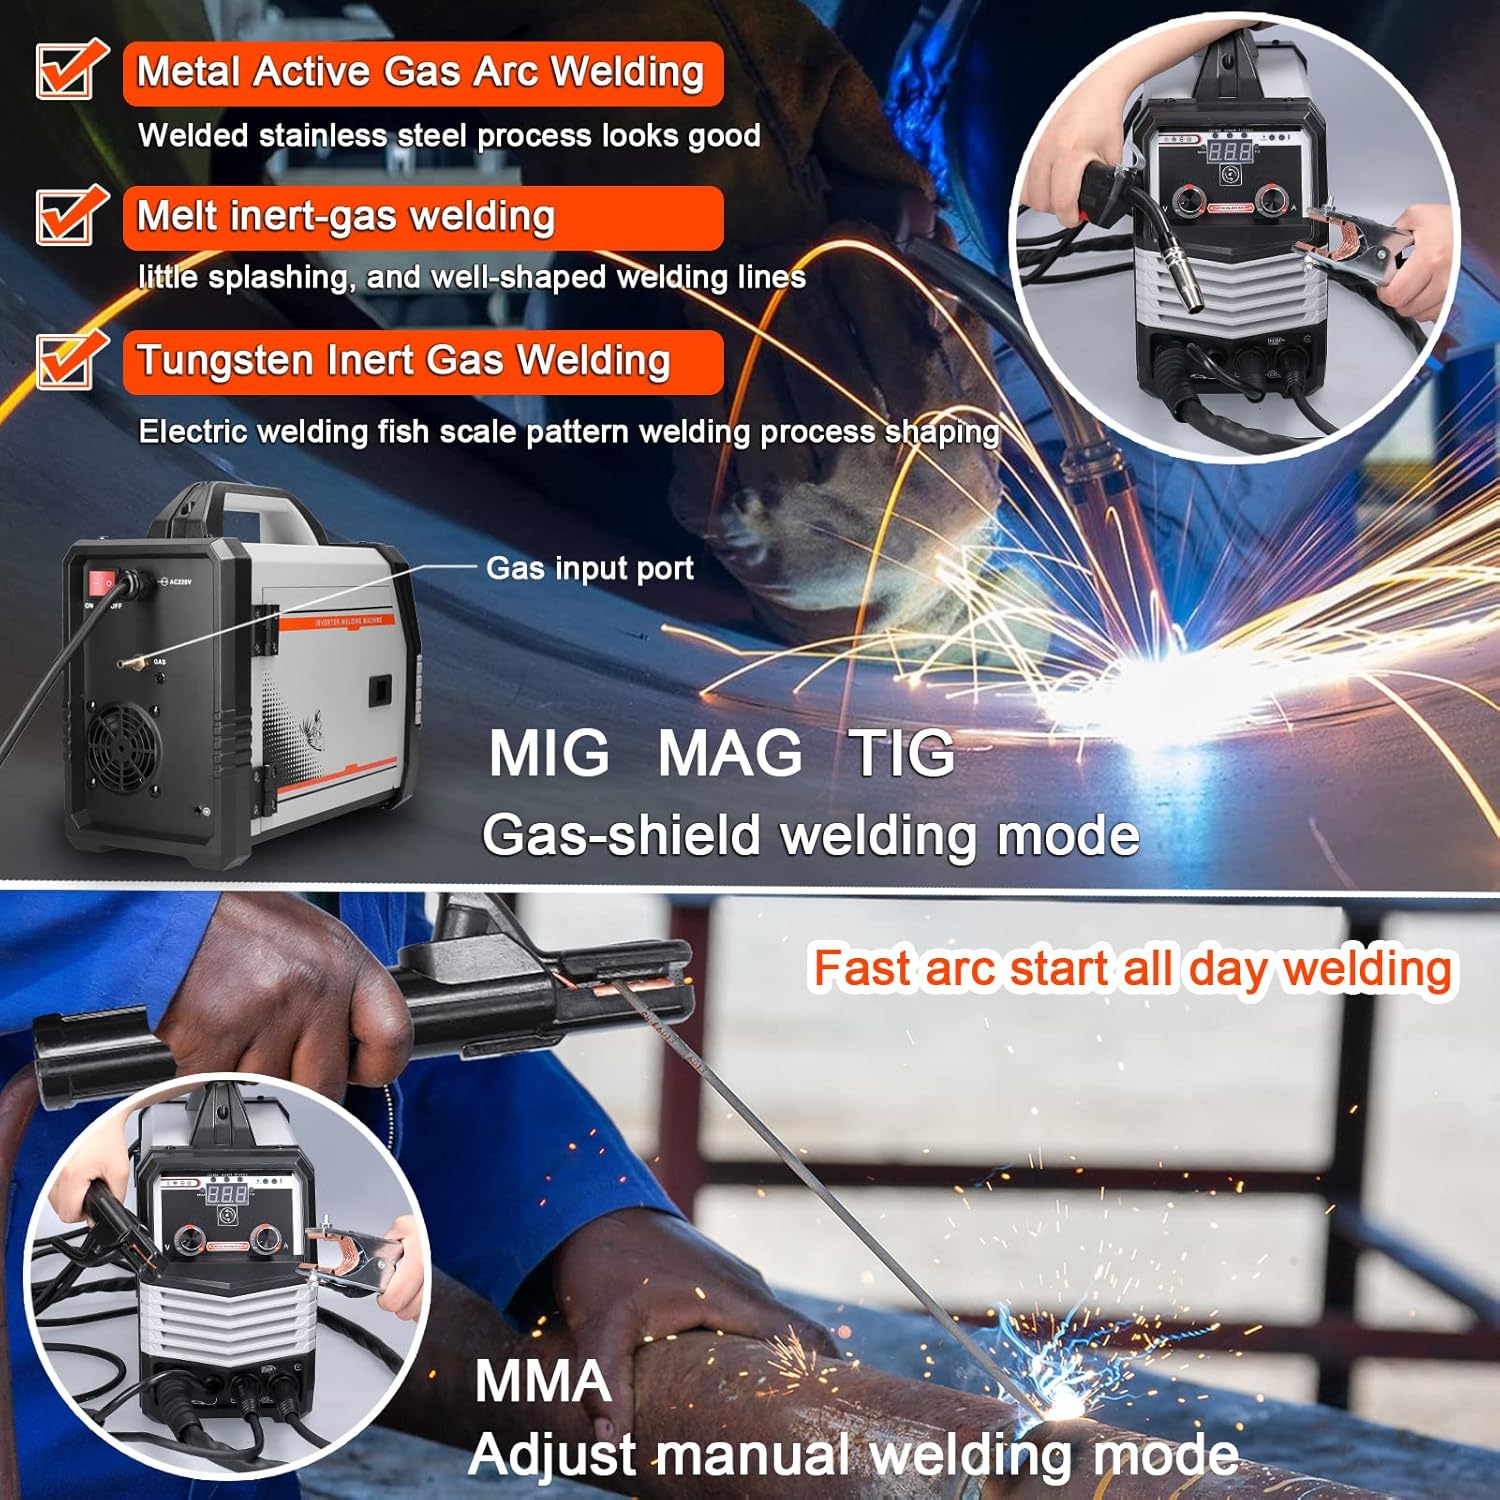
Figure 6.3: MIG/MAG/TIG and MMA welding in action.
6.3.1 MIG/MAG Welding (Gas-Shielded)
- Ensure gas cylinder is connected and gas flow is set.
- Use solid wire (e.g., 0.8mm for CO2 gas).
- MIG トーチのトリガーを押して、アークとワイヤの供給を開始します。
6.3.2 Gasless MIG Welding (Flux-Cored)
- No shielding gas required. Use flux-cored wire (e.g., 0.8mm - 1.0mm).
- Ensure polarity is set correctly for flux-cored wire (refer to wire manufacturer's instructions).
- MIG トーチのトリガーを押して、アークとワイヤの供給を開始します。
6.3.3 MMA(スティック)溶接
- 電極ホルダーケーブルをプラス(+)端子とアース端子に接続します。amp to the negative (-) terminal (or vice-versa, depending on electrode type).
- 電極をホルダーに挿入します。
- Strike the arc by lightly touching and quickly lifting the electrode from the workpiece.
- Recommended electrode thickness: 1.6mm - 3.2mm.
6.3.4 TIG溶接
- Connect the TIG torch (not included in standard package) and gas supply (Argon).
- Ensure the tungsten electrode is properly ground.
- Initiate the arc (lift arc or high-frequency start, depending on machine features).
6.4 Welding Current Setting Reference
Refer to the table below for recommended welding current and voltage settings based on electrode diameter for MMA welding.

Figure 6.4: Reference table for welding current settings.
| 電極径(んん) | 推奨溶接電流(A) | 推奨溶接voltage(V) |
|---|---|---|
| 1.0 | 20〜60 | 20.8〜22.4 |
| 1.6 | 44〜84 | 21.76〜23.36 |
| 2.0 | 60〜100 | 22.4〜24.0 |
| 2.5 | 80〜120 | 23.2〜24.8 |
| 3.2 | 108〜148 | 23.32〜24.92 |
| 4.0 | 140〜180 | 24.6〜27.2 |
| 5.0 | 180〜220 | 27.2〜28.8 |
7. メンテナンス
定期的なメンテナンスにより、溶接機の寿命が長くなり、安全に操作できるようになります。
- クリーニング: Regularly clean the machine's exterior with a dry cloth. Use compressed air to blow out dust from inside the machine, especially the cooling vents, at least once a month or more frequently in dusty environments. Ensure the machine is unplugged before cleaning.
- ケーブル検査: Inspect all welding cables, power cords, and gas hoses for cuts, abrasions, or loose connections before each use. Replace damaged components immediately.
- ワイヤフィーダー: Clean the wire feeder rollers and guide tubes regularly to prevent wire feeding issues. Check for wear on the drive rollers.
- Torch/Electrode Holder: Clean the MIG torch nozzle and contact tip. Replace worn contact tips. Ensure the MMA electrode holder jaws are clean and grip electrodes securely.
- ストレージ: 溶接機を使用しないときは、清潔で乾燥した環境に保管してください。
8。 トラブルシューティング
このセクションでは、発生する可能性のある一般的な問題について説明します。ここに記載されていない問題については、カスタマーサポートにお問い合わせください。
| 問題 | 考えられる原因 | 解決 |
|---|---|---|
| マシンの電源が入らない | No power supply; Power switch off; Faulty power cable/plug | Check power outlet; Ensure switch is ON; Inspect and replace cable if damaged. |
| No welding arc (MMA) | Poor ground connection; Incorrect current setting; Wet electrode; Faulty electrode holder | Ensure good ground contact; Adjust current; Use dry electrodes; Check electrode holder. |
| Wire not feeding (MIG/MAG) | Wire spool tangled; Drive rollers loose/worn; Contact tip clogged; Liner blocked | Untangle wire; Adjust/replace rollers; Clean/replace contact tip; Clean/replace liner. |
| 溶接品質が悪い | 設定が正しくありません(電流/音量tage/wire speed); Improper technique; Contaminated workpiece; Insufficient gas flow (MIG/MAG) | Adjust settings; Practice technique; Clean workpiece; Check gas supply and flow rate. |
| 過熱保護がアクティブになりました | Exceeded duty cycle; Insufficient ventilation; Blocked cooling vents | マシンを冷却し、適切な換気を確保し、冷却通気口を清掃します。 |
9. 仕様
Technical specifications for the Weytoll 4-in-1 Welding Machine.
| パラメータ | 価値 |
|---|---|
| モデル | Schweißgerät 4in1 |
| 入力ボリュームtage | 220V |
| 出力電流(A) | 20A-300A |
| Power Capacity (KVA) | 7.4 |
| 周波数 (HZ) | 50/60 |
| 出力巻tage(V) | 16.5-24 |
| 定格デューティサイクル (%) | 60 |
| 力率 | 0.85 |
| 効率 (%) | 85 |
| Wire Feeding Style | 内部 |
| Wire Feed Speed (m/min) | 3.6-12 |
| Post-Flux Time (S) | 0.5±1 |
| 絶縁等級 | F |
| Housing Protection Index | IP21 |
| Max Wire Spool Size | Φ200 |
| 周囲温度 | -10℃~40℃ |
| 高度 | ≤1000メートル |
| Relative Humidity (40°C) | ≤ 50% |
| Relative Humidity (20°C) | ≤ 90% |
| アイテムの寸法 | 375 x 245 x 160 ミリメートル |
| アイテム重量 | 6740グラム |
| パッケージ寸法 | 470 x 225 x 400 ミリメートル |
| パッケージ重量 | 7000グラム |
10. 保証とサポート
保証情報やテクニカルサポートについては、ご購入時に付属の説明書をご参照いただくか、販売店またはメーカーに直接お問い合わせください。保証請求の際に必要となりますので、購入証明書を保管してください。
Manufacturer: Weytoll