1. はじめに
Thank you for choosing the Goshyda Portable Multimedia 1080P Projector. This compact and versatile device is designed to provide a personal cinema experience, supporting various multimedia inputs for entertainment, presentations, and more. Please read this manual carefully before using the projector to ensure proper operation and to maximize its lifespan.

Image 1.1: The Goshyda YG300 Mini Portable Projector in a home entertainment setting.
2. 安全情報
- 電源: Use only the specified 5V 2A power adapter or a compatible power bank. Incorrect voltagデバイスが損傷する可能性があります。
- 換気: 通気口を塞がないでください。過熱を防ぐため、プロジェクター周囲に十分な空気の流れを確保してください。
- 環境: Avoid exposing the projector to water, moisture, dust, or extreme temperatures. Operate in a clean, dry environment.
- クリーニング: 清掃する前に電源を切ってください。柔らかく乾いた布を使用してください。液体洗剤やエアゾール洗剤は使用しないでください。
- 分解: プロジェクターをご自身で分解したり修理したりしないでください。修理はすべて資格のある専門家にご依頼ください。
- 目の保護: プロジェクターレンズを直接見ないでください。amp オンです。
3. パッケージ内容
開梱後、パッケージの内容をご確認ください。不足品や破損品がございましたら、販売店までご連絡ください。
- Goshyda Portable Projector
- リモートコントロール
- AVケーブル
- 電源アダプター
- ユーザーマニュアル(このドキュメント)

Image 3.1: Included accessories with the Goshyda Portable Projector.
4.製品オーバーview
4.1. プロジェクターの機能
- 1080P解像度サポート: 鮮明で詳細な画像を提供します。
- コンパクトでポータブルなデザイン: Weighing approximately 290g, it is easy to carry.
- マルチポート接続: Includes USB, HDMI, AV, memory card slot, and audio output.
- 内蔵スピーカー: 利便性のために統合オーディオを提供します。
- 柔軟なパワー: Can be powered by a 5V 2A wall charger or power bank.

Image 4.1: Visual representation of the projector's main features.
4.2. Projector Ports and Controls
Familiarize yourself with the various ports and controls on your projector.
- レンズ: 前面投影レンズ。
- フォーカスリング: 画像の鮮明さを調整します。
- 電源入力(DC IN): Connects to the 5V 2A power adapter.
- HDMIポート: HDMIケーブルでデバイスを接続します。
- USBポート: USB ストレージ デバイスを接続します。
- AVポート: For connecting devices via AV cable.
- MicroSDカードスロット: メモリーカードを挿入します。
- オーディオ出力: 外部スピーカーやヘッドホンを接続します。
- コントロールボタン: On the top panel for basic navigation and selection.

画像4.2: 側面 view of the projector highlighting its connectivity ports.

Image 4.3: Close-up of the projector lens.
5. セットアップ
5.1. 電源接続
- Connect the provided power adapter to the DC IN port on the projector.
- 電源アダプタを標準のコンセントに差し込みます。
- Alternatively, for portable use, connect a 5V 2A power bank to the DC IN port.

Image 5.1: Powering the projector via wall adapter or power bank.
5.2. 配置と投影
Place the projector on a stable, flat surface. The optimal projection distance is between 1 to 2.5 meters, allowing for a screen size of up to 60 inches.
- 24 インチのスクリーンの場合は、プロジェクターを約 0.8 メートル離して配置します。
- 47 インチのスクリーンの場合は、プロジェクターを約 1.2 メートル離して配置します。
- 60 インチのスクリーンの場合は、プロジェクターを約 1.6 メートル離して配置します。
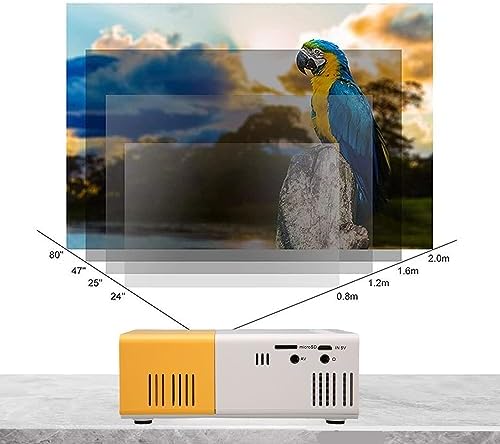
Image 5.2: Projection distance guidelines for various screen sizes. Note: Maximum recommended projection size is 60 inches.
5.3.フォーカス調整
After placing the projector and powering it on, rotate the focus ring located around the lens until the projected image appears clear and sharp.
6. 操作手順
6.1. 電源のオン/オフ
- 電源オン: プロジェクターまたはリモコンの電源ボタンを押します。
- 電源を切る: 電源ボタンをもう一度押すと、プロジェクターの電源が切れます。
6.2. 入力ソースの選択
Use the 'Source' button on the remote control or the projector's control panel to cycle through available input sources (HDMI, USB, AV, MicroSD).
6.3. メニューナビゲーション
Use the arrow buttons on the remote control or projector to navigate through menus. Press 'OK' or 'Enter' to confirm selections. Use the 'Return' or 'Back' button to go back to the previous menu.
7. 接続性
プロジェクターは、さまざまなデバイスに対応する複数の接続オプションを提供します。

Image 7.1: Connectivity options for the Goshyda projector.
7.1. HDMI接続
Connect devices such as laptops, TV Sticks, game consoles (e.g., for Xbox One), or Blu-ray players using an HDMI cable. Select 'HDMI' as the input source.
7.2.USB接続
USBフラッシュドライブをUSBポートに挿入してメディアを再生します files directly. Select 'USB' as the input source and navigate through your files.
7.3. AV接続
DVDプレーヤーなどの古い機器を接続する場合は、付属のAVケーブルを使用してください。入力ソースとして「AV」を選択してください。
7.4. Smartphone/Tablet Connection
To connect directly to your smartphone or tablet, you will need an appropriate adapter (e.g., Micro USB to HDMI, Type-C to HDMI, or a dedicated HD multimedia interface device), depending on your device's operating system (OS X or Android) and available ports. These adapters are sold separately.
7.5。 音声出力
Connect external speakers or headphones to the audio output port for enhanced sound.
8. メンテナンス
- レンズクリーニング: Use a soft, lint-free cloth specifically designed for optical lenses to gently wipe the projector lens. Do not use abrasive materials or harsh chemicals.
- 外装清掃: プロジェクターの外側を柔らかく乾いた布で拭いてください。
- ストレージ: 長期間使用しない場合は、プロジェクターを直射日光やほこりを避け、涼しく乾燥した場所に保管してください。
9。 トラブルシューティング
| 問題 | 考えられる原因 | 解決 |
|---|---|---|
| 電源なし | Power adapter not connected or faulty; insufficient power supply. | Ensure the 5V 2A power adapter is securely connected and plugged into a working outlet. Try a different power source or power bank. |
| 画像なし | Incorrect input source selected; cable not connected properly; device not outputting signal. | Select the correct input source (HDMI, USB, AV). Check all cable connections. Ensure the connected device is powered on and outputting a signal. |
| 画像がぼやけている | フォーカスが調整されていない、プロジェクターがスクリーンに近すぎる/遠すぎる。 | Rotate the focus ring to sharpen the image. Adjust the projection distance within the recommended range (1-2.5m). |
| 音が出ない | Volume too low or muted; external speakers not connected; audio format not supported. | Increase the volume on the projector and the source device. Check if external speakers are properly connected. Ensure the audio format is supported. |
10. 仕様
| 特徴 | 詳細 |
|---|---|
| ブランド | ゴシダ |
| モデル番号 | Goshyda89pkbg17g0 |
| ディスプレイ解像度 | 1920 x 1080 (1080P 対応) |
| 輝度 | 200ルーメン |
| アスペクト比 | 4:3 |
| 投影距離 | 1~2.5メートル |
| 投影サイズ | 最大60インチ |
| 接続技術 | HDMI, USB, AV, MicroSD, Audio Out |
| 電源入力 | 5V 2A |
| 表示タイプ | 液晶 |
| 製品寸法 | 12L x 8.5W x 4.6H cm (Approx. 4.7 x 3.3 x 1.8 inches) |
| フォームファクター | ポータブル |
| 取り付けタイプ | テーブルマウント |
11. 保証とサポート
For warranty information and customer support, please refer to the documentation provided with your purchase or contact your retailer directly. Keep your proof of purchase for warranty claims.