
導入
The Solid State Logic SSL 12 is a high-performance 12-in/8-out USB audio interface designed for professional recording and mixing environments. It features studio-quality audio conversion, robust preamps, and flexible monitoring options to enhance your audio production workflow. This manual provides essential information for setting up, operating, maintaining, and troubleshooting your SSL 12 interface.

図1: 前面 view of the Solid State Logic SSL 12 USB Audio Interface.
設定
Follow these steps to set up your SSL 12 audio interface:
- ソフトウェアのインストール: Before connecting the hardware, download and install the latest drivers and SSL 360° software from the official Solid State Logic website. This software is essential for full control and functionality of your interface.
- コンピュータに接続します: Connect the SSL 12 to your computer using the provided USB cable. The interface is bus-powered via USB.
- 電源オン: Press the power button located on the rear panel of the unit. The power indicator LED on the front panel will illuminate.
- マイク/楽器を接続する: Use XLR or 1/4-inch TRS cables to connect your microphones or instruments to the combo inputs (1-4) on the rear panel. For instruments, use the dedicated 1/4-inch instrument inputs (INST 1, INST 2) on the front panel for optimal impedance matching.
- Connect Monitors/Headphones: Connect your studio monitors to the 1/4-inch TRS outputs (1-4) on the rear panel. Plug your headphones into the dedicated 1/4-inch headphone outputs (A, B) on the front panel.
- ADAT and MIDI Connections (Optional): If expanding your setup, connect ADAT compatible devices to the ADAT IN port and MIDI devices to the MIDI IN/OUT ports on the rear panel.

Figure 2: SSL 12 with various cables connected for a typical studio setup.
操作手順
Understanding the controls and connections of your SSL 12 is crucial for effective operation.
フロントパネルコントロール

図3:上 view of the SSL 12, highlighting front panel controls.
- チャンネル1-4: Each channel features a GAIN knob to adjust input level, a +48V button for phantom power (for condenser microphones), and a LINE button to switch between microphone/instrument and line-level inputs. The LED meters provide visual feedback on input levels.
- レガシー 4K ボタン: These buttons activate the '4K' mode, which emulates the sound characteristics of the classic SSL 4000 series console, adding harmonic enhancement and a high-frequency boost.
- モニターレベル: The large blue knob controls the overall output level to your main studio monitors.
- ヘッドフォン出力(A & B): Two independent headphone outputs with individual level controls allow for separate monitoring mixes.
- トークバック: The built-in talkback microphone allows communication with artists in a separate recording space. Use the TALK button to activate, CUT to mute, and ALT to switch between alternative monitor outputs.
背面パネルの接続
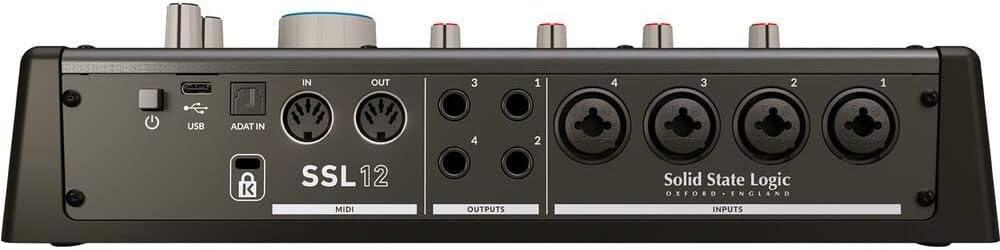
図4:背面 view of the SSL 12, showing input and output connections.
- 入力1〜4: Combo XLR/TRS jacks for connecting microphones and line-level sources.
- 出力1〜4: 1/4-inch TRS balanced outputs for connecting studio monitors or other outboard gear.
- MIDI 入力/出力: Standard 5-pin DIN connectors for connecting MIDI controllers or other MIDI-enabled devices.
- ADAT In: Optical input for expanding your input count with an ADAT-compatible device, providing up to 8 additional channels.
- USB: USB-C port for connection to your computer.
- 力: ユニットのオン/オフ スイッチ。
メンテナンス
To ensure the longevity and optimal performance of your SSL 12, follow these maintenance guidelines:
- クリーニング: 本体の外側は、柔らかく乾いた布で拭いてください。研磨剤入りの洗剤や溶剤は使用しないでください。頑固な汚れには、軽くこすってから拭いてください。amp 布を使用することで、ユニット内に湿気が入らないようにすることができます。
- 防塵: Keep the unit covered when not in use to prevent dust accumulation, which can affect internal components and ventilation.
- 換気: ユニット周囲に十分な空気の流れを確保してください。通気口を塞がないでください。
- ケーブル管理 コネクタへの負担や不意の切断を防ぐために、ケーブルをきちんと整理します。
- ソフトウェアアップデート: ソリッドステートロジックを定期的にチェックする website for firmware and software updates to ensure compatibility and access to the latest features and bug fixes.
トラブルシューティング
If you encounter issues with your SSL 12, refer to the following common problems and solutions:
- 電源なし: Ensure the USB cable is securely connected to both the interface and your computer. Verify the power button on the rear panel is in the 'On' position. Try a different USB port or cable.
- サウンド出力なし: Check that your monitors and headphones are correctly connected and powered on. Verify the Monitor Level and Headphone Level knobs are turned up. Ensure the correct output device is selected in your computer's sound settings and your Digital Audio Workstation (DAW).
- 入力信号なし: Confirm that microphones/instruments are properly connected to the correct inputs. Check the GAIN knob for the respective channel is turned up. Ensure +48V phantom power is enabled for condenser microphones. Verify the correct input is selected in your DAW.
- オーディオクリッピング/歪み: Reduce the GAIN on the input channel. Ensure your input source is not sending an excessively hot signal. Check your DAW's input levels. The 32-bit float converters offer high dynamic range, but extreme input levels can still cause clipping.
- レイテンシーの問題: Adjust the buffer size in your DAW's audio settings. Lower buffer sizes reduce latency but require more processing power. Ensure your computer meets the minimum system requirements.
- ソフトウェアがインターフェースを認識しない: Reinstall the SSL 360° software and drivers. Try connecting the interface to a different USB port. Restart your computer.
仕様
| 特徴 | 仕様 |
|---|---|
| ブランド | ソリッドステートロジック |
| モデル番号 | 726705X1 |
| 接続技術 | USB |
| チャンネル数 | 14 (12-in, 8-out) |
| 最大Sampルレート | 192 kHz |
| ビット深度 | 32ビット |
| マイクゲイン | 62デシベル |
| 対応デバイス | Headphone, Personal Computer |
| サポートされているソフトウェア | SSL 360 degrees (DAW) |
| オペレーティング·システム | Windows (and macOS, though not explicitly listed in provided data, it's standard for audio interfaces) |
| アイテム重量 | 1.43キログラム |
| 欧州連合 | 878076001678 |
保証とサポート
The Solid State Logic SSL 12 USB Audio Interface comes with a 1年間保証 ご購入日から有効です。この保証は製造上の欠陥をカバーし、通常の使用において製品が意図されたとおりに機能することを保証します。
For technical support, warranty claims, or additional product information, please visit the official Solid State Logic web販売店のウェブサイトをご覧いただくか、カスタマーサービス部門にお問い合わせください。保証に関するお問い合わせに備えて、購入証明書を保管してください。