導入
This manual provides detailed instructions for the setup, operation, maintenance, and troubleshooting of your NiPoGi AK1 PRO Mini PC. The AK1 PRO is a compact desktop computer powered by an 11th Generation Intel Celeron N5105 processor, designed for efficient daily tasks, multimedia playback, and business applications. It features 12GB DDR4 RAM, a 256GB M.2 SSD, 4K UHD video output, dual display support, Dual Band WiFi, and Bluetooth 4.2.
箱の中身
到着後、パッケージの内容をご確認ください。標準パッケージには以下が含まれます。
- 1 x NiPoGi AK1 PRO Mini PC (12GB RAM, 256GB ROM)
- EU電源アダプター x 1
- HDMIケーブル x 1
- 1 x VESA Bracket with Screws
- ユーザーマニュアル x 1
製品終了view
The NiPoGi AK1 PRO Mini PC is designed with various ports for connectivity and expansion. Familiarize yourself with the layout below.
画像: フロントとリア view of the NiPoGi AK1 PRO Mini PC, highlighting its various ports and compact design. The front features the power button and USB ports, while the rear includes HDMI, Ethernet, and additional USB ports.
ポートレイアウト:
- フロント: Power Button, 2 x USB 3.0 ports, 2 x USB 2.0 ports
- 後方: DC Power Input, 2 x HDMI ports, 1 x RJ45 Gigabit Ethernet port, 1 x 3.5mm Audio Jack
主な特徴:
- プロセッサ: 11th Gen Intel Celeron N5105 Quad-Core (up to 2.9 GHz)
- グラフィック: Intel UHD Graphics, supporting 4K UHD (4096x2160@60Hz)
- メモリ: 12GB DDR4 メモリ
- ストレージ: 256GB M.2 SSD (expandable with 2.5-inch SSD/HDD up to 2TB)
- 接続性: Dual Band 2.4GHz+5GHz WiFi, Gigabit Ethernet, Bluetooth 4.2
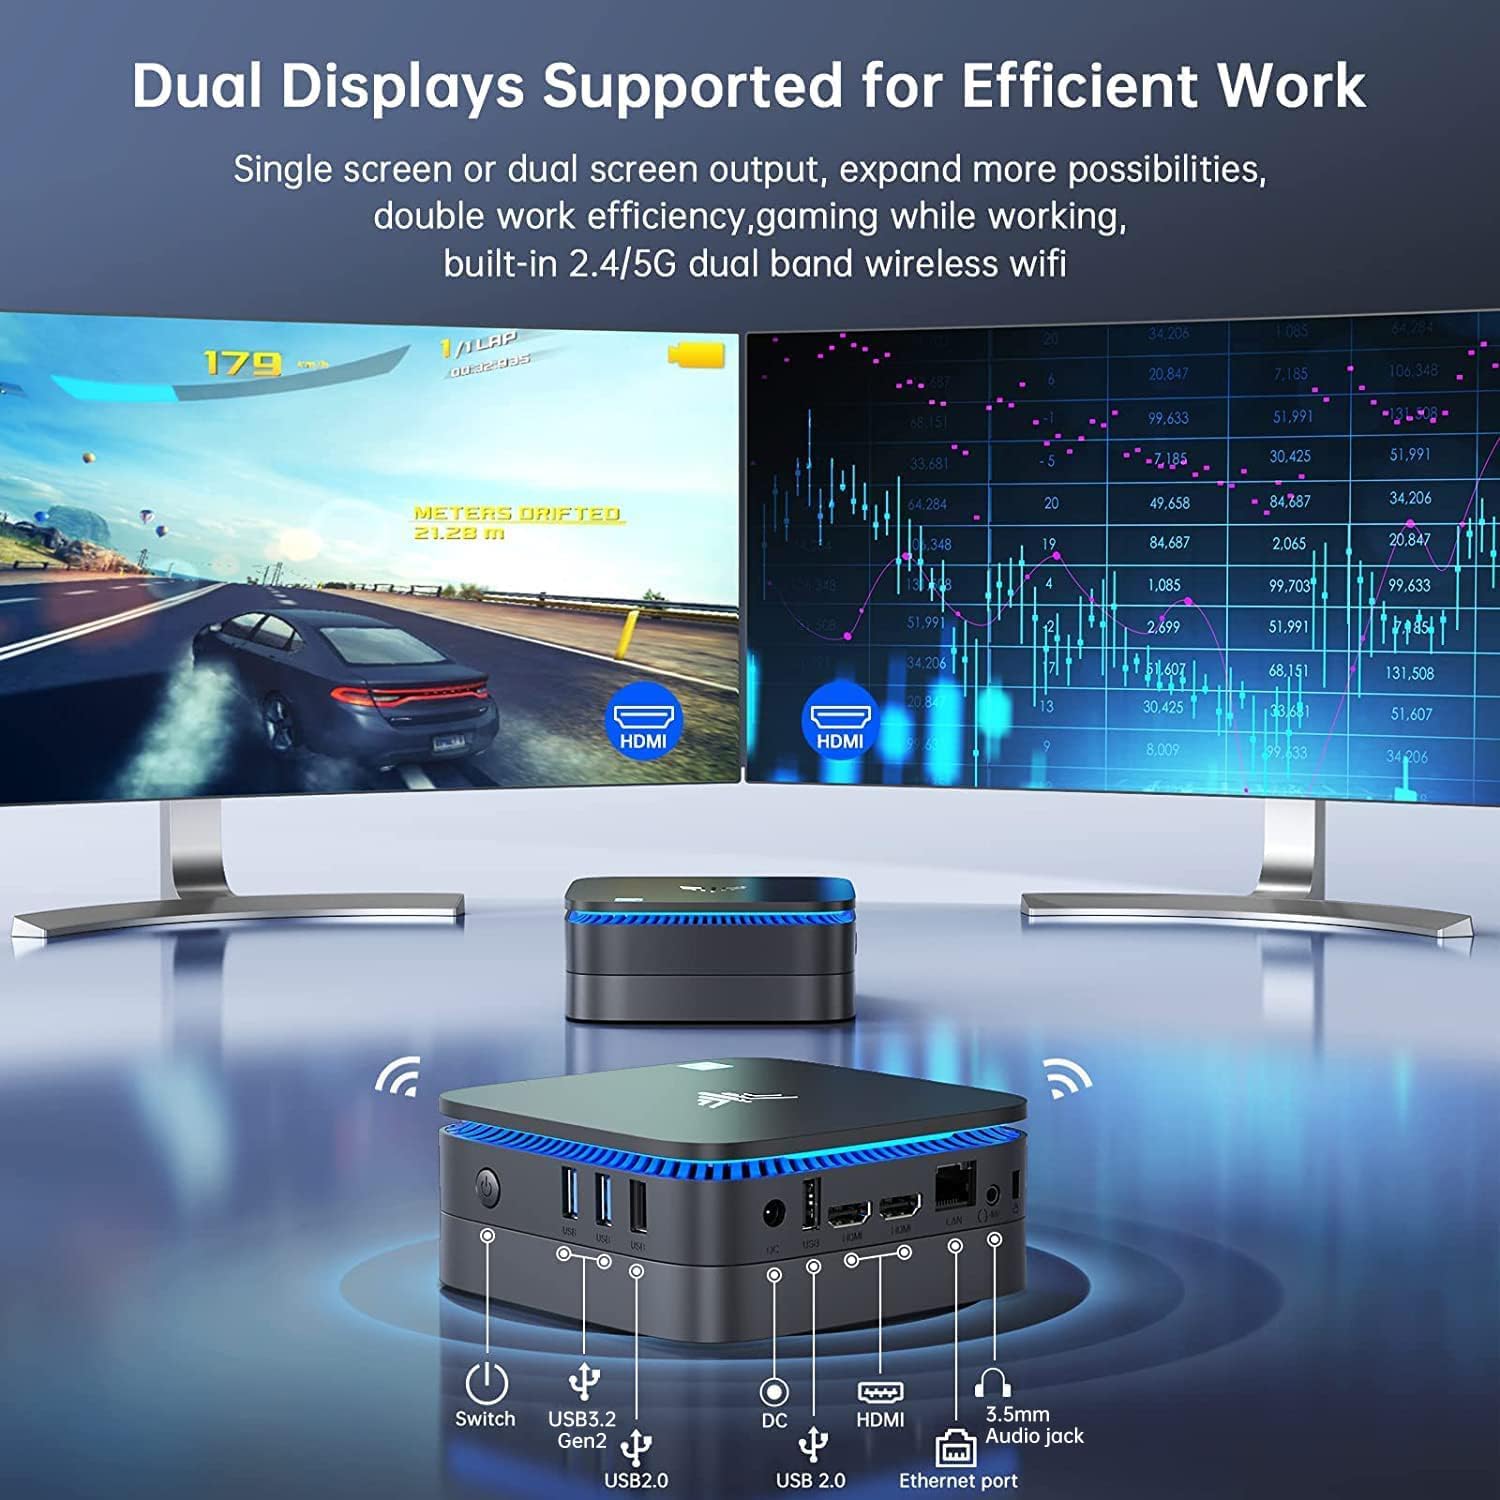
- 表示出力: Dual HDMI for dual screen setup
- オペレーティング·システム: プリインストールOS
セットアップガイド
Follow these steps to set up your NiPoGi AK1 PRO Mini PC for the first time.
- ディスプレイに接続する: Use the provided HDMI cable to connect the Mini PC to your monitor or TV. The AK1 PRO supports dual displays, so you can connect two monitors via the two HDMI ports.
- 周辺機器を接続します。 利用可能な USB ポートに USB キーボードとマウスを接続します。
- 電源に接続: Connect the EU power adapter to the DC input port on the Mini PC, then plug the adapter into a power outlet.
- 電源オン: Press the power button located on the front of the Mini PC. The device will boot up, and the blue light will illuminate.
- 初期 OS セットアップ: Follow the on-screen instructions to complete the operating system setup, including language, region, and network configuration.
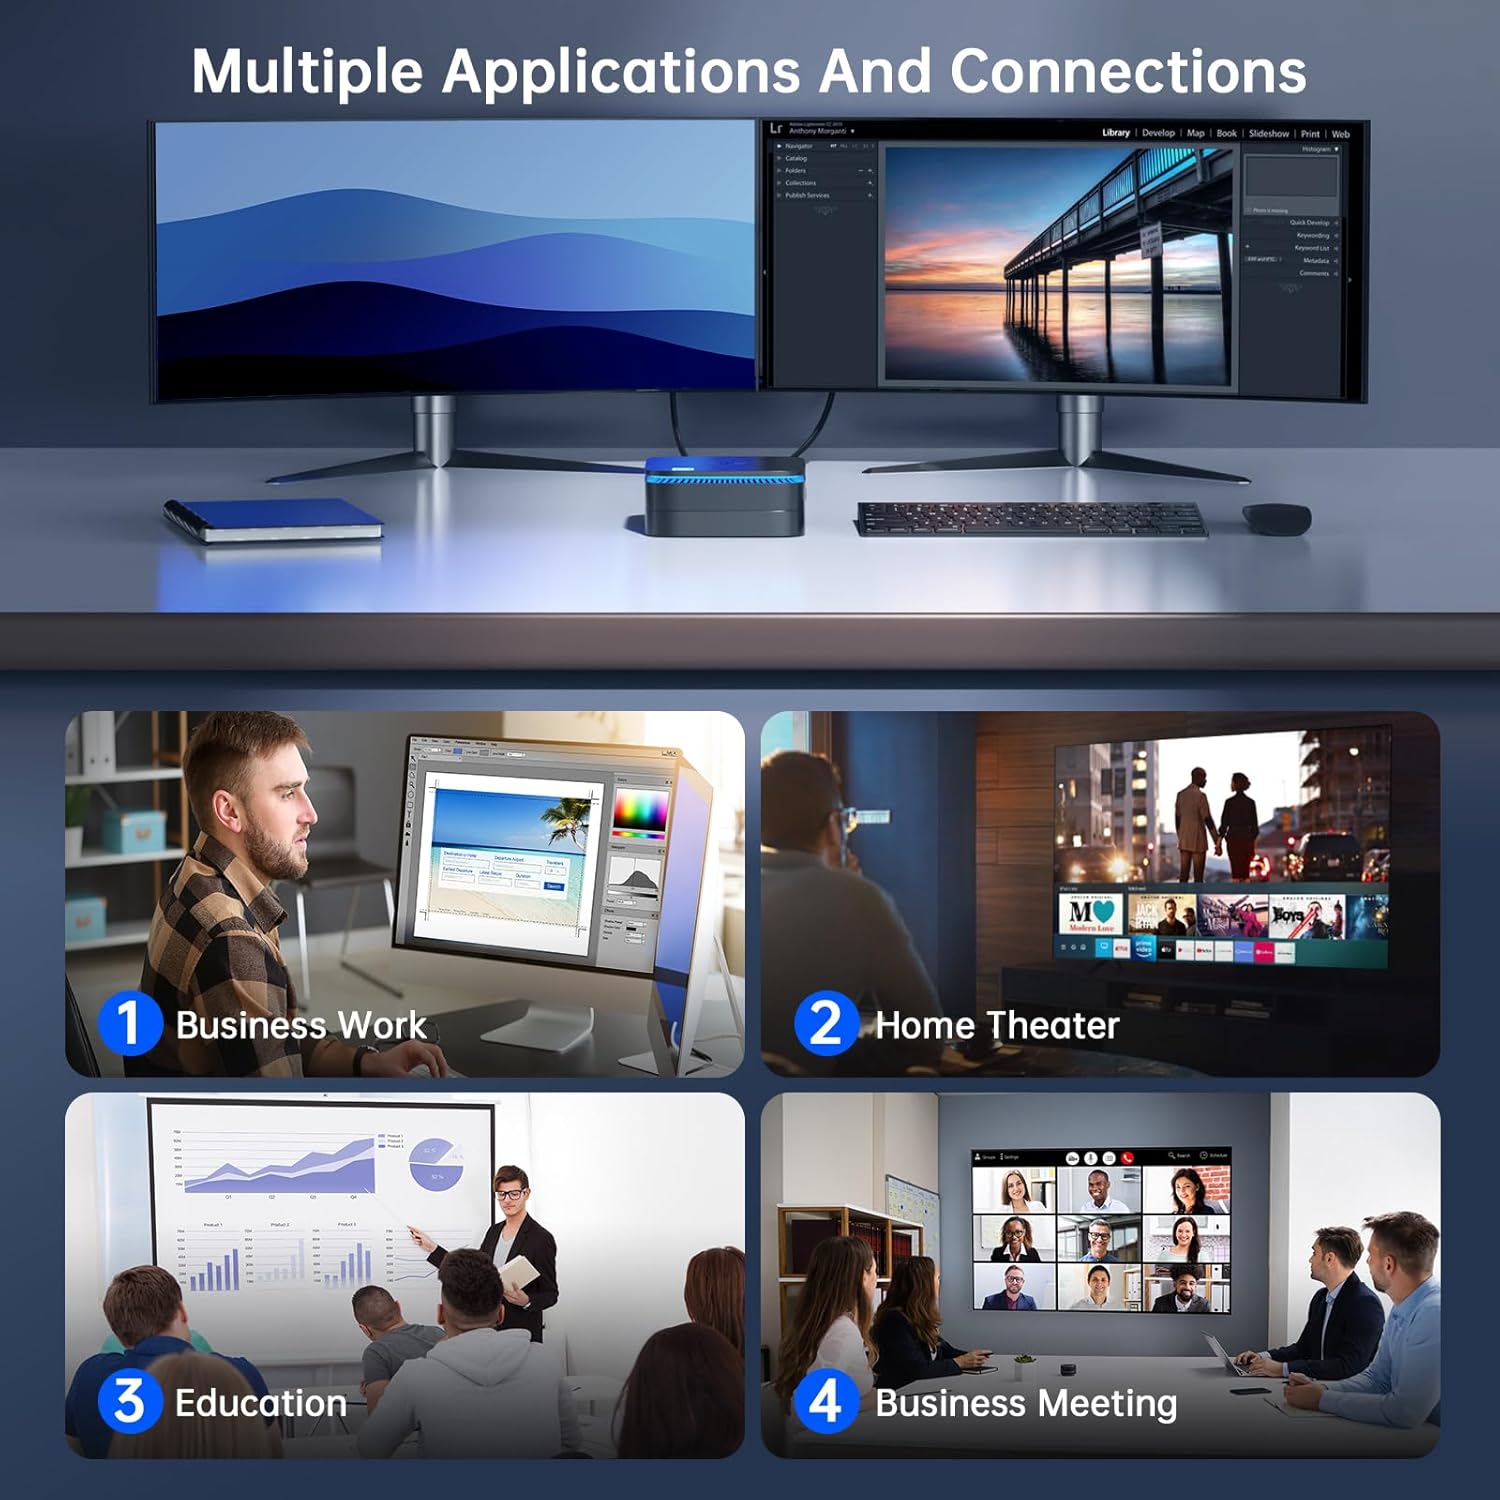
画像: The NiPoGi AK1 PRO Mini PC demonstrating multiple applications and connections, including business work, home theater, education, and business meetings, showcasinその汎用性。
操作手順
基本操作:
- 電源オン/オフ: Press the front power button to turn the PC on. To turn off, use the operating system's shutdown function or press and hold the power button for a few seconds for a forced shutdown (not recommended for regular use).
- 再起動: オペレーティング システムの再起動機能を使用します。
- スリープモード: The PC can enter sleep mode to save power. Wake it up by moving the mouse or pressing a key on the keyboard.
4K UHDビデオ再生:
The integrated Intel UHD Graphics supports 4K UHD resolution (4096x2160@60Hz), providing a clear visual experience for movies, streaming, and presentations.

画像: A person enjoying 4K HD video playback on a large display, powered by the NiPoGi AK1 PRO Mini PC, highlighting its multimedia capabilities and wireless Bluetooth support.
デュアルディスプレイ構成:
Connect two monitors to the two HDMI ports for an extended desktop experience. This can enhance productivity for work or provide a more immersive entertainment setup. Configure display settings within your operating system.
ストレージ拡張
The NiPoGi AK1 PRO Mini PC comes with a 256GB M.2 SSD. For additional storage, you can install a 2.5-inch SSD or HDD (not included) in the removable base, supporting up to 2TB.
インストール手順:
- ミニ PC の電源がオフになっており、電源アダプタから取り外されていることを確認します。
- ミニ PC の底面カバーを慎重に開きます。
- Insert your 2.5-inch SSD/HDD into the designated slot in the removable base.
- Secure the drive with screws if necessary (check the base for mounting points).
- 下部カバーを取り付けます。
- After powering on, you may need to initialize and format the new drive through your operating system's disk management tools.

画像: A visual tutorial demonstrating how to install a 2.5-inch SSD or HDD into the NiPoGi AK1 PRO Mini PC by opening the bottom cover and inserting the drive into the expansion bay.
VESAマウントの取り付け
The included VESA bracket allows you to mount the Mini PC to the back of a compatible monitor or TV, saving desk space and creating an all-in-one computing solution.
インストール手順:
- Attach the VESA bracket to the back of your monitor using the provided screws. Ensure your monitor has standard VESA mounting holes.
- Slide the NiPoGi AK1 PRO Mini PC onto the VESA bracket until it clicks securely into place.
- Connect all necessary cables (power, HDMI, peripherals) to the Mini PC.

画像: The NiPoGi AK1 PRO Mini PC shown mounted on the rear of a computer monitor using a VESA bracket, illustrating how it can transform into an all-in-one computer and save desk space.
メンテナンス
適切なメンテナンスを行うことで、ミニ PC の寿命が長くなり、最適なパフォーマンスが確保されます。
- クリーニング: ミニPCの外装は、柔らかく乾いた布で定期的に清掃してください。過熱を防ぐため、圧縮空気を使用して通気口のほこりを取り除いてください。
- ソフトウェアアップデート: セキュリティとパフォーマンスを確保するために、オペレーティング システムとドライバーを最新の状態に保ってください。
- 環境条件: ミニ PC は、直射日光、過度の熱、湿気を避け、換気の良い場所で操作してください。
- パワー管理: 付属の電源アダプターを使用してください。頻繁な突然の停電は避けてください。
トラブルシューティング
If you encounter issues with your Mini PC, refer to the following common troubleshooting steps.
- 電源なし:
- 電源アダプタがミニ PC と正常な電源コンセントの両方にしっかりと接続されていることを確認します。
- 別のデバイスを接続して、電源コンセントが機能していることを確認します。
- 表示なし:
- HDMI ケーブルがミニ PC とモニターの両方にしっかりと接続されていることを確認します。
- モニターの電源がオンになっており、正しい入力ソース (HDMI 1、HDMI 2 など) に設定されていることを確認します。
- 別の HDMI ケーブルまたはモニターがある場合は、それを試してください。
- インターネット接続なし(Wi-Fi/イーサネット):
- Wi-Fi の場合、オペレーティング システムで Wi-Fi アダプタが有効になっており、正しいパスワードを使用して正しいネットワークに接続されていることを確認します。
- For Ethernet, ensure the Ethernet cable is securely connected to both the Mini PC and your router/modem. Check router status.
- ルーター/モデムとミニ PC を再起動します。
- パフォーマンスが遅い:
- バックグラウンドで実行されている不要なアプリケーションを閉じます。
- プライマリドライブに十分な空き容量があることを確認してください。
- 保留中のオペレーティング システムの更新を確認してインストールします。
- Monitor CPU and RAM usage through Task Manager (Windows) to identify resource-intensive processes.
仕様
Detailed technical specifications for the NiPoGi AK1 PRO Mini PC.
| 特徴 | 詳細 |
|---|---|
| ブランド | ニポギ |
| モデルシリーズ | AK1PRO N5105/12GB RAM+256GB ROM |
| プロセッサ | Intel Celeron N5105 (11th Gen, Quad-Core, up to 2.9 GHz) |
| グラフィックスコプロセッサ | インテルUHDグラフィックス |
| ラム | 12GB DDR4 |
| ストレージ | 256GB M.2 SSD (Expandable with 2.5" SSD/HDD up to 2TB) |
| オペレーティング·システム | OS |
| 接続性 | Dual Band Wi-Fi (802.11a/b/g/n/ac), Bluetooth 4.2, Gigabit Ethernet |
| USBポート | 2のx USB 3.0、2のx USB 2.0 |
| HDMIポート | 2 (supports dual display, 4K UHD resolution) |
| オーディオ | 1 x3.5mmオーディオジャック |
| 寸法 | 12.8 x 12.8 x 5.15 cm(約5.04 x 5.04 x 2.05インチ) |
| 重さ | 274グラム |
| 色 | 黒 |
保証とサポート
NiPoGi provides comprehensive support and warranty services for your Mini PC.
サポートへのお問い合わせ:
- Amazon注文: Log in to Amazon, go to "Your Account", then "Your Orders", and select "Ask Product Question" for assistance.
- メールサポート: support@inipogi.com
- 電話サポート: +44 808 175 2348 (月曜~金曜、午前 9 時~午後 5 時 EST)
NiPoGi offers maintenance points for exchange or repair of your mini PC during the warranty period. Please retain your proof of purchase for warranty claims.

画像: Information regarding NiPoGi's "All-Around Protection" plan, including contact methods for support via Amazon, email, and phone, and details about maintenance services.