1. はじめに
This manual provides detailed instructions for the installation, operation, and maintenance of your VANTRUE VP01 5-Level Adjustable ACC Hardwire Kit. Please read this manual thoroughly before installation and use to ensure proper functionality and safety. This hardwire kit is designed to provide continuous power to your compatible dash cam for parking mode functionality and includes features to protect your vehicle's battery.
2.製品オーバーview
The VANTRUE VP01 Hardwire Kit is an essential accessory for enabling advanced parking surveillance features on your compatible dash cam. It connects directly to your vehicle's fuse box, providing a stable power supply and intelligent battery protection. Key features include:
- 低ボリュームtag保護: 車のバッテリー残量が少なくなると、ダッシュカメラの電源を自動的に切断します。tage drops below a user-defined threshold, preventing battery drain.
- Custom Timer Setting: Allows continuous recording or power supply for a set duration after the vehicle is parked.
- ACC Linkage Function: Automatically switches the dash cam to parking mode when the ignition is turned off.
- ワイドVoltage互換性: Supports 12V-24V vehicle electrical systems.
- USB Type-C出力: Compatible with various Type-C dash cams and other devices.
含まれるコンポーネント:
- Vantrue Hardwire Kit (VP01)
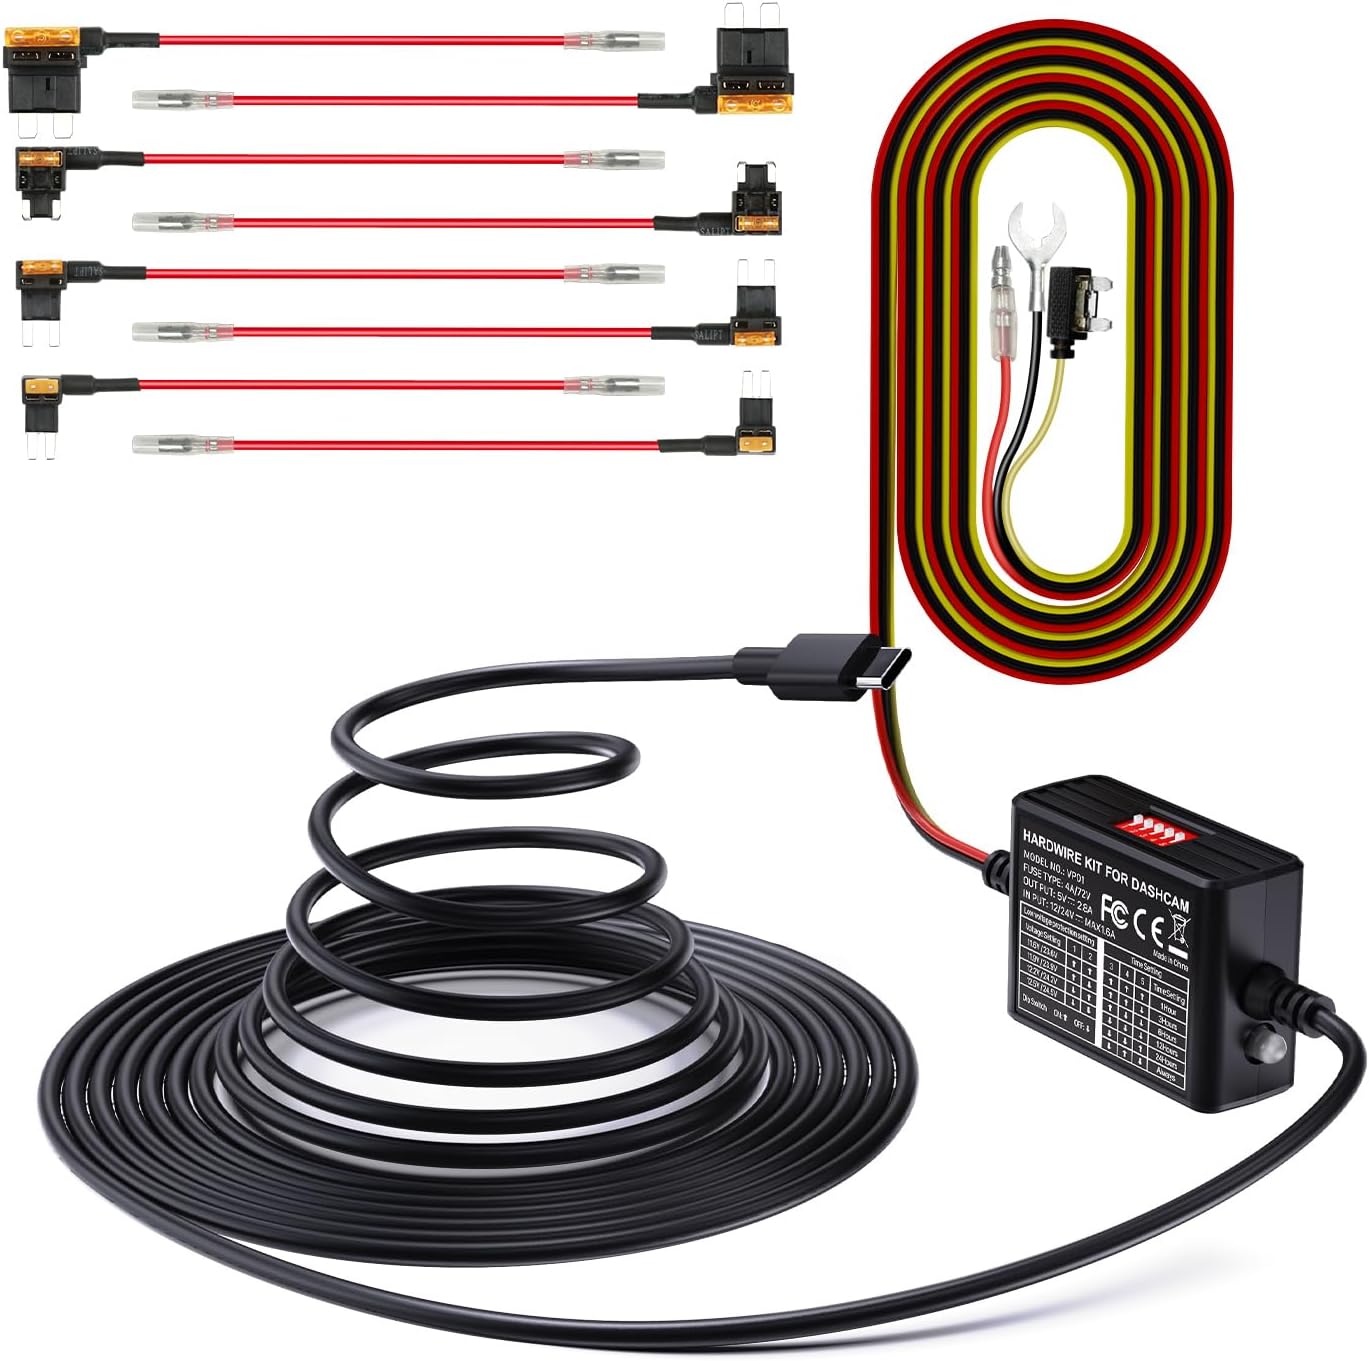
Image 2.1: The VANTRUE VP01 Hardwire Kit, showing its compact design and USB-C connector.
3. 互換性
The VANTRUE VP01 Hardwire Kit is designed for broad compatibility with vehicles operating on 12V to 24V electrical systems. It features a USB Type-C output, making it suitable for a wide range of dash cams and other devices that use a Type-C USB connection.
Compatible VANTRUE Dash Cam Models:
- N4 ProS
- E1プロ
- N5
- N5S
- N4
- N4S
- E2
- S1 Pro(Max)
- N2X
- E360
Note: This kit is specifically designed for the listed Vantrue dash cam models and may not be compatible with other Vantrue dash cams or third-party devices.

Image 3.1: Visual representation of the hardwire kit's compatibility with several VANTRUE dash cam models.
4.インストールガイド
Proper installation is crucial for the optimal performance of your hardwire kit. If you are unsure about any steps, it is recommended to seek professional assistance.
4.1 配線接続
The hardwire kit requires connection to three points in your vehicle's fuse box:
- 黄色のワイヤー: Connect to a constant power source (B+) that provides power even when the ignition is off. This is typically a fuse that is always live.
- 赤いワイヤー: Connect to an ACC (Accessory) power source that provides power only when the ignition is on. This allows the dash cam to detect when the vehicle is running or parked.
- 黒ワイヤー: Connect to any metal part of the vehicle chassis for a ground connection.

Image 4.1: Diagram illustrating the connection points for the yellow (ACC), red (continuous power), and black (ground) wires.
4.2 ヒューズボックスの接続
Use the included fuse taps to connect the yellow and red wires to appropriate fuses in your vehicle's fuse box. Ensure the fuse tap is inserted in the correct orientation to maintain circuit protection.

Image 4.2: Step-by-step visual guide for connecting the hardwire kit to the vehicle's fuse box, showing continuous power, ACC power, and ground connections.
5. 操作手順
Once installed, the hardwire kit operates automatically with your dash cam. It manages power delivery based on your vehicle's ignition status and the settings configured on the kit.
5.1 Parking Mode Activation
With the ACC linkage function, your dash cam will automatically transition into parking mode when the vehicle's ignition is turned off. This ensures continuous surveillance even when your car is parked.

Image 5.1: Graphic illustrating the 24-hour parking mode, providing continuous surveillance for your vehicle.
6. 設定の構成
The hardwire kit features dip switches for configuring low voltage protection and timer settings. These switches allow you to customize the kit's behavior to suit your needs and vehicle's battery health.

Image 6.1: Close-up of the hardwire kit's dip switches for adjusting low voltage protection and parking mode timer settings.
6.1低巻tage 保護設定
This feature prevents your vehicle's battery from draining completely by cutting power to the dash cam when the voltage drops below a selected level. Use the dip switches to set your desired voltageしきい値:
| 巻tage設定 | ディップスイッチ1 | ディップスイッチ2 |
|---|---|---|
| 11.6V / 23.6V | ON (Up) | ON (Up) |
| 11.9V / 23.9V | OFF (Down) | ON (Up) |
| 12.2V / 24.2V | ON (Up) | OFF (Down) |
| 12.5V / 24.5V | OFF (Down) | OFF (Down) |
Note: The higher voltage values (23.6V, 23.9V, 24.2V, 24.5V) apply to 24V vehicle systems.

Image 6.2: Visual explanation of the low voltage protection system, showing the battery icon and automatic power cut-off.
6.2つのタイマー設定
Configure how long the dash cam remains powered in parking mode after the ignition is off. Use the dip switches to select your desired duration:
| 時間設定 | ディップスイッチ3 | ディップスイッチ4 | ディップスイッチ5 |
|---|---|---|---|
| 1時間 | ON (Up) | ON (Up) | ON (Up) |
| 3時間 | OFF (Down) | ON (Up) | ON (Up) |
| 6時間 | ON (Up) | OFF (Down) | ON (Up) |
| 12時間 | OFF (Down) | OFF (Down) | ON (Up) |
| 24時間 | ON (Up) | ON (Up) | OFF (Down) |
| いつも | OFF (Down) | OFF (Down) | OFF (Down) |
7. メンテナンス
To ensure the longevity and reliable performance of your hardwire kit and dash cam, consider the following maintenance tips:
- 定期的に接続を確認してください: Periodically inspect all wiring connections to ensure they are secure and free from damage.
- SDカード管理: For dash cams, regularly format the SD card to prevent data corruption and ensure continuous recording. Replace the SD card if it shows signs of wear or error.
- デバイスをクリーニングします。 Keep the hardwire kit and dash cam free from dust and debris. Use a soft, dry cloth for cleaning.
8。 トラブルシューティング
ハードワイヤー キットで問題が発生した場合は、次の一般的な問題と解決策を参照してください。
- Dash Cam Not Powering On in Parking Mode:
- Check the yellow wire connection to ensure it is connected to a constant power fuse.
- 低ボリュームを確認するtage protection settings. If the vehicle battery voltage is below the set threshold, the kit will cut power.
- Ensure the timer setting is not expired or set to 'Off'.
- Dash Cam Not Switching to Parking Mode:
- Check the red wire connection to ensure it is connected to an ACC power fuse that activates with the ignition.
- Confirm the ACC linkage function is enabled on your dash cam (refer to your dash cam's manual).
- Vehicle Battery Drains Quickly:
- 低音量を調整するtage protection setting to a higher voltage (e.g., 12.5V for 12V systems) to cut power sooner.
- Reduce the parking mode timer duration.
- Ensure the fuse adapter is correctly oriented in the fuse box. Incorrect orientation can bypass the protection circuit.
- ダッシュカムに電源が入らない:
- Check all three wire connections (yellow, red, black) for secure contact.
- Inspect the fuses in the fuse box that the hardwire kit is connected to. Replace any blown fuses.
- Ensure the USB Type-C connection to the dash cam is firm.
9. 仕様
| 特徴 | 仕様 |
|---|---|
| モデル | VP01 |
| 入力ボリュームtage | 12V~24V |
| 出力巻tage | 5V |
| 出力電流 | 2A |
| ケーブル長さ | 14.8フィート |
| コネクタタイプ | USBタイプC |
| 低ボリュームtag保護 | Adjustable (11.6V/11.9V/12.2V/12.5V for 12V; 23.6V/23.9V/24.2V/24.5V for 24V) |
| タイマー設定 | Adjustable (1, 3, 6, 12, 24 hours, or Always) |
| 商品の寸法 (長さ x 幅 x 高さ) | 4.33 x 3.03 x 2.4インチ |
10. 保証とサポート
10.1 保証情報
The VANTRUE VP01 Hardwire Kit comes with a 12ヶ月保証 ご購入日から1年間有効です。この保証は製造上の欠陥を保証し、製品が規定の性能を満たすことを保証します。保証請求の際は、購入証明書を保管してください。
10.2 カスタマーサポート
For any questions, technical assistance, or warranty inquiries, please contact VANTRUE customer support. Refer to the official VANTRUE web最新の連絡先情報については、サイトまたは製品パッケージをご覧ください。