1. はじめに
The MTW Signal Fire AI-6C is an advanced optical fiber fusion splicer designed for efficient and precise fiber optic cable splicing. This device features six motors for core and cladding alignment, ensuring high-quality splices. It is suitable for various fiber types including SM, MM, DS, and NZDS, making it a versatile tool for FTTH (Fiber to the Home) and other optical network installations. This manual provides essential information for the safe and effective operation, maintenance, and troubleshooting of your AI-6C fusion splicer.

Figure 1: MTW Signal Fire AI-6C Optical Fiber Fusion Splicer
2. 安全情報
Please read and understand all safety instructions before operating the AI-6C fusion splicer to prevent injury and damage to the equipment.
- 目の保護: Always wear appropriate eye protection when working with optical fibers and the splicer. Invisible laser radiation may be present.
- 電気安全: Do not operate the splicer with wet hands or in damp environments. Ensure the power adapter is correctly connected to a grounded outlet.
- ファイバーハンドリング: Optical fiber shards are extremely sharp and can cause serious injury. Always dispose of fiber scraps in a designated container.
- 高温: The heating element reaches high temperatures during the heat shrink process. Avoid direct contact to prevent burns.
- バッテリーの安全性: Use only the specified battery and charger. Do not expose the battery to extreme temperatures or puncture it.
- 可燃性物質: Keep flammable liquids, such as alcohol for cleaning, away from the heating element and arc discharge area.
3. パッケージ内容
Verify that all items listed below are present in your AI-6C fusion splicer kit:

Figure 2: Accessories in the Tool Box
- AI-6C Fusion Splicer Unit
- S07 ファイバークリーバー
- Spare Electrode
- ストラップ
- User's Manual & Quality Certificate Warranty Card
- ワイヤーストリッピングプライヤー
- Miller Stripper
- Alcohol Bottle (empty)
- ブラシ
- 電源アダプター
4.製品オーバーview
The AI-6C fusion splicer features a robust design with intuitive controls and a clear display for efficient operation. Key components are highlighted below:
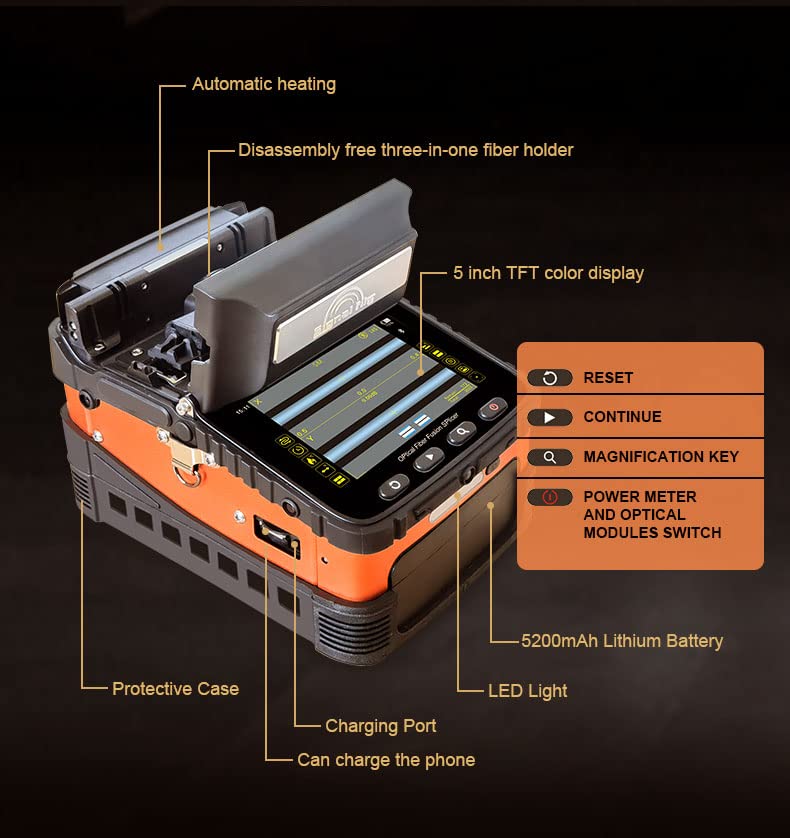
Figure 3: AI-6C Component Diagram
- 保護ケース: 耐久性のある外側asin保護のためのg。
- 充電ポート: 電源アダプターを接続して内蔵バッテリーを充電します。
- USBポート: Can be used to charge external devices like a phone.
- Automatic Heating Element: For heat shrinking splice protection sleeves.
- Disassembly-Free Three-in-One Fiber Holder: Accommodates various fiber types without needing to change holders.
- 5インチTFTカラーディスプレイ: Provides real-time splicing status and menu navigation.
- コントロールボタン: RESET, CONTINUE, MAGNIFICATION KEY, POWER METER AND OPTICAL MODULES SWITCH.
- 5200mAhリチウム電池: High-capacity internal battery for portable operation.
- LEDライト: Built-in illumination for night or low-light operation.
5. セットアップ
Follow these steps for initial setup of your AI-6C fusion splicer:
- 開梱して検査する: Carefully remove all components from the toolbox and inspect for any damage.
- バッテリーを充電する: Connect the power adapter to the splicer's charging port and a power outlet. The 5200mAh lithium battery requires approximately 3.5 hours for a full charge. Ensure the battery is securely installed.
- 電極を取り付ける: If not already installed, carefully place the electrodes into their designated slots. Refer to the user manual for detailed instructions on electrode installation and replacement.
- 電源オン: Press and hold the power button to turn on the splicer. The 5-inch TFT color display will illuminate.
- 初期キャリブレーション: The splicer may perform an automatic calibration upon first power-on or after electrode replacement. Allow this process to complete.
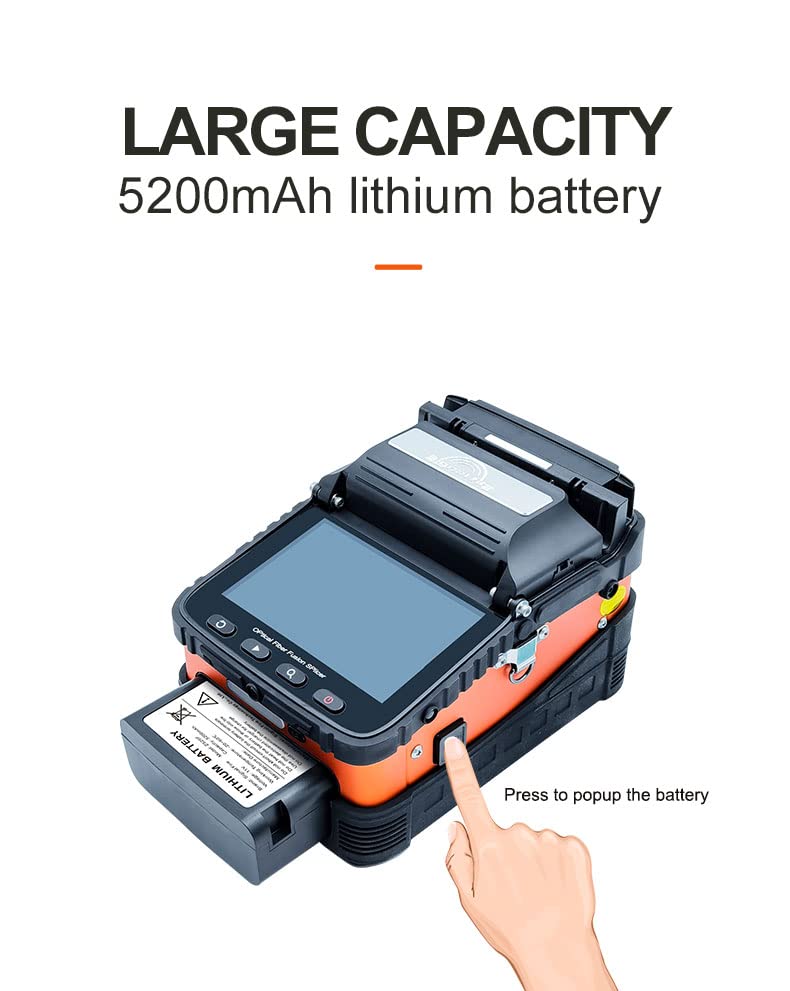
図4: バッテリーの取り付け/取り外し
6. 操作手順
This section outlines the general procedure for performing a fiber fusion splice.
6.1 繊維の準備
- ファイバーを剥ぎ取る: Use the wire stripping pliers and Miller stripper to remove the outer jacket and coating from the fiber, exposing the bare fiber. Ensure the stripped length is appropriate for cleaving.
- ファイバーをクリーニングする: Apply a small amount of isopropyl alcohol to a lint-free wipe and carefully clean the bare fiber to remove any residue. Allow it to air dry completely.
- ファイバーを切断する: Place the cleaned, stripped fiber into the S07 Fiber Cleaver. Follow the cleaver's instructions to achieve a precise, perpendicular cleave. A good cleave is critical for low splice loss.
6.2 スプライシング手順
- Place Fiber in Holders: Open the splicer's lid and carefully place the prepared fibers into the 3-in-1 fiber holders. Ensure the cleaved ends are positioned correctly within the V-grooves. The universal fiber holders support SM, MM, bare fiber, pigtail, rubber-insulated, and multi-fiber cables.
- 蓋を閉めます: Gently close the splicer's lid. The AI-6C will automatically begin the alignment process using its six motors and auto-focus feature.
- スプライシングの開始: The splicer will typically initiate the splicing process automatically once alignment is complete. The splicing time is approximately 8 seconds.
- Inspect Splice: After splicing, the display will show the estimated splice loss. Visually inspect the splice on the screen for any imperfections.
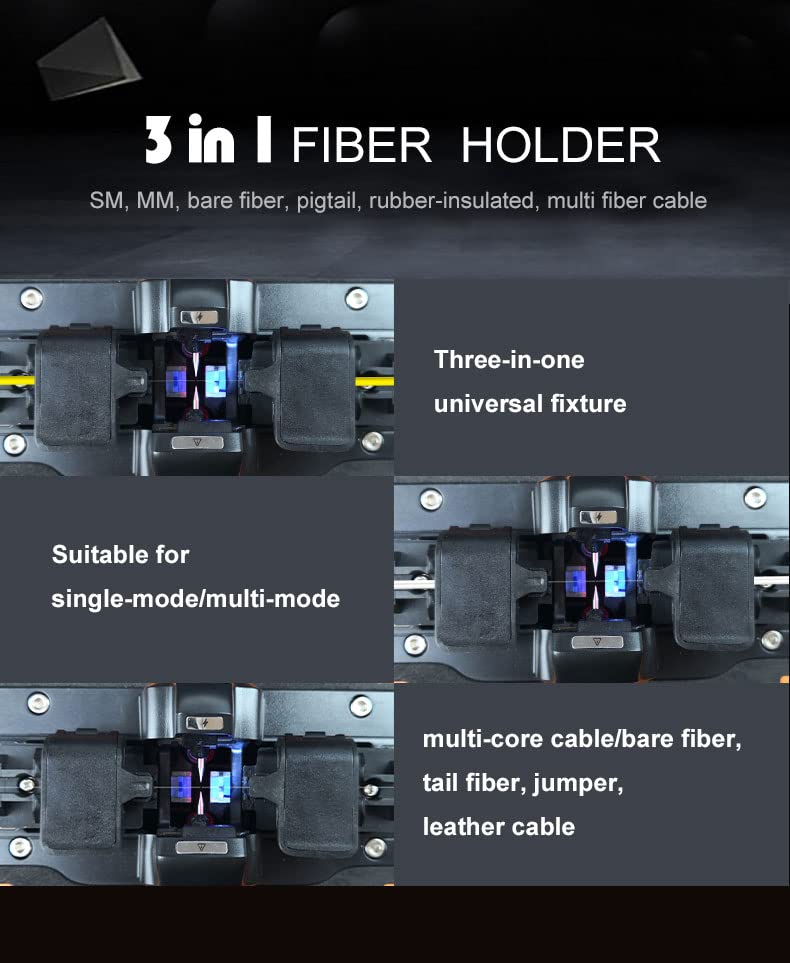
Figure 5: 3-in-1 Fiber Holder Versatility
6.3 Heat Shrink Protection
- Position Protection Sleeve: Carefully remove the spliced fiber from the V-grooves and slide a heat shrink protection sleeve over the splice point.
- Place in Heater: Position the fiber with the protection sleeve in the automatic heating oven. The heating time is approximately 18 seconds.
- 取り外して冷まします: Once heating is complete, carefully remove the fiber and allow the sleeve to cool and harden before handling further.
6.4追加機能
- 夜間作戦: The built-in LED light provides illumination for working in dark environments.
- 電話の充電: The splicer's internal battery can be used to charge a mobile phone via its USB port.
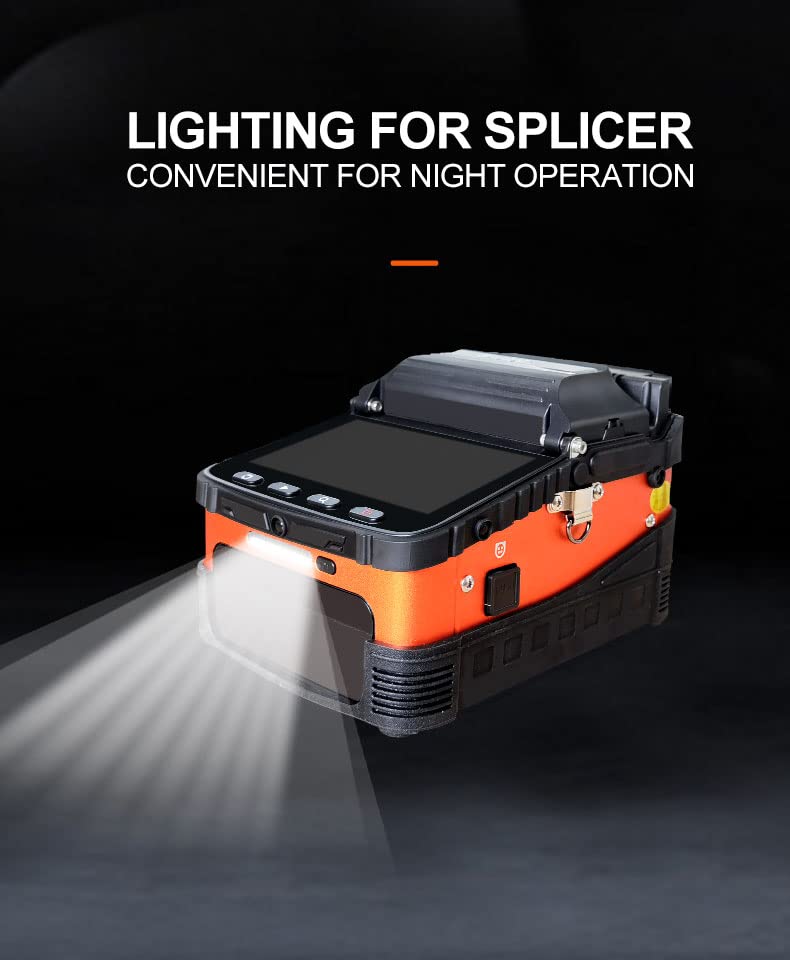
Figure 6: LED Light for Night Operation
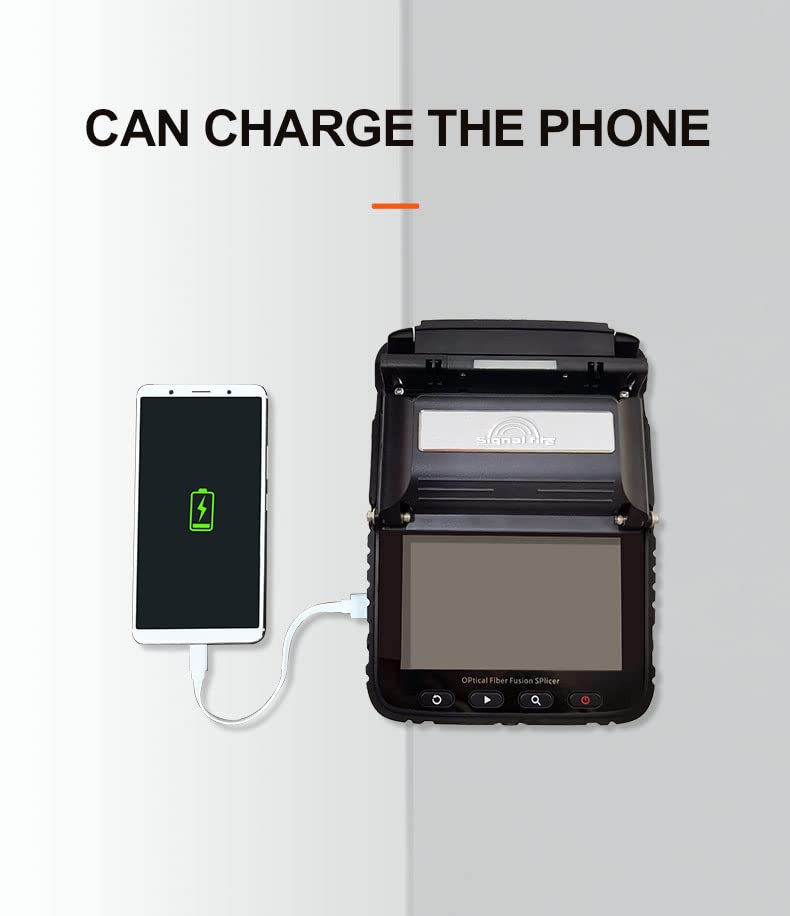
Figure 7: Phone Charging Capability
7. メンテナンス
Regular maintenance ensures the longevity and optimal performance of your AI-6C fusion splicer.
- Clean V-Grooves and Lenses: Use a cotton swab moistened with isopropyl alcohol to gently clean the V-grooves and objective lenses regularly. Dust and fiber debris can affect splicing accuracy.
- 電極の清掃/交換: If splice quality degrades or the splicer prompts, clean the electrodes with a brush. Replace electrodes when they become worn or damaged, following the instructions in the full user manual.
- バッテリーのケア: To maximize battery life, avoid fully discharging the battery frequently. Store the splicer in a cool, dry place when not in use. If storing for extended periods, charge the battery to approximately 50%.
- ソフトウェアアップデート: メーカーの web最適なパフォーマンスと新機能を確保するために、利用可能なソフトウェア アップデートをサイトで確認してください。
8。 トラブルシューティング
This section addresses common issues you might encounter with the AI-6C fusion splicer.
| 問題 | 考えられる原因 | 解決 |
|---|---|---|
| 高い接続損失 | Dirty V-grooves or lenses Poor fiber cleave 摩耗した電極 ファイバータイプの設定が正しくありません | Clean V-grooves and lenses Re-cleave fiber, ensure proper technique Clean or replace electrodes Verify correct fiber type selected in settings |
| Splicer Fails to Power On | バッテリーが消耗しました バッテリーが正しく取り付けられていない Power adapter fault | バッテリーを充電する バッテリーをしっかりと取り付け直す Test power adapter with another device if possible; contact support |
| Heating Element Not Working | 発熱体の故障 ソフトウェアの問題 | Restart splicer. If issue persists, contact technical support. |
| Fiber Not Aligning | Dirty V-grooves Damaged fiber holders Fiber not seated correctly | Clean V-grooves Inspect fiber holders for damage Ensure fiber is properly seated in V-grooves |
9. 仕様
The following table details the technical specifications of the MTW Signal Fire AI-6C Optical Fiber Fusion Splicer:

図8: 基本パラメータ
| パラメータ | 仕様 |
|---|---|
| ファイバーアライメント | Core/cladding alignment / Manual alignment |
| スプライシングタイム | 8秒 |
| 加熱時間 | 18 seconds (Automatic heating/Preheating) |
| フォーカスモード | Six motors Auto focus |
| 適用可能な繊維 | SM (G.652 & G.657), MM (G.651), DS (G.657), NZDS (G.655) |
| 接合損失 | 0.025dB (SM), 0.01dB (MM), 0.04dB (DS/NZDS) |
| 制御技術 | 核融合ARCのリアルタイム制御とキャリブレーション |
| リターンロス | 60dB以上 |
| 繊維径 | Cladding Diameter: 80-150 µm, Coating Diameter: 100-1000 µm |
| ファイバー切断長 | Coating less than 250µm: 8-16mm, Coating less than 250-1000µm: 16mm |
| 内蔵照明 | Easy for night operation |
| 張力試験 | 標準2N |
| Fiber Holders | 3 in 1 fiber holder (SM, MM, bare fiber, pigtail, rubber-insulated, multi fiber cable) |
| 倍率 | XまたはYの場合は300 view、XまたはYの場合は150 view |
| 画面 | 5インチTFTカラーディスプレイ |
| スプライシングモード | 通常/高精度接合 |
| Splicing Record Storage | Synchronize to phone, server to cloud storage (unlimited) |
| 内蔵バッテリー | 5200 mAh high-capacity lithium battery, charging time ≤ 3.5 hours, continuous splicing and heating about 160 times |
| 電源 | Input AC100-240V 50/60Hz, output DC13.5V/4A, real-time detection of battery power |
| 動作条件 | Temperature: -15 ~ +50 ℃, Humidity: <95% RH (no condensation), Working Altitude: 0-5000m, Max. Wind Speed: ≤ 15m/s |
| 収縮チューブ | 60mm、40mm |
| 機械重量 | 2.08kg (with battery), 1.60kg (without battery) |
| Toolbox Weight | 4.7kg(本体および付属品を含む) |
| 総重量 | 5.5kg |
10. 保証とサポート
The MTW Signal Fire AI-6C Optical Fiber Fusion Splicer comes with a standard warranty as detailed in the included Quality Certificate Warranty Card. Please refer to this document for specific terms, conditions, and duration of your warranty.
For technical support, service, or warranty claims, please contact your authorized dealer or the manufacturer directly. Contact information can typically be found on the warranty card or the manufacturer's official webサイト。