
1. はじめに
The OWON SDS1102 is a 2-channel digital storage oscilloscope designed for a wide range of electronic measurement and analysis tasks. It features a 100 MHz bandwidth, a 1 GSa/s real-time sampling rate, and a clear 7-inch TFT-LCD display. This manual provides essential information for setting up, operating, maintaining, and troubleshooting your device, ensuring optimal performance and longevity.

Figure 1: OWON SDS1102 Digital Oscilloscope
2. 安全情報
Please read and understand all safety instructions before operating the device. Failure to comply with these instructions may result in electric shock, fire, or damage to the product.
- デバイスに付属の電源コードのみを使用してください。
- 感電を防ぐために、デバイスが適切に接地されていることを確認してください。
- 濡れた状態や濡れた状態でデバイスを操作しないでください。amp 条件。
- デバイスを直射日光や高温にさらさないでください。
- デバイスを開けないでくださいasing; すべてのサービスは資格を持った担当者に依頼してください。
- Verify probe attenuation settings match the oscilloscope's input settings.
3. パッケージ内容
以下にリストされているすべてのアイテムがパッケージに含まれていることを確認してください。
- OWON SDS1102 Digital Oscilloscope
- 電源コード
- CD-ROM (containing software and documentation)
- USBケーブル
- オシロスコーププローブ(2個)
- プローブ調整ツール(ドライバー)
- ユーザーマニュアル(このドキュメント)
4.製品オーバーview
The SDS1102 is designed for efficiency and accuracy in various applications, from electronic circuit debugging to automotive maintenance.
主な特徴:
- HD LCD スクリーン: A 7-inch color TFT-LCD with 65535 colors and 800 x 480 pixel resolution provides clear and concise waveform readings. It supports four automatic cursor modes for precise voltage and time difference measurements.
- ハイSampリンレート: Equipped with a 1 GSa/s sampling rate, the device allows for detailed waveform capture and analysis. It includes single waveform recording and playback, and supports plug-and-play USB storage devices.
- Powerful System: Features an auto-range function and supports horizontal, vertical, single/multi-waveform tracking. Probe attenuation settings include 1x, 10x, 100x, and 1000x. It offers 30 types of automatic measurement functions and supports LABVIEW communication for secondary development.
- 移植性: With ultra-thin body design (301 x 152 x 70 mm) and a weight of 1.1 kg, the oscilloscope is highly portable, saving desktop space and operating quietly.

Figure 2: Key features of the SDS1102 Oscilloscope

Figure 3: Compact design and dimensions for portability

Figure 4: Diverse applications of the SDS1102 Oscilloscope
5. セットアップ
5.1 初期電源投入
- Connect the power cord to the oscilloscope and a suitable power outlet.
- 電源ボタンを押してデバイスの電源を入れます。
- The 7-inch TFT-LCD display will illuminate, showing the OWON logo and then the main waveform interface.
5.2プローブ校正
Before taking measurements, it is crucial to calibrate the oscilloscope probes for accurate readings. This process compensates for any slight variations in the probes as supplied.
- Connect a probe to one of the BNC input connectors (e.g., CH1).
- Ensure the probe's attenuation switch (usually on the probe body) is set to 10倍.
- Connect the probe tip to the test point, which is a small metal loop located on the bottom right of the oscilloscope's front panel.
- Attach the black grounding alligator clip of the probe to the lower metal loop, which serves as the ground test point.
- を押す 自動設定 button on the oscilloscope. The device will automatically adjust settings to display the test signal. The test point outputs a 1 kHz, 5V square wave.
- Observe the waveform on the screen. If it does not appear as a perfect square wave (e.g., rounded corners or overshoot), use the supplied probe adjustment tool (small screwdriver).
- Carefully insert the screwdriver into the compensation screw on the BNC connector of the probe and adjust it until the displayed square wave is clean and flat on top and bottom, with sharp corners. A slight turn (approximately 1/8th) may be sufficient.
- Repeat this process for all probes you intend to use.
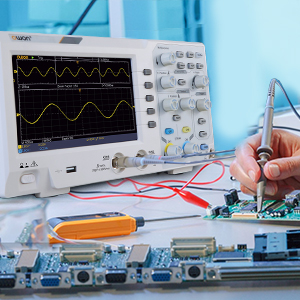
Figure 5: Oscilloscope probe connected to a circuit for testing
6. 操作手順
6.1 基本波形表示
- プローブをテスト対象の回路に接続します。
- 調整する Vertical Scale (VOLTS/DIV) そして Horizontal Scale (SEC/DIV) knobs to get a stable and viewable waveform on the screen.
- 使用 位置 knobs to move the waveform vertically or horizontally.
- を押す 自動設定 波形を自動最適化するボタン。

Figure 6: Auto-range function in action
6.2 Cursor Measurements
The SDS1102 supports four automatic cursor modes for precise measurements.
- を押す カーソル ボタン。
- Select the desired cursor type (e.g., Voltage, Time) using the menu options.
- Adjust the cursor positions using the multipurpose knob to measure specific points on the waveform.
- The measured values (e.g., ◊V, ◊T) will be displayed on the screen.

Figure 7: Performing cursor measurements
6.3 自動測定
The oscilloscope offers 30 types of automatic measurements for quick analysis.
- を押す 測定 ボタン。
- Navigate through the menu to select the desired automatic measurements (e.g., Frequency, Peak-to-Peak Voltage、RMS)。
- The selected measurements will be displayed on the screen, updating in real-time.

Figure 8: Automatic measurement display
6.4 Waveform Recording and Playback
The device allows for recording and replaying single waveforms.
- を押す 保存/リコール button (or similar function).
- Select the option to record a waveform.
- To replay, select the playback option and choose the desired stored waveform.
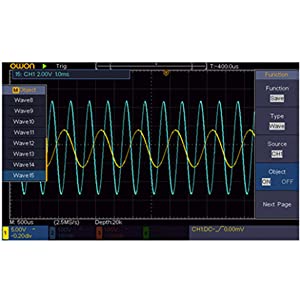
Figure 9: Waveform save and recall menu
6.5 USB Connectivity and PC Control
The SDS1102 supports plug-and-play USB storage devices for saving data and configurations. It also allows for remote communication and control via a computer using the USB interface, with support for LABVIEW and SCPI commands.

Figure 10: USB connection for PC communication and data transfer
7. メンテナンス
The OWON SDS1102 is designed for continuous, maintenance-free use under normal operating conditions. However, proper care ensures its longevity and performance.
- クリーニング: オシロスコープの外側は、柔らかく乾いた布で拭いてください。頑固な汚れには、軽く湿らせた布で拭いてください。amp 中性洗剤を含ませた布で拭いてください。液体がデバイス内に入らないようにしてください。研磨剤入りの洗剤や溶剤は使用しないでください。
- ストレージ: When not in use, store the oscilloscope in a clean, dry environment, away from extreme temperatures and humidity.
- プローブのお手入れ: Handle probes carefully. Avoid bending or stressing the cables. Keep probe tips clean.
- 内部メンテナンス: The device does not require user-performed internal maintenance. Do not attempt to open the casing 、保証が無効になり、電気的な危険にさらされる可能性があります。
8。 トラブルシューティング
If you encounter issues with your OWON SDS1102, refer to the following common troubleshooting steps:
| 問題 | 考えられる原因 | 解決 |
|---|---|---|
| デバイスの電源が入りません。 | Power cord not connected; power outlet faulty; device fault. | Check power cord connection. Test power outlet with another device. If problem persists, contact support. |
| 波形が表示されません。 | Probe not connected; probe faulty; input signal too small/large; incorrect vertical/horizontal settings. | Ensure probes are securely connected. Check probe functionality. Adjust VOLTS/DIV and SEC/DIV. Use Autoset. |
| Waveform is distorted or noisy. | Uncalibrated probe; poor grounding; external interference. | Perform probe calibration (Section 5.2). Ensure proper grounding. Minimize external electromagnetic interference. |
| USBストレージが認識されません。 | USB device format incompatible; faulty USB device/port. | Ensure USB device is formatted correctly (e.g., FAT32). Try a different USB device or port. |
For issues not covered here, please refer to the full manual on the provided CD-ROM or contact OWON customer support.
9. 仕様
| 特徴 | 仕様 |
|---|---|
| メーカー | オウォン |
| モデル番号 | OWON-SDS1102 |
| 寸法(長さ×幅×高さ) | 30.1 x 15.2 x 7 cm |
| 重さ | 1.67キロ |
| 画面 | 7-inch Color TFT-LCD, 800 x 480 pixels |
| チャンネル | 2 |
| 帯域幅 | 100 MHz |
| Sampルレート | 1GSa/秒 |
| レコード長 | 10Kポイント |
| 立ち上がり時間 | ≤1.7ナノ秒 |
| プローブ減衰 | 1倍、10倍、100倍、1000倍 |
| 自動測定 | 30種類 |
| 接続性 | USB (for storage, PC communication) |
| ソフトウェアサポート | ラボVIEW, SCPI |
| 電池付属 | いいえ |
| 初回利用可能日 | 23年2022月XNUMX日 |

Figure 11: Summary of key technical specifications
10. 保証とサポート
OWON products are designed for reliability and performance. For warranty information, please refer to the documentation included on the CD-ROM or visit the official OWON website. Information regarding the availability of spare parts is currently unavailable.
For technical support, product inquiries, or service requests, please contact OWON customer service through their official channels. Keep your purchase receipt and product model number (OWON-SDS1102) handy when contacting support.