1. はじめに
The ARROWMAX SDS PRO PLUS Mini Electric Drill is a versatile and precise tool designed for intricate tasks, model making, DIY crafts, and more. Featuring an OLED display, LED lights, gyroscopic motion control, and a compact design, it offers both portability and high performance. This manual provides detailed instructions for setup, operation, and maintenance to ensure optimal use of your device.

Figure 1.1: The ARROWMAX SDS PRO PLUS Mini Electric Drill with its accessories, including the storage case, various drill bits, and the benchtop drill press.
2. パッケージ内容
以下にリストされているすべてのアイテムがパッケージに含まれていることを確認してください。
- (1x) SDS PRO PLUS Mini Electric Drill
- (1x) Benchtop Drill Press
- (1x) Storage Case for SDS PRO PLUS
- (10x) HSS Drill Bits (sizes ranging from 0.6mm to 2.2mm with 2.35mm diameter shaft)
- (1x) USB-C Charging Cable
- (1x) User Manual (this document)

Figure 2.1: A visual representation of the complete package contents, showing the drill, its dedicated case, the benchtop stand, and the set of 10 drill bits.
3. セットアップと組み立て
3.1デバイスの充電
Before first use, fully charge the SDS PRO PLUS Mini Electric Drill. Connect the provided USB-C cable to the charging port on the drill and to a compatible USB power source. The OLED display will indicate the charging status.
3.2 ドリルビットの挿入
The drill features a keyless chuck for easy bit changes. To insert a drill bit:
- Grip the chuck firmly and rotate it counter-clockwise to open the jaws.
- Insert the desired 2.35mm diameter drill bit into the chuck.
- Rotate the chuck clockwise to tighten the jaws securely around the drill bit. Ensure the bit is centered and held firmly.

Figure 3.1: Illustration detailing the process of inserting a drill bit into the keyless chuck, highlighting the 2.35mm diameter compatibility.
3.3 Assembling the Benchtop Drill Press
The industrial-grade benchtop drill press provides enhanced stability and precision for drilling tasks. Follow the instructions provided with the drill press for proper assembly. Once assembled, securely mount the SDS PRO PLUS Mini Electric Drill into the designated holder on the press.

Figure 3.2: The mini electric drill securely mounted on its benchtop press, demonstrating its use for precise drilling operations.
3.4 開梱と初期セットアップビデオ
For a visual guide on unboxing and initial setup, please refer to the official video below:
Video 3.1: An unboxing and initial setup guide for the SDS PRO PLUS Mini Electric Drill, demonstrating how to unpack the product and prepare it for first use.
4. 操作手順
4.1 Powering On/Off and Basic Operation
Press the power button (usually located on the side of the drill) to turn the device on or off. The OLED display will activate upon power-on, showing battery status and current mode.

Figure 4.1: The power button on the drill, indicating its simple one-key operation for turning the device on and off.
4.2 速度と方向の制御
The SDS PRO PLUS offers 5 variable modes for precise control:
- Mode A (Smart Motion Control): Speed is adjustable by the angle of your wrist rotation. The greater the angle, the higher the speed. Direction (forward/reverse) is also controlled by body sensing (twist left for reverse, twist right for forward).
- Mode D (Max Operating Speed): Provides maximum operating speed. Direction is controlled by body sensing.
- Mode 1 (400 RPM): Fixed speed of 400 revolutions per minute. Press the single button to switch direction (clockwise/anti-clockwise).
- Mode 2 (550 RPM): Fixed speed of 550 revolutions per minute. Press the single button to switch direction (clockwise/anti-clockwise).
- Mode 3 (700 RPM): Fixed speed of 700 revolutions per minute. Press the single button to switch direction (clockwise/anti-clockwise).
To switch between modes, refer to the OLED display and the drill's controls. The OLED display shows the current speed setting and drilling direction.
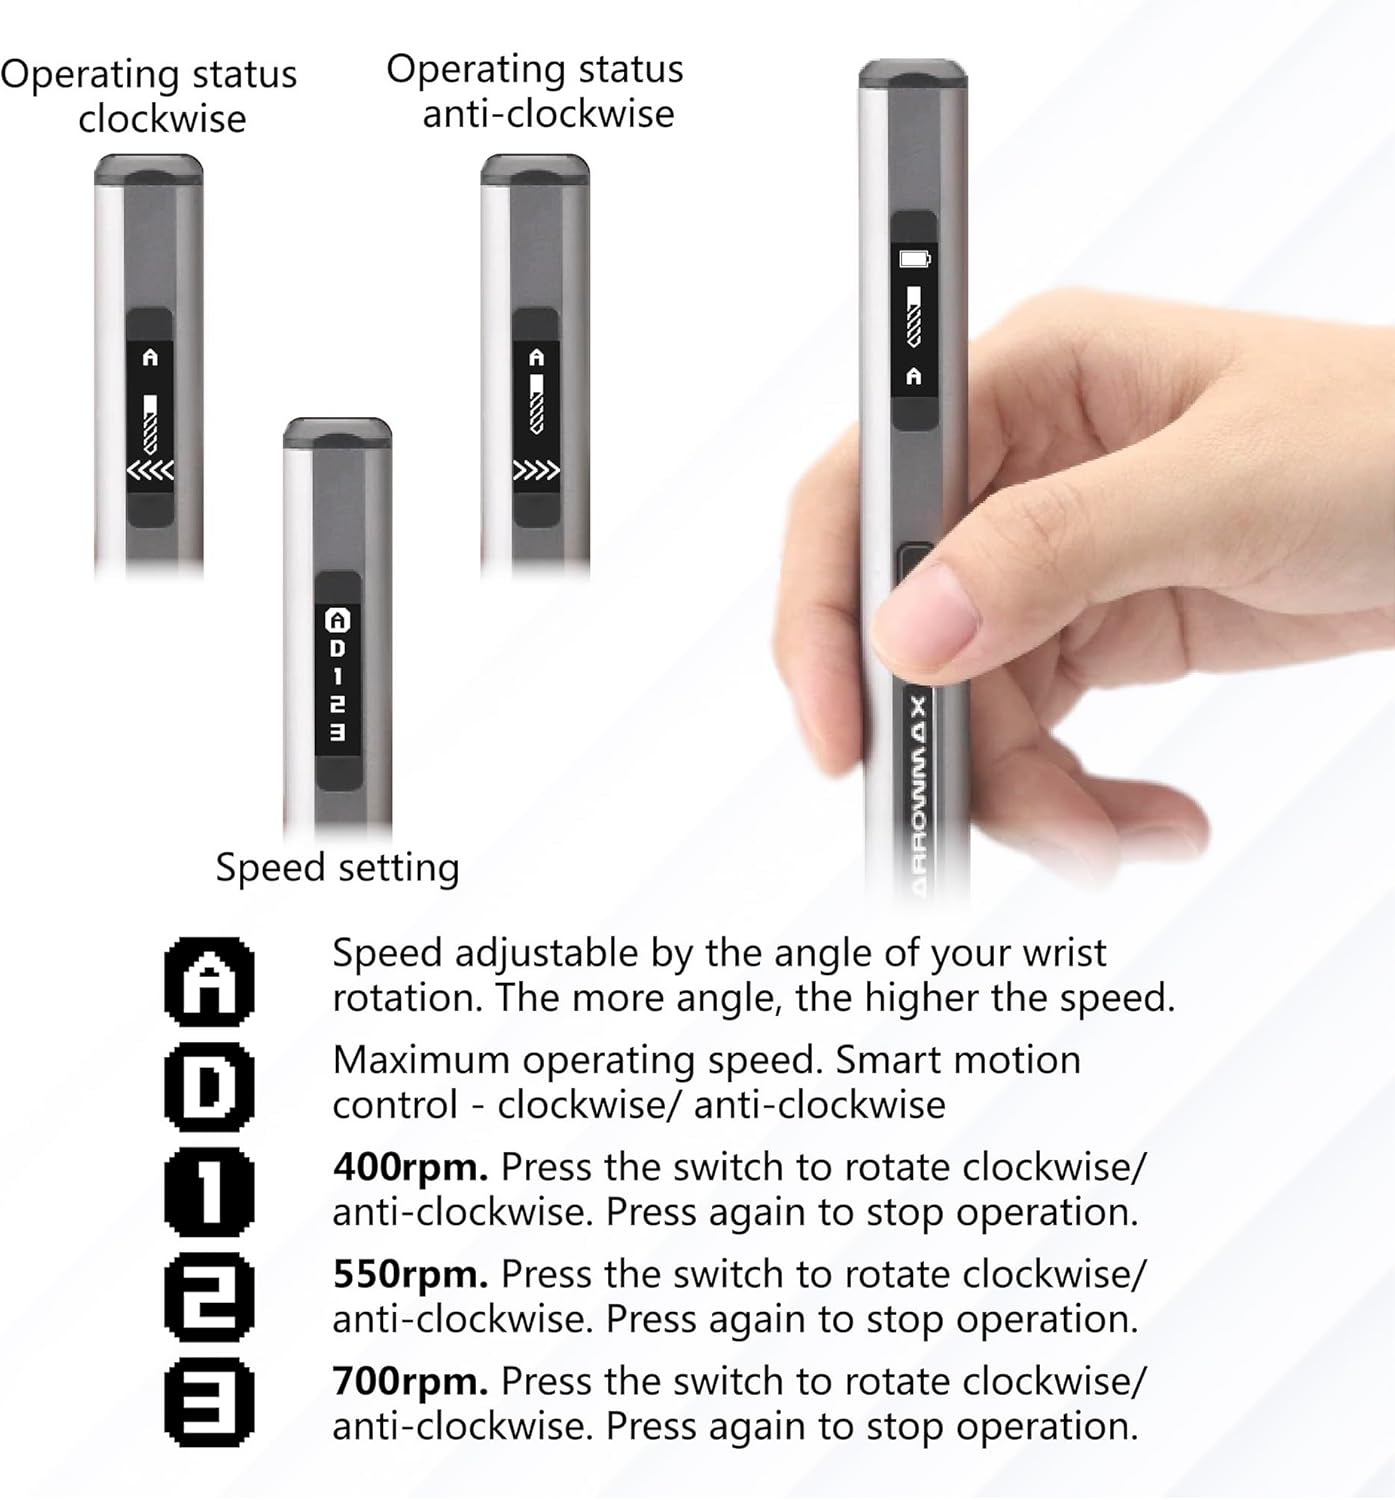
Figure 4.2: The OLED display on the drill, illustrating how operating status and speed settings are shown, including clockwise and anti-clockwise indicators.

Figure 4.3: Visual guide to the smart motion control feature, demonstrating how twisting the drill to the left or right controls the drilling direction.
4.3 LEDライトの使用
The drill is equipped with four shadow-less LED lights around the chuck. These lights automatically illuminate the drilling area, providing clear visibility and improving precision, especially in low-light conditions.

Figure 4.4: The drill's chuck area with its four integrated LED lights, designed to illuminate the workspace for enhanced visibility.
5. メンテナンス
5.1 クリーニング
After each use, wipe down the drill and benchtop press with a clean, dry cloth to remove dust and debris. Do not use harsh chemicals or abrasive cleaners. Ensure the chuck area is free of obstructions.
5.2 Drill Bit Care
Keep drill bits clean and sharp. Store them in the provided case to prevent damage and loss. Replace dull or damaged bits to maintain drilling performance and prevent strain on the motor.
5.3 ストレージ
Store the SDS PRO PLUS Mini Electric Drill and its accessories in a dry, cool place, away from direct sunlight and extreme temperatures. Use the provided aluminum case for secure storage and transport.
6。 トラブルシューティング
If you encounter issues with your SDS PRO PLUS Mini Electric Drill, please refer to the following common troubleshooting steps:
| 問題 | 考えられる原因 | 解決 |
|---|---|---|
| ドリルが作動しません。 | バッテリー残量が少ない。電源ボタンが正しく押されていません。 | Charge the drill fully. Ensure the power button is pressed firmly. |
| ドリルビットが回転しない、または回転が遅い。 | Chuck not tightened; Low battery; Incorrect speed mode selected; Obstruction. | Tighten the chuck. Recharge the battery. Select a higher speed mode. Check for and remove any obstructions. |
| OLEDディスプレイが空白です。 | Device is off; Low battery. | Press the power button to turn on. Charge the drill. |
| Motion control (Mode A/D) not responding. | Incorrect mode selected; Sensor obstruction. | Ensure Mode A or D is selected. Clean the drill body to ensure sensors are clear. |
これらの解決策を試しても問題が解決しない場合は、カスタマー サポートにお問い合わせください。
7. 仕様
| 特徴 | 詳細 |
|---|---|
| ブランド | アローマックス |
| モデル番号 | AM-199974 |
| 電源 | 電池駆動 |
| 電池のタイプ | リチウムイオン(1個付属) |
| バッテリー容量 | 500mAh / 1.5 Amp 営業時間 |
| 巻tage | 4 ボルト (DC) |
| Amp怒る | 1.5 Amps |
| 最高回転数 | 700 RPM (Variable up to 700 RPM) |
| 速度の数 | 5 (A, D, 1, 2, 3) |
| 最大チャックサイズ | 2.35ミリメートル(3/32インチ) |
| 特集 | Reverse Rotation, Variable Speed, OLED Display, LED Lights, Gyroscopic Control |
| Product Dimensions (Drill) | 約長さ10.75インチ x 幅4.75インチ x 高さ2.03インチ |
| Item Weight (Drill) | 55グラム/1.94オンス |
| ドリルタイプ | Drill Press (with included attachment) |
| 掘削能力(木材) | 7.2インチ |
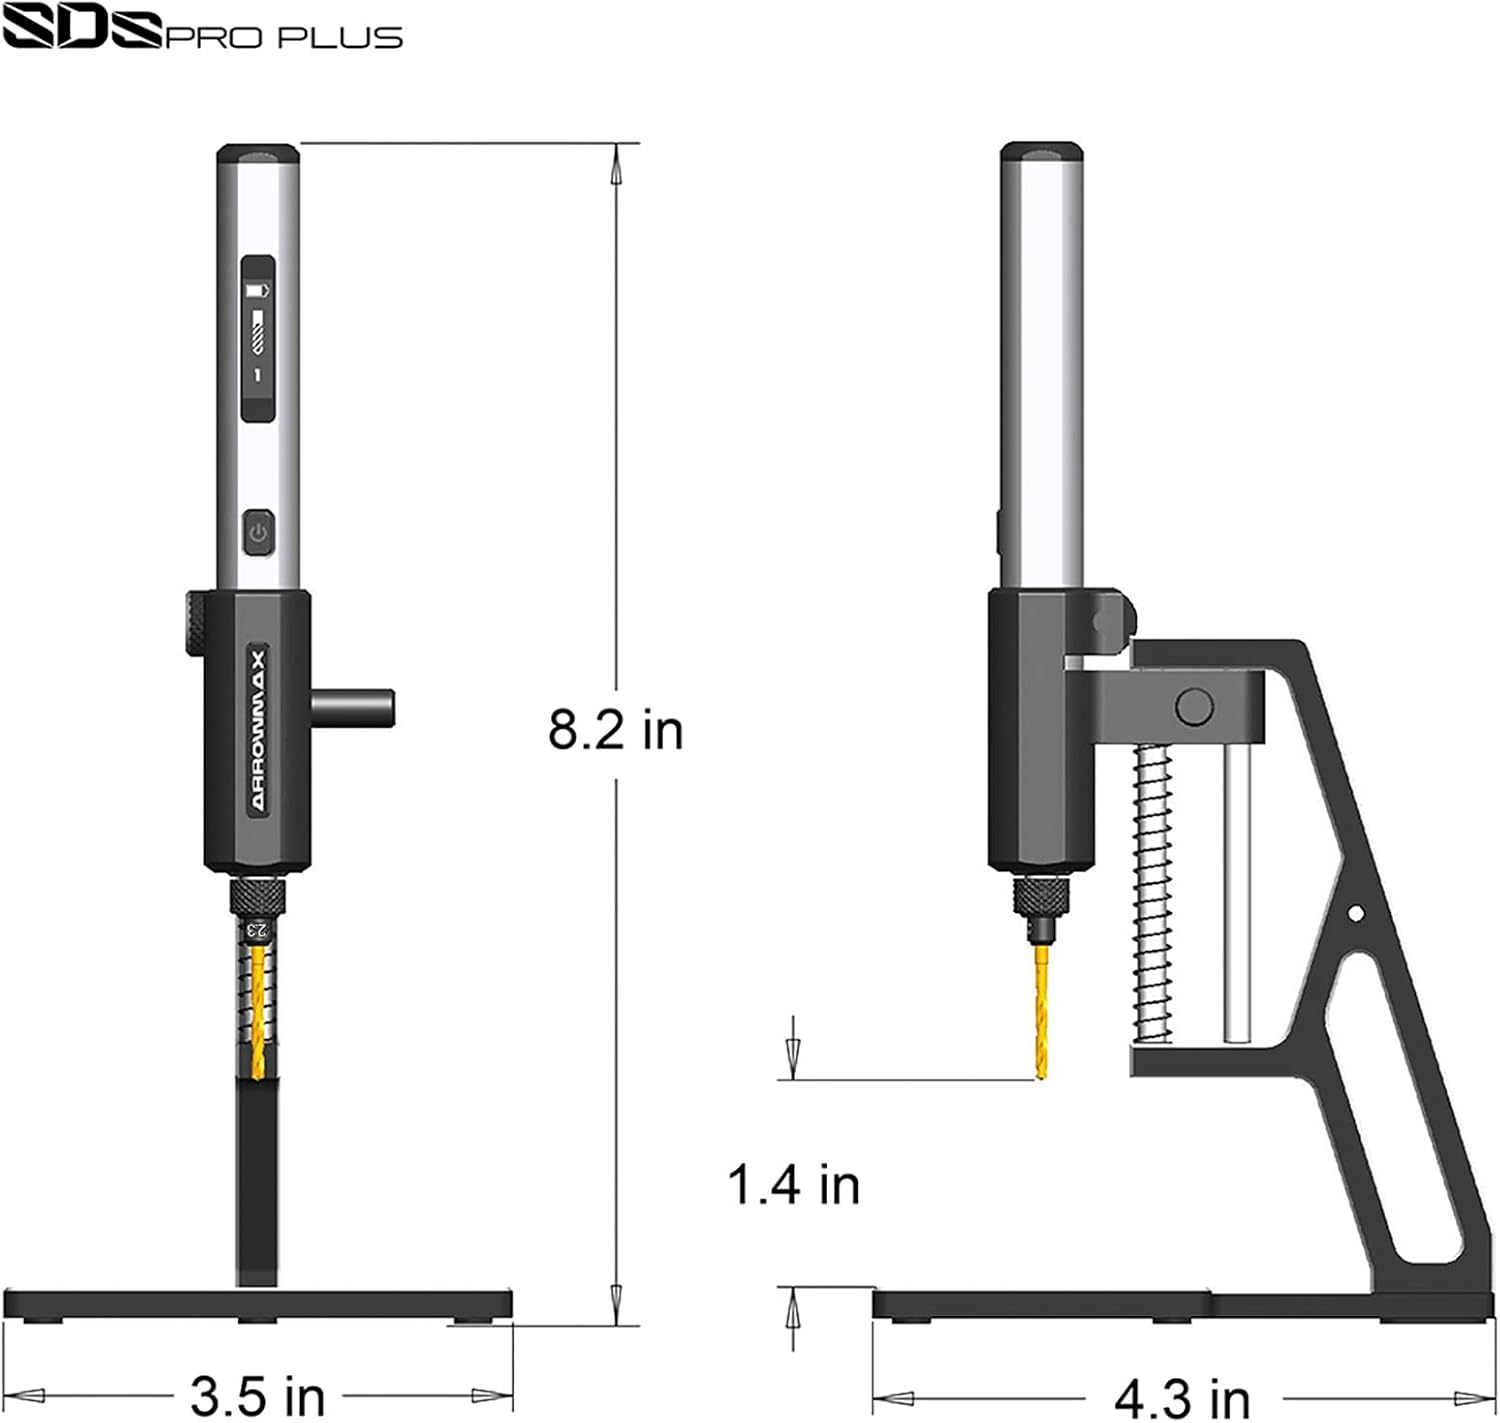
Figure 7.1: Detailed dimensions of the SDS PRO PLUS drill and its accompanying benchtop press, indicating its compact size.
8. 安全情報
Please read and understand all safety warnings and instructions before operating the SDS PRO PLUS Mini Electric Drill. Failure to follow the warnings and instructions may result in electric shock, fire, and/or serious injury.
- Always wear appropriate personal protective equipment, such as safety glasses, when operating the drill.
- Ensure your work area is well-lit and clear of clutter.
- 穴あけ加工をする前にワークピースが動かないように固定します。
- Do not force the drill; let the tool do the work.
- Keep hands and fingers away from the rotating drill bit.
- Disconnect the power source before changing accessories or performing maintenance.
- ドリルを雨や濡れた状態にさらさないでください。
- Store the drill out of reach of children.
9. 保証とサポート
Specific warranty information for the ARROWMAX SDS PRO PLUS Mini Electric Drill is typically provided with your purchase documentation or on the manufacturer's official webサイトでご確認ください。保証請求のために購入証明書を保管してください。
For technical support, troubleshooting assistance, or to inquire about replacement parts, please visit the official ARROWMAX website or contact their customer service department. The website address can often be found on the product packaging or in the included documentation.
Based on product packaging, you may find support information at: arrowmax-rc.com