1. はじめに
This manual provides detailed instructions for the safe and effective operation of your RIUKOE PL-W126 Fanless LED Par Light. This versatile lighting fixture is designed for various applications, including DJ setups, parties, weddings, and stage productions, offering powerful and quiet illumination.
主な特徴:
- Small Body, Big Power: Equipped with 12x12W RGBWAUV 6-in-1 LEDs, delivering a high lumen output of 8550 lux at 1 meter.
- 100% Quiet & Durable: Features a fanless design with a robust aluminum cast housing and efficient heat sink for silent operation and enhanced durability.
- Dimmable & Color Mixing: Utilizes imported LED beads and a 40-degree lens for smooth dimming and excellent, even color mixing.
- Multiple Smart Control Modes: Supports DMX512, Master-slave, Auto, IR remote, and Sound activated control for flexible operation.
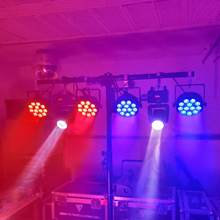
- 多用途アプリケーション: Ideal for DJ events, discos, parties, weddings, churches, clubs, and any venue requiring a portable LED wash light.

画像1.1: 以上view of the RIUKOE PL-W126 LED Par Light highlighting its control modes.
2. 安全情報
本製品を設置または操作する前に、すべての安全に関する指示をよく読んで理解してください。指示を守らないと、怪我をしたり、製品が損傷したりする恐れがあります。
- 本製品は屋内専用です。雨や湿気にさらさないでください。
- 電源がボリュームと一致していることを確認してくださいtag電源要件(AC 100~240V、50/60Hz)。
- 清掃やメンテナンスを行う前に必ず電源を切ってください。
- 電源コードが損傷している場合は器具を操作しないでください。
- Ensure adequate ventilation around the fixture. Do not block cooling fins.
- 光源が目に直接当たらないようにしてください。
- お子様の手の届かない場所に保管してください。
3. パッケージ内容
以下にリストされているすべてのアイテムがパッケージに含まれていることを確認してください。
- 1 x RIUKOE PL-W126 LED Par Light
- 1 x IR Remote Control (1 CR2 battery included)
- 電源ケーブル x 1
- 1 xDMXケーブル
- 1 x取付金具
- ユーザーマニュアル x 1
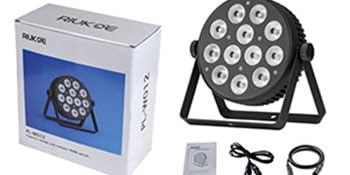
Image 3.1: Contents typically found in the RIUKOE PL-W126 product package.
4.製品オーバーview
コンポーネントとコントロール:
Familiarize yourself with the main components and control interface of your LED Par Light.

画像4.1:正面 view of the LED Par Light and its IR remote control.

画像4.2: 詳細 view of the rear panel, highlighting power input/output, DMX connections, digital display, menu buttons, and fixed knob.
- LEDアレイ: 12x12W RGBWAUV 6-in-1 LEDs for diverse color mixing.
- 取付けブラケット: Adjustable bracket for floor standing or truss mounting.
- Power IN/OUT: 複数のユニットをデイジー チェーン接続するための標準電源接続。
- DMX イン/アウト: 3-pin XLR connectors for DMX control and daisy-chaining.
- デジタルディスプレイ: LED screen for menu navigation and setting display.
- メニューボタン: Menu, Up, Down, Enter buttons for navigating settings.
- Fixed Knob: Secures the light's tilt angle.
5. セットアップ
5.1 取り付け
The fixture comes with a bracket suitable for various mounting options:
- フロアスタンディング: Position the light on a stable, flat surface using the bracket as a stand.
- トラス取り付け: Attach the bracket to a compatible clamp (not included) and secure it to a lighting truss. Ensure the clamp and truss can support the weight of the fixture.
Adjust the angle of the light using the fixed knobs on the sides of the bracket. Tighten securely once the desired angle is achieved.

Image 5.1: Detail of the DMX ports and the fixed knob for angle adjustment.
5.2電源接続
Connect the provided power cable to the 'POWER IN' socket on the rear panel of the fixture and then to a suitable AC power outlet (100-240V, 50/60Hz). Multiple units can be daisy-chained by connecting the 'POWER OUT' of one fixture to the 'POWER IN' of the next, up to the maximum recommended load.
5.3 DMX接続
For DMX control, connect a DMX controller to the 'DMX IN' socket of the first fixture using a 3-pin XLR DMX cable. To daisy-chain multiple fixtures, connect the 'DMX OUT' of the first fixture to the 'DMX IN' of the next, and so on. Ensure the last fixture in the chain has a DMX terminator (not included) for stable signal transmission.
6. 操作
6.1 コントロールパネルのナビゲーション
背面パネルの 4 つのボタンを使用して、メニューを移動し、設定を調整します。
- メニュー: メイン メニュー オプションを切り替えます。
- 上下: Adjusts values or cycles through sub-menu options.
- 入る: Confirms a selection or saves a setting. Always press "Enter" to save any changes you make.
6.2IRリモコン
The included IR remote control provides convenient wireless operation for basic functions.
- 初回使用: Pull out the insulation sheet from the battery compartment before first use.
- 範囲: The effective range is approximately 6 meters (20 ft). For white light, the range may be reduced to about 3 meters.
- 互換性: Ensure the light is set to an address mode like "d00X" or "E00X" (where X is a number) for the remote to function.
- Conflict: DMX console control and IR remote control cannot be used simultaneously to avoid signal conflicts. Disconnect or turn off one control method before using the other.
- Master-Slave with IR: If using Master-slave mode with the IR remote, daisy-chain the lights with DMX cables. Set one unit as the master (e.g., "d00X" or "E00X") and others as slaves (e.g., "d001" or "E001"). The remote will then only control the master unit.
6.3動作モード
The PL-W126 offers several operating modes:
- DMX512 モード: For professional control, connect to a DMX controller. Set the DMX address via the menu to integrate with your lighting system.
- マスター/スレーブモード: Link multiple fixtures via DMX cables. Set one unit as the master (e.g., "d00X") and the others as slaves (e.g., "d001"). The master unit will control all linked slave units.
- 自動モード: The fixture runs through pre-programmed light shows and color sequences automatically. Select desired auto programs via the menu.
- サウンド起動モード: The light reacts to ambient sound or music, changing patterns and colors in sync with the beat. Adjust sensitivity via the menu.
7. メンテナンス
7.1 クリーニング
To maintain optimal performance and appearance, clean the fixture regularly:
- 清掃する前に電源を切ってください。
- 外側を拭くときは、柔らかく乾いた布を使用してください。
- For lenses, use a soft cloth and a mild glass cleaner. Avoid abrasive materials.
7.2冷却システム
The RIUKOE PL-W126 features a fanless design, relying on its aluminum housing and heat sink for cooling. It is normal for the unit to become warm or hot to the touch after extended use. The light includes built-in temperature protection to prevent overheating.

Image 7.1: The fanless design ensures quiet operation.
画像7.2: 内部 view showing the robust construction and heat dissipation components.
8。 トラブルシューティング
If you encounter issues with your RIUKOE PL-W126, refer to the following common problems and solutions:
- Light gets very hot: This is normal for the fanless design. The aluminum housing acts as a heat sink, and the unit has built-in temperature protection. Ensure adequate airflow around the fixture.
- IR Remote not working:
- Check if the insulation sheet has been removed from the remote's battery compartment.
- Ensure the CR2 battery is correctly inserted and has sufficient charge.
- Verify the light is set to an appropriate address mode (e.g., "d00X" or "E00X").
- Confirm that DMX control is not active, as it can conflict with the IR remote.
- DMX Control Issues (e.g., dimming not smooth, strobe erratic):
- Double-check all DMX cable connections for proper seating and integrity.
- Verify the DMX address settings on the fixture match your controller.
- Ensure a DMX terminator is used on the last fixture in a daisy-chain.
- Note: Some users have reported that DMX programming for dimming and strobe functions may not be as smooth as expected. This is a characteristic of the unit's internal programming.
- Mounting Knobs breaking: The plastic knobs for adjusting the mounting bracket may be susceptible to damage. If they break, contact customer support for assistance or consider replacing them with more durable alternatives if available.
9. 仕様
Detailed technical specifications for the RIUKOE PL-W126 LED Par Light:

Image 9.1: Product dimensions of the RIUKOE PL-W126 LED Par Light.
| 特徴 | 仕様 |
|---|---|
| モデル番号 | PL-W126 |
| 光源の種類 | 発光ダイオード(LED) |
| LED について | 12 x 12W RGBWAUV 6-in-1 LEDs |
| 輝度 | 8550 lumen (at 1M) |
| ビーム角度 | 40度 |
| 色 | RGBWAUV |
| 材料 | アルミニウム |
| 仕上げタイプ | アルミニウム |
| 電源 | コード式電気 |
| 入力ボリュームtage | AC 100-240V、50/60Hz |
| ワットtage | 70 Watts (Light Source: 12 Watts) |
| 制御モード | DMX512, Master-slave, Auto, IR remote, Sound activated |
| 製品寸法 | 長さ8.3インチ x 幅2.4インチ x 高さ9インチ (長さ21.1cm x 幅6.1cm x 高さ22.9cm) |
| アイテム重量 | 4.8ポンド(2.18kg) |
| バッテリー | 1 CR2 battery required (included for IR remote) |
| メーカー | Guangzhou Rico Stage Lighting Co.,Ltd |
10. 保証とサポート
保証情報、テクニカルサポート、またはサービスに関するお問い合わせは、販売店またはメーカーに直接お問い合わせください。ご購入の証明として、ご購入時のレシートを保管してください。