1. はじめに
The Beelink SER3 Mini PC is a compact and powerful computing solution designed for a variety of tasks, from business applications and home entertainment to online courses and light gaming. Equipped with an AMD Ryzen 3 3200U processor, 16GB of DDR4 RAM, and a 500GB PCIe SSD, it offers efficient performance in a small form factor. This manual provides essential information for setting up, operating, maintaining, and troubleshooting your Mini PC.

図1: 前面 view of the Beelink SER3 Mini PC, showcasinコンパクトなデザインとアクセスしやすいフロント ポートを備えています。
2. 箱の中身
開梱したらパッケージの内容を確認し、すべてのアイテムが揃っていることを確認してください。
- ミニPC 1台
- HDMIケーブル x 1
- 電源アダプター x 1
- ユーザーマニュアル x 1

Figure 2: Included accessories for the Beelink SER3 Mini PC.
3.製品オーバーview
3.1. 外部機能とポート
The Beelink SER3 Mini PC features a sleek, compact design with strategically placed ports for easy connectivity.
フロントパネル:
- 電源ボタン: デバイスの電源をオン/オフにします。
- USB 3.2 ポート (x2): 対応デバイスとの高速データ転送を実現します。
- オーディオジャック(HP&MIC): ヘッドフォンとマイク用。
- CLR CMOS: CMOS設定をクリアするボタン。

Figure 3: Front panel of the Mini PC with power button, USB ports, and audio jack.
後面パネル:
- LAN(RJ-45): 有線ネットワーク接続用のギガビット イーサネット ポート。
- USB 3.2 ポート (x2): 追加の高速 USB ポート。
- HDMIポート(x2): デュアル 4K@60Hz ディスプレイ出力をサポートします。
- DCジャック: 電源アダプタを接続します。

Figure 4: Rear panel of the Mini PC with network, USB, HDMI, and power input.
3.2. 内部コンポーネント
The Mini PC is designed for easy access to its internal components for upgrades and maintenance.
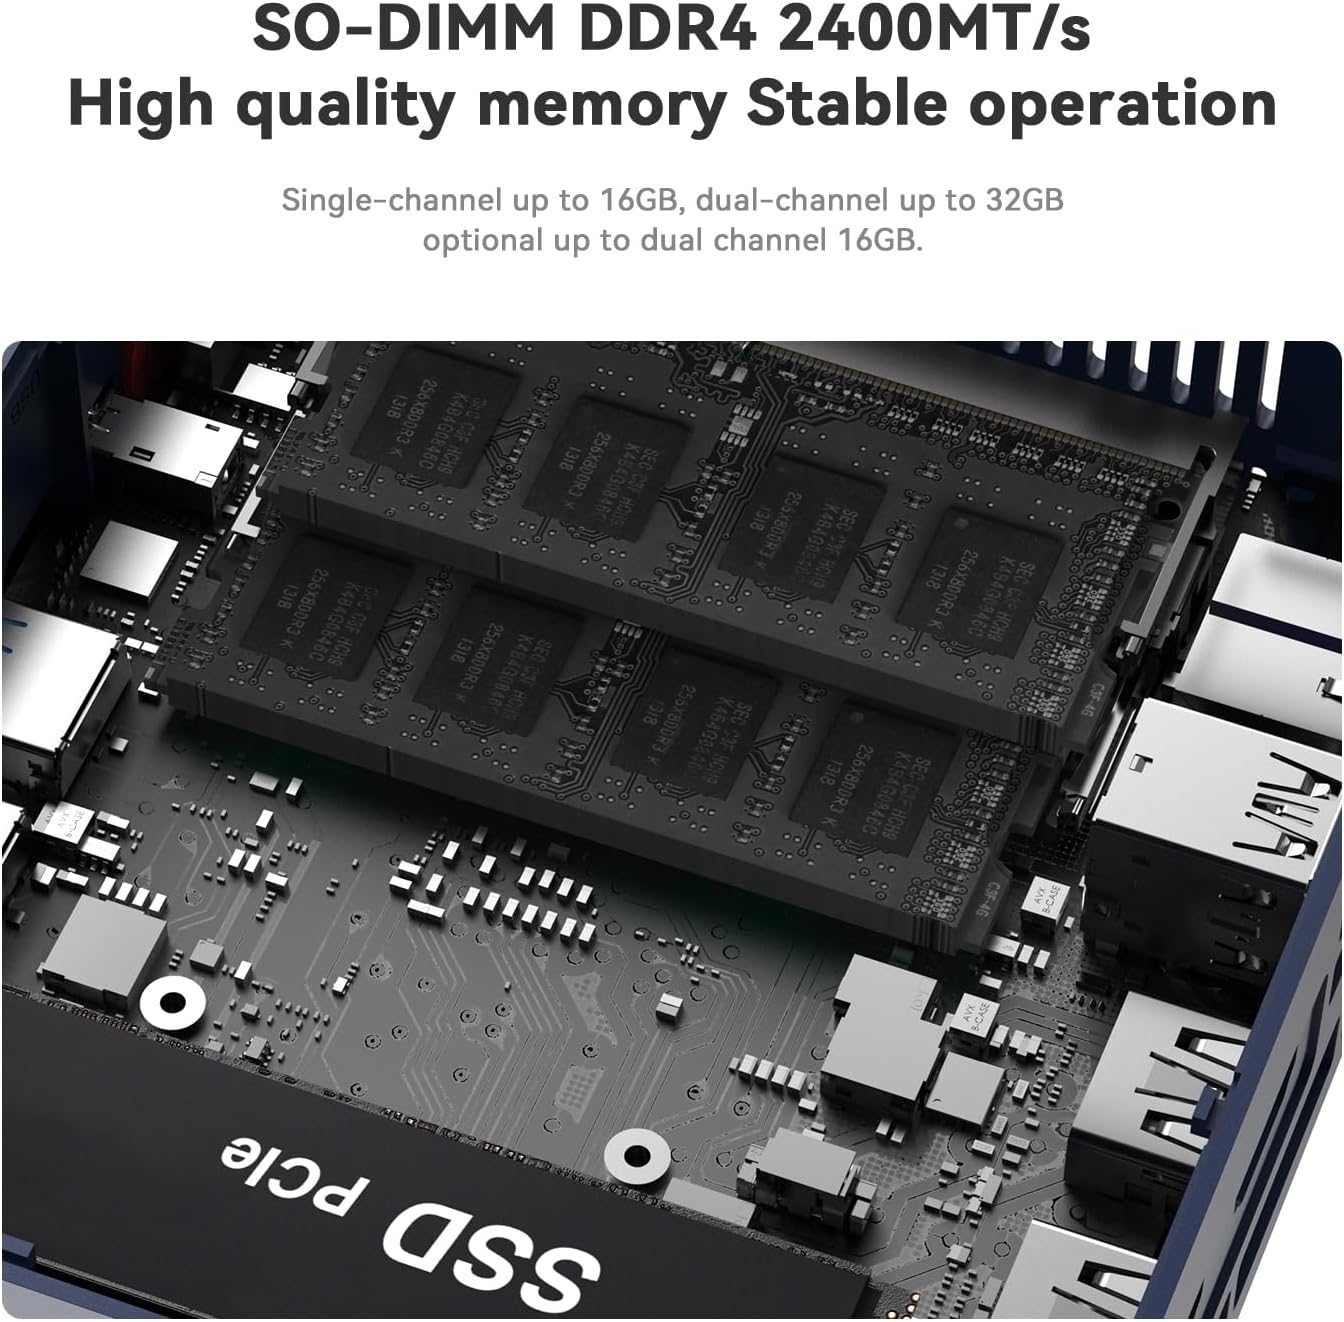
図 5: 分解 view illustrating the internal structure and components of the Mini PC.
4. セットアップ
- 周辺機器を接続します。 キーボード、マウス、モニターを適切な USB ポートと HDMI ポートに接続します。
- ネットワークに接続する: For wired connection, plug an Ethernet cable into the LAN port. For wireless, ensure your Wi-Fi network is available during initial setup.
- 接続電源: Plug the power adapter into the DC Jack on the rear panel, then connect it to a power outlet.
- 電源オン: 前面パネルの電源ボタンを押して、ミニ PC の電源をオンにします。
5. 操作手順
- 最初のブート: Upon first boot, the system will guide you through the Windows 11 setup process. Follow the on-screen instructions to configure your language, region, network, and user account.
- 電源オン/オフ: Press the power button once to turn on the device. To shut down, use the standard Windows shutdown procedure (Start Menu > Power > Shut down). A short press on the power button will put the PC to sleep.
- 再起動: 標準の Windows 再起動手順 (スタート メニュー > 電源 > 再起動) を使用します。
- デュアルディスプレイ: Connect up to two monitors via the HDMI ports for extended desktop functionality.
6. コンポーネントのアップグレード
The Beelink SER3 Mini PC allows for easy upgrades of its RAM and storage components.
6.1. RAMのアップグレード
The device comes with 16GB DDR4 RAM (2400MHz) and can be upgraded to a maximum of 32GB (2 x 16GB).
6.2. SSDのアップグレード
The Mini PC includes a 500GB M.2 PCIe 3.0 x4 (2280) SSD, which can be upgraded to a maximum of 2TB. It also supports adding a 2.5-inch SATA HDD/SSD (up to 2TB).

Figure 6: Internal layout highlighting the M.2 SSD and RAM slots for easy upgrades.
6.3. Upgrade Tutorial Video
For a detailed visual guide on upgrading the SSD, please refer to the official tutorial video:
Video 1: Official tutorial on how to replace the SSD in a Beelink Mini PC.
7. Windows 11 Installation
Your Beelink SER3 Mini PC comes pre-installed with Windows 11 Pro. If you need to reinstall the operating system, follow these general steps:
- インストールメディアを準備します。 Create a bootable USB drive with Windows 11 installation files using the Microsoft Media Creation Tool.
- Boot from USB: Connect the bootable USB drive to the Mini PC. Power on the PC and repeatedly press the designated key (usually F7 or DEL, refer to your specific model's quick start guide) to enter the boot menu. Select your USB drive as the boot device.
- 画面上の指示に従ってください: The Windows setup wizard will guide you through the installation process. Choose your language, time, and keyboard settings. Select the custom installation option to manage disk partitions.
- Disk Partitioning: If reinstalling, you may need to delete existing partitions on your SSD before creating new ones for a clean installation. Ensure you back up any important data beforehand.
- インストール完了: Follow the remaining prompts to complete the Windows 11 installation. The PC will restart several times.
7.1. Windows 11 Installation Tutorial Video
For a visual guide on installing Windows 11, please watch the official tutorial:
Video 2: Official tutorial demonstrating the steps to install Windows 11 on a Beelink Mini PC.
8. ドライバーのインストール
After installing Windows 11, it is crucial to install the correct drivers for optimal performance. While Windows Update may install some drivers automatically, it is recommended to download the latest drivers directly from the Beelink support webサイト。
- ドライバーをダウンロード: Beelinkの公式サポートをご覧ください web地点 (www.bee-link.com/support). Navigate to the 'Drivers & Downloads' section.
- Locate Your Model: 検索する 'SER3' or your specific model number to find the relevant drivers.
- ダウンロードとインストール: Download all necessary drivers (e.g., chipset, graphics, Wi-Fi, Bluetooth, audio). Unzip them if necessary and follow the installation instructions provided with each driver package. Restart your PC after installing all drivers.
9. 仕様
| 特徴 | 仕様 |
|---|---|
| ブランド | ビーリンク |
| モデル名 | ビーリンク SER3 |
| CPUモデル | AMD Ryzen 3 3200U(2C/4T、最大3.5GHz) |
| グラフィックスコプロセッサ | Radeon Vega 3 Graphics (3core 1200 MHz) |
| RAMメモリ | 16GB DDR4 2400MHz(32GBまでアップグレード可能) |
| ハードディスク | 500GB M.2 PCIe 3.0 x4 (2280) SSD (Upgradeable to 2TB) |
| 追加ストレージ | Supports 2.5" SATA HDD/SSD (up to 2TB) |
| オペレーティング·システム | ウィンドウズ11プロ |
| ワイヤレス接続 | WiFi6(802.11ac)、Bluetooth 5.2 |
| 無線LAN | 1000M ギガビットイーサネット |
| ビデオ出力 | HDMI x 2 (4K@60Hz デュアルディスプレイ) |
| USBポート | USB 4 x 3.2 |
| オーディオポート | オーディオジャック(HP&MIC)×1 |
| 冷却方法 | Fan, Large fan and dual heat conduction tube |
| 寸法 | 124x113x42mm |
10。 トラブルシューティング
If you encounter any issues with your Beelink SER3 Mini PC, please refer to the following general troubleshooting tips:
- 電源なし: 電源アダプターがPCと正常な電源コンセントの両方にしっかりと接続されていることを確認してください。必要に応じて別のコンセントを試してください。
- 表示なし: Check all HDMI cable connections. Ensure your monitor is set to the correct input source. Try a different HDMI cable or monitor.
- システムが応答しません: Press and hold the power button for 10 seconds to force a shutdown, then restart the PC. If the issue persists, try clearing the CMOS settings using the CLR CMOS button on the front panel (refer to the quick start guide for location).
- ネットワークの問題: For wired connections, check the Ethernet cable and router. For Wi-Fi, ensure the network is available and you have the correct password. Update Wi-Fi drivers if needed.
- ドライバーの問題: If devices are not working correctly, ensure all drivers are installed and up-to-date from the official Beelink support webサイト。
11. 保証とサポート
Beelink は、ミニ PC に優れたアフターサービスを提供することに尽力しています。
- 保証: Your Beelink SER3 Mini PC comes with a 3-year warranty.
- テクニカルサポート: We offer lifetime technical support.
- アフターサービス: 24時間7日のアフターサービスをご利用いただけます。
If you have any questions or require assistance, please do not hesitate to contact us. We are 100% guaranteed to solve your problems.
11.1. How to Contact Us Video
For information on how to reach our support team, please watch the following video:
Video 3: Official guide on contacting Beelink customer support.