1. はじめに
Thank you for choosing the CREWORKS 8-in-1 Heat Press. This versatile machine is designed for transferring designs onto various items such as T-shirts, bags, hats, mugs, and plates using heat transfer or sublimation paper and vinyl. Its 30x38cm heating platen provides ample space for creative projects, offering professional results for both personal and commercial use.
Key features of your heat press include:
- 強力な機能: Equipped with a 30x38cm Teflon-coated heating panel for efficient and safe operation.
- デュアルデジタルディスプレイ: Features a digital timer and dual temperature control display for precise and intuitive operation.
- 便利なデザイン: Rack-type control box for easy connection and immediate use.
- 簡単操作: Drawer-type work platform allows for simple replacement of accessories. Aluminum grill lid base and baking sheets ensure mechanical strength and reduced weight.
- 汎用性: The 8-in-1 design accommodates a wide range of items including T-shirts, mouse pads, backpacks, pillowcases, mugs, and hats.
2. 安全に関する注意事項
Please read all safety instructions carefully before operating the heat press to prevent injury or damage to the machine. Keep this manual for future reference.
- 常に正しい電圧のアース付き電源コンセントに本機を接続してください。tage(220V / 50Hz)。
- Do not touch the heating platen or other hot surfaces during operation or immediately after use. Use heat-resistant gloves if necessary.
- 操作中は子供やペットを機械から遠ざけてください。
- Ensure adequate ventilation in the work area to dissipate heat and fumes from transfer materials.
- 電源が入っているときや動作しているときは、機械から目を離さないでください。
- 濡れた手や暗い場所で機械を操作しないでください。amp 条件。
- 使用していないときや清掃、メンテナンスを行う前には、本機を電源コンセントから抜いてください。
- 電源コードが損傷した場合は、危険を回避するために、製造元、サービス代理店、または同様の資格を持つ担当者が交換する必要があります。
- The machine is designed with a heat-resistant casing, capable of withstanding temperatures up to 250°C (480°F). However, direct contact with hot surfaces should still be avoided.

Figure 2.1: The heat press features a heat-resistant casing and insulation layers, designed to protect users from direct heat and capable of withstanding temperatures up to 250°C (480°F).
3.製品コンポーネント
Familiarize yourself with the main parts of your CREWORKS 8-in-1 Heat Press:
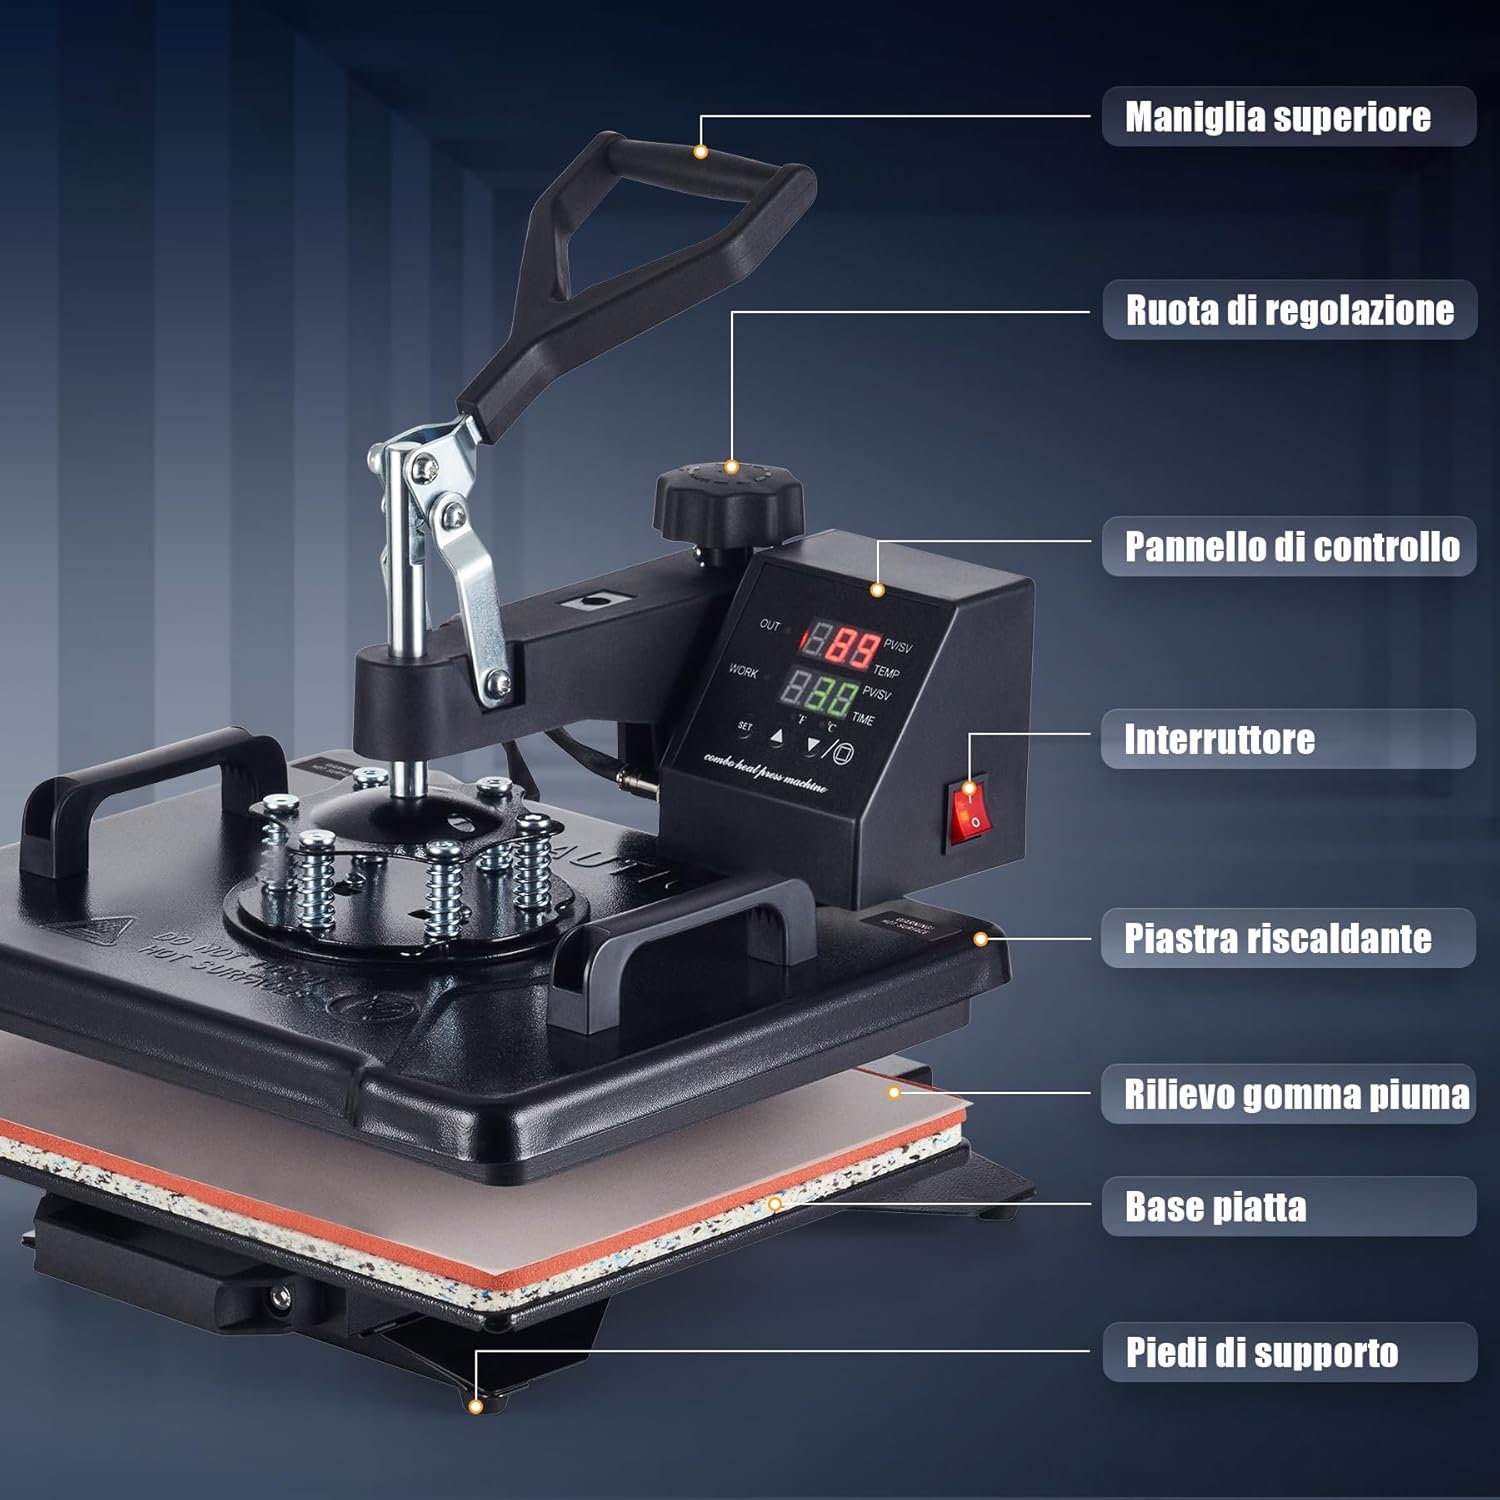
Figure 3.1: This diagram identifies the key parts of your heat press machine, including the top handle, adjustment wheel, control panel, power switch, heating platen, foam rubber pad, flat base, and support feet.
- トップハンドル: Used to lift and lower the heating platen.
- 調整ホイール: Controls the pressure applied by the heating platen.
- コントロールパネル: Digital display for setting temperature and time.
- 電源スイッチ: マシンの電源をオン/オフにします。
- Heating Platen: The upper heated surface that applies heat and pressure.
- Foam Rubber Pad: Provides a soft, heat-resistant surface for items.
- フラットベース: The lower platform where items are placed.
- サポートフィート: Stabilize the machine during operation.
4. パッケージ内容
開梱したら、以下の品目がすべて含まれていることを確認してください。
- 1 x Heat Press Main Unit
- 1 x 9 oz Cup Press Attachment
- 1 x 11 oz Cup Press Attachment
- 1 x 12 oz Cup Press Attachment
- 1 x 17 oz Cup Press Attachment
- 1 x 5" Plate Press Attachment
- 1 x 6" Plate Press Attachment
- キャッププレスアタッチメント x 1
- 1 x Instruction Manual (English or German)
5. 仕様
| 特徴 | 仕様 |
|---|---|
| ブランド | クレワークス |
| モデル | 30x38cm 8 in 1 |
| 力 | 1150W |
| 巻tage | 220V / 50Hz |
| 最高温度 | 250°C (480°F) |
| タイマー制御 | 0~999秒 |
| 全体寸法 | 30のx 38のx 49.5センチ(12のx 15のx 19.5中) |
| 高さ範囲 | 34〜43 cm(13.25〜17インチ) |
| プラテンエリア | 30 x 38 cm (12 x 15 インチ) |
| ケーブル長さ | 137 cm(4.5フィート) |
| アイテム重量 | 11.5キログラム |
| 材料 | Ceramic, Silicone, Vinyl (for accessories) |
| 推奨用途 | Bag, Bottle, Cap, Handbag, Hat, Mouse Pad, Mug, Pillow, Plate, Socks, T-Shirt |
6. セットアップ
Follow these steps for initial setup of your heat press:
- 開梱: すべての部品をパッケージから慎重に取り出してください。パッケージは保管または輸送のために保管してください。
- 配置: Place the main heat press unit on a stable, heat-resistant surface in a well-ventilated area. Ensure there is enough space around the machine for safe operation and rotation.
- コントロールボックスの接続: The control box is designed for rack-type installation. Simply connect the control box to the main unit. Ensure all connections are secure.
- 電源接続: Plug the power cord into a grounded 220V / 50Hz electrical outlet.
- 初期チェック: Before first use, turn on the power switch and allow the machine to heat up to a low temperature (e.g., 100°C) to ensure all functions are working correctly. Observe for any unusual smells or sounds.
7. 操作手順
This section outlines the general operation of your heat press. Specific settings (temperature, time, pressure) will vary depending on the material and transfer type.

Figure 7.1: Operating the heat press is simplified into three main steps: 1. Lift and rotate the heating platen away from the base. 2. Position your item and design on the silicone pad. 3. Lower the heating platen and apply pressure to begin the transfer.
7.1. 基本的な操作手順
- 電源オン: Turn on the main power switch located on the control panel.
- 温度と時間を設定します: Use the digital control panel to set the desired temperature and time according to your transfer material's specifications. Refer to Section 7.2 for details.
- 予熱: Allow the machine to reach the set temperature. The display will indicate when the target temperature is achieved.
- 準備するアイテム: Lift the top handle and rotate the heating platen 360 degrees to the side, away from the base. This provides a clear workspace.
- ポジションアイテム: Place your item (e.g., T-shirt, mug) onto the appropriate pad or attachment. Lay your transfer design onto the item.
- 圧力をかける: Rotate the heating platen back over the item. Lower the top handle firmly to engage the heating platen with the item. The timer will start automatically.
- 転送完了: Once the timer alarms, lift the top handle and rotate the heating platen away from the item. Carefully remove the transferred item.
- 電源を切る: 終了したら、電源スイッチをオフにして、機械のプラグを抜いてください。
7.2. コントロールパネルの設定
The intuitive LED control panel allows precise adjustment of temperature and time.

Figure 7.2: The intuitive LED control panel displays the maximum temperature (250°C / 480°F) and timer interval (0-999 seconds). It also provides recommended temperature settings for common materials like chemical fibers (160°C), cotton apparel (170°C), and ceramic mugs (200°C).
- 温度設定: Press the 'SET' button, then use the up/down arrows to adjust the target temperature. Press 'SET' again to confirm. The maximum temperature is 250°C (480°F).
- 時間設定: Press the 'SET' button twice, then use the up/down arrows to adjust the transfer time in seconds. Press 'SET' again to confirm. The timer range is 0-999 seconds.
- 温度単位: The display can switch between Celsius and Fahrenheit. Consult the manual for specific instructions on changing units if needed.
推奨温度ガイドライン:
- Chemical Fibers: Approximately 160°C
- Cotton Apparel: Approximately 170°C
- Ceramic Mugs: Approximately 200°C
Note: These are general guidelines. Always refer to the specific instructions provided with your transfer material and item.
7.3.圧力調整
The pressure adjustment wheel allows you to fine-tune the downward force of the heating platen. Proper pressure is crucial for a successful transfer.

Figure 7.3: The machine features a 360-degree swivel design for safe and easy placement of items, along with a pressure adjustment knob to apply the correct force for various materials.
- To Increase Pressure: Turn the adjustment wheel clockwise.
- To Decrease Pressure: Turn the adjustment wheel counter-clockwise.
- Testing Pressure: Before heating, close the platen onto your item. You should feel a firm resistance when closing the handle. Adjust until the desired pressure is achieved.
7.4. 異なる添付ファイルの使用
The 8-in-1 heat press includes various attachments for different items. The drawer-type work platform makes changing accessories straightforward.
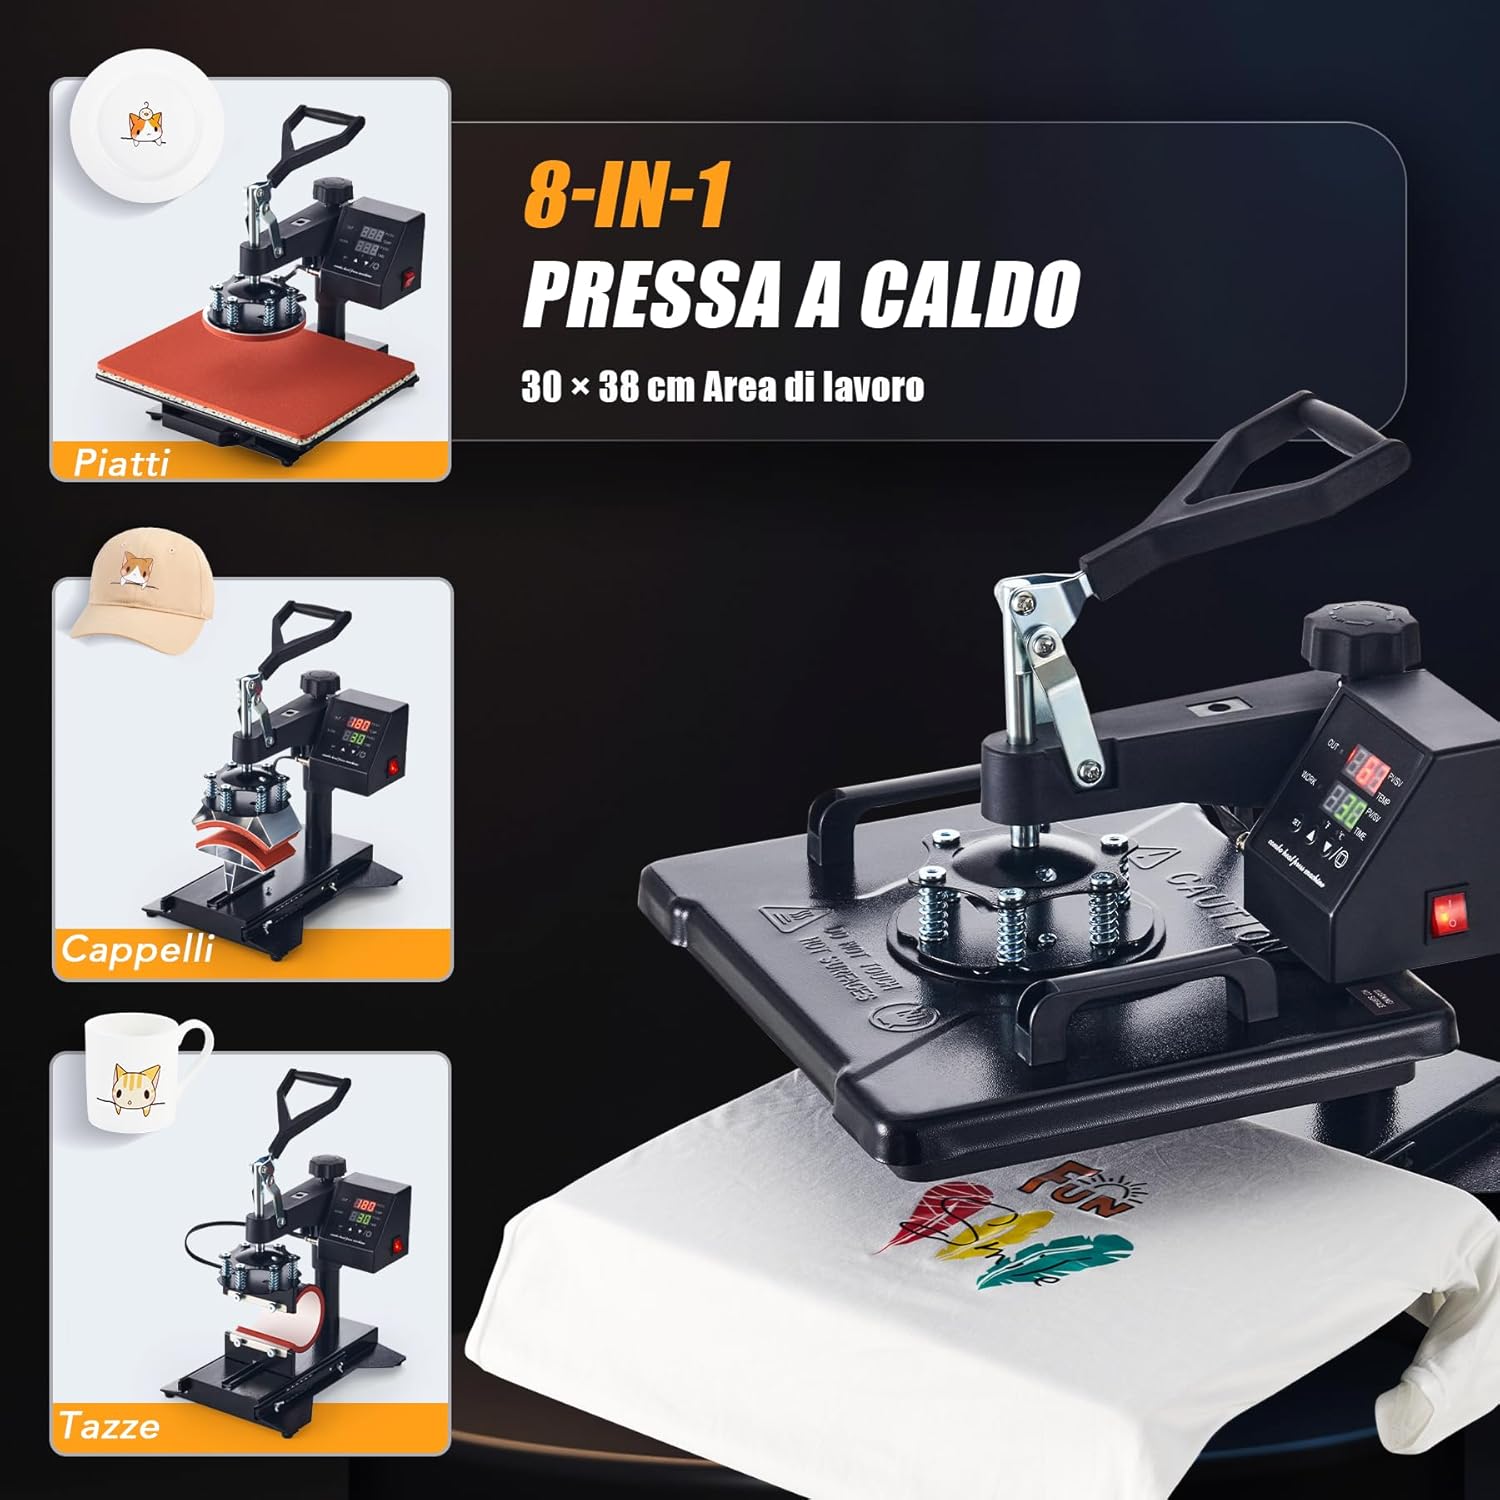
Figure 7.4: The CREWORKS 8-in-1 Heat Press comes with various attachments, allowing you to transfer designs onto different items such as plates, caps, and mugs, in addition to flat items like T-shirts.
- 添付ファイルの変更: Ensure the machine is unplugged and cool. Loosen any securing screws or clips holding the current attachment. Carefully remove it and install the desired attachment (e.g., mug press, plate press, cap press). Secure it firmly.
- マグプレス: Use the appropriate mug attachment for your mug size (9oz, 11oz, 12oz, 17oz). Adjust the pressure knob on the mug attachment to ensure a snug fit around the mug.
- プレートプレス: Use the 5" or 6" plate attachment. Ensure the plate is centered and stable.
- キャッププレス: Use the cap attachment. Position the cap securely on the curved surface.
7.5. Uniform Heat Transfer
The CREWORKS heat press is designed with a dual-tube heating element to ensure consistent results.
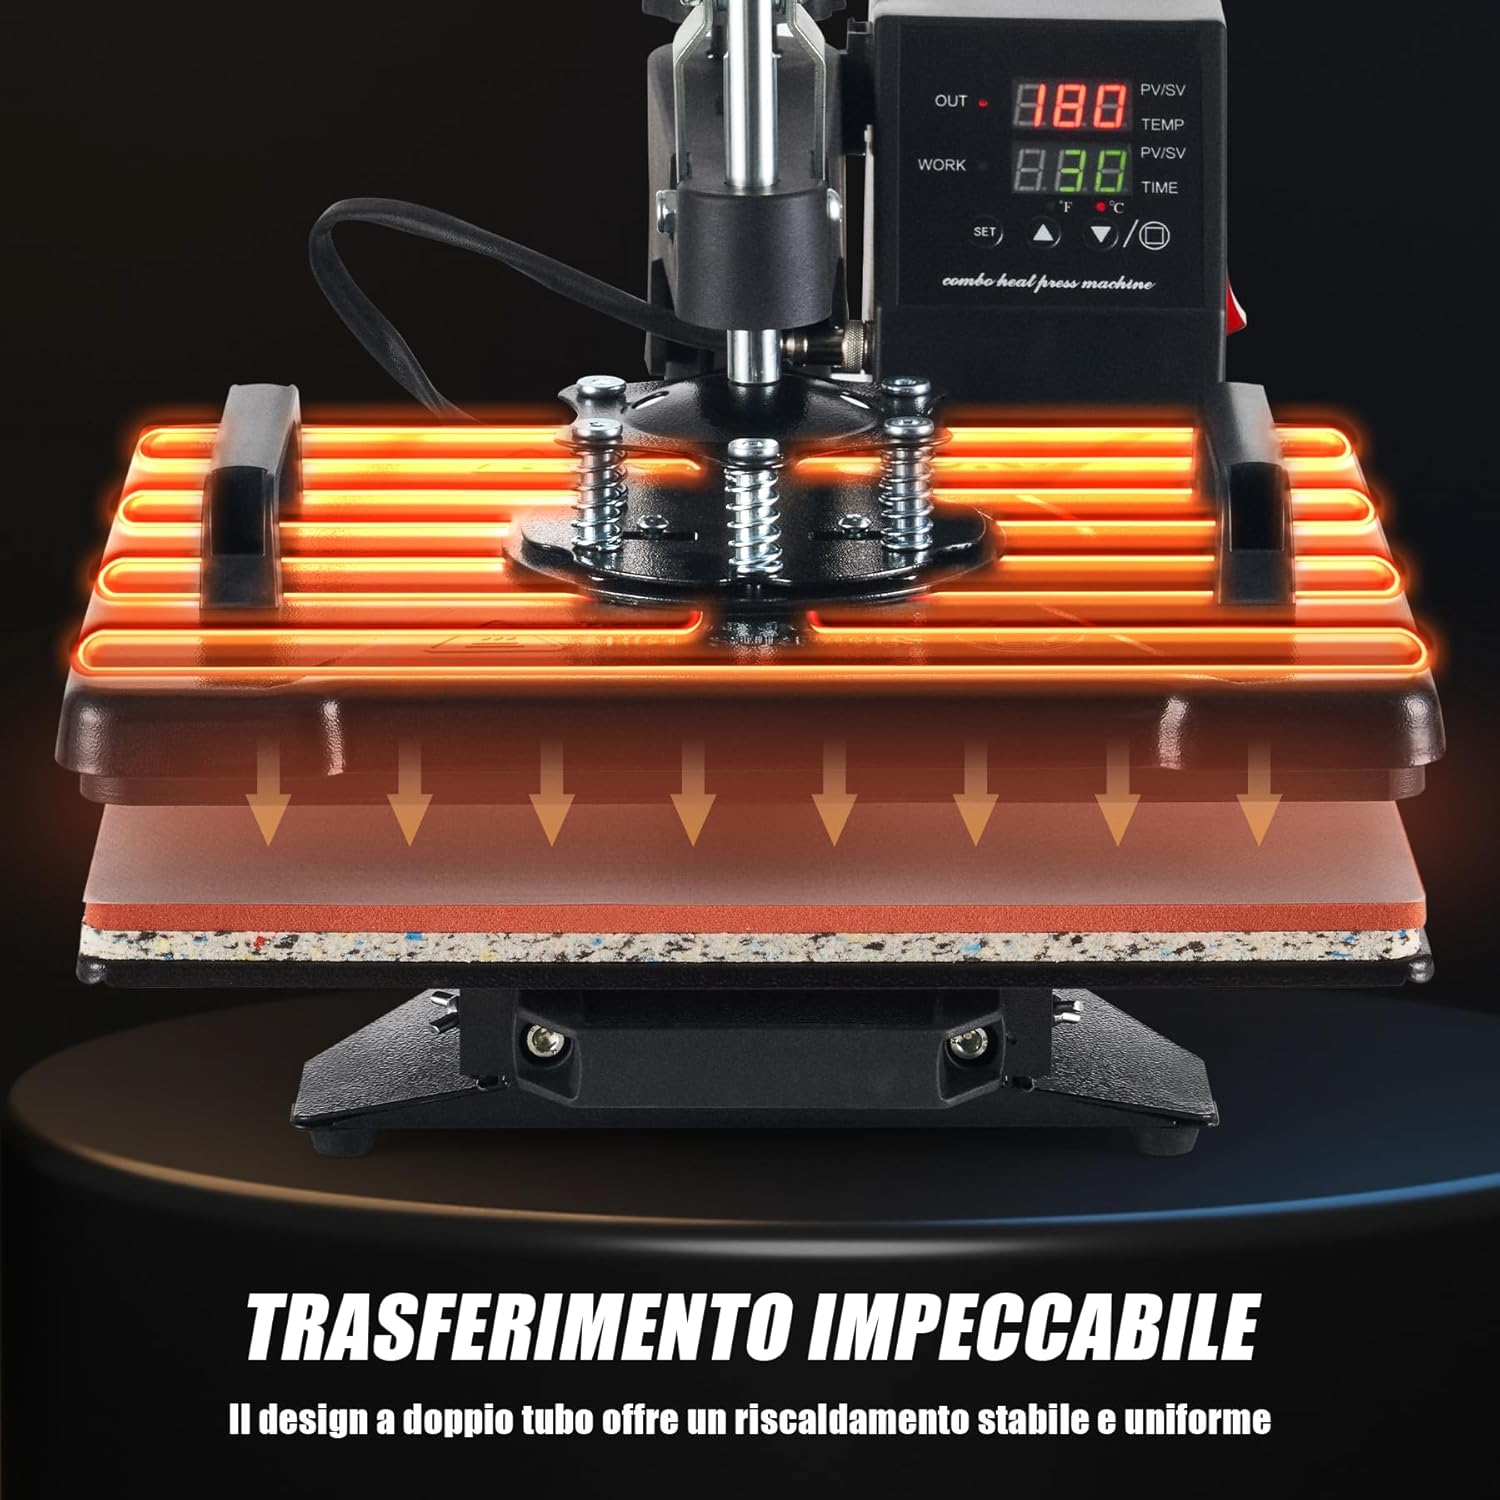
Figure 7.5: The dual-tube heating design ensures stable and uniform heat distribution across the entire platen, guaranteeing consistent and high-quality transfers.
The dual-tube heating design provides stable and uniform heat distribution across the entire platen surface. This minimizes cold spots and ensures that your designs are transferred evenly and consistently, resulting in professional-quality finished products.
8. メンテナンス
定期的なメンテナンスにより、ヒートプレス機の寿命が長くなり、最適なパフォーマンスが確保されます。
- プラテンのクリーニング: Ensure the machine is cool and unplugged. Use a soft, damp cloth to wipe down the Teflon-coated heating platen. For stubborn residue, use a specialized platen cleaner. Avoid abrasive cleaners or tools that could scratch the surface.
- Cleaning the Silicone Pad: The silicone pad can be wiped with a damp cloth. If it becomes heavily soiled or damaged, it may need replacement to ensure even pressure.
- 一般的な清掃: 機械の外側を乾いた布か軽く湿らせた布で拭いてください。amp 布でホコリやゴミを取り除きます。
- ストレージ: Store the heat press in a clean, dry environment when not in use.
- 検査: Periodically check all cables and connections for signs of wear or damage. Do not operate the machine if any part is damaged.
9。 トラブルシューティング
If you encounter issues with your heat press, refer to the table below for common problems and solutions.
| 問題 | 考えられる原因 | 解決 |
|---|---|---|
| マシンの電源が入らない | Power cord not plugged in; Power outlet fault; Main switch off | 電源コードの接続を確認し、別のデバイスでコンセントをテストし、メインスイッチがオンになっていることを確認します。 |
| Heating platen not heating up | Temperature not set; Heating element fault | Verify temperature setting on control panel; Contact customer support if issue persists. |
| Uneven transfer results | Uneven pressure; Incorrect temperature/time; Damaged silicone pad | Adjust pressure knob; Verify temperature and time settings; Inspect and replace silicone pad if damaged. |
| 転写が付着しない | Insufficient temperature; Insufficient time; Insufficient pressure; Incorrect transfer material | Increase temperature or time; Increase pressure; Ensure correct transfer material for item; Consult transfer material instructions. |
| Design peeling or cracking | Over-pressing; Too high temperature; Incorrect peeling method (hot/cold peel) | Reduce pressure or time; Lower temperature; Follow transfer material's specific peeling instructions. |
If you encounter a problem not listed here or if the suggested solutions do not resolve the issue, please contact CREWORKS customer support.
10. 保証とサポート
CREWORKS products are manufactured to high-quality standards. For information regarding warranty coverage, please refer to the warranty card included with your product or visit the official CREWORKS webサイト。
For technical assistance, troubleshooting, or spare parts, please contact CREWORKS customer support through the retailer where you purchased the product or via the contact information provided on the official CREWORKS webサイト。