導入
Thank you for choosing the Xgody 3-Channel Dash Cam. This manual provides detailed instructions for the installation, operation, and maintenance of your new dash camera. Please read this manual thoroughly before using the product to ensure proper function and to maximize your user experience. Keep this manual for future reference.
製品終了view 箱の中身
The Xgody 3-Channel Dash Cam is designed to record video from the front, inside, and rear of your vehicle simultaneously, providing comprehensive coverage. It features high-definition recording, infrared night vision, G-sensor for emergency locking, loop recording, and parking monitoring.
パッケージ内容:
- Xgody Dash Cam Unit
- 後方 View Camera (6M cable)
- カーチャージャー
- USBデータケーブル
- ユーザーマニュアル
- 64GB SDカード
- 粘着ステッカー
- カードピン
- ネジ(リアカメラ取り付け用)
- 3M Glue Stick Card Line
- バール(ケーブル配線用)

Figure 1: Xgody Dash Cam and Included Accessories
主な特徴
Three-Channel Recording
The dash cam simultaneously records video from three perspectives: front (1080p), inside (720p), and rear (720p). For clearer internal and external footage, the front and cabin dual-lens cameras can operate independently at 1080p+1080p.

Figure 2: Three-Channel Recording Overview
赤外線(IR)ナイトビジョン
The inside-facing camera is equipped with 4 IR LED lights and an F/2.0 aperture. This technology automatically increases exposure in low-light or dark conditions, ensuring clear video footage of the vehicle's interior. The operating temperature range is -31°F to 167°F (-35°C to 75°C).

図3: 赤外線暗視装置の動作
ループ録音
Continuous loop recording automatically overwrites the oldest unlocked video files when the memory card is full. This ensures that recording never stops due to a full card, providing uninterrupted surveillance.

図4: ループ録画機能
Gセンサー(緊急ロック)
The built-in G-sensor detects sudden shocks or collisions. When such an event occurs, the dash camera automatically locks the current video footag例えば、ループ録画による上書きを防止し、重要な証拠を確実に保存します。
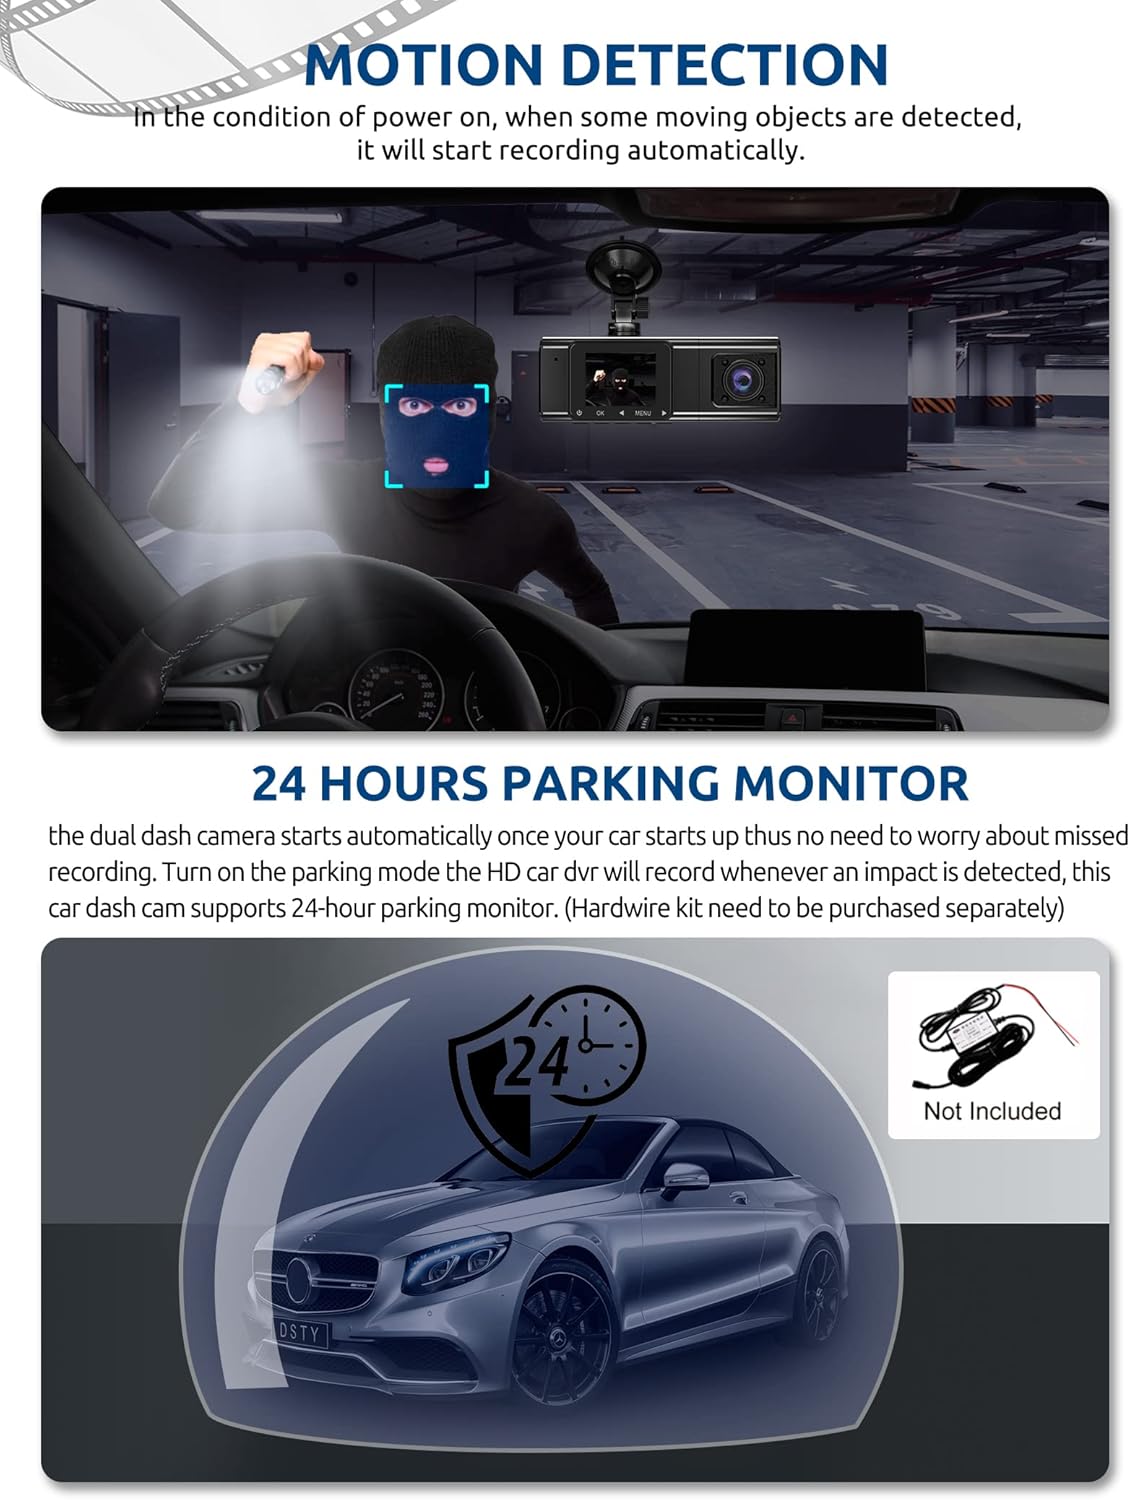
Figure 5: G-Sensor Activating During an Impact
Motion Detection & 24-Hour Parking Mode
In motion detection mode, the video recorder begins recording automatically when it detects movement in front of the camera. For continuous 24-hour surveillance, even when the car is off, the dash cam can be connected to the car battery via a hardwire kit (not included). This enables parking mode, which records when an impact is detected.

Figure 6: Motion Detection and Parking Monitoring
セットアップ手順
1. Insert the SD Card
- ダッシュ カメラの側面にある SD カード スロットを見つけます。
- 付属の 64GB SD カードを、金色の接点をカメラの背面に向けて、カチッと音がするまで挿入します。
- カードが完全に挿入されていることを確認してください。
2. ドライブレコーダーを取り付ける
- ダッシュ カメラを取り付ける予定のフロント ガラス部分をきれいにします。
- 吸盤マウントをダッシュ カメラに取り付けます。
- 吸盤をフロントガラスにしっかりと押し付けて固定します。カメラの位置を調整して、視界が確保できるようにします。 view 運転中の視界を妨げることなく、前方の道路の状況を把握できます。
3. リアカメラを取り付ける
- リアカメラケーブルをメインのダッシュ カメラ ユニットに接続します。
- Route the cable neatly along the vehicle's headliner and trim to the rear of the car. Use the provided crowbar to tuck the cable under panels.
- Mount the rear camera on the rear windshield using the adhesive sticker or screws, ensuring it has a clear view 後ろの道の。
4. 電源を入れる
- 車の充電器を車のシガレットライターソケットに差し込みます。
- 車の充電ケーブルのもう一方の端をダッシュ カメラの電源入力ポートに接続します。
- 通常、ダッシュ カメラは、車両が始動すると自動的に電源がオンになり、車両が停止すると電源がオフになります。
操作手順
電源オン/オフ
- 自動: The dash cam powers on and starts recording automatically when connected to power and the vehicle ignition is on. It powers off automatically when the ignition is turned off.
- マニュアル: Press and hold the power button for a few seconds to manually turn the device on or off.
記録モード
- 通常録画: The default mode, continuously recording video in segments.
- 緊急録画(Gセンサー): Automatically activated upon impact, locking the current video file.
- 動き検出記録: Records when motion is detected while the vehicle is parked (requires activation in settings).
- 駐車監視: Records when an impact is detected while the vehicle is parked (requires hardwire kit and activation in settings).
メニューナビゲーション
- Use the 'MENU' button to access settings.
- Use the 'UP' and 'DOWN' arrow buttons to navigate through menu options.
- 「OK」ボタンを押して選択を確定します。
- Common settings include video resolution, loop recording duration, G-sensor sensitivity, parking mode, date/time, and language.
Viewイング・フーtage
- デバイス上: Enter playback mode via the menu to view recorded videos directly on the dash cam screen.
- コンピューター上: Remove the SD card from the dash cam and insert it into a computer's card reader. The video files can then be accessed and played using standard media player software.
メンテナンス
SDカードのフォーマット
It is recommended to format the SD card regularly (e.g., once a month) to ensure optimal performance and prevent data corruption. This can typically be done through the dash cam's menu settings. Formatting will erase all data on the card, so back up any important fileまず最初に。
レンズのクリーニング
Periodically clean the lenses of the front, inside, and rear cameras with a soft, lint-free cloth. Avoid using abrasive cleaners that could scratch the lens surface. Clean lenses ensure clear video quality.
ファームウェアの更新
Check the official Xgody website periodically for any available firmware updates. Updates can improve performance, add new features, or fix bugs. Follow the instructions provided with the firmware update carefully.
トラブルシューティング
| 問題 | 考えられる原因 | 解決 |
|---|---|---|
| ダッシュカムの電源が入りません。 | 電源が供給されない、車の充電器が故障している、接続が緩んでいる。 | Check car charger connection; ensure vehicle's cigarette lighter socket is functional; try a different power source if available. |
| 録音が停止するか、 fileが破損しています。 | SD カードがいっぱいです。SD カードにエラーがあります。SD カードに互換性がありません。 | Format the SD card regularly; use a high-speed (Class 10 or U3) SD card; replace the SD card if issues persist. |
| Screen is unresponsive or distorted. | Extreme temperatures; software glitch. | Allow the device to return to normal operating temperature; perform a factory reset (refer to manual for specific steps); ensure the device is not exposed to direct sunlight for extended periods in hot climates. |
| ビデオの品質が悪いです。 | レンズが汚れている、レンズに保護フィルムが貼られたままである、解像度の設定が正しくない。 | Clean camera lenses; remove any protective film; check video resolution settings in the menu. |
| Gセンサーが敏感すぎる/敏感さが足りない。 | Gセンサーの感度設定が高すぎる/低すぎます。 | ダッシュ カメラの設定メニューで G センサーの感度を調整します。 |
仕様
| 特徴 | 仕様 |
|---|---|
| 製品寸法 | 4.25 x 1.77 x 1.57インチ |
| アイテム重量 | 1.26ポンド |
| 接続技術 | USB、ワイヤレス |
| ビデオキャプチャ解像度 | 1080p (Front), 720p (Inside), 720p (Rear) |
| 画面サイズ | 1.5インチ |
| フラッシュメモリタイプ | SD |
| 動作温度 | -31°F ~ 167°F (-35°C ~ 75°C) |
| 含まれるコンポーネント | メモリーカード(64GB) |
| 色 | 黒 |
保証とサポート
Xgody provides 18 months of service for this product. If you have any questions or require assistance regarding your Xgody Dash Cam, please contact our customer support. We aim to respond with helpful advice within 24 hours.
For support, please refer to the contact information provided in the packaging or on the official Xgody webサイト。