1. はじめに
This manual provides detailed instructions for the installation, operation, and maintenance of your ALTHY PRE-1 Whole House Spin Down Sediment Water Filter. Please read this manual thoroughly before installation and use to ensure proper function and safety.
The ALTHY PRE-1 filter is designed to remove sediment, rust, dust, and sand particles from your household water supply, protecting downstream appliances and improving overall water quality.
2. 安全情報
- Always turn off the main water supply before installing or performing maintenance on the filter.
- Depressurize the water system before opening the filter housing.
- 漏れを防ぐために、すべての接続が確実に固定されていることを確認してください。
- Do not install the filter in direct sunlight or in areas where it may freeze. Freezing can cause damage to the filter housing and lead to leaks.
- Use only genuine ALTHY replacement parts and filters.
- 設置手順が不明な場合は、資格のある配管工にご相談ください。
3.製品コンポーネント
The ALTHY PRE-1 Whole House Spin Down Sediment Water Filter package typically includes the following components:
- Filter Unit (Housing, Filter Screen)
- 排水バルブ
- Special Wrench for Filter Housing
- 1/2" Internal 304 Stainless Steel Thread Adapters (2 pieces)
- 取扱説明書

Image 3.1: ALTHY PRE-1 Filter Unit and Included Accessories. This image displays the main filter unit, two filter screens, and a black wrench.

Image 3.2: What's in the Box. This image shows the filter unit, two stainless steel thread adapters, a drain valve, and the special wrench.
4. インストール
The ALTHY PRE-1 filter should be installed on the main water line entering your home, after the main shut-off valve and before any other water treatment systems or appliances.
4.1インストール前のチェックリスト
- セクション 3 に記載されているすべてのコンポーネントが揃っていることを確認します。
- Gather necessary tools: pipe wrench, thread sealant tape (Teflon tape), pipe cutter (if modifying existing pipes), measuring tape.
- Choose a suitable installation location:
- 直射日光を避けてください。
- 氷点下の温度から保護されます。
- メンテナンスのためにアクセス可能です。
- Near a drain for flushing.
4.2 インストール手順
- Turn off Main Water Supply: Locate your main water shut-off valve and turn it off. Open a faucet in your home to relieve pressure and drain water from the pipes.
- パイプを準備する: Cut a section of the main water line where you intend to install the filter. Ensure the cut is clean and straight. The filter should be installed with the water flow direction matching the "IN" and "OUT" markings on the filter head.
- アダプターをインストールします: Apply thread sealant tape to the threads of the 1/2" internal 304 Stainless Steel Thread Adapters. Screw these adapters into the inlet and outlet ports of the filter head.

Image 4.1: Flexible Installation for Water Pipe. This diagram illustrates how different pipe sizes (1/2", 3/4", 1") can be adapted for connection to the filter using the included adapters.
- フィルターを接続します。 Connect the filter unit to the cut sections of your main water line. Ensure the flow direction is correct (water enters the "IN" side and exits the "OUT" side). Tighten all connections securely, but do not overtighten.
- 排水バルブの取り付け: Attach the drain valve to the bottom of the filter housing. Ensure it is securely tightened.
- 漏れがないか確認する: Slowly turn on the main water supply. Carefully inspect all connections for any leaks. If leaks occur, turn off the water, depressurize the system, and re-tighten the connections.
- システムをフラッシュする: Once installed and leak-free, open the drain valve at the bottom of the filter for a few minutes to flush out any air and fine particles from the new filter. Close the drain valve.
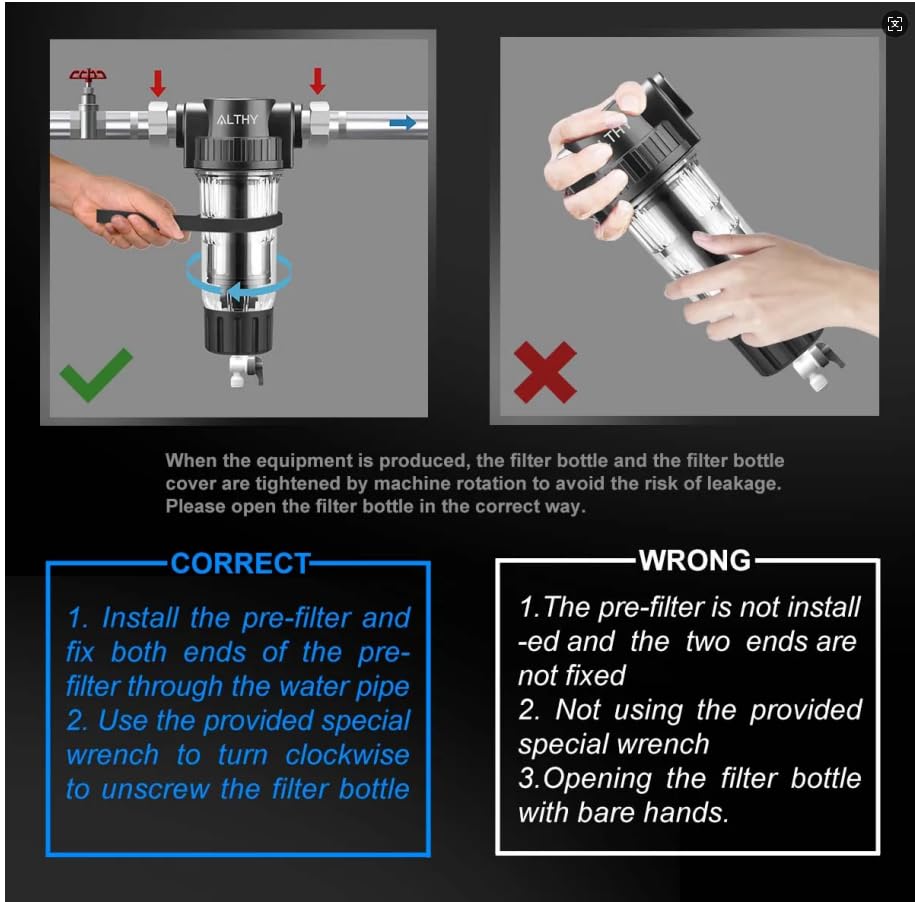
Image 4.2: Correct and Incorrect Installation/Opening. This image highlights the proper way to install the pre-filter and use the special wrench to unscrew the filter bottle, contrasting it with incorrect methods.
Video 4.1: ALTHY PRE-1 Pre-Filter Spin Sediment Filter Introduction. This video provides an overview of the ALTHY PRE-1 filter, its components, and basic functionality, including installation context within a whole house water purification system.
5. 操作
Once installed, the ALTHY PRE-1 filter operates continuously to filter your incoming water supply. The transparent housing allows for visual inspection of the filter screen and accumulated sediment.
5.1 Flushing the Filter
Regular flushing is essential to maintain filter efficiency and extend the life of the filter screen. The frequency of flushing depends on your water quality and usage.
- Locate the Drain Valve: The drain valve is at the bottom of the filter housing.
- Open the Drain Valve: Slowly turn the handle of the drain valve to the "ON" or open position. You will see water and accumulated sediment flush out.
- Flush Duration: Allow water to flush for 30-60 seconds, or until the water runs clear.
- Close the Drain Valve: Turn the handle back to the "OFF" or closed position.
It is recommended to flush the filter at least once a month, or more frequently if you notice a decrease in water pressure or visible sediment accumulation in the housing.
6. メンテナンス
Beyond regular flushing, periodic cleaning of the filter screen is necessary to ensure optimal performance.
6.1 フィルタースクリーンの清掃
The ALTHY PRE-1 features a reusable and flushable stainless steel filter screen with a built-in double-sided scraper for efficient cleaning.
- 給水を止める: 主給水を停止し、近くの蛇口を開いて圧力を解放します。
- 水を抜きます: Open the drain valve at the bottom of the filter to drain water from the housing. Close the drain valve once drained.
- Remove Filter Housing: Use the provided special wrench to carefully unscrew the transparent filter housing from the filter head. Turn counter-clockwise.

Image 6.1: Using the Special Wrench. The image demonstrates the correct use of the special wrench to unscrew the filter housing for maintenance.
- Remove Filter Screen: Carefully pull out the stainless steel filter screen from the housing.
- クリーンスクリーン: Rinse the filter screen thoroughly under running water. The built-in double-sided scraper helps dislodge trapped particles. You can also use a soft brush if necessary.

Image 6.2: Double-sided Scraper. This diagram shows the internal double-sided scraper mechanism designed for 360-degree cleaning of the filter screen from the inside out.
- Oリングを検査します。 Check the O-rings on the filter housing and head for any signs of wear, cracks, or damage. Replace if necessary. Lubricate O-rings with food-grade silicone grease to ensure a good seal.
- 組み立て直す: Insert the clean filter screen back into the housing. Carefully screw the filter housing back onto the filter head, ensuring it is hand-tightened first, then use the special wrench for a final snug fit. Do not overtighten.
- 給水復旧: ゆっくりと給水元を開き、水漏れがないか確認します。
It is recommended to clean the filter screen every 3-6 months, depending on your water quality.
7。 トラブルシューティング
| 問題 | 考えられる原因 | 解決 |
|---|---|---|
| 水漏れ |
|
|
| 水圧が低い |
|
|
| Visible Sediment After Filtration |
|
|
8. 仕様
| 特徴 | 詳細 |
|---|---|
| モデル番号 | プレ1 |
| ろ過評価 | 40-Micron |
| フィルター材料 | 316L Stainless Steel Mesh |
| ハウジング材質 | BPA-free, Food Grade Material |
| 流量 | 最大20 GPM(1分あたりのガロン) |
| インレット/アウトレット接続 | 3/4" NPT (includes 1/2" adapters) |
| 製品寸法 | 3.74 x 8.86 x 4.33インチ |
| アイテム重量 | 2.89 ポンド |
| 特集 | Rust Resistant, Reusable/Flushable Filter, Built-in Double-sided Scraper |
| 圧力テスト済み | 150,000 cycle water hammer tests (1Mpa), 1000psi hydrostatic test |

Image 8.1: Filter Performance Overview. This image highlights the filter's ability to remove up to 99% of impurities and its flow rate of up to 20 GPM.

Image 8.2: Featured Material and Testing. This image emphasizes the filter's BPA-free, food-grade construction and its successful completion of 150,000 cycle water hammer tests and a 1000psi hydrostatic test.
9. 保証とサポート
ALTHY products are manufactured to high-quality standards. For warranty information, technical support, or to purchase replacement parts, please contact ALTHY customer service through the retailer where you purchased the product or visit the official ALTHY webサイト。
保証請求のために購入証明書を保管してください。