導入
This manual provides detailed instructions for the safe and efficient operation of your SINGER M1005 Electric Sewing Machine. The M1005 is designed for various sewing projects, offering 4 built-in stitches with 11 options, adjustable thread tension, and a reverse lever for securing seams. Please read this manual thoroughly before using the machine to ensure proper setup and function.
重要な安全上の注意事項
電気製品を使用するときは、次のような基本的な安全上の注意事項を必ず守ってください。
- このミシンを使用する前に、すべての指示をお読みください。
- Keep these instructions in a convenient place near your machine.
- 使用後、および清掃、カバーの取り外し、潤滑、または取扱説明書に記載されているその他のユーザー保守調整を行う前に、必ずマシンを電源コンセントから抜いてください。
- おもちゃとして使用しないでください。 本製品を子供が使用する場合や子供の近くで使用する場合は、細心の注意が必要です。
- この製品は、このマニュアルに記載されている本来の用途にのみ使用してください。
- Never operate this sewing machine if it has a damaged cord or plug, if it is not working properly, or if it has been dropped or damaged.
- すべての可動部品に指を近づけないでください。 ミシンの針の周りには特別な注意が必要です。
- 常に適切な針板を使用してください。不適切な針板を使用すると、針が折れる場合があります。
- 縫っている間は布地を引っ張ったり押し込んだりしないでください。針が曲がって折れてしまう可能性があります。
- 針に糸を通す、針を交換する、ボビンに糸を通す、押さえ金を交換するなど、針周りの調整を行うときは、ミシンの電源を切ってください。
製品終了view
The SINGER M1005 is a compact and user-friendly electric sewing machine designed for ease of use and portability.
主な特徴:
- 4 Stitches in 11 Options: Select from various straight stitches, zigzag stitches, blind hem stitch, and multi-stitch zigzag using the Stitch Selector Dial.
- 調整可能な糸張力: Allows for fine-tuning stitch quality for different fabrics and threads.
- Top Drop-in Bobbin: Features a transparent bobbin cover for easy monitoring of thread supply and simple bobbin insertion.
- Free-Arm Design: Facilitates sewing of cylindrical items like trouser hems and sleeve cuffs.
- リバースレバー: Conveniently located for securing the beginning and end of seams with reverse stitches.
- Extra High-Presser Foot Lifter: Provides additional clearance for sewing multiple layers or thicker fabrics.
- ポータブルデザイン: Lightweight for easy transport and storage.
含まれるコンポーネント:
Your SINGER M1005 sewing machine package includes the following items:
- 1 ミシン
- All-purpose Foot
- Extra Needle
- Finger Guard (pre-installed, removable)
- Bobbins: Class 15 (Transparent)
- 手動糸通し器
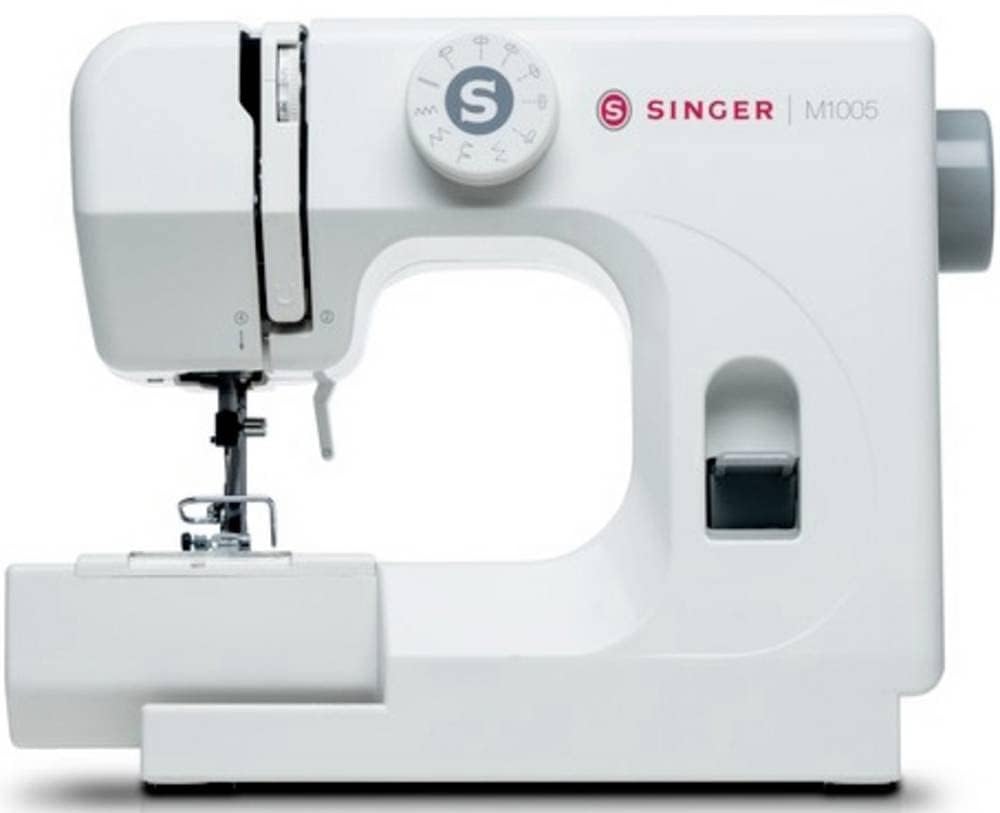
図1: The SINGER M1005 Electric Sewing Machine, showcasing its compact design and ready-to-use setup.
設定
1. 電源接続
- 機械を安定した平らな面に置きます。
- 電源スイッチが「オフ」の位置にあることを確認してください。
- 電源コードをマシンの電源入力に接続し、適切な電源コンセントに接続します。
2. ボビンを巻く
Proper bobbin winding ensures smooth stitching.
- 糸こまを糸立て棒に置きます。
- 糸を上部の糸ガイドに通してボビン巻き上げテンションディスクの周りに導きます。
- Insert the thread through the small hole in the bobbin from the inside out.
- Place the bobbin onto the bobbin winder spindle.
- 下糸巻き軸を右に押します。
- Turn on the machine and gently press the foot controller (if applicable) or press the start button to begin winding.
- Once the bobbin is full, push the spindle back to the left and cut the thread.
3. Inserting the Top Drop-in Bobbin
The transparent bobbin cover allows for easy monitoring.
- 針が最も高い位置にあることを確認します。
- Open the transparent bobbin cover plate.
- 糸を反時計回りにほどきながら、巻かれたボビンをボビンケースに入れます。
- Guide the thread into the tension spring and then into the thread guide slot.
- Pull out approximately 10-15 cm (4-6 inches) of thread.
- ボビンカバープレートを交換してください。
4. 上糸を通す
Correct upper threading is crucial for proper stitch formation.
- プレッサーフットリフターを上げます。
- 糸こまを糸立て棒に置きます。
- 糸を上部の糸ガイドに通します。
- Follow the numbered threading path down the right channel, up the left channel, and through the take-up lever from right to left.
- 糸を針棒糸ガイドまで導き続けます。
- 針を前から後ろへ通します。
- Pull approximately 15-20 cm (6-8 inches) of thread through the needle eye.
図2: フロント view of the SINGER M1005, highlighting the stitch selector dial and general threading area.
操作手順
1. ステッチの選択
The SINGER M1005 offers 4 core stitch types with 11 different options.
- を回す ステッチセレクターダイヤル to choose your desired stitch pattern.
- Available stitches include various straight stitches (different lengths/positions), three types of zigzag stitches (different lengths/widths), one blind hem stitch, and one multi-stitch zigzag.
- The optimum stitch width for this machine is 4 mm.
2. 糸調子の調整
Adjust the needle thread tension to achieve balanced stitches.
- The tension dial is usually located on the front of the machine.
- Turn the dial to a higher number for tighter tension, and a lower number for looser tension.
- Test on a scrap piece of fabric to find the ideal setting for your fabric and thread combination.
3. Using the Reverse Lever
The reverse lever is used to secure the beginning and end of seams.
- 逆方向に縫うには、 リバースレバー located on the front of the machine.
- Release the lever to resume forward stitching.
4. Free-Arm Sewing
To utilize the free-arm feature for sewing cuffs, pant hems, or other small circular items:
- Remove the accessory storage compartment (if present) by sliding it off to the left.
- The narrow free arm is now exposed, allowing you to slide fabric around it.
5. Extra High-Presser Foot Lifter
For thicker fabrics or multiple layers, the presser foot can be raised higher than its standard position.
- Lift the presser foot lifter to its highest position.
- For extra clearance, push the lifter up further to engage the extra high position.
メンテナンス
定期的なメンテナンスは、ミシンの寿命を延ばし、最適なパフォーマンスを維持するのに役立ちます。メンテナンスを行う前に、必ず電源プラグを抜いてください。
1。 機械の清掃
- 糸くずの除去: 小さなブラシを使用して、ボビンエリアと送り歯から糸くずやほこりを取り除きます。
- 外装清掃: 外側の表面を柔らかい布で拭きます。amp 布で拭いてください。強い化学薬品は使用しないでください。
2. 針の交換
Replace the needle regularly (after 8-10 hours of sewing) or if it becomes bent, dull, or broken.
- マシンの電源をオフにして、プラグを抜きます。
- 針を緩めるclamp スクリュー。
- 古い針を取り外します。
- 新しい針を、平らな面を機械の背面に向けて、できるだけ奥まで押し込みながら挿入します。
- 針を締めるamp しっかりとねじ込みます。
トラブルシューティング
発生する可能性のある一般的な問題の解決策については、このセクションを参照してください。
| 問題 | 考えられる原因 | 解決 |
|---|---|---|
| スキップされたステッチ | 針が間違っている、針が曲がっている、糸通しが不適切。 | 正しいタイプ/サイズの針に交換し、機械に正しく糸を通します。 |
| スレッドの切断 | Incorrect threading, tension too tight, damaged needle, poor quality thread. | 機械に糸を通し直し、張力を調整し、針を交換し、良質の糸を使用します。 |
| 生地のしわ | Tension too tight, incorrect stitch length, wrong needle for fabric. | Loosen tension, adjust stitch length, use appropriate needle. |
| マシンジャミング | Thread tangled in bobbin area, lint buildup, incorrect bobbin insertion. | Remove bobbin and clean bobbin case, re-insert bobbin correctly. |
| 不均一なステッチ | 糸の張力が不適切、糸通しが不適切、針が摩耗している。 | Adjust tension, re-thread machine, replace needle. |
仕様
Technical specifications for the SINGER M1005 Electric Sewing Machine.
- ブランド: 歌手
- モデル番号: M1005 (Part Number: 230246102)
- 色: 白
- 材料: プラスチック
- 商品の重量: 3キログラム
- 電源: コード式電気
- Stitch Options: 4 built-in stitches with 11 options
- Max Stitch Width: 4ミリメートル
- ボビンタイプ: Class 15 (Transparent, Top Drop-in)
- 特別な機能: Adjustable Thread Tension, Free-Arm Design, Reverse Lever, Extra High-Presser Foot Lifter
保証とサポート
For warranty information, service, or technical support, please refer to the warranty card included with your product or contact SINGER customer service directly. Keep your purchase receipt as proof of purchase.
You can typically find contact information for SINGER support on their official webサイトまたは製品パッケージ内に記載されています。