
1. はじめに
This manual provides detailed instructions for the installation, operation, and maintenance of your SECULINK 16-Channel 4K/8MP Network Video Recorder (NVR). This NVR is designed to provide a comprehensive security solution, supporting up to 16 channels of 4K (8MP) video recording from ONVIF-compliant IP cameras. It features advanced H.265+ compression, motion detection recording, and P2P remote access for convenient monitoring.
2.製品オーバーview
主な特徴
- Ultra HD Video: Full 4K (3840x2160P) video viewing and recording on all 16 channels, supporting 8MP/5MP/4MP/3MP/1080p ONVIF IP cameras.
- H.265+圧縮: Enhances bandwidth and storage efficiency, providing smaller file sizes, higher definition, and longer recording times. Supports simultaneous network transmission and playback.
- 動き検出記録: Configurable to record only when motion is detected, optimizing storage space.
- 簡単なセットアップ: Requires a wired connection to your router for operation and manages all connected IP cameras on your network.
- 複数のストレージ オプション: Supports up to 6TB internal SATA HDD (sold separately) and cloud storage service (sold separately). Backup options include USB flash disk, USB DVR writer, and network.
- P2Pリモートアクセス: Cloud P2P function for remote viewing on smartphones, tablets, and PCs via the XMeye app.
パッケージ内容
- 1x SECULINK 16-Channel Network Video Recorder (NVR1616PF-4K)
- 電源アダプター x 1
- USBマウス x 1
3.セットアップガイド
3.1 物理的な接続
NVR の電源を入れる前に、必要な接続がすべて行われていることを確認してください。
- モニターを接続する: HDMI または VGA ケーブルを使用して、NVR をモニターまたはテレビに接続します。
- マウスを接続する: Plug the included USB mouse into one of the USB ports on the NVR.
- ネットワーク接続: Connect the NVR's LAN port to your router using an Ethernet cable. This NVR requires a wired network connection.
- 電源接続: Connect the power adapter to the NVR's DC 12V input and then plug it into a power outlet.

図3.1: NVR背面パネルの接続
3.2 ハードドライブのインストール(HDDは付属していません)
The NVR supports a single SATA hard drive up to 6TB for local storage. Follow these steps to install an HDD:
- Unscrew the top cover of the NVR chassis.
- Connect the SATA data and power cables from the NVR to the corresponding ports on the hard drive.
- 付属のネジを使用してハードドライブを NVR シャーシに固定します。
- 上部カバーを取り付けて、ネジで固定します。
After installation, the NVR will typically detect the new HDD. You may need to format the HDD through the NVR's system settings before recording can begin.
3.3ネットワーク構成
The NVR connects to your network via an Ethernet cable. Ensure your router is functioning correctly. The NVR will typically obtain an IP address automatically via DHCP. For remote access, ensure your network allows outbound connections for the NVR's P2P service.
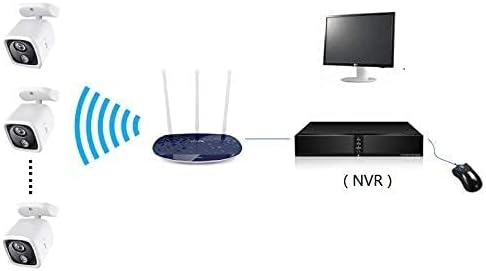
Figure 3.2: NVR Network Connection Diagram
3.4 カメラの統合
The NVR supports ONVIF-compliant IP cameras. To add cameras:
- Ensure your IP cameras are powered on and connected to the same network as the NVR.
- Access the NVR's main menu using the connected monitor and mouse.
- Navigate to the Camera Management or Channel Setup section.
- The NVR should automatically detect ONVIF cameras on the network. Select and add them, providing credentials if required.
4. 操作手順
4.1 ユーザーインターフェースナビゲーション
接続されたUSBマウスを使用して、NVRのグラフィカルユーザーインターフェース(GUI)を操作します。右クリックでメインメニューにアクセスし、左クリックでオプションを選択したりサブメニューを開いたりできます。
4.2 録音管理
The NVR offers flexible recording options:
- 連続記録: 24時間7日中断なく記録します。
- 動き検出記録: Records only when motion is detected by the cameras, saving storage space. Configure motion detection zones and sensitivity in the NVR settings.
- スケジュールされた記録: 録音を実行する特定の時間を設定します。
These modes can be configured per channel in the NVR's recording settings.

図4.1: 記録モード
4.3 リモートアクセス(P2P)
に view カメラをリモート操作:
- ダウンロード XMeye スマートフォンやタブレットのアプリ。
- アカウントを登録してログインします。
- Add your NVR device by scanning the QR code displayed on the NVR's monitor (usually found in the P2P or Cloud settings) or by manually entering the device ID.
- 追加したら、 view ライブフィードと録画された動画の再生tagインターネット接続があればどこからでも。

Figure 4.2: P2P Remote Access
4.4 ビデオの再生とバックアップ
再するためにview 記録されたfootage, access the Playback menu from the NVR's main interface. You can search by time, date, event, or channel. To back up footage, connect a USB flash drive to the NVR's USB port and use the backup function in the menu.
5. メンテナンス
5.1 ハードドライブ管理
Regularly check the status of your hard drive through the NVR's system settings. Consider backing up critical footage periodically to an external device or cloud storage. If the HDD fails, replace it following the installation steps in Section 3.2.
5.2 システムアップデート
定期的にメーカーの website for firmware updates. Keeping your NVR's firmware updated can improve performance, add new features, and enhance security. Follow the provided instructions carefully when performing firmware updates.
5.3 クリーニング
Ensure the NVR unit is kept in a clean, dry, and well-ventilated area. Dust can accumulate and affect performance. Use a soft, dry cloth to clean the exterior of the NVR. Do not use liquid cleaners or aerosols.
6。 トラブルシューティング
- モニターにビデオ出力がありません:
- Check HDMI/VGA cable connections to both NVR and monitor.
- Ensure the monitor is set to the correct input source.
- Verify the NVR is powered on (power indicator light should be active). - ネットワーク接続なし:
- Ensure the Ethernet cable is securely connected to both the NVR and the router.
- Check if your router is functioning correctly.
- Verify network settings in the NVR's menu (e.g., DHCP enabled). - カメラが表示/録画しない:
- Confirm IP cameras are powered on and connected to the network.
- Check camera IP addresses and ensure they are discoverable by the NVR.
- Verify camera credentials (username/password) are correctly entered in the NVR's camera management.
- Ensure the HDD is installed and formatted correctly for recording. - リモート アクセスが機能しない:
- Ensure the NVR has an active internet connection.
- Verify the P2P function is enabled in the NVR's network settings.
- Check your smartphone/tablet's internet connection.
- Ensure the correct device ID is entered in the XMeye app. - ビデオ品質が悪い:
- Ensure cameras are set to their highest resolution (e.g., 4K/8MP).
- Check network bandwidth if experiencing lag or pixelation, especially for remote viewing。
7. 仕様
| 特徴 | 仕様 |
|---|---|
| モデル番号 | NVR1616PF-4K |
| チャンネル数 | 16 |
| 解決 | 16*4K 8MP |
| ビデオ出力 | VGA x 1、HDMI x 1 |
| オーディオ出力 | 1×RCA |
| ネットワークポート | 1x RJ45 10M/100M |
| USBポート | 2x USB2.0 |
| Streaming Specification | オンビフ |
| 記録モード | 手動 > アラーム > 動体検知 > タイミング |
| ビデオ検索 | 時間、日付、イベント、チャンネル検索 |
| 力 | DC12V |
| ケースサイズ | 260mm x 43mm x 190mm (長さ10.24インチ x 幅7.48インチ x 高さ1.69インチ) |
| HDDインターフェース | SATA(最大6TB) |
| アプリ | XMeye |
| 接続技術 | イーサネット、HDMI、USB、VGA |
| オーディオ入力 | マイクロフォン |
| アイテム重量 | 1.01キログラム |
8. 保証とサポート
For warranty information, please refer to the documentation provided with your purchase or contact SECULINK customer support directly. Technical support is available through the manufacturer's official channels. Please visit the SECULINK web最新のサポート リソース、FAQ、および連絡先情報については、こちらのサイトをご覧ください。