
1. はじめに
This manual provides detailed instructions for the installation, operation, maintenance, and troubleshooting of your ATOTO AC-HD03LR 720P Rear View Backup Camera. Please read this manual thoroughly before using the product to ensure correct usage and optimal performance. Keep this manual for future reference.
2.製品オーバーview
主な特徴
- HD 720P Video Output: Provides clear 720P HD video signals for enhanced visibility.
- 180度超広角: 幅広い分野を提供 view 死角を最小限に抑えます。
- Real-time Rear View (LRV): 背面を表示します view in real-time even when driving forward, aiding in obstacle avoidance.
- バーチャルサラウンド View (VSV) Parking Assist: Compatible with specific ATOTO head units to provide a simulated bird's-eye view 駐車場用。
- ナイトビジョン機能: 暗い場所でもクリアな視界を確保します。
- IP67防水等級: さまざまな気象条件に耐えられるように設計されています。
- 簡単なインストール: Simple setup with an included 8-meter extension wire.
互換性
This camera is specifically designed for use with the following ATOTO car stereo models:
- ATOTO A6PF/PL/PP series
- ATOTO S8 series (excluding S8 UN/PN/MS/Gen4 models)
- ATOTO S8 Gen1 models (requires firmware update for LRV function)
注記: このカメラは 互換性がない with ATOTO A6GC, F7, A5, or X10 models, or other car stereo brands.

Image: The 180-degree wide-angle view provides a significantly broader perspective compared to standard cameras, enhancing situational awareness. The 720P image quality ensures clear and detailed visuals, superior to 480-line resolution.
3. パッケージ内容
以下にリストされているすべてのアイテムがパッケージに含まれていることを確認してください。
- 1x ATOTO AC-HD03LR Rear Wide-Angle Camera
- 1x 8-Meter Extension Wire
- 2x取り付けネジ
- 粘着ステッカー1枚
- 1x Calibration Cloth

Image: The package includes the AC-HD03LR camera (01), an 8-meter extension wire (02), two screws (03), an adhesive sticker (04), and a calibration cloth (05).
4. セットアップとインストール
配線図
Follow the wiring diagram below for proper connection to your ATOTO car stereo system. Ensure all connections are secure to prevent signal loss or power issues.
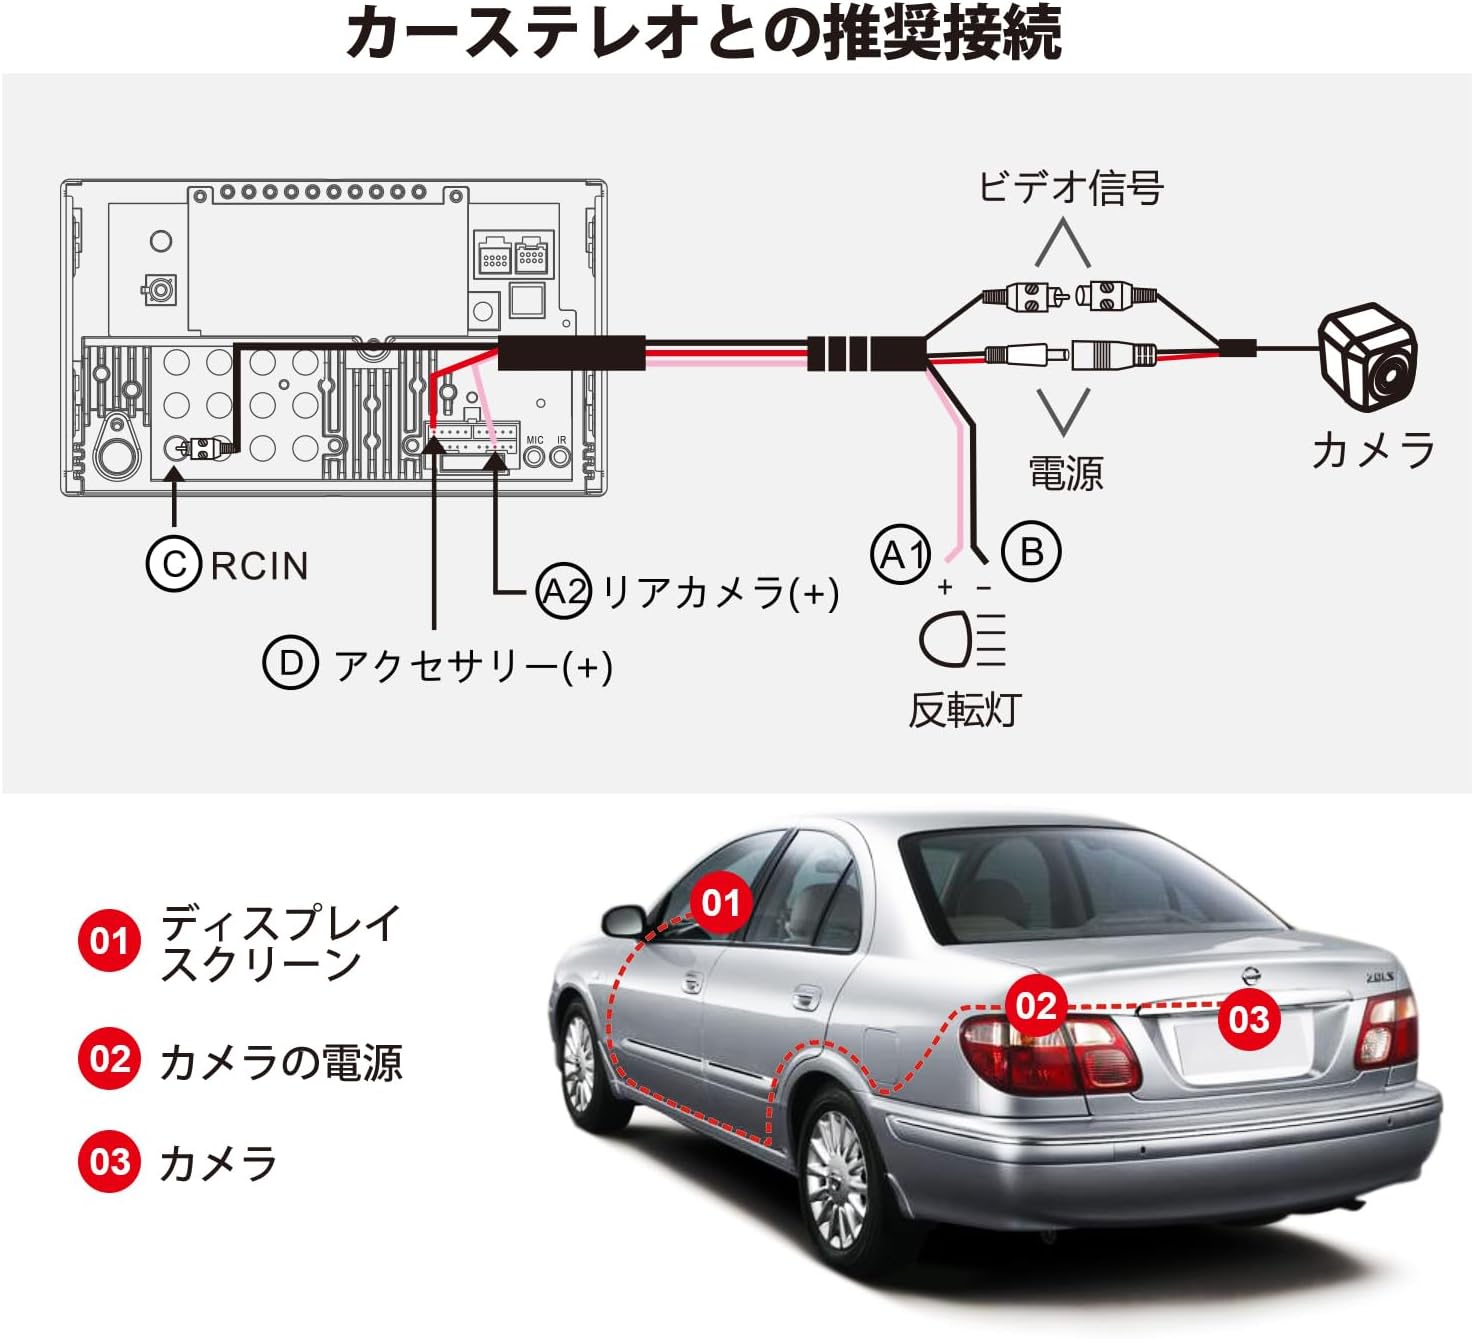
Image: Recommended connection diagram. The camera's video signal connects to the car stereo's RCIN (C). The camera's power (A1, B) connects to the reversing light and accessory power (D), while the rear camera trigger wire (A2) connects to the car stereo's rear camera input.
インストール手順
- カメラを取り付ける: Choose a suitable location on the rear of your vehicle, typically near the license plate, for optimal viewing. Secure the camera using the provided screws or adhesive sticker.
- ケーブルを配線する: Carefully route the 8-meter extension wire from the camera to the car stereo unit. Ensure the cable is protected from sharp edges, heat, and moving parts.
- 接続電源: Connect the camera's power wire (red) to the vehicle's reversing light power supply (typically 12V). Connect the ground wire (black) to a suitable chassis ground point.
- ビデオ信号を接続: Plug the RCA video connector from the camera's extension wire into the 'RCIN' (Rear Camera Input) port on your ATOTO car stereo.
- Connect Trigger Wire: Connect the camera's trigger wire (usually a thin red wire on the RCA cable) to the 'Rear Camera (+)' or 'Reverse Gear Signal' input on your ATOTO car stereo. This tells the stereo when to switch to the camera view.
- テスト機能: Before finalizing the installation, turn on your car stereo and engage reverse gear to ensure the camera displays correctly.
5. 操作手順
バーチャルサラウンド View (VSV) 駐車場
The VSV function, available on compatible ATOTO S8 (Gen2) Android car stereos, uses the AC-HD03LR camera to create a simulated bird's-eye view of your vehicle's surroundings. This feature significantly enhances parking safety by providing a comprehensive overhead perspective.
- To activate VSV, ensure your ATOTO S8 (Gen2) head unit has the necessary firmware and image stitching algorithm.
- The system will process the camera's 180-degree input to generate a dynamic, simulated 360-degree view on your car stereo screen.
- Your vehicle's position and surrounding obstacles will be clearly distinguished on the display.
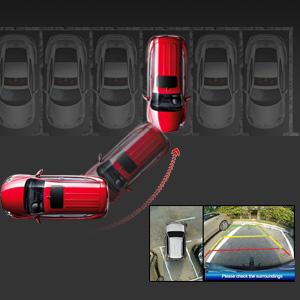
Image: A simulated bird's-eye view from the VSV parking assist system, showing the vehicle's position relative to parking lines and surrounding objects.
Real-time Rear View (LRV)
The LRV function allows you to view the rear of your vehicle in real-time, even when driving forward. This is particularly useful for monitoring traffic behind you or checking for blind spots.
- This feature is supported by specific ATOTO head units and requires a firmware update for S8 Gen1 models.
- Consult your car stereo's manual for instructions on how to activate and switch to the real-time rear view 画面。
カメラキャリブレーション
Calibration is essential for accurate VSV display. The included calibration cloth is used to help the system map the camera's view correctly. Perform calibration in a flat, open area with good lighting.

Image: Vehicle positioned over the calibration cloth. The distance between the cloth's center and the rear bumper may vary by vehicle type, but the entire cloth should be visible on screen for proper calibration.

Image: Calibration steps on the car stereo display. Step 1: Select Vehicle Size by entering parameters. Step 2: Start Calibration by touching 'Calibration' on the rear camera video screen. Step 3: Center the Rear Video Image if the camera is not centrally mounted. Step 4: Trim Rear View カメラ・フーtage to remove black blocks in corners and adjust the back shade.
6. メンテナンス
定期的なメンテナンスにより、カメラの寿命が長くなり、最適なパフォーマンスが確保されます。
- クリーニング: カメラのレンズは定期的に柔らかくてきれいな布で拭いてください。amp 布で汚れ、ほこり、水滴を拭き取ってください。レンズを傷つける可能性のある研磨剤入りの洗剤は使用しないでください。
- 検査: Regularly check the camera's mounting and wiring for any signs of damage, corrosion, or loose connections. Ensure the camera is securely fastened.
- 水への露出: While the camera is IP67 waterproof, avoid directing high-pressure water jets directly at the camera during car washes, as this could potentially compromise the seal over time.
7。 トラブルシューティング
ATOTO AC-HD03LRカメラで問題が発生した場合は、次の一般的な問題と解決策を参照してください。
| 問題 | 考えられる原因 | 解決 |
|---|---|---|
| 画面に画像がありません | ビデオケーブルの接続が緩んでいる カメラに電源が入らない Incorrect trigger wire connection カメラの故障 | 両端の RCA ビデオ ケーブルの接続を確認します。 Verify camera power supply (12V) and ground connections. Ensure trigger wire is correctly connected to the car stereo's reverse input. Test camera with another compatible display if possible. |
| 画像がぼやけたり歪んだりする | 汚れたレンズ カメラアングルが間違っている Firmware issue on head unit Calibration required/incorrect | カメラのレンズを掃除してください。 最適なカメラアングルに調整 view. Ensure car stereo firmware is up-to-date. Perform camera calibration as per instructions. |
| VSV/LRV not working | Incompatible head unit Firmware not updated Calibration not performed | Confirm head unit compatibility (ATOTO A6PF/PL/PP, S8 series). Update car stereo firmware, especially for S8 Gen1 models. Perform camera calibration. |
| Image has black blocks in corners | Calibration trimming needed | Follow Step 4 of the calibration process to trim the video footage. |
8. 仕様
| 特徴 | 仕様 |
|---|---|
| 製品モデル | AC-HD03LR(北米版、ナンバープレート取付ブラケット付き) |
| イメージセンサーフォーマット | 1/2.9インチCMOS |
| ピクセル | 1280(H)×720(V) |
| ホワイトバランス | 自動 |
| 逆光補正 | はい |
| ノイズ低減 | 3D DNR |
| ビデオフレームレート | 720P @ 30FPS |
| ビデオ信号出力 | Analog HD signal, 1.0 Vp-p / 75Ω |
| 営業巻tage | DC12V |
| 動作電流 | 130mA〜150mA |
| 動作温度 | -30℃〜+ 80℃(-22°F〜176°F) |
| 後方 View ガイドライン | Not built-in, provided by car stereo system |
| 防水等級 | IP67 |
| ナイトビジョン | はい |
| のレンズフィールド View | 180度 |
| 取り付けタイプ | 表面実装 |
9. 保証とサポート
ATOTO products are designed for reliability and performance. For warranty information, technical support, or service inquiries, please refer to the warranty card included with your product or visit the official ATOTO website. You can also contact ATOTO customer service directly through their support channels.
Official ATOTO Webサイト: ホームページ