1. はじめに
Thank you for choosing the Crenova Laminator Machine FNL001. This device is designed to protect and preserve your documents, photos, and other materials with a clear, durable laminated finish. This manual provides essential information for the safe and efficient operation, maintenance, and troubleshooting of your laminator. Please read it thoroughly before first use and keep it for future reference.
2. 安全に関する注意事項
To ensure safe operation and prevent damage to the laminator or injury, please observe the following safety precautions:
- 機械を操作する前にすべての指示をお読みください。
- ラミネーターを水やその他の液体から遠ざけてください。濡れた手で操作しないでください。
- Do not touch the hot parts of the machine during or immediately after use.
- ラミネーターを使用していないときや清掃する前には、ラミネーターの電源プラグをコンセントから抜いてください。
- 操作中は機械の周囲の換気が適切であることを確認してください。
- Keep out of reach of children and pets. Adult supervision is required if children are near the device.
- ラミネート袋以外の物を機械内に挿入しないでください。
- Use only laminating pouches recommended for this type of machine.
3.製品オーバーview
The Crenova Laminator FNL001 features a compact design with essential controls for efficient lamination.
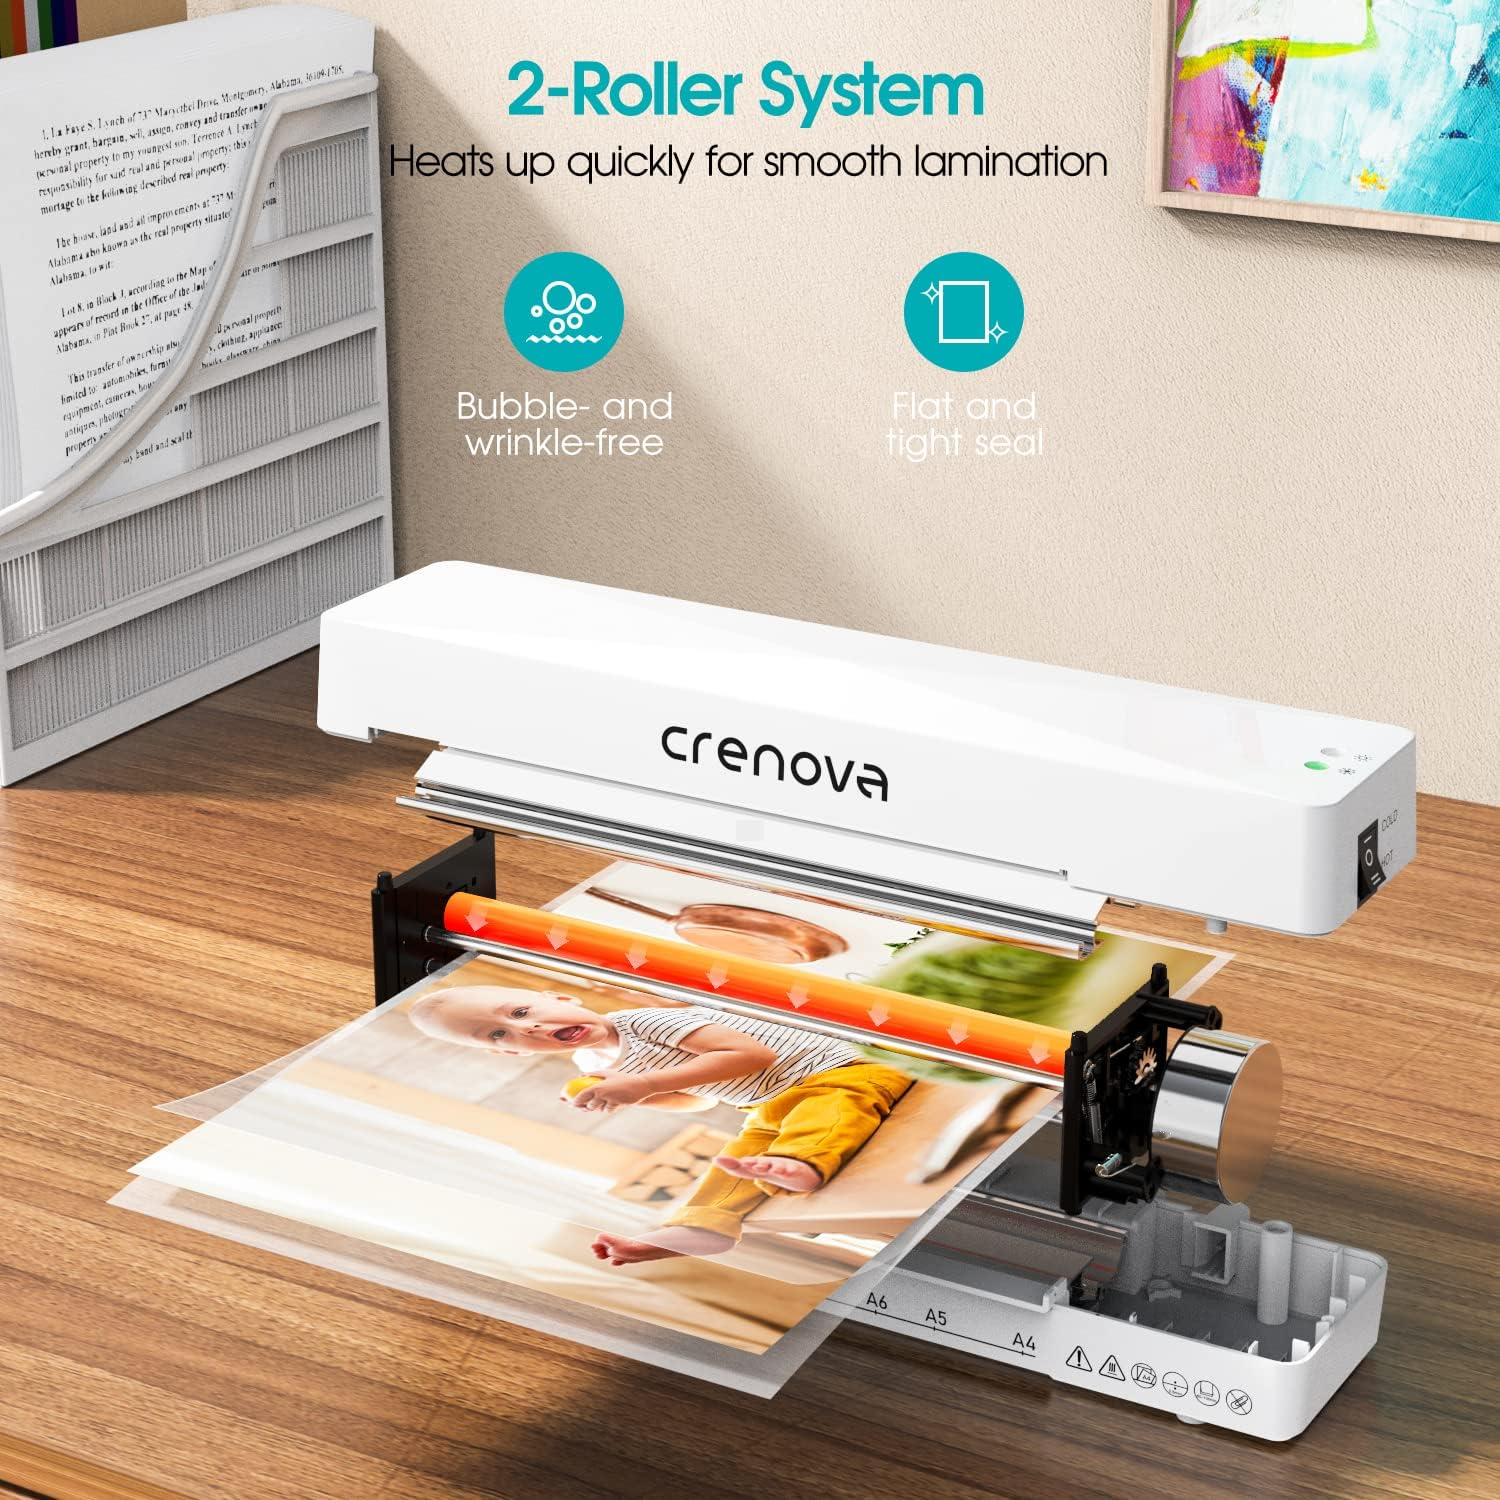
画像の説明: 内部の view of the Crenova laminator, highlighting its 2-roller system designed for smooth lamination. The image shows a document being fed through the rollers, illustrating the heating process.
- 電源/モードスイッチ: Selects between OFF, COLD, and HOT lamination modes.
- インジケーターライト: Illuminates to show power status and readiness for lamination.
- Document Inlet: ラミネートパウチが挿入される場所。
- Document Outlet: ラミネートされた書類が出る場所。
- Jam Release Lever (ABS): Used to clear misfed or jammed pouches.
4. セットアップ
- Unpack the laminator and remove all packaging materials.
- Place the laminator on a flat, stable, and heat-resistant surface.
- Ensure there is enough space around the machine for proper ventilation and for documents to exit freely.
- 電源コードを標準の電源コンセントに差し込みます。
5. 操作手順
ラミネートを成功させるには、次の手順に従ってください。

画像の説明: A four-panel image illustrating the simple operation of the Crenova laminator. Panel 1 shows switching to HOT or COLD. Panel 2 shows the mode indicator turning green. Panel 3 shows inserting the pouch straight into the inlet. Panel 4 shows the pouch auto-exiting the outlet.
- ステップ 1: モードを選択します。 Switch the power button to either 熱い or 寒い mode, depending on your laminating pouch and document type. For most standard documents, use HOT mode. Cold lamination is suitable for heat-sensitive materials or self-adhesive pouches.
- Step 2: Wait for Readiness. If using HOT mode, allow the machine to preheat. The mode indicator light will turn 緑 when the laminator is ready for use. This typically takes a few minutes.
- Step 3: Prepare Document. Place your document inside a laminating pouch, ensuring it is centered and there is an even border around the edges. Do not overload the pouch.
- Step 4: Insert Pouch. Insert the sealed edge of the laminating pouch straight into the document inlet. The machine will automatically feed the pouch through. Do not force the pouch or insert it at an angle.
- Step 5: Retrieve Laminated Document. The laminated document will exit from the rear outlet. Allow it to cool on a flat surface before handling to ensure a smooth, flat finish.
The Crenova Laminator supports various document sizes up to A4 (230mm / 9 inches wide).

画像の説明: The Crenova laminator positioned next to various paper sizes (A4, A5, A6, A7) with their dimensions, illustrating the machine's capability to laminate documents up to 230mm (9 inches) wide.

画像の説明: A visual representation of the Crenova A4 laminator's versatility, showing it can laminate various document types such as certificates, photos, and menus.
6. メンテナンス
- クリーニング: Always unplug the laminator and allow it to cool completely before cleaning. Wipe the exterior with a soft, dry cloth. Do not use abrasive cleaners or solvents.
- ストレージ: Store the laminator in a clean, dry, and cool place when not in use.
- ローラークリーニング: 定期的にクリーニング シート (別売) をラミネーターに通して、ローラーに付着した接着剤の残留物を除去します。
7。 トラブルシューティング
If you encounter issues with your laminator, refer to the following common problems and solutions:
Paper Jam Release

画像の説明: A three-panel image demonstrating the paper jam release process. Panel 1 shows switching the laminator off. Panel 2 shows pushing and holding the ABS lever. Panel 3 shows pulling the jammed pouch out.
- Step 1: Switch Off. Immediately turn off the laminator using the power switch.
- Step 2: Engage Release Lever. Locate the ABS (Anti-Blocking System) jam release lever, usually on the side or back of the machine. Push and hold this lever.
- Step 3: Remove Pouch. While holding the lever, carefully pull the misfed or jammed pouch straight out from the inlet or outlet.
- Release the lever and allow the machine to cool before attempting further lamination.
その他の問題
- Poor Lamination Quality (Bubbles, Wrinkles):
- Ensure the laminator has fully preheated (green indicator light).
- Use appropriate pouch thickness for the machine and document.
- Insert the pouch straight and centered.
- Do not laminate multiple items in one pouch if they are too small or unevenly spaced.
- マシンの電源が入らない:
- 電源コードがラミネーターと壁のコンセントの両方にしっかりと差し込まれているかどうかを確認します。
- 電源コンセントが機能していることを確認します。
8. 仕様
| ブランド | Crenova |
| モデル番号 | 品番 |
| アイテム重量 | 1.94ポンド |
| パッケージ寸法 | 13.54 x 6.3 x 3.11インチ |
| Max Lamination Width | 230mm(A4) |
| Roller System | 2ローラーシステム |
| 積層モード | 熱と冷たさ |
| ASIN | B08QMMSNBF |
| 初回利用可能日 | 3年2025月XNUMX日 |
9. 保証とサポート
For detailed warranty information, please refer to the warranty card included with your product packaging or visit the official Crenova webサイト。
If you require technical assistance or have questions not covered in this manual, please contact Crenova customer support. Contact details can typically be found on the manufacturer's webサイトまたは製品のパッケージ。