テクタケ 401105
tectake 401105 Bike Repair Stand User Manual
モデル: 401105
1. はじめに
Thank you for choosing the tectake 401105 Bike Repair Stand. This manual provides essential information for the safe and effective assembly, operation, and maintenance of your new repair stand. Please read these instructions carefully before use and retain them for future reference.
The tectake 401105 Bike Repair Stand is designed to provide a stable and convenient platform for bicycle maintenance and repair, allowing for comfortable work at eye level. It features a practical tool tray and a compact folding mechanism for easy storage.
2. 安全に関する注意事項
怪我や製品の損傷を防ぐために、常に次の安全上の注意事項を守ってください。
- Ensure the stand is placed on a stable, level surface before mounting a bicycle.
- 最大積載量を超えないでください 20キロ.
- Always secure the bicycle firmly in the clamp 作業を実行する前に。
- Keep hands and fingers clear of moving parts and pinch points during adjustment and folding.
- Do not allow children to play with or near the repair stand.
- Regularly inspect all components for wear or damage. Do not use the stand if any parts are damaged.
- Use the stand only for its intended purpose of supporting bicycles for maintenance.
3. パッケージ内容
開梱したら、すべてのコンポーネントが揃っていて損傷がないことを確認してください。
- 1 x tectake 401105 Bicycle Repair Stand
- 1 x Tool Tray
- 1 x Front-wheel Mount
- 組み立て説明書(このマニュアル)1冊

Figure 3.1: The tectake 401105 Bike Repair Stand, showing its main components.
4. セットアップと組み立て
The tectake 401105 Bike Repair Stand is designed for easy assembly. Follow these steps:
- ベースを展開します。 Carefully unfold the main legs of the stand until they are fully extended and locked into position. Ensure the stand is stable on the ground.
- Attach the Tool Tray: Locate the designated slot or attachment point for the tool tray on the main shaft. Slide or clip the tool tray into place, ensuring it is secure and level.
- Clを調整するamp 身長: Loosen the quick-release lever or knob on the main vertical shaft to adjust the height of the bicycle clamp. Raise or lower it to your desired working height and then firmly tighten the lever/knob.
- Clを調整するamp 角度: The bicycle clamp can be rotated. Loosen the adjustment knob near the clamp to set the desired angle, then tighten it securely.
- Install Front-wheel Mount (Optional): If using the front-wheel mount, attach it to the lower part of the stand as indicated in the diagram. This provides additional stability for the front wheel.

Figure 4.1: The stand's adjustable height and angle, along with its compact folded configuration for storage.
5. 操作手順
5.1 Mounting a Bicycle
- Ensure the stand is stable and the clamp is at an appropriate height.
- clを開くamp jaws by rotating the handle or lever.
- Carefully lift your bicycle and position a frame tube (e.g., top tube or seat post) between the open clamp あご。
- 窓を閉じるamp jaws firmly around the frame tube. Ensure the bicycle is securely held and balanced before releasing your grip. Do not overtighten, as this may damage the frame.
- If using the front-wheel mount, secure the front wheel into the designated slot for added stability.

Figure 5.1: A bicycle securely mounted on the tectake 401105 Bike Repair Stand, demonstrating proper positioning.
5.2 Using the Tool Tray
The integrated tool tray provides a convenient space to keep your tools, small parts, and lubricants within easy reach during maintenance tasks. Avoid placing heavy or excessively large items on the tray to maintain stability.
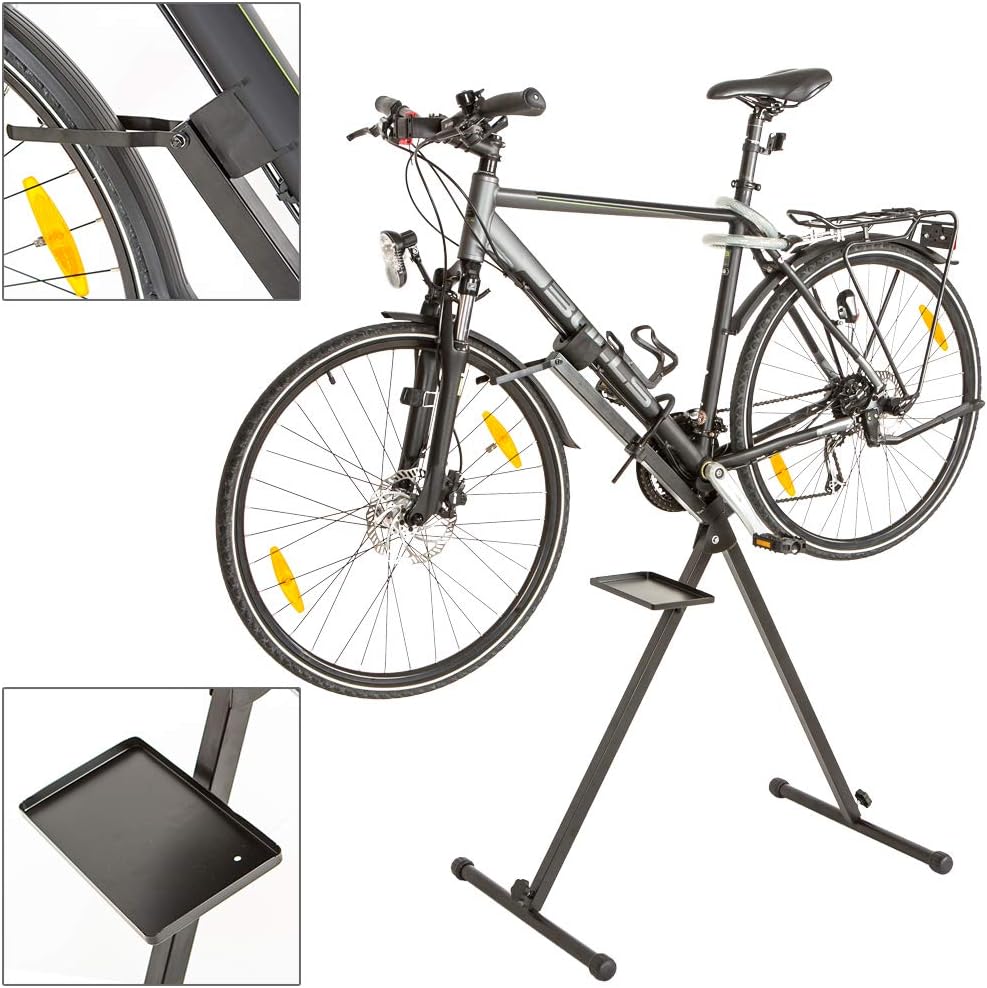
図5.2:詳細 view of the practical tool tray and the front wheel support mechanism.
5.3 収納時の折りたたみ
To fold the stand for compact storage:
- Remove the bicycle from the clamp.
- Remove the tool tray and front-wheel mount if attached.
- Loosen the quick-release levers and knobs to collapse the stand's legs and main shaft.
- Fold the stand into its compact configuration as shown in Figure 4.1. Ensure all locking mechanisms are engaged to prevent accidental unfolding.
6. メンテナンス
Regular maintenance will extend the life of your tectake 401105 Bike Repair Stand:
- クリーニング: スタンドを拭いてamp cloth after use to remove dirt, grease, or oil. Avoid abrasive cleaners.
- 潤滑: Periodically apply a small amount of lubricant to moving parts, such as hinges and quick-release mechanisms, to ensure smooth operation.
- 検査: Before each use, inspect all bolts, nuts, and quick-release levers to ensure they are tight and secure. Check for any signs of wear, cracks, or damage to the frame or plastic components.
- ストレージ: Store the folded stand in a dry, clean environment away from extreme temperatures and direct sunlight.
7。 トラブルシューティング
| 問題 | 考えられる原因 | 解決 |
|---|---|---|
| スタンドがぐらついたり不安定になったりします。 | Not fully unfolded; placed on uneven surface; loose connections. | Ensure legs are fully extended and locked. Move to a level surface. Check and tighten all bolts and quick-release levers. |
| Bicycle slips in clamp. | Clamp not tightened enough; clamp jaws are dirty/greasy. | 締めるamp more firmly (without overtightening). Clean clamp jaws with a degreaser. |
| Stand difficult to fold/unfold. | Moving parts are stiff or dirty. | Clean and lubricate hinges and quick-release mechanisms. |
8. 技術仕様
| 特徴 | 詳細 |
|---|---|
| モデル | 401105 |
| ブランド | テクタケ |
| 全体寸法(約) | 60 cm(W)x 93 cm(D)x 120 cm(H) |
| 折りたたみ時の寸法(約) | 17 cm(W)x 61 cm(D)x 95 cm(H) |
| Tool Rack Dimensions (approx.) | 25 cm x 15 cm x 1.5 cm |
| 材料 | 合金鋼 |
| 最大積載量 | 20キロ |
| 重量(約) | 6キロ |
9. 保証とサポート
For warranty information, technical support, or spare parts, please contact tectake customer service. Refer to your purchase documentation or the official tectake web連絡先の詳細についてはサイト。
サポートにお問い合わせの際は、モデル番号 (401105) と購入日をご用意ください。
関連文書 - 401105
 |
GOENER'S BRS-403 Heavy Duty Bike Repair Stand - Assembly, Parts, and Service Guide Comprehensive guide for the GOENER'S BRS-403 heavy-duty bike repair stand. Includes assembly instructions, parts list, usage notes, storage tips, and customer service information for maintenance of bicycles, e-bikes, and mountain bikes. |
 |
VonHaus 3500243 Adjustable Bicycle Repair Stand - User Manual User manual and assembly guide for the VonHaus 3500243 adjustable bicycle repair stand. Includes safety instructions, parts list, step-by-step assembly, and maintenance tips for your bike maintenance tool. |
 |
CRAVOT MastJack Mechanical Lift Repair Stand User Manual Comprehensive user manual for the CRAVOT MastJack Mechanical Lift Repair Stand, covering safety, installation, operation, maintenance, warranty, and technical specifications for bicycles and e-bikes. |
 |
Topeak TwoUp TuneUp バイクスタンド ユーザーガイド Topeak TwoUp TuneUp バイク スタンドの総合的なユーザー ガイド。自転車の最適なメンテナンスと保管のための取り付け、組み立て、部品、使用方法、保証情報が詳しく説明されています。 |
 |
Topeak Prepstand X Pro 自転車修理スタンド マニュアル Topeak Prepstand X Pro自転車修理スタンドの組み立て、設置、調整、メンテナンスを網羅した総合ガイド。自転車作業スタンドの効果的なセットアップと使用方法を学びましょう。 |
 |
CRAVOT MastJack Mechanical Lift Repair Stand User Manual Official user manual for the CRAVOT MastJack Mechanical Lift Repair Stand. Learn about safe operation, assembly, maintenance, and technical specifications for bicycle and e-bike repair. |
Ask a question about this manual
Ask about setup, troubleshooting, compatibility, parts, safety, or missing instructions. Manuals+ will review the question and use this page’s manual context to help answer it.