導入
This manual provides instructions for the proper setup, operation, and maintenance of your ELECOM EX-G Left Handed Trackball Mouse, model M-XT4DRBK-G. This wireless trackball mouse is designed for left-handed users, featuring ergonomic design, thumb control, and programmable buttons for enhanced productivity and comfort.

Image: The ELECOM EX-G Left Handed Trackball Mouse, showcasin人間工学に基づいたデザインと赤いトラックボールが特徴です。
設定
1. パッケージ内容
パッケージにすべてのアイテムが揃っていることを確認します。
- ELECOM EX-G Left Handed Trackball Mouse
- USBワイヤレスレシーバー
- 単3電池(1本)
- 取扱説明書(本書)

Image: The trackball mouse, a single AA battery, and the USB receiver, representing the items included in the box.
2. バッテリーの取り付け
- マウスの下側にあるバッテリー収納部を見つけます。
- 電池ボックスのカバーを開きます。
- 付属の単三電池を正しい極性 (+/-) を確認して挿入します。
- 電池カバーをしっかりと閉じてください。

Image: A diagram showing the battery installation process for the trackball mouse.
3. USBレシーバーの接続
- マウスの裏側にある収納スロットから USB レシーバーを取り外します。
- USBレシーバーをコンピューターの使用可能なUSBポートに接続します。
- Your computer should automatically detect the device.

Image: A diagram illustrating how to insert the USB receiver into a computer's USB port.
4. 電源オン
Locate the power switch on the underside of the mouse and slide it to the "ON" position. The mouse is now ready for use.

Image: A diagram showing the power switch on the underside of the trackball mouse in the "ON" position.
5. ソフトウェアのインストール(エレコム マウスアシスタント)
To customize the 6 programmable buttons and other settings, download and install the "ELECOM Mouse Assistant" software from the official ELECOM website. This software allows you to assign various functions to each button.

Image: Screenshot of the ELECOM website showing the download links for the Mouse Assistant software for Windows and Mac.

Image: Screenshot of the ELECOM Mouse Assistant software interface, showing button customization options and DPI settings.
操作手順
1. Basic Trackball Operation
Control the cursor by rolling the red trackball with your thumb. The optical tracking technology provides precise movement.

Image: A left hand operating the trackball mouse, demonstrating thumb control of the red trackball.
Video: Official product video demonstrating the ELECOM Left-Handed Wireless Thumb-Operated Trackball Mouse (M-XT4DRBK-G) in use, highlighting its features and ergonomic design.
2. DPI調整
The DPI button allows you to switch between two cursor speeds: 750 DPI (Low) and 1500 DPI (High). Press the DPI button located near the scroll wheel to toggle between these settings.

Image: Close-up of the trackball mouse showing the DPI switch button, labeled "HIGH", located above the trackball.
3. ボタンの機能
The mouse features 6 physical buttons, which can be customized using the ELECOM Mouse Assistant software. Default functions include:
- 左クリック: 一次選択。
- 右クリック: コンテキスト メニュー。
- スクロールホイールのクリック: Middle click or auto-scrolling.
- 戻るボタン: 戻る web ブラウザまたは file 探検家。
- 進むボタン: 前方に移動します web ブラウザまたは file 探検家。
- 機能ボタン: ソフトウェアでカスタマイズ可能。
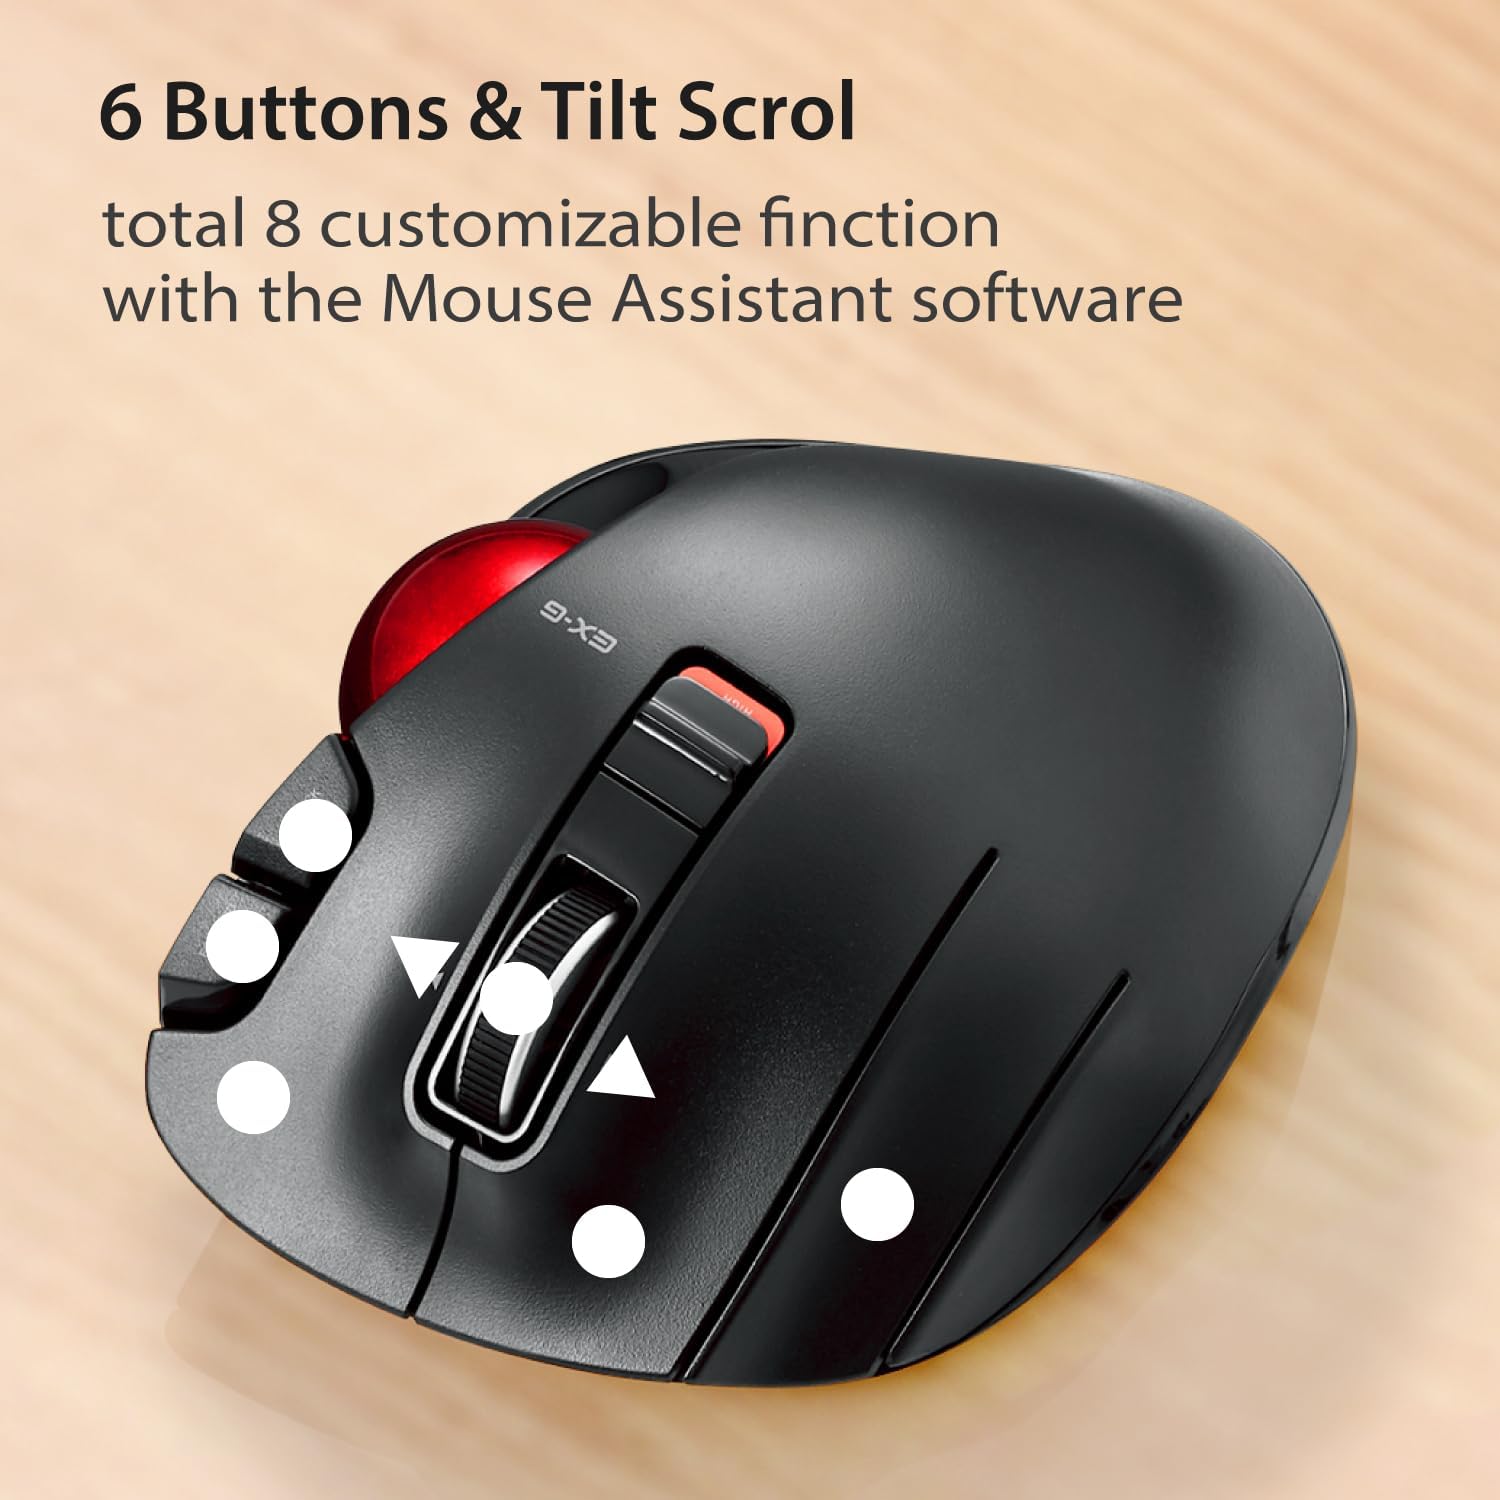
画像: トップダウン view of the trackball mouse highlighting the positions of its 6 buttons and tilt scroll wheel.

Image: Detailed diagram labeling the tilt wheel, function button, back/forward buttons, DPI switch, 34mm ball, ball removal hole, power switch, low power indicator, high speed indicator, and USB receiver storage.
4. Tilt Scroll
The scroll wheel can be tilted left or right to enable horizontal scrolling, useful for navigating wide documents or spreadsheets. This function may not be supported on all operating systems (e.g., Windows RT8.1).
5. 人間工学に基づいたデザイン
The mouse is designed to support the left hand in a natural, angled position, promoting comfort during extended use and reducing strain.

Image: A left hand resting comfortably on the trackball mouse, illustrating its ergonomic shape.
メンテナンス
1. Trackball Cleaning
時間の経過とともに、トラックボールの周りにほこりやゴミが蓄積し、スムーズな動作に影響を与えることがあります。クリーニング方法:
- マウスの電源を切ります。
- Locate the trackball removal hole on the underside of the mouse.
- Use a pen or a similar blunt object to push the trackball out from the bottom.
- Clean the trackball and the inside of the trackball housing with a soft, lint-free cloth.
- Reinsert the trackball until it clicks into place.
Image: Diagram showing the location of the trackball removal hole on the underside of the mouse, indicating where to push to remove the trackball for cleaning.
2. バッテリーの交換
When the battery remaining light lamp indicates low power, replace the AA battery following the installation steps in the Setup section.
トラブルシューティング
| 問題 | 考えられる原因 | 解決 |
|---|---|---|
| Cursor does not move or moves erratically. |
|
|
| Buttons are not responding as expected. |
|
|
| Horizontal scrolling not working. |
|
|
仕様
| 特徴 | 詳細 |
|---|---|
| モデル番号 | M-XT4DRBK-G |
| 寸法(長さ×幅×高さ) | 4.9 x 3.73 x 1.89 インチ (124.4 x 94.7 x 47.9 mm) |
| 重量(電池なし) | 4.5オンス(約127.6g) |
| 接続性 | 2.4GHzワイヤレス(USBレシーバー) |
| DPI レベル | 750 / 1500 count (switchable) |
| ボタン | 6 (Programmable) + Tilt Scroll |
| 追跡技術 | Optical (Red Ball) |
| 電源 | 1 x単三電池(付属) |
| システム要件 | Windows Vista, 7, 8, 10 or later; macOS 10.10 or later |

Image: Diagram showing the length, width, and height dimensions of the trackball mouse.
保証情報
ELECOM products are typically covered by a limited manufacturer's warranty. For specific details regarding the warranty period and terms for your M-XT4DRBK-G trackball mouse, please refer to the warranty card included with your product or visit the official ELECOM webサイト。
サポート
For further assistance, technical support, or to download the latest version of the ELECOM Mouse Assistant software, please visit the official ELECOM-USA webサイト:
You can also find additional product information and FAQs on the ELECOM brand store on Amazon.