1. はじめに
This manual provides essential information for the proper installation, configuration, and operation of your GIGABYTE B550 AORUS ELITE AX motherboard. This motherboard is designed to support 3rd Gen AMD Ryzen Processors and offers advanced features for high-performance computing.

画像1.1: 以上view of the GIGABYTE B550 AORUS ELITE AX Motherboard. This image displays the full motherboard with its various components, including the CPU socket, RAM slots, PCIe slots, and heatsinks.
Key features include a True 12+2 Phases Digital VRM Solution, advanced thermal design with enlarged surface heatsinks, an Ultra Durable PCIe 4.0 x16 Slot, dual ultra-fast NVMe PCIe 4.0/3.0 x4 M.2 slots with dual thermal guards, and integrated Intel WiFi 6 802.11ax with Bluetooth 5.
2. セットアップとインストール
取り付けを始める前に、システムの電源がオフになっていること、および壁のコンセントからプラグが抜かれていることを確認してください。静電気放電を防ぐため、マザーボードは必ず端を持って取り扱ってください。
2.1.コンポーネントの識別
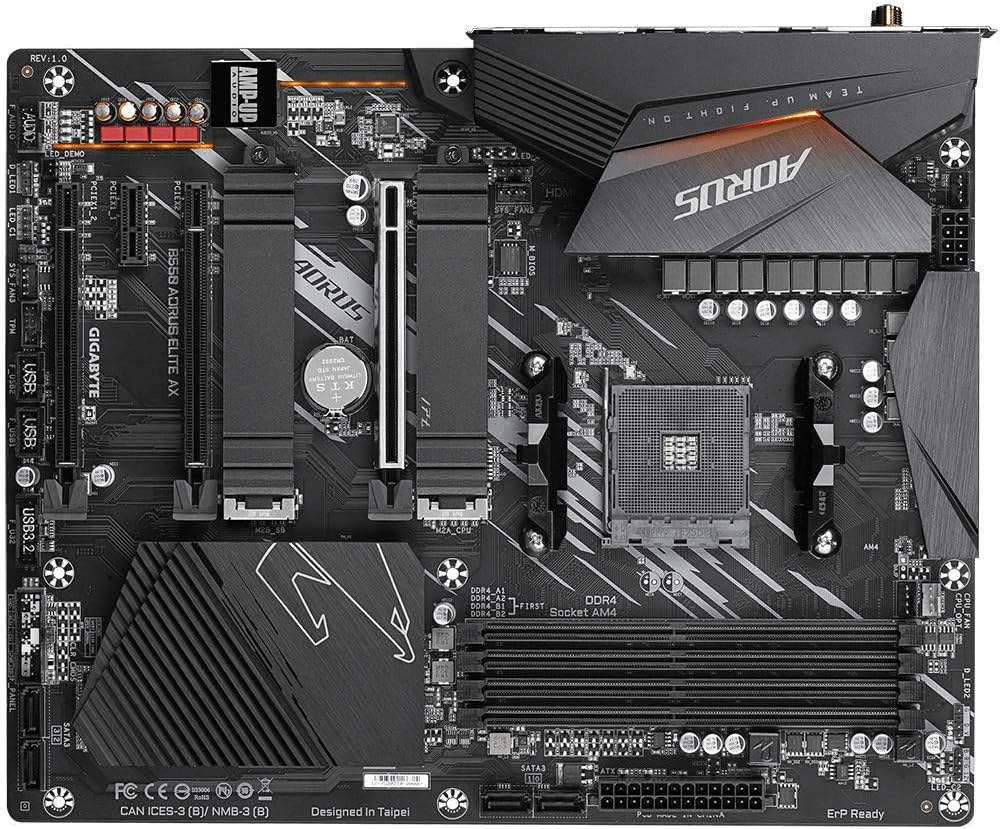
画像2.1: トップダウン view of the GIGABYTE B550 AORUS ELITE AX Motherboard. This image highlights the layout of the CPU socket, four DDR4 DIMM slots, multiple PCIe slots, and two M.2 slots with their thermal guards.
2.2. CPUの取り付け
- Locate the AM4 CPU socket. Lift the load lever to open the socket.
- CPUの三角形のマークとソケットのマークを慎重に合わせます。無理に押し込まず、CPUをソケットにゆっくりと差し込みます。
- Lower the load lever back into place to secure the CPU.
2.3. RAMのインストール
This motherboard supports Dual Channel ECC/Non-ECC Unbuffered DDR4 memory across 4 DIMM slots.
- DIMM スロットの両端のクリップを開きます。
- Align the notch on the DDR4 memory module with the key on the DIMM slot.
- クリップがカチッと音がするまで、メモリ モジュールの両端をしっかりと押し下げます。
2.4. M.2 SSDのインストール
The motherboard features dual ultra-fast NVMe PCIe 4.0/3.0 x4 M.2 slots with dual thermal guards.
- Unscrew and remove the M.2 thermal guard from the desired slot.
- M.2 SSD を斜めにしてスロットに挿入します。
- SSD をゆっくりと押し下げて、付属のネジで固定します。
- Reattach the M.2 thermal guard to ensure optimal cooling.
2.5. PCIeカードの取り付け
Install graphics cards or other expansion cards into the PCIe slots. The top slot is an Ultra Durable PCIe 4.0 x16 slot.
- Align the PCIe card with the chosen slot.
- カードが完全に装着され、保持クリップが固定されるまでしっかりと押し下げます。
2.6.電源接続
Connect the 24-pin ATX main power connector and the 8-pin CPU power connector from your power supply to the motherboard.
2.7. フロントパネルコネクタ
Connect the power button, reset button, HDD LED, and USB/audio headers from your PC case to the corresponding pins on the motherboard. Refer to the motherboard diagram for exact pin locations.
2.8. 背面I/Oパネル

Image 2.2: Rear I/O Panel of the GIGABYTE B550 AORUS ELITE AX Motherboard. This image shows the various ports available, including USB 3.2 Gen 1, USB 3.2 Gen 2, DisplayPort, HDMI, 2.5GbE LAN, Wi-Fi antenna connectors, and audio jacks. The pre-installed I/O shield is visible.
The motherboard features a pre-installed I/O shield for easy and quick installation. Connect your peripherals such as monitor, keyboard, mouse, and network cable to the appropriate ports on the rear I/O panel.
3. 操作手順
3.1. 最初の起動
After assembling all components and connecting power, press the power button on your PC case. The system should power on and display the GIGABYTE splash screen.
3.2. BIOS/UEFIへのアクセス
BIOS/UEFIセットアップユーティリティに入るには、 削除 key repeatedly during the initial boot process when the GIGABYTE logo appears. The BIOS allows you to configure system settings, boot order, and enable features like XMP for memory profiles.
3.3. ドライバーのインストール
After installing your operating system, install the necessary drivers for the motherboard's components. These include chipset drivers, LAN drivers, Wi-Fi/Bluetooth drivers, and audio drivers. Drivers can typically be found on the GIGABYTE official web特定のマザーボード モデルのサイトをご覧ください。
4. メンテナンス
4.1. システムのクリーニング
ほこりの蓄積を防ぐため、コンピューター内部を定期的に清掃してください。ほこりは過熱やパフォーマンスの低下につながります。圧縮空気を使用して、ファン、ヒートシンク、その他のコンポーネントからほこりを取り除きます。清掃する前に、システムの電源をオフにし、電源プラグを抜いてください。
4.2. BIOSアップデート
GIGABYTE provides BIOS updates to improve system stability, add support for new hardware, and fix bugs. The B550 AORUS ELITE AX supports Q-Flash Plus, allowing you to update the BIOS without installing the CPU, memory, or graphics card. Refer to the GIGABYTE website for detailed instructions on using Q-Flash Plus and for the latest BIOS versions.
5。 トラブルシューティング
このセクションでは、発生する可能性のある一般的な問題について説明します。
5.1. 電源が入らない / 起動しない
- すべての電源ケーブル (24 ピン ATX、8 ピン CPU) がマザーボードと電源にしっかりと接続されていることを確認します。
- 電源スイッチが「オン」の位置にあることを確認します。
- フロントパネルの電源ボタンコネクタがマザーボードに正しく接続されていることを確認します。
- 可能であれば別の電源でテストしてください。
5.2. ディスプレイ出力なし
- Ensure your monitor is connected to the graphics card (if installed) or the motherboard's HDMI/DisplayPort (if using an APU with integrated graphics).
- グラフィック カードとメモリ モジュールを装着し直します。
- RAM スティックを 1 つだけ取り付けた状態で起動してみます。
5.3. Bluetooth / Wi-Fi Connectivity Issues
- Ensure the external Wi-Fi antenna is securely connected to the rear I/O panel.
- Update your Wi-Fi and Bluetooth drivers to the latest version from the GIGABYTE webサイト。
- If Bluetooth devices disconnect after sleep mode, try disabling USB selective suspend settings in Windows Power Options or updating the BIOS to the latest version, as this has resolved similar issues in some cases.
5.4. BIOS Reset
If you encounter issues after changing BIOS settings, you may need to reset the BIOS to default settings. This motherboard does not feature a dedicated BIOS reset button. To clear CMOS (BIOS settings), power off your system, unplug it, and remove the small circular battery (CMOS battery) from the motherboard for a few minutes. Reinsert the battery and power on the system.
6. 仕様
Below are the key technical specifications for the GIGABYTE B550 AORUS ELITE AX Motherboard:
| 特徴 | 仕様 |
|---|---|
| ブランド | ギガバイト |
| モデル名 | B550 AORUS エリート AX |
| CPUソケット | ソケットAM4 |
| 互換性のあるプロセッサ | AMD第3世代Ryzen |
| チップセットタイプ | B550 について |
| RAMメモリ技術 | DDR4 |
| メモリ速度 | 2133 MHz (Base), up to 4733MHz (OC) |
| メモリストレージ容量 | 128 GB(最大) |
| ワイヤレスタイプ | 802.11ax (Intel WiFi 6) |
| 無線LAN | 2.5ギガビットイーサネット |
| PCIeスロット | 1x PCIe 4.0 x16, 2x PCIe 3.0 x16 (x4 mode), 1x PCIe 3.0 x1 |
| M.2 スロット | 2x NVMe PCIe 4.0/3.0 x4 with Thermal Guards |
| USB 2.0 ポート | 2(リア) |
| USB 3.2 Gen1ポート | 4(リア) |
| USB 3.2 Gen2ポート | 2 (Rear, Type-A) |
| ビデオ出力 | HDMI、DisplayPort |
| オーディオ | Realtek ALC1200 コーデック、 AMP-UPオーディオ |
| フォームファクター | ATTX |
| アイテム重量 | 4.07ポンド |
| 製品寸法 | 13.18 x 10.62 x 3.14インチ |
7. 保証情報
GIGABYTE products are covered by a limited warranty. The specific terms and duration of the warranty may vary by region and product type. Please retain your proof of purchase for warranty claims. For detailed warranty information, including coverage, limitations, and the claims process, please visit the official GIGABYTE webサイトをご覧いただくか、お近くの販売店にお問い合わせください。
8. テクニカルサポート
If you encounter issues that cannot be resolved using this manual or require further assistance, please contact GIGABYTE technical support. You can find support resources, FAQs, driver downloads, and contact information on the official GIGABYTE webサイト:
When contacting support, please have your motherboard model (B550 AORUS ELITE AX) and a detailed description of your issue ready.