
1. はじめに
The Kinter A7BT is a compact 2-channel mini amplifier designed for various audio applications, including home, automotive, and motorcycle setups. It features Bluetooth connectivity, USB and TF card playback, FM radio, and multiple control options. This manual provides detailed instructions for the proper installation, operation, and maintenance of your A7BT amplifier。
2. パッケージ内容
Verify that all items listed below are included in your package. If any items are missing or damaged, please contact Kinter customer support.
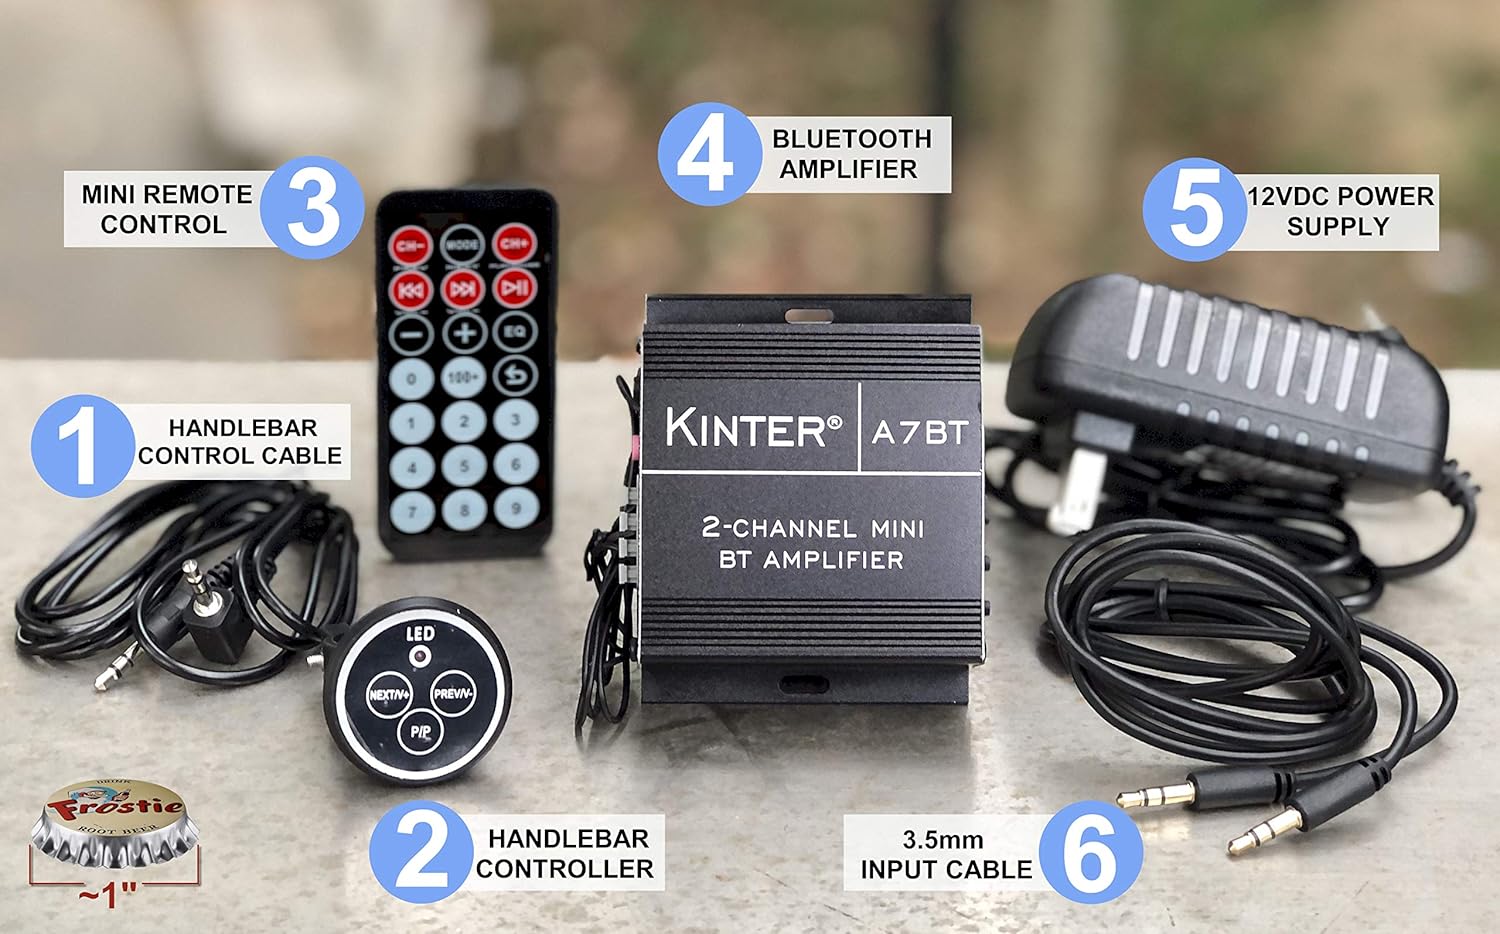
Image: Kinter A7BT amplifier, handlebar controller, IR remote, 12V power supply, and cables.
- Kinter A7BT 2-Channel Mini Bluetooth Ampリファイアー
- Wired Handlebar Controller
- Wireless Infrared (IR) Remote Control
- 3.5mm Audio Input Cable (59 inches length)
- 12V DC Power Supply (34 inches length)
3.製品オーバーview
3.1 フロントパネルとリアパネル
さまざまなコントロールと接続に慣れてください。 amplifier。
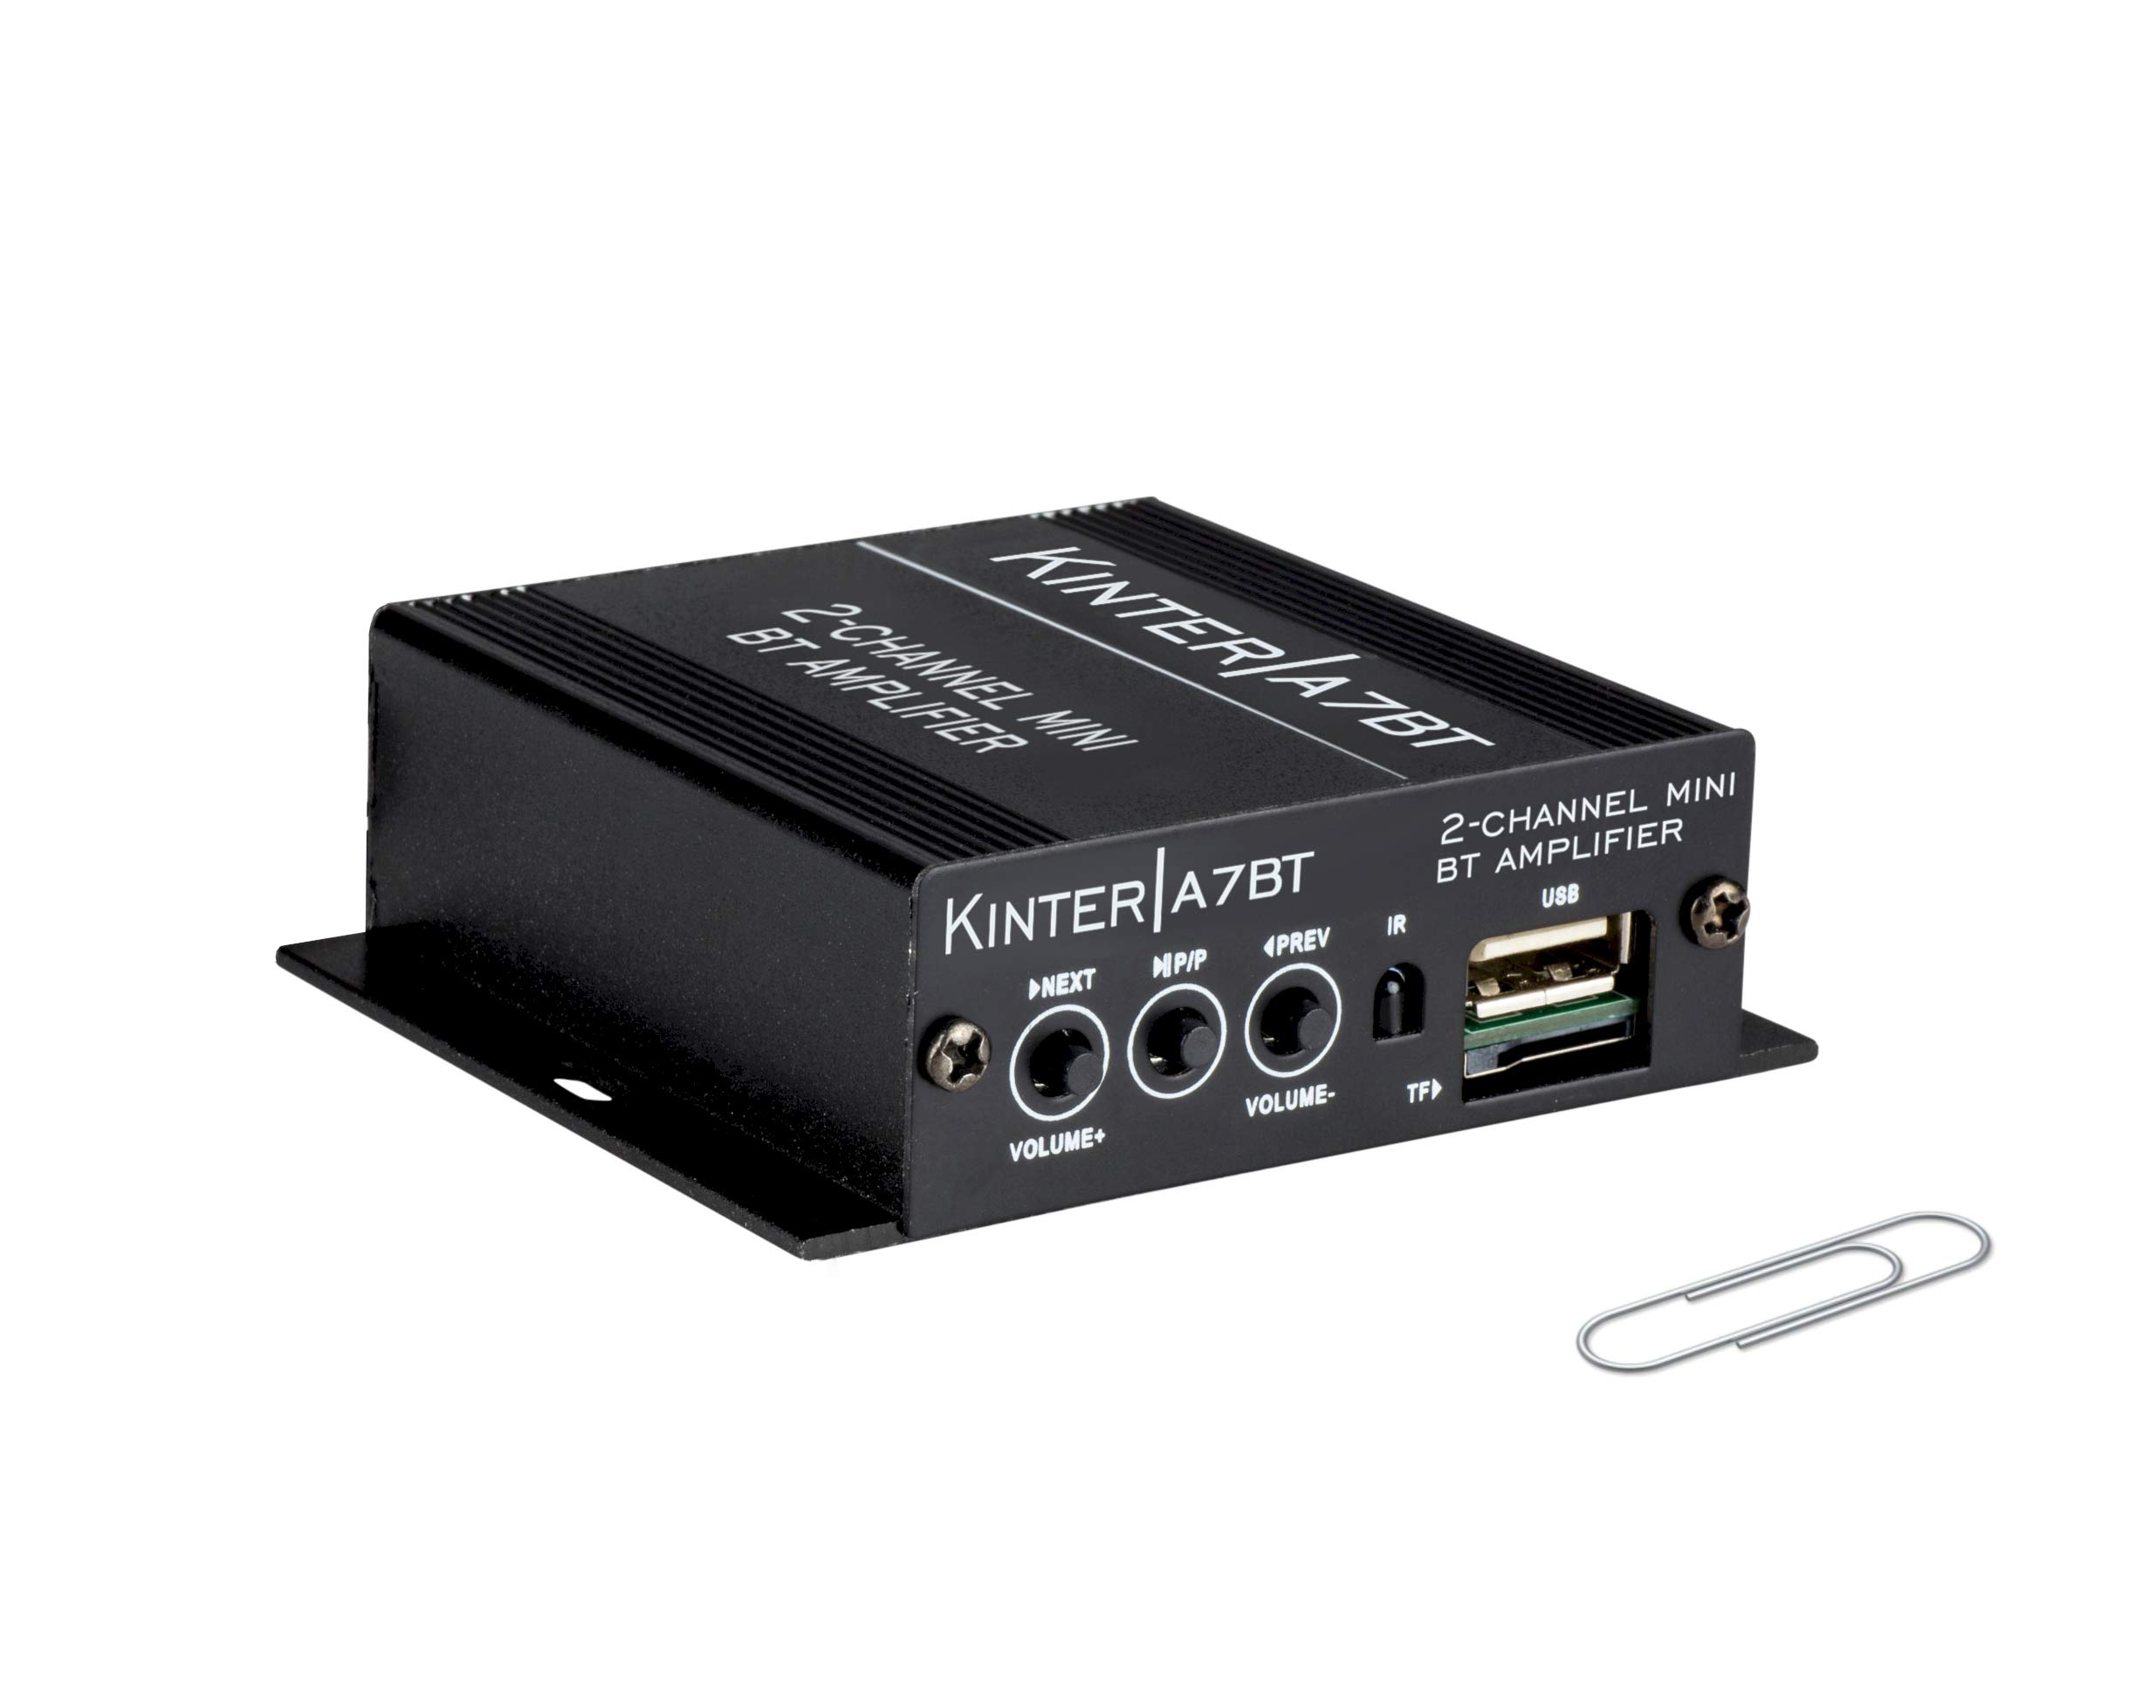
Image: Detailed diagram showing the front and rear panels of the Kinter A7BT amplifier with numbered components.
- NEXT/P (Next Song / Volume Up): 短く押すと次のトラック、長く押すと音量が上がります。
- M/P/P (Mode / Play / Pause): Short press for play/pause, long press to change input mode (Bluetooth, AUX, USB/TF, FM).
- PREV/V (Previous Song / Volume Down): 短く押すと前のトラックに移動し、長く押すと音量が下がります。
- IR(赤外線受信機): For wireless remote control signals.
- TF (TransFlash / Micro SD Card Slot): オーディオ再生用 file■TFカードから。
- USB (USB Port): オーディオ再生用 file■USBフラッシュドライブから。 Note: This is not a charging port.
- AUX IN (3.5mm Stereo Audio Input Jack): 3.5mm ケーブルを介して外部オーディオ デバイスを接続します。
- FMアンテナ: Connection point for the FM antenna wire.
- REMOTE LINE IN: Input for the wired handlebar remote control.
- スピーカー出力(右/左): Terminals for connecting passive speakers (Right and Left channels).
- DC12V (12V DC Power Input): For connecting the 12V DC power supply.
- Bluetooth Operation Indicator: LED indicator for Bluetooth status.
3.2 ハンドルバーコントローラー
The wired handlebar controller provides convenient access to essential functions.
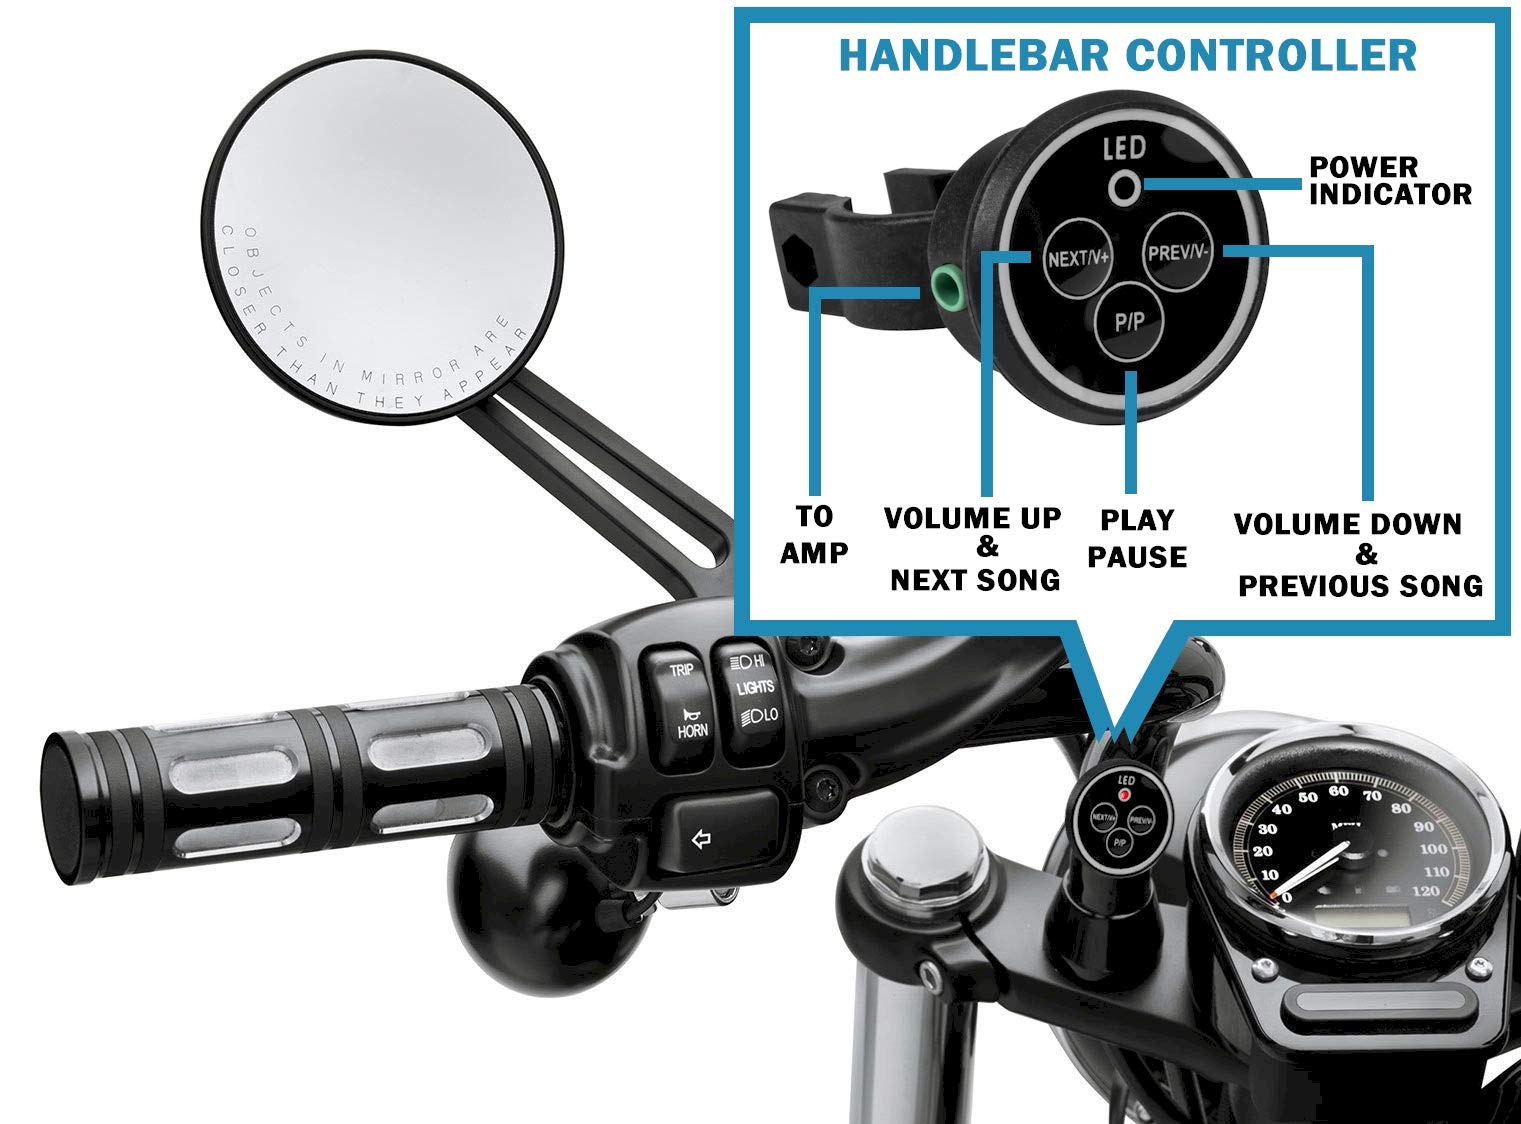
Image: Close-up of the handlebar controller showing LED power indicator, Next/Volume Up, Previous/Volume Down, and Play/Pause buttons.
- 導かれた: 電源インジケータ。
- 次/V+: Next Song / Volume Up.
- 前/V-: Previous Song / Volume Down.
- P / P: 再生/一時停止。
4. セットアップ
4.1電源接続
Connect the included 12V DC power supply to the DC12V input on the amplifier. Plug the power supply into a standard wall outlet.
For automotive or motorcycle applications, you can hardwire the amplifier to a 12V battery system. Use the included PSU's wire and connector. Strip the wire as shown in the diagram below. The white wire is POSITIVE (+), and the bare wire is GROUND (-). It is recommended to install a 2 Amp fuse inline (not included) for protection.
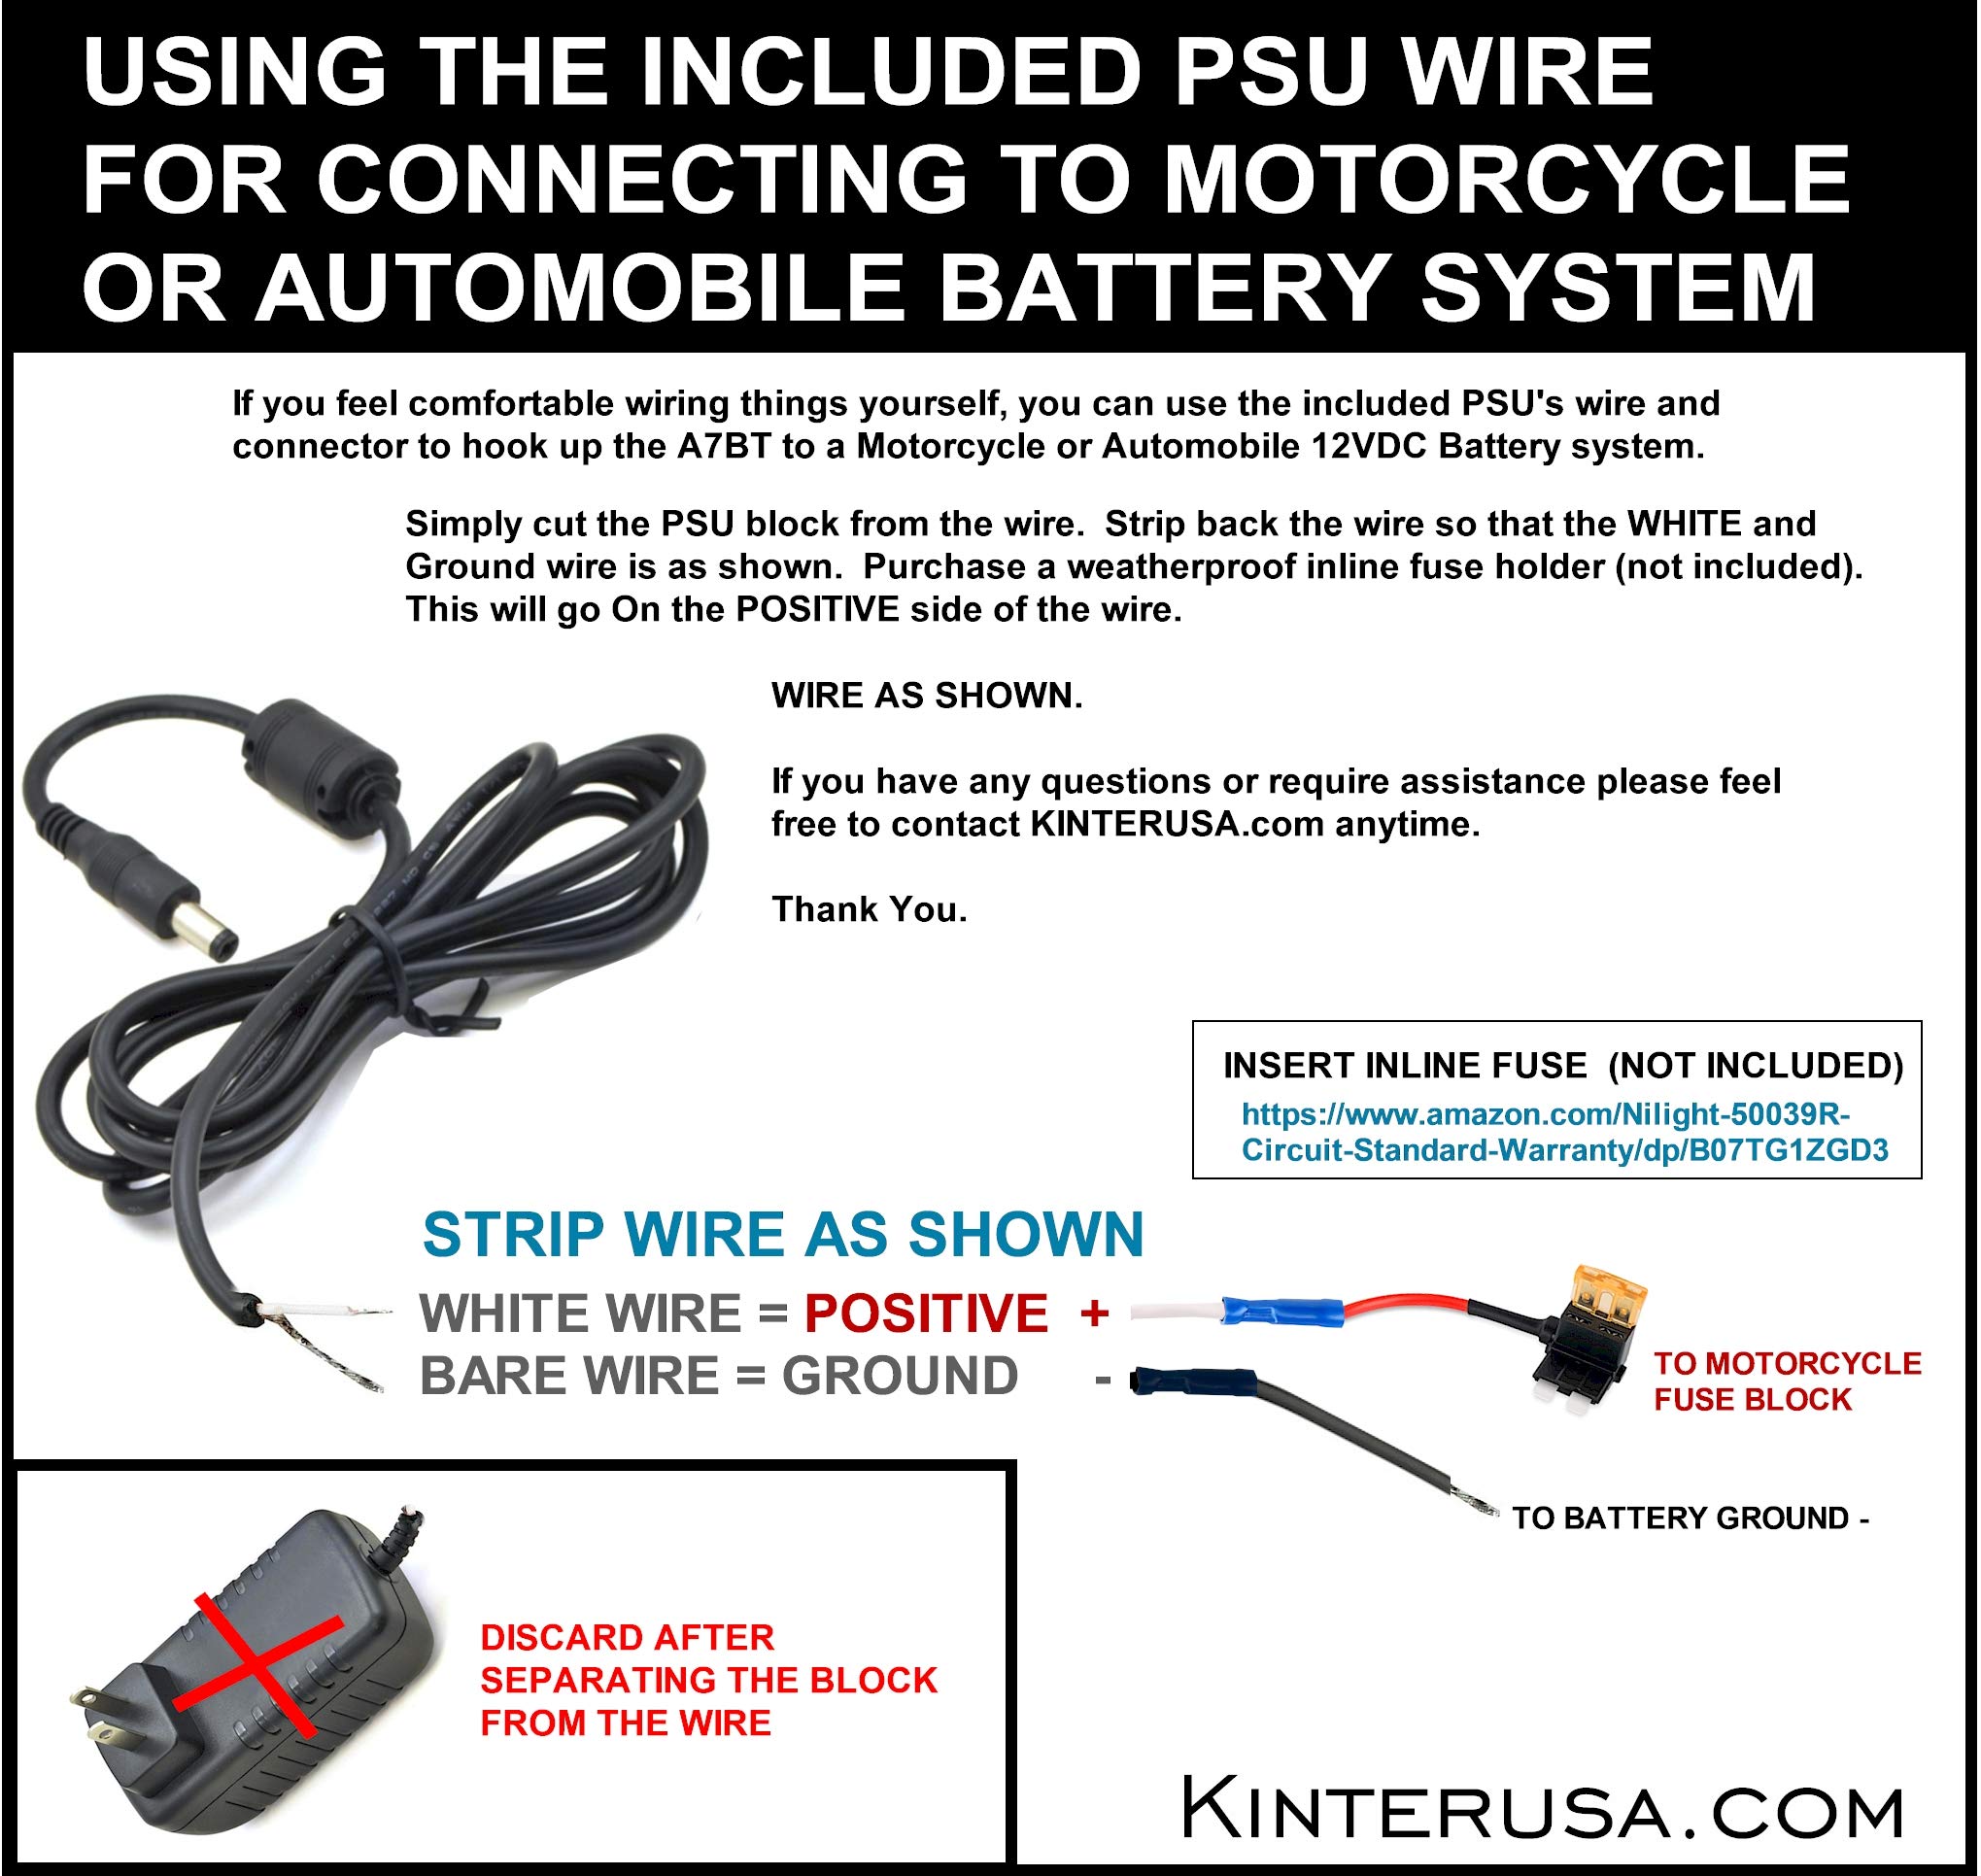
Image: Instructions for connecting the amplifier to a motorcycle or automobile battery, including wire stripping and fuse recommendation.
4.2スピーカー接続
Connect your passive speakers to the SPEAKER OUT terminals on the rear panel. Ensure correct polarity (positive to positive, negative to negative) for each channel (Left and Right). Use a small screwdriver to press the terminal tabs, insert the speaker wire, and then release the tab to secure the wire.
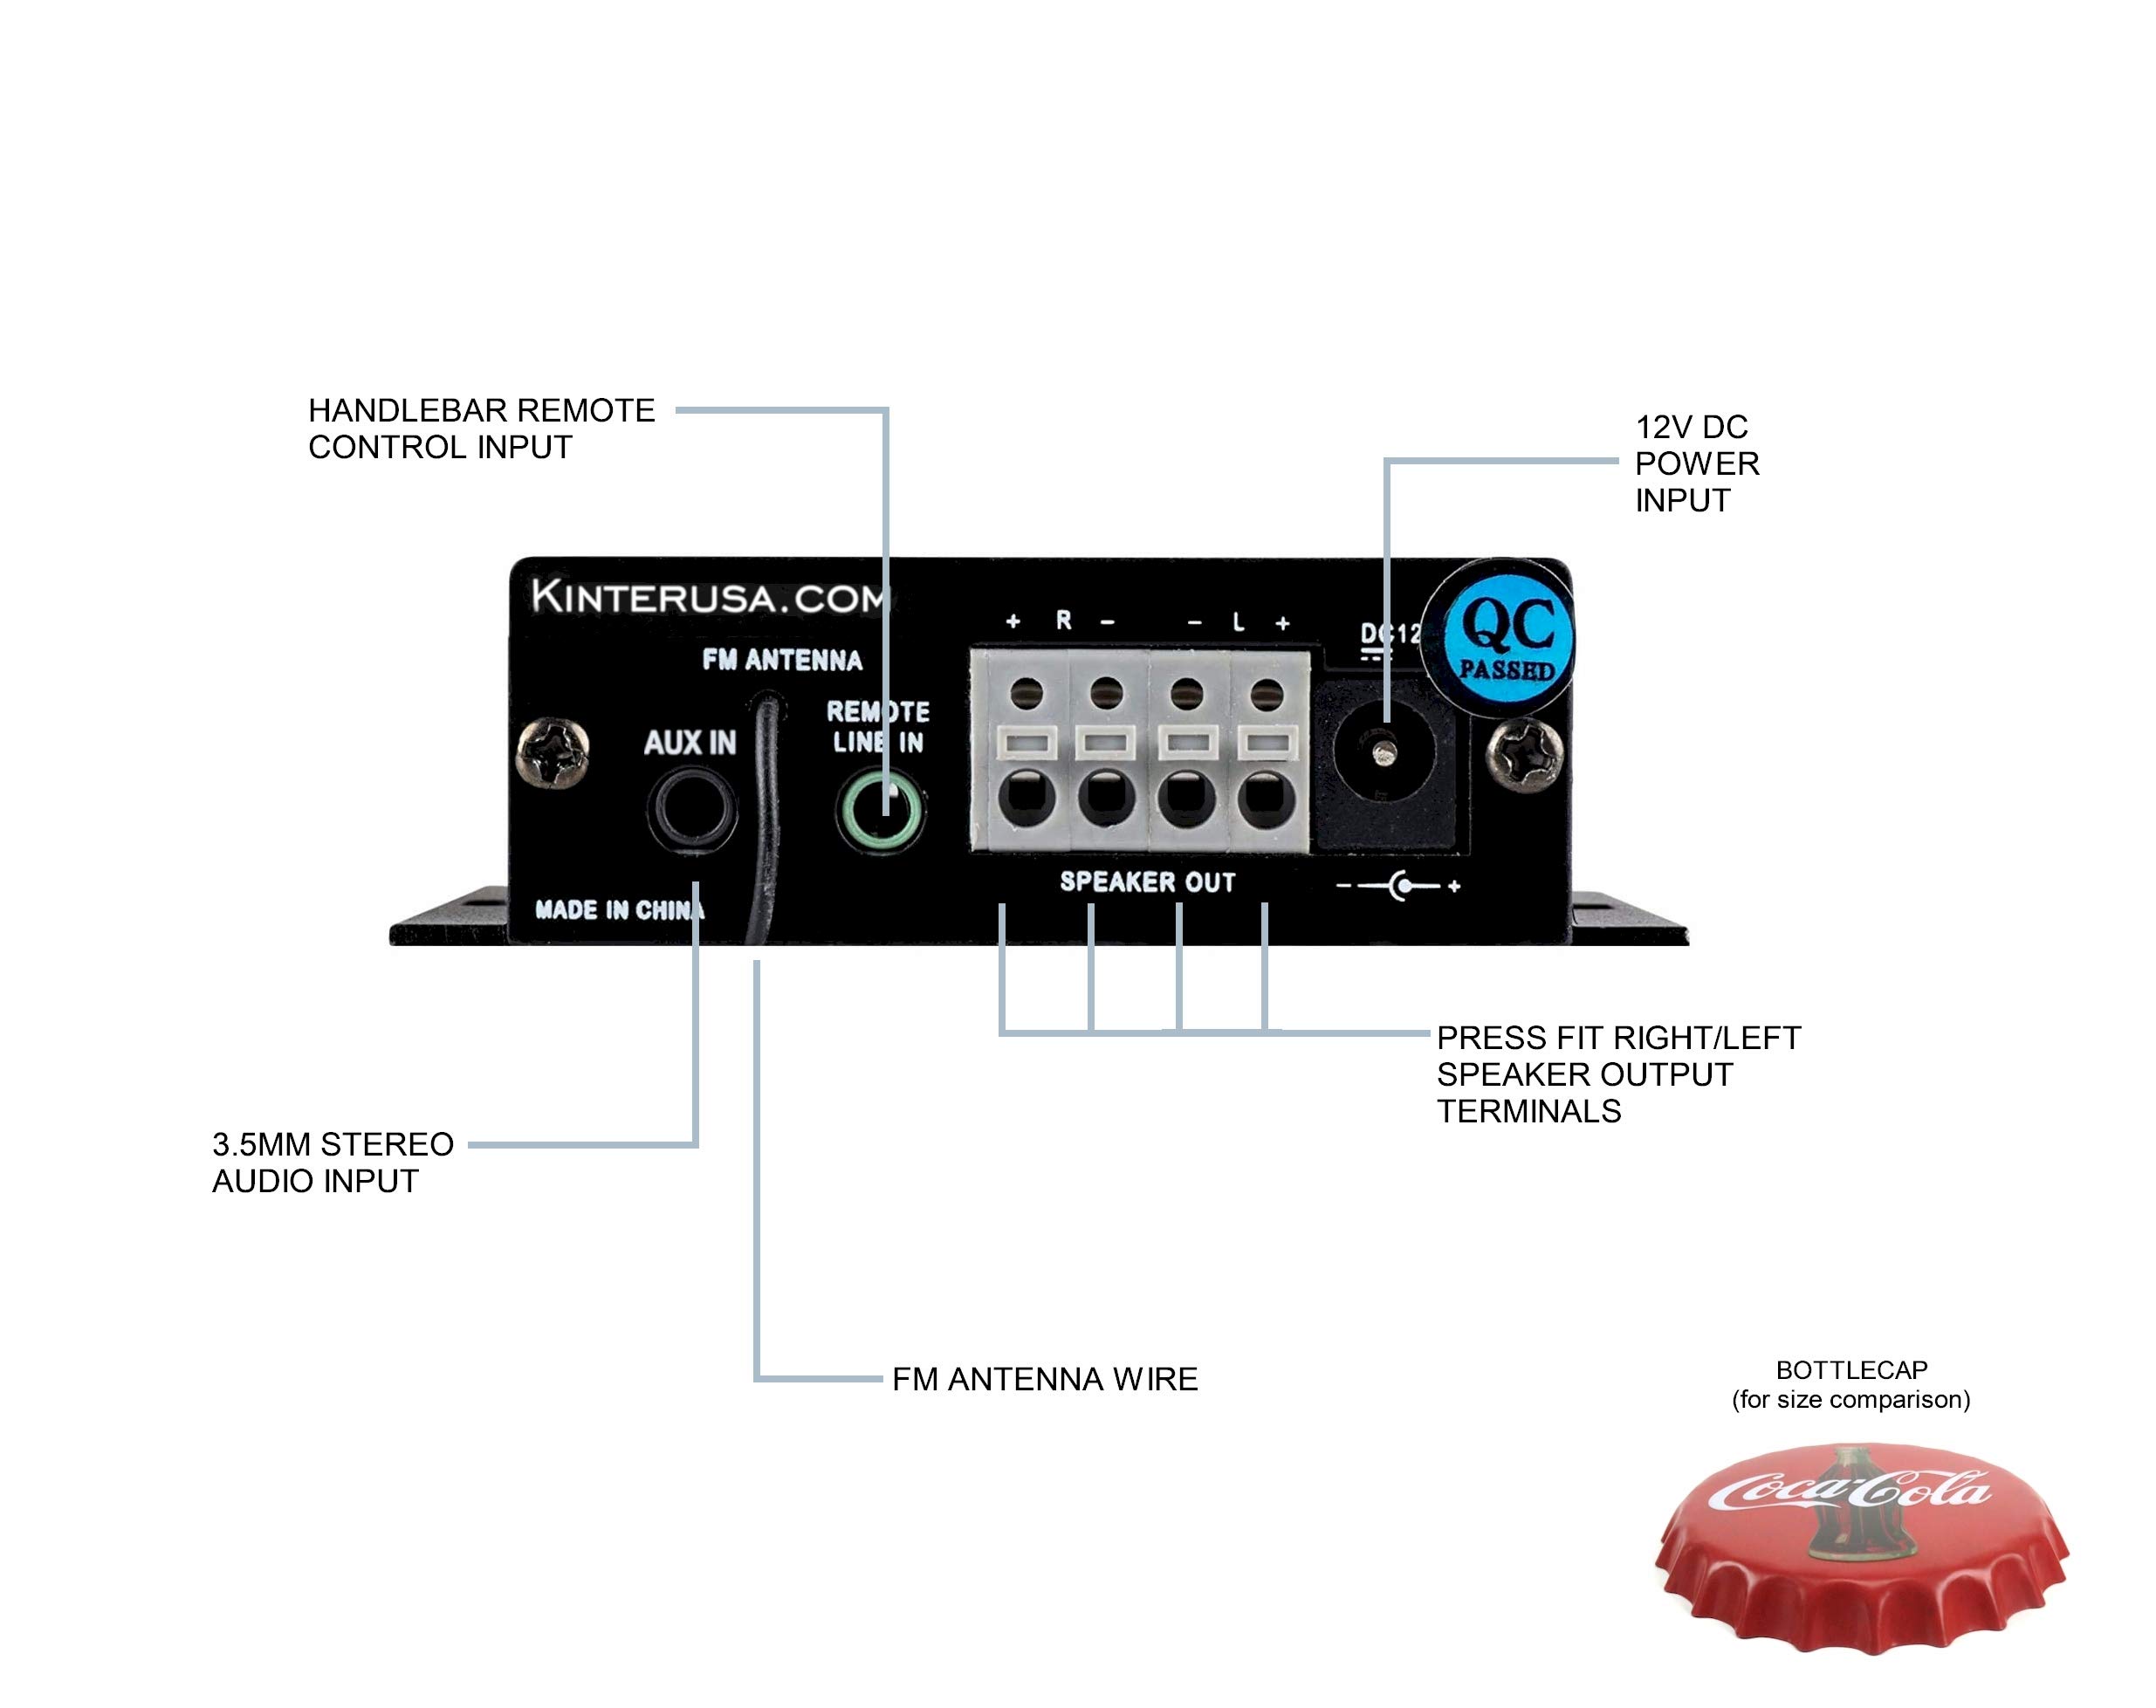
Image: A finger pressing a speaker terminal tab while inserting a speaker wire.
注記: Avoid using excessively large speaker wire that may cause shorts. Soldering the ends of the speaker wires can prevent stray strands and improve connection reliability.
4.3 オーディオ入力接続
- AUX入力: Connect external audio devices (e.g., smartphone, MP3 player) using the included 3.5mm audio cable to the AUX IN jack.
- USB/TFカード: MP3オーディオが入ったUSBフラッシュドライブまたはTF(Micro SD)カードを挿入します files into the respective ports. The amplifier will automatically detect and play compatible files.
- FMアンテナ: Connect the FM antenna wire to the FM ANTENNA input for radio reception.
4.4 リモートコントロール接続
- Wired Handlebar Controller: Plug the handlebar controller cable into the REMOTE LINE IN jack on the ampライファイアの背面パネル。
- Wireless IR Remote: Ensure the IR receiver on the front panel (labeled 'IR') has a clear line of sight to the remote control.
5. 操作
5.1 電源オン/オフ
The Kinter A7BT amplifier does not have a dedicated power on/off button. It powers on automatically when connected to a 12V DC power source and powers off when the power source is disconnected.
5.2 モード選択
を押し続けます M/P/P button on the front panel or the 'MODE' button on the IR remote to cycle through the available input modes: Bluetooth, AUX, USB, TF, and FM radio.
5.3 ボリュームコントロール
Adjust the volume using the:
- フロントパネル: 長押し NEXT/P button for Volume Up, and long press the PREV/V button for Volume Down.
- Handlebar Controller: 使用 ネクスト/V+ button for Volume Up, and 前へ/V- button for Volume Down.
- IRリモート: 専用の音量アップボタンと音量ダウンボタンを使用します。
5.4 再生コントロール
Control audio playback using the:
- フロントパネル: ショートプレス NEXT/P for next track, short press PREV/V for previous track, short press M/P/P 再生/一時停止用。
- Handlebar Controller: 使用 ネクスト/V+ 次のトラックのために、 前へ/V- for previous track, and 個人/個人 再生/一時停止用。
- IRリモート: Use the dedicated track skip and play/pause buttons.
5.5Bluetoothペアリング
When the A7BT amplifier is powered on, it is ready for Bluetooth pairing. Follow these steps:
- オーディオ デバイス (スマートフォン、タブレットなど) で Bluetooth が有効になっていることを確認します。
- デバイスの Bluetooth 設定を開きます。
- 新しいデバイスをスキャンします。
- Select "A7BT" from the list of available devices to connect.
- Once connected, the Bluetooth operation indicator will confirm the status.
5.6 FMラジオの操作
In FM mode, use the track skip buttons on the front panel, handlebar controller, or IR remote to scan for and select radio stations.
5.7 USB/TFカード再生
When a USB drive or TF card is inserted, the amplifier will automatically switch to the corresponding mode and begin playing audio files. The unit will resume playback from where it left off when powered off and on again. Fast-forwarding within a song is not supported.
6. メンテナンス
To ensure optimal performance and longevity of your Kinter A7BT amplifier, observe the following maintenance guidelines:
- 換気: 確実に amplifier is placed in a well-ventilated area. The aluminum casing acts as a heatsink, and proper airflow is crucial to prevent overheating. Avoid enclosing the unit in tight spaces without ventilation.
- クリーニング: 柔らかく乾いた布で拭いてください。 amp洗浄機の外装。液体洗剤や溶剤は使用しないでください。
- 環境: 露出を避ける amplifier to extreme temperatures, direct sunlight, high humidity, or dusty environments.
- 接続: すべてのケーブル接続が安全で腐食がないことを定期的に確認してください。
7。 トラブルシューティング
If you encounter issues with your Kinter A7BT amp問題が頻繁に発生する場合は、次の一般的な問題と解決策を参照してください。
| 問題 | 考えられる原因 | 解決 |
|---|---|---|
| 電源なし | Power supply not connected or faulty; vehicle battery issue. | Check power supply connection and outlet. If hardwired, check battery connection and inline fuse (if installed). |
| 音が出ない | Incorrect input mode; speaker wires loose or incorrectly connected; volume too low; faulty audio source. | Verify correct input mode. Check speaker wire connections and polarity. Increase volume. Test with a different audio source. |
| Bluetoothが接続されない | Ampライファイアが Bluetooth モードではありません。デバイスが遠すぎます。デバイスはすでに別のユニットとペアリングされています。 | 確保する amplifier is in Bluetooth mode. Move device closer. Forget "A7BT" on your device and re-pair. |
| USB/TFカードが再生されない | サポートされていません file フォーマット; カード/ドライブが正しく挿入されていない; 破損している files. | 確保する files are MP3 format. Reinsert card/drive. Try a different card/drive. |
| Ampリファーが過熱する | Poor ventilation; impedance mismatch with speakers. | Ensure adequate airflow around the unit. Verify speaker impedance matches ampリファー仕様。 |
| リモコンが動作しない | IR receiver blocked; remote battery low (for wireless IR remote); wired remote connection loose. | Ensure clear line of sight to IR receiver. Replace remote battery. Check wired remote connection. |
8. 仕様
Detailed technical specifications for the Kinter A7BT amplifier。
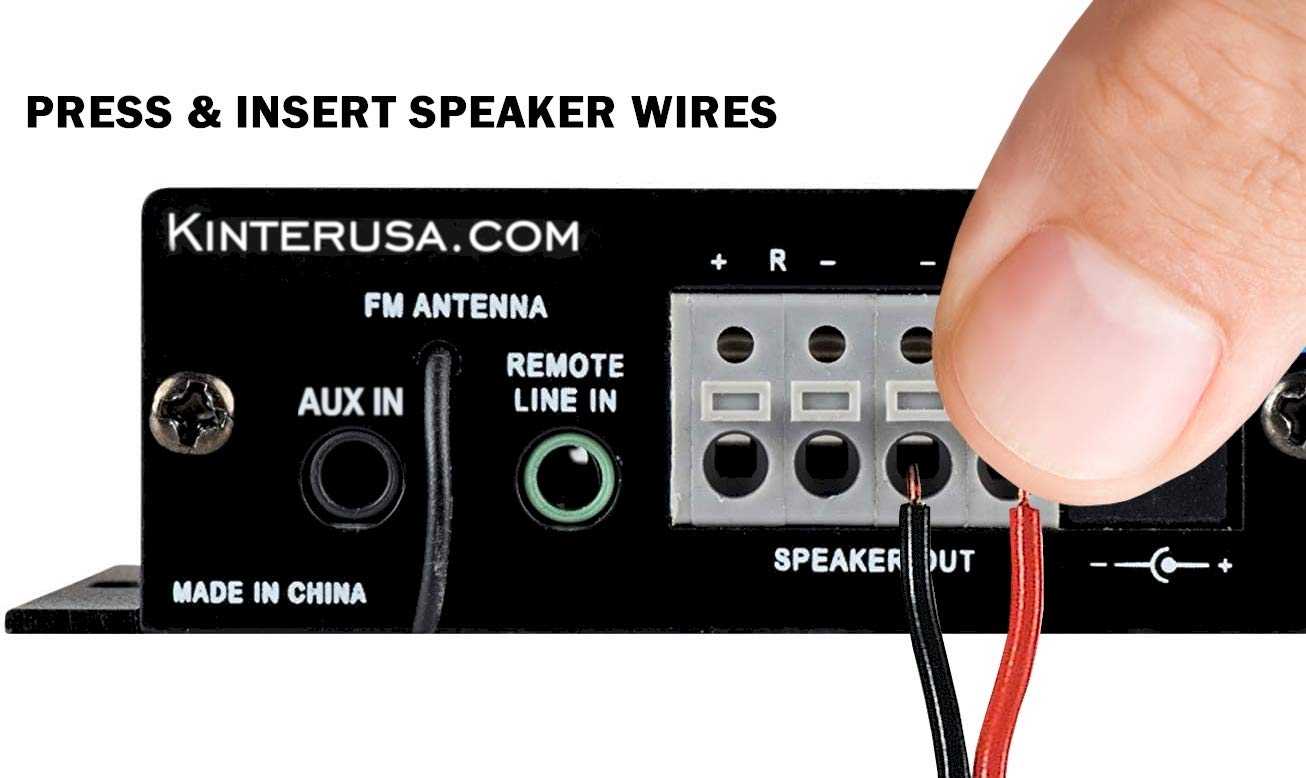
Image: The Kinter A7BT amplifier with its length, width, and height dimensions indicated.
| 特徴 | 仕様 |
|---|---|
| モデル番号 | A7BT |
| チャンネル数 | 2 |
| 出力電力 | 2 x 20W (4Ω, 10% THD Max) |
| 入力ボリュームtage | 9-14.4V DC |
| 定格入力ボリュームtage | 12ボルト |
| 定格入力電流 | ≦3A |
| 周波数応答 | 20Hz-20KHz |
| 出力インピーダンス | 4-8オーム |
| 信号対雑音比(SNR) | ≥80dB |
| 全高調波歪み(THD) | ≤0.02% 4W |
| FM周波数範囲 | 87.5-108.0MHz |
| Input Impedance (FM) | 47Kオーム |
| 外部制御 | 赤外線リモコン |
| 動作温度 | 0~46℃(32~115℉) |
| 保管温度 | 0~60℃(32~140℉) |
| 湿度 | 10-85% (Operating), 10-95% (Storage) |
| 商品の寸法 (長さ x 幅 x 高さ) | 6.4 x 6.4 x 2.5 Centimeters (2.5 x 2.5 x 1 inches approx.) |
9. 保証とサポート
The Kinter A7BT amplifier comes with a one-year warranty from the date of purchase. This warranty covers manufacturing defects under normal use. It does not cover damage caused by misuse, accidents, unauthorized modifications, or improper installation.
For technical support, warranty claims, or any questions regarding your Kinter A7BT amplifier, please visit the official KinterUSA webサイトをご覧いただくか、カスタマー サービスに直接お問い合わせください。