
1.はじめにおよび安全情報
Thank you for choosing the ANENG V8 Digital Multimeter. This device is designed for safe and accurate measurement of AC/DC voltage, AC/DC current, resistance, capacitance, frequency, temperature, diode, continuity, and battery testing. Please read this manual thoroughly before use to ensure proper operation and to prevent potential hazards.
1.1 安全上の注意
- 使用前に必ずマルチメーターが正常に動作していることを確認してください。テストリードに損傷がないか点検してください。
- ボリュームを適用しないtagマルチメーターの最大定格値を超える電圧または電流。
- volを使用する場合は、細心の注意を払ってくださいtag36V DC または 25V AC RMS を超える電圧は感電の危険があるため使用しないでください。
- 必ず回路の電源を切り、高電圧の電気をすべて放電してください。tag抵抗、導通、ダイオード、または静電容量を測定する前に、コンデンサをテストします。
- テスト リード線を回路に接続する前に、ロータリー スイッチが目的の測定に対して正しい位置にあることを確認してください。
- 爆発性のガス、蒸気、またはほこりの多い環境ではマルチメーターを操作しないでください。
- 正確な測定を保証するために、電池残量低下インジケーターが表示されたら、すぐに電池を交換してください。
2.製品オーバーview
2.1 パッケージ内容
The ANENG V8 Digital Multimeter package typically includes the following items:
- ANENG V8 Digital Multimeter
- テストリード(赤と黒)
- 温度プローブ
- キャリングケース
- ユーザーマニュアル

Image: ANENG V8 Digital Multimeter with its standard accessories, including test leads, a temperature probe, and a protective carrying case.
2.2 コントロールとディスプレイ
The multimeter features an 8000-count LCD backlight display for clear readings in various lighting conditions. Key controls include a rotary switch for function selection and buttons for range, data hold, and other features.

画像: 詳細 view of the multimeter's front panel, highlighting the LCD screen, the central rotary selector, and various control buttons.
3. セットアップ
3.1 バッテリーの取り付け
The ANENG V8 Digital Multimeter is powered by batteries. To install or replace batteries:
- マルチメーターの電源がオフになっていることを確認し、すべてのテストリードを外します。
- デバイスの背面にある電池ボックスのカバーを見つけます。
- ドライバーを使用して、バッテリー カバーを固定しているネジを緩めます。
- カバーを取り外します。
- Insert new batteries, observing the correct polarity (+ and -) as indicated inside the compartment. The device typically uses AA batteries.
- 電池カバーを元に戻し、ネジで固定します。
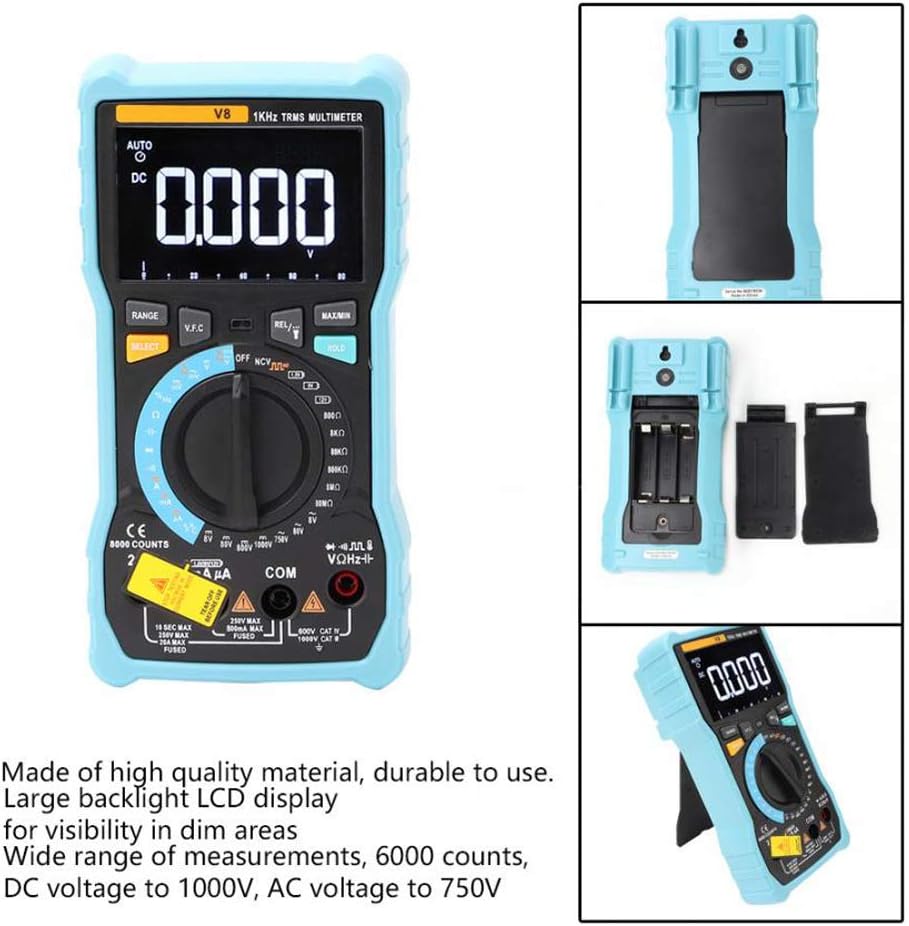
画像: 背面 view of the multimeter with the battery compartment open, illustrating the correct placement for three AA batteries.
4. 操作手順
Before any measurement, ensure the test leads are correctly inserted into the input jacks and the rotary switch is set to the appropriate function.
4.1 DC/AC電圧の測定tage
- Set the rotary switch to the 'V–' (DC Voltage) or 'V~' (AC Voltage) 位置。
- 赤いテスト リードを「VΩmA」ジャックに接続し、黒いテスト リードを「COM」ジャックに接続します。
- 測定する回路またはコンポーネントにテスト リード線を並列に接続します。
- 巻を読むtagディスプレイ上のe値。
4.2 DC/AC電流の測定
- Set the rotary switch to the 'A–' (DC Current) or 'A~' (AC Current) position. For milliampere (mA) または microampere (µA) measurements, select the corresponding range.
- For current up to 800mA, connect the red test lead to the 'VΩmA' jack. For current up to 20A, connect the red test lead to the '20A' jack. Connect the black test lead to the 'COM' jack.
- Disconnect power to the circuit. Open the circuit where you want to measure current. Connect the multimeter in series with the circuit.
- 回路に電力を供給し、ディスプレイ上の電流値を読み取ります。
4.3抵抗の測定
- ロータリースイッチを「Ω」(抵抗)の位置に設定します。
- 赤いテスト リードを「VΩmA」ジャックに接続し、黒いテスト リードを「COM」ジャックに接続します。
- Ensure the circuit is de-energized and all capacitors are discharged. Connect the test leads across the component to be measured.
- ディスプレイの抵抗値を読み取ります。
4.4 NCV(非接触ボリュームtage) 検出
- ロータリースイッチを「NCV」の位置に設定します。
- マルチメーターの上端を導体またはコンセントの近くに移動します。
- The multimeter will emit an audible beep and the NCV indicator light will flash if AC voltage is detected, indicating the presence of live voltag身体的な接触なしに。
4.5温度測定
- ロータリースイッチを「°C/°F」(温度)の位置に設定します。
- Connect the temperature probe to the 'VΩmA' and 'COM' jacks, observing polarity if applicable.
- 温度プローブの先端を、温度を測定したい物体の上または近くに置きます。
- ディスプレイ上の温度値を読み取ります。
4.6 その他の機能
- キャパシタンス: Set the rotary switch to the 'F' position. Connect leads across the discharged capacitor.
- 周波数/デューティサイクル: Set the rotary switch to the 'Hz/%' position. Connect leads to the signal source.
- ダイオードテスト: Set the rotary switch to the 'Diode' position. Connect leads across the diode.
- 導通テスト: Set the rotary switch to the 'Continuity' position. Connect leads across the circuit. An audible beep indicates continuity.
- バッテリーテスト: Set the rotary switch to the 'Battery' position. Connect leads to the battery terminals (1.5V, 9V, or 12V).
- データ保持: 「HOLD」ボタンを押すと、ディスプレイの現在の表示が固定されます。もう一度押すと解除されます。
- バックライト/懐中電灯: Press the backlight button to turn on/off the display backlight or flashlight.
- 自動電源オフ: マルチメーターは、一定時間操作しないと自動的に電源がオフになり、バッテリー寿命が長くなります。
5. メンテナンス
5.1 クリーニング
広告でケースを拭くamp 布と中性洗剤を使用してください。研磨剤や溶剤は使用しないでください。入力端子を汚れや湿気から守ってください。
5.2 ヒューズの交換
電流測定機能が故障した場合は、ヒューズの交換が必要になる可能性があります。適切なヒューズの種類と定格については、仕様書を参照してください。ヒューズの交換は、必ず資格のある担当者が行ってください。
5.3 ストレージ
When not in use for extended periods, remove the batteries to prevent leakage and store the multimeter in a dry, cool place.
6。 トラブルシューティング
- 表示なし: バッテリーの取り付けと充電を確認してください。必要に応じてバッテリーを交換してください。
- 間違った読み方: Ensure the rotary switch is set to the correct function and range. Check test lead connections. Verify battery charge.
- 電流測定が機能しない: Check the fuse. Replace if blown (refer to fuse replacement section).
- NCV 検出なし: Ensure the NCV function is selected and the multimeter is close enough to the AC voltag電子ソース。
7. 仕様
| パラメータ | 価値 |
|---|---|
| 画面 | 8000 Counts LCD with Backlight |
| DCVol。tage(V) | 8.000V / 80.00V / 800.0V / 1000V |
| DCVol。tage(mV) | 800mV |
| ACVol。tage(V) | 8.000V / 80.00V / 750V |
| ACVol。tage(mV) | 800mV |
| 直流電流 (A) | 8.000A / 20.00A |
| DC電流(mA) | 8.000mA / 80.00mA / 800.0mA |
| 直流電流(µA) | 800µA / 8000µA |
| AC電流(A) | 8.000A / 20.00A |
| AC電流(mA) | 8.000mA / 80.00mA / 800.0mA |
| AC電流(µA) | 800µA / 8000µA |
| 抵抗 | 800.0Ω / 8.000kΩ / 80.00kΩ / 800.0kΩ / 8.000MΩ / 80.00MΩ |
| キャパシタンス | 9.999nF / 99.99nF / 999.9nF / 9.999μF / 99.99μF / 999.9μF / 9.999mF / 99.99mF |
| 頻度 | 9.999Hz / 99.99Hz / 999.9Hz / 9.999kHz / 99.99kHz / 999.9kHz / 9.999MHz |
| デューティサイクル | 1%~99% |
| 温度範囲 | -20°C ~ 1000°C (-4°F ~ 1832°F) |
| バッテリーテスト | 1.5V / 9V / 12V |
| 範囲 | 自動/手動 |
| 更新レート | 3回/秒 |
| 真のRMS | はい |
| データ保持 | はい |
| バックライト/懐中電灯 | はい |
| 低バッテリー警告 | はい |
| 自動電源オフ | はい |
| 材料 | ABS / PVC |
| 電源 | 電池駆動 |
8. 保証とサポート
This product is covered by a standard manufacturer's warranty against defects in materials and workmanship. Please refer to the warranty card included with your purchase for specific terms and conditions. For technical support or service inquiries, please contact your retailer or the manufacturer's customer service department.
9. 公式製品ビデオ
現時点では、売り手からの公式製品ビデオを埋め込むことはできません。