
導入
The Perel EDIN305N is a 230V 16A 3600W DIN-rail mount digital weekly timer designed for indoor use. This device allows for precise, programmable control of electrical circuits, enabling automatic switching ON and OFF of connected appliances or lighting systems over a weekly cycle. It features a clear digital display and multiple programming options to suit various scheduling needs.
安全上の注意
警告: Electrical installation should only be performed by a qualified electrician. Incorrect wiring can lead to electric shock, fire, or damage to the device and connected equipment. Always disconnect power at the main circuit breaker before installation or maintenance.
- Ensure the power supply matches the device's specifications (230V~50Hz).
- 最大負荷容量16A/3600Wを超えないでください。
- This device is designed for indoor use only. Avoid exposure to moisture, dust, or extreme temperatures.
- ご自身でデバイスを開けたり修理したりしないでください。すべての修理は資格のある専門家にご依頼ください。
- お子様の手の届かない場所に保管してください。
製品終了view
The Perel EDIN305N digital timer consists of a main body with a digital display, control buttons, and terminal blocks for electrical connections. A transparent cover protects the display and buttons.
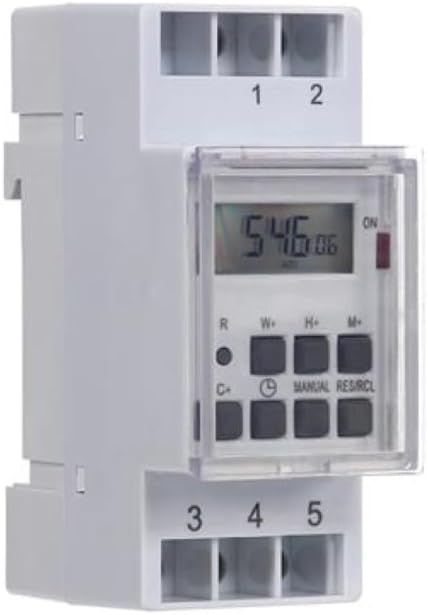
図1: フロント view of the Perel EDIN305N Digital Weekly Timer. The image displays the LCD screen, control buttons (R, W+, H+, M+, C+, Clock, Manual, RES/RCL), and numbered terminal blocks (1, 2 at the top, 3, 4, 5 at the bottom).
コントロールボタン:
- R: Reset button (recessed).
- W+: Weekday setting.
- H+: 時間設定。
- M +: Minute setting.
- C+: Clear program.
- 時計アイコン: Used to set current time and day, and to exit programming mode.
- マニュアル: Manual override for ON/AUTO/OFF modes.
- RES/RCL: Reset/Recall program.
端子台:
- 1、2: Power supply input (N, L).
- 3、4、5: Output terminals for controlled circuit (Common, Normally Open, Normally Closed).
技術仕様
| パラメータ | 価値 |
|---|---|
| モデル番号 | EDIN305N |
| 巻tage | 230V〜50Hz |
| 最大電流 | 16A |
| 最大出力 | 3600W |
| 設定数 | 7(オン/オフプログラム) |
| 取り付けタイプ | DINレール |
| 寸法(長さ×幅×高さ) | 2.36 x 3.54 x 1.57 インチ (60 x 90 x 40 mm) |
| 重さ | 0.12kg (4.2オンス) |
| 材料 | プラスチック |
| 色 | 白 |
| 電池が必要 | No (internal battery for memory backup) |
インストール
1. 取り付け
The Perel EDIN305N is designed for DIN-rail mounting. Securely attach the timer to a standard 35mm DIN-rail within an electrical enclosure. Ensure sufficient space for wiring and ventilation.
2.配線
重要: Ensure power is disconnected at the main circuit breaker before proceeding with wiring. Follow local electrical codes and regulations.
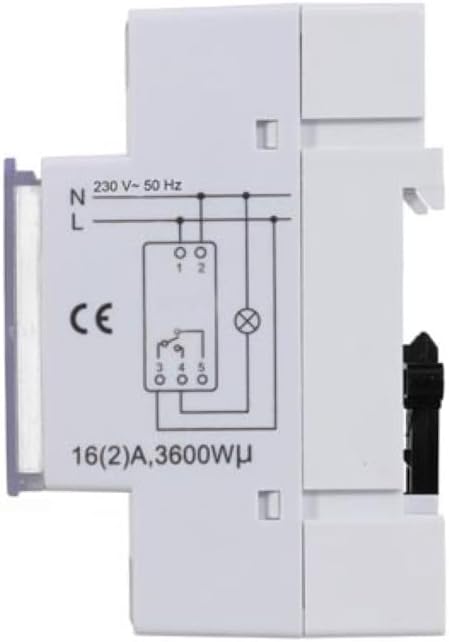
図2: 側 view of the Perel EDIN305N Digital Weekly Timer showing the electrical wiring diagram. It illustrates connections for Neutral (N), Live (L), and the output contacts (1, 2, 3, 4, 5) for controlling a load.
Refer to the wiring diagram (Figure 2) and the terminal block labels on the device:
- Connect the Neutral (N) wire of your 230V AC supply to terminal 1.
- Connect the Live (L) wire of your 230V AC supply to terminal 2.
- For the controlled circuit:
- Terminal 3: Common contact for the relay output.
- Terminal 4: Normally Open (NO) contact. The circuit connected here will be ON when the timer is active.
- Terminal 5: Normally Closed (NC) contact. The circuit connected here will be OFF when the timer is active.
- Connect the load (e.g., light, appliance) between the Live (L) supply and either terminal 4 (for NO operation) or terminal 5 (for NC operation), with terminal 3 connected to the Live (L) supply. Alternatively, connect the load between terminal 4 or 5 and the Neutral (N) supply, with terminal 3 connected to the Live (L) supply. Consult a qualified electrician for specific load wiring configurations.
初期設定と操作
1. 電源オンとリセット
After wiring and restoring power, the display will illuminate. If the display is blank or shows erratic characters, press the recessed R (Reset) button using a pointed non-metallic object (e.g., a pen tip). This will clear all settings and restore default values.
2. 現在の時刻と日付の設定
- を押し続けます 時計アイコン ボタン。
- 保持しながら 時計アイコン ボタンを押して、を押します W+ to set the current day of the week (1=Monday, 7=Sunday).
- 保持しながら 時計アイコン ボタンを押して、を押します H+ 現在の時間(0~23)を設定します。
- 保持しながら 時計アイコン ボタンを押して、を押します M+ 現在の分(0~59)を設定します。
- リリース 時計アイコン ボタンを押します。これで時刻と日付が設定されました。
3. オン/オフサイクルのプログラミング
タイマーは最大7個のオン/オフプログラムをサポートします。各プログラムはオン時間とオフ時間で構成されます。
- を押す 時計アイコン ボタンを1回押してプログラミングモードに入ります。ディスプレイに「1 ON」と表示されます。
- プレス W+ このプログラムを実施する曜日を選択します。1日、複数日(例:月曜~金曜)、または全曜日を選択できます。
- プレス H+ to set the ON hour for program 1.
- プレス M+ to set the ON minute for program 1.
- を押す 時計アイコン もう一度ボタンを押します。ディスプレイに「1 OFF」と表示されます。
- Repeat steps 2-4 to set the OFF day(s), hour, and minute for program 1.
- To set additional programs (2-7), press the 時計アイコン button to cycle through "2 ON", "2 OFF", etc., and repeat the setting process.
- 必要なプログラムをすべて設定したら、 マニュアル ボタンを押すとプログラミングモードが終了し、現在の時刻表示に戻ります。
4。 手動オーバーライド
を押す マニュアル ボタンを繰り返し押すと、動作モードが切り替わります。
- に: The output is continuously ON, overriding all programs.
- 自動: タイマーはプログラムされたオン/オフ サイクルに従って動作します。
- OFF: The output is continuously OFF, overriding all programs.
タイマーが設定されていることを確認してください オート プログラム操作用。
5. Clearing Programs
特定のプログラムをクリアするには:
- を押してプログラミングモードに入ります 時計アイコン button until the desired program number (e.g., "3 ON") is displayed.
- を押す C+ button. This will clear both the ON and OFF times for that specific program.
- Repeat for other programs as needed.
- プレス マニュアル プログラミングモードを終了します。
To clear all programs and reset the device, use the recessed R (Reset) button.
メンテナンス
- 柔らかく乾いた布でデバイスを拭いてください。研磨剤入りの洗剤や溶剤は使用しないでください。
- Ensure the transparent cover is closed to protect the display and buttons from dust and splashes.
- Regularly check electrical connections for tightness, especially in high-vibration environments.
トラブルシューティング
| 問題 | 考えられる原因 | 解決 |
|---|---|---|
| 表示が空白です。 | 電源が供給されていません。内部バッテリーが消耗しています。 | Check power connections (terminals 1 & 2). Ensure main power is ON. If power is present, press the R (Reset) button. The internal battery recharges when connected to power. |
| タイマーがプログラムどおりにオン/オフを切り替えません。 | Incorrect program settings; timer in manual ON/OFF mode. | Verify program settings (time, day, ON/OFF). Ensure the timer is in オート を押してモード マニュアル ボタン。 |
| Connected appliance not receiving power. | Incorrect wiring; appliance fault; timer fault. | Check wiring according to Figure 2. Test the appliance directly. If wiring and appliance are fine, the timer may be faulty. |
| Buttons unresponsive or display erratic. | Software glitch; low internal battery. | 凹んだ部分を押す R (Reset) button. Ensure the timer has been connected to power for at least 24 hours to fully charge the internal battery. |
廃棄
Do not dispose of this product with general household waste. This electronic device contains materials that can be recycled. Please dispose of it at a designated collection point for electrical and electronic equipment waste, in accordance with local regulations.
保証とサポート
Perel products are manufactured to high quality standards. For warranty information, technical support, or service inquiries, please refer to the documentation provided with your purchase or contact your local Perel distributor or retailer. Please have your model number (EDIN305N) and purchase details ready when contacting support.