
1. はじめに
This manual provides detailed instructions for the installation, operation, and maintenance of your Dweekiy 22mm 7/8in Handlebar Electric 3-Speed Module Switch Shift. Please read this manual thoroughly before use to ensure proper function and safety. This product is designed for use with motorcycles, e-bikes, and scooters requiring a 3-speed electric shift control.
2.製品オーバーview
The Dweekiy 3-Speed Module Switch is engineered for vehicles with a 22mm (7/8 inch) diameter handlebar. It facilitates electric 3-speed shifting with a compact design that minimizes space usage on the handlebar. Constructed from premium plastic and metal, it offers durability and wear-resistance.

Image: The Dweekiy 3-Speed Module Switch, showcasing its compact housing, red 3-speed button, and integrated wiring with blade terminals.
3. 仕様
| 材料 | プラスチック、金属 |
| ケーブル長さ | 58 cm(22.8インチ) |
| 取付径 | 22 mm(7/8インチ) |
| 適合 | Motorcycles, E-bikes, Scooters |
| 製品寸法(長さ x 幅 x 高さ) | 約3.94×3.94×3.94インチ |
| 重さ | 約1.06オンス |
| 操作モード | マニュアル |
| 連絡先の種類 | 通常オープン |
| コネクタタイプ | クリンプ |
| 端末タイプ | ブレード |
| 回路タイプ | 3ウェイ |
| 国際保護格付け | IP65 |
| ポジション数 | 3 |

Image: Detailed dimensions of the Dweekiy 3-Speed Module Switch, indicating measurements such as 5mm (0.2in) width, 55mm (2.1in) height, and 22mm (0.90in) mounting diameter.
4. インストール手順(セットアップ)
Follow these steps for proper installation of the 3-speed module switch:
- 準備: Ensure the vehicle's power is completely off before beginning installation. Identify a suitable location on the 22mm (7/8 inch) diameter handlebar. The switch is designed to be mounted over an existing clutch lever perch to save space.
- スイッチの取り付け: Loosen the screw on the switch clamp. Position the switch onto the handlebar at your desired location. Ensure it is easily accessible for operation. Tighten the screw securely to prevent the switch from rotating, but do not overtighten to avoid damage to the handlebar or switch housing.
- 配線接続: The switch features a 3-wire connection (typically black, red, and green/blue). Refer to your vehicle's specific wiring diagram to identify the corresponding speed control wires. Connect the switch wires to the vehicle's speed control system using appropriate crimp connectors or by soldering. Ensure all connections are secure and properly insulated to prevent short circuits.
- テスト: After completing the wiring and mounting, carefully turn on the vehicle's power. Test the 3-speed functionality by pressing the switch button. Verify that each speed setting (1, 2, 3) engages correctly and the vehicle responds as expected.

Image: The Dweekiy 3-Speed Module Switch shown installed on a motorcycle handlebar, illustrating its integration with the vehicle's controls.
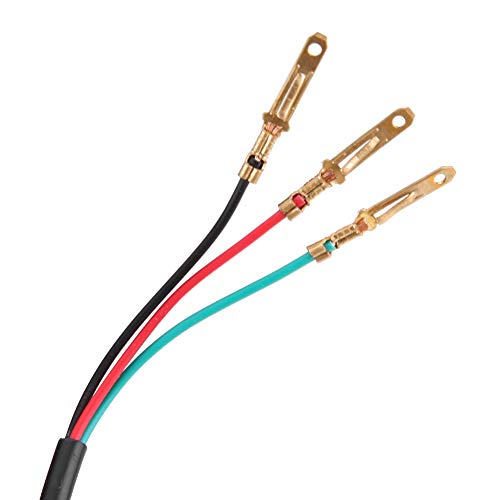
画像: クローズアップ view of the three-wire connection (black, red, green/blue) with blade terminals, ready for connection to the vehicle's electrical system.
5. 操作
The Dweekiy 3-Speed Module Switch provides three distinct speed settings for your vehicle. The red button on the switch is used to cycle through these settings.
- スピード1: Represents the lowest speed setting.
- スピード2: Represents the medium speed setting.
- スピード3: Represents the highest speed setting.
To change speeds, simply press the red button. Each press will sequentially switch to the next speed setting (e.g., from 1 to 2, 2 to 3, and 3 back to 1). The illuminated number on the button indicates the currently selected speed setting.
6. メンテナンス
Regular maintenance ensures the longevity and reliable performance of your switch:
- クリーニング: Periodically wipe the switch housing with a soft, dry cloth to remove dust, dirt, and grime. Avoid using harsh chemicals, solvents, or abrasive cleaners, as these can damage the plastic and markings.
- 接続チェック: Regularly inspect all wiring connections for any signs of wear, corrosion, or looseness. Ensure that the blade terminals are securely seated and that the insulation around the wires is intact. Loose connections can lead to intermittent operation or electrical issues.
- 物理検査: Examine the switch housing for any cracks, chips, or other physical damage. Ensure the red button operates smoothly without sticking or excessive play.
- 環境保護: The switch has an IP65 rating, providing protection against dust ingress and low-pressure water jets from any direction. While it is resistant to splashes and light rain, avoid submerging the switch in water or exposing it to high-pressure water streams.
7。 トラブルシューティング
If you encounter issues with your Dweekiy 3-Speed Module Switch, refer to the following troubleshooting guide:
| 問題 | 考えられる原因 | 解決 |
|---|---|---|
| Switch does not change speeds. | Loose or incorrect wiring connection; internal switch failure. | Verify all wiring connections are secure and correctly matched to your vehicle's speed control system. If connections are correct, the switch may be faulty and require replacement. |
| Switch button is stuck or difficult to press. | Dirt or debris lodged in the button mechanism; physical damage to the button. | Gently clean around the button with a soft, dry cloth or compressed air. If the issue persists or there is visible damage, the switch may need replacement. |
| Intermittent speed changes or unreliable operation. | Poor electrical contact; damaged internal wiring; moisture ingress. | Inspect wiring for fraying, cuts, or corrosion. Ensure all connectors are making solid contact. Check for signs of moisture inside the switch. If problems continue, consider replacing the switch. |
8. 保証とサポート
This Dweekiy product is manufactured to high-quality standards and undergoes strict factory quality control. For any issues related to installation, product quality, or performance, please contact Dweekiy customer support. Refer to your purchase documentation or the Dweekiy official website for specific warranty terms, return policies, and contact information.