1. はじめに
The DHRUV-PRO TV160-7th Generation LVDS & Vbyone-HDMI Converter is a specialized tool designed for testing and maintaining LCD TV mainboards. It addresses the challenges of diverse panel technologies like TTL (LVDS) and V-by-One, and varying screen parameters. This converter allows technicians to test mainboards without needing to disassemble the entire TV or risk damaging expensive screens, by converting LVDS and V-by-One signals to standard HDMI 1.3 signals for external display. It features a built-in 7-inch high-definition display for direct viewing of motherboard images.
2. 主な特徴
- 統合ディスプレイ: Equipped with a 7-inch high-definition (1024x600) display for direct viewing of motherboard output.
- HDMI出力: Simultaneously outputs 1080P/60Hz HDMI, allowing connection to external displays or TVs.
- 2K TV Support: Supports single and double line LVDS signals for 2K television products, including 60Hz, 120Hz, and 240Hz resolutions.
- 4K TV Support: Supports V-by-One signals (including 4, 8, 16 lanes) for 4K TV products, converting them into full-screen output.
- Automatic Signal Recognition: Automatically recognizes LVDS and V-by-One signals.
- モード切り替え: Allows cycling between LVDS (2K mode) and V-by-One (4K mode) via a dedicated button.
- 幅広い電源入力: Designed to support 5V-12V adapters (recommended 5-6V / 2A or more current).
3. パッケージ内容
The DHRUV-PRO TV160 package includes the following components:
- TV160-7th Generation LVDS & Vbyone-HDMI Converter Host Unit
- 電源アダプター
- LVDS Adapter Plates (various types for different panel interfaces)
- AVアダプター
- TFカードリーダー

図1:以上view of the DHRUV-PRO TV160 main unit, power adapter, various LVDS adapter boards, and ribbon cables.
4.セットアップガイド
4.1. 電源の接続
- Connect the provided power adapter to the DC input port on the TV160 main unit.
- Plug the power adapter into a suitable electrical outlet. The device supports 5V-12V input; a 5-6V / 2A adapter is recommended.

図2:側面 view of the TV160 unit, highlighting the power input port and HDMI output port.
4.2. Connecting to a Mainboard
- Identify the appropriate LVDS or V-by-One adapter plate for the TV mainboard you intend to test. The kit includes various adapter plates to accommodate different interface types and pin configurations.
- Carefully connect the selected adapter plate to the corresponding LVDS or V-by-One input port on the TV160 main unit. Ensure a secure connection.
- Connect the ribbon cable from the TV mainboard to the adapter plate. Pay close attention to the orientation and pin alignment to prevent damage.
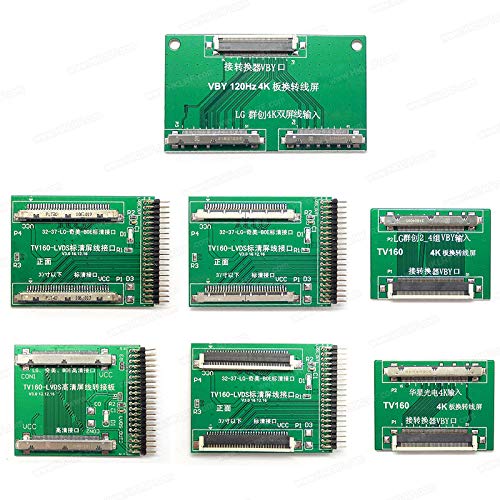
Figure 3: A selection of LVDS and V-by-One adapter boards included with the TV160, designed for compatibility with various TV mainboards.
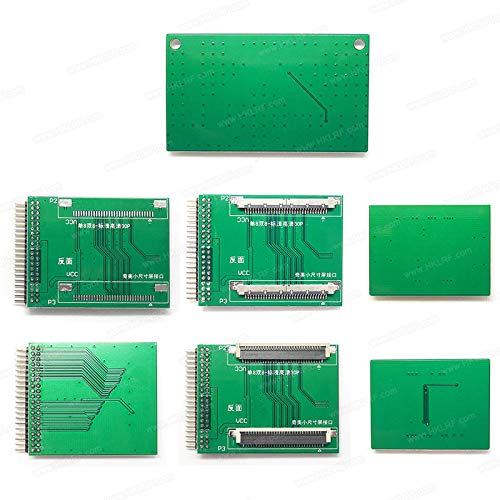
Figure 4: The reverse side of the LVDS and V-by-One adapter boards, showing circuit traces and connectors.
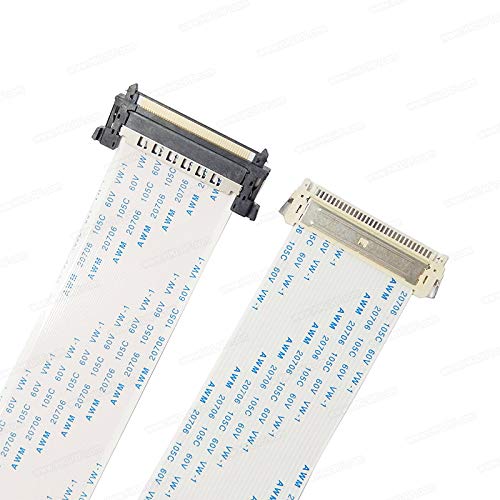
図5:詳細 view of the flat ribbon cables, which are used to connect the TV mainboard to the adapter plates.
4.3. Connecting External Display (Optional)
ご希望の場合は view the output on a larger screen, connect an HDMI cable from the HDMI output port of the TV160 to an HDMI input on an external monitor or TV.
5. 操作手順
5.1. Powering On and Initial Display
- Once all connections are secure, press the power button on the TV160 unit. The integrated 7-inch display will power on.
- The device will automatically attempt to recognize the incoming LVDS or V-by-One signal from the connected mainboard.

図6: 前面 view of the TV160 unit, showing the 7-inch display and control buttons for mode selection and reset.
5.2. Switching Display Modes (2K/4K)
The TV160 supports both 2K (LVDS) and 4K (V-by-One) signal modes. Use the dedicated mode button on the unit to cycle between these modes if the automatic recognition does not select the correct one, or if you need to manually switch.
- Press the "2K Mode" button for LVDS signal testing.
- Press the "4K Mode" button for V-by-One signal testing.
5.3. リセット機能
If the display appears distorted or no signal is detected after changing connections or modes, press the "RES" (Reset) button to reinitialize the signal detection process.
5.4. Interpreting Display Output
The integrated display and external HDMI output will show the video signal from the connected TV mainboard. This allows for visual inspection of the mainboard's functionality, identifying issues such as no signal, distorted images, or color problems.
6. メンテナンス
- クリーニング: デバイスの外側を清掃する際は、柔らかく乾いた布をご使用ください。液体クリーナーや研磨剤は使用しないでください。
- ストレージ: デバイスとその付属品は、直射日光や極端な温度を避け、涼しく乾燥した場所に保管してください。
- 取り扱い: Handle the adapter plates and ribbon cables with care to avoid bending pins or damaging connectors.
- 電源: Always use the recommended power adapter to prevent damage to the unit.
7。 トラブルシューティング
| 問題 | 考えられる原因 | 解決 |
|---|---|---|
| デバイスの電源が入りません。 | 電源がない、アダプタに障害がある、または接続が緩んでいる。 | Ensure power adapter is securely connected and plugged into a live outlet. Verify power adapter functionality. |
| No image on integrated display or external HDMI. | Incorrect adapter plate, loose ribbon cable, incorrect mode selected, or mainboard issue. | Verify correct adapter plate is used and securely connected. Check ribbon cable connection to mainboard and adapter. Press the mode button to cycle between 2K and 4K modes. Press the RES button. Confirm the TV mainboard is functioning. |
| 画像が歪んだりちらついたりします。 | Signal mismatch, loose connection, or damaged cable/adapter. | Ensure the correct mode (2K/4K) is selected. Check all cable connections for looseness or damage. Try pressing the RES button. |
| External HDMI output not working. | Faulty HDMI cable, incorrect input selected on external display, or external display issue. | Test with a different HDMI cable. Ensure the external display is set to the correct HDMI input. Verify the external display is working correctly. |
8. 仕様
- モデル: TV160-7th Generation
- 表示サイズ: 7インチ
- ディスプレイ解像度: 1024×600
- HDMI出力解像度: 1080P / 60Hz
- Supported Signal Types: LVDS (2K), V-by-One (4K)
- LVDS Refresh Rates: 60Hz、120Hz、240Hz
- V-by-One Lanes: 4、8、16
- 電源入力: 5V-12V DC (Recommended 5-6V / 2A)
- 商品の重量: 約749g
- パッケージ寸法: 28 x 18 x 12 cm
- 対応デバイス: TVs, External Displays with HDMI input
- 特別な機能: Lightweight, Portable, Automatic Signal Recognition
9. 保証とサポート
For warranty information, technical support, or service inquiries, please contact DHRUVPRO customer service.
- メーカー: DHRUV, DHRUVcom CHENNAI, TAMIL NADU, 600001, India
- メールアドレス: support@dhruvpro.in
- 電話: 7200470717
Please have your product model number (TV160) and purchase details ready when contacting support.