
Immergas 7T.81.0.000.2301
Immergas CARV2 ワイヤレスクロノサーモスタット ユーザーマニュアル
Model: 7T.81.0.000.2301
Brand: Immergas
1. はじめに
This user manual provides comprehensive instructions for the installation, operation, and maintenance of your Immergas CARV2 Wireless Chronothermostat. Please read this manual thoroughly before using the device to ensure proper functionality and safety. This device is designed for precise temperature control in HVAC systems.
2. 安全情報
以下の安全上の注意事項を常に守ってください。
- 設置は、地域の電気規則に従って、資格のある担当者のみが行う必要があります。
- インストールやメンテナンスを行う前に電源を切ってください。
- デバイスを水や過度の湿気にさらさないでください。
- ご自身でデバイスの修理を試みないでください。すべての修理は資格のあるサービス担当者にご依頼ください。
- Ensure the power supply matches the device's specifications (230 Volts).
3.製品オーバーview
The Immergas CARV2 is a wireless digital chronothermostat designed for efficient heating and cooling management. It features a clear display and intuitive controls for setting desired temperatures and programming schedules.
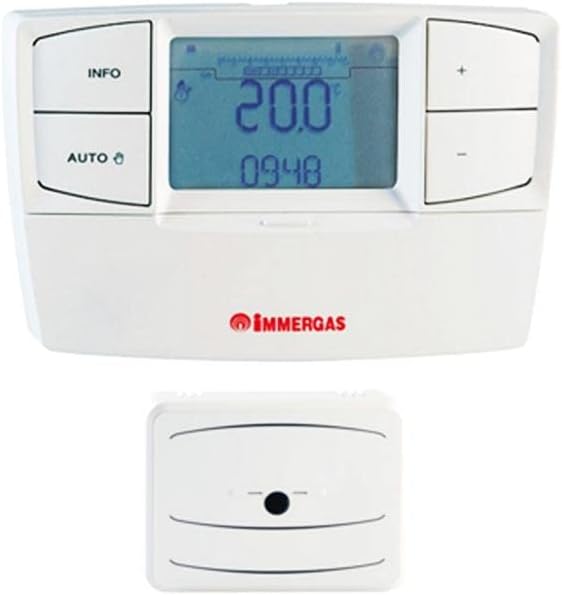
Figure 3.1: Immergas CARV2 Wireless Chronothermostat (top) showing the display with temperature and time, and control buttons (INFO, AUTO, +, -). Below it is the wireless receiver unit (bottom) with a small indicator light.
3.1 コンポーネント
- サーモスタットユニット: ディスプレイとボタンを備えたメインコントロールユニット。
- ワイヤレス受信ユニット: Connects to the HVAC system and communicates wirelessly with the thermostat unit.
3.2 ディスプレイとボタン
The thermostat unit features a digital display showing current temperature, set temperature, time, and operating mode. Control buttons include:
- 情報ボタン: Accesses information screens.
- 自動ボタン: Toggles between automatic and manual operating modes.
- +ボタン: Increases temperature setting or navigates menus.
- - ボタン: Decreases temperature setting or navigates menus.
4. セットアップとインストール
Proper installation is crucial for optimal performance. Refer to the detailed wiring diagrams provided with the product packaging for specific connections.
4.1 受信機ユニットの取り付け
- Ensure power to the HVAC system is turned off at the main breaker.
- Mount the receiver unit near your boiler or heating system, ensuring it is within wireless range of the thermostat unit.
- Connect the receiver unit to your HVAC system's control wiring according to the provided wiring diagram. This typically involves connecting to the boiler's thermostat terminals.
- Secure the receiver unit to the wall or mounting surface.
4.2 サーモスタットユニットの配置
- Place the thermostat unit in a central location within the heated area, away from direct sunlight, drafts, or heat sources (e.g., lamps、家電製品など。
- Ensure the location allows for accurate room temperature sensing.
- The thermostat unit is battery-powered (batteries not included, typically AA or AAA). Insert fresh batteries before initial use.
4.3 初期ペアリング(必要な場合)
Some units may require initial pairing between the thermostat and receiver. Refer to the quick start guide for specific pairing instructions. Generally, this involves pressing a pairing button on both units within a short timeframe.
5. 操作手順
5.1 電源投入と初期表示
Once batteries are inserted and the receiver is powered, the thermostat display will illuminate, showing the current room temperature and time.
5.2 時刻と日付の設定
Access the settings menu (often by holding the INFO button) to set the correct time and date. Use the + and - buttons to adjust values and the INFO or AUTO button to confirm and move to the next setting.
5.3動作モード
- 自動モード(AUTO): The thermostat follows the programmed weekly schedule. Press the AUTO button to activate this mode.
- 手動モード: Allows you to set a constant desired temperature that overrides the schedule. Press the AUTO button until the manual mode indicator appears. Use + and - to adjust the temperature.
- オフモード: Turns off heating/cooling. Consult the manual for specific steps to enter this mode, often by setting a very low temperature or a dedicated off setting.
5.4温度調整
In manual mode, or during a temporary override in auto mode, use the + そして - buttons to increase or decrease the desired temperature. The new setpoint will be displayed.
5.5 Programming Weekly Schedule
The CARV2 allows for a detailed weekly programming schedule. This typically involves setting different temperatures for various times of the day across each day of the week.
- Enter programming mode (refer to your specific model's manual, often by holding INFO or AUTO for several seconds).
- プログラムする曜日を選択します。
- Set the desired temperature for specific time intervals (e.g., 6:00 AM - 8:00 AM, 8:00 AM - 5:00 PM, etc.).
- Repeat for all desired time intervals and days.
- 保存してプログラミングモードを終了します。
6. メンテナンス
6.1 クリーニング
Clean the thermostat unit with a soft, dry cloth. Do not use abrasive cleaners, solvents, or spray directly onto the unit. Ensure no moisture enters the device.
6.2 電池の交換
When the low battery indicator appears on the display, replace the batteries immediately. Use high-quality alkaline batteries (e.g., AA or AAA, depending on model). Open the battery compartment on the back of the thermostat unit, remove old batteries, and insert new ones, observing polarity.
7。 トラブルシューティング
| 問題 | 考えられる原因 | 解決 |
|---|---|---|
| 表示が空白です。 | No power to thermostat unit (dead batteries). | 電池を交換してください。 |
| サーモスタットが暖房/冷房を制御しません。 | Receiver unit not powered or not paired. Incorrect wiring. | Check power to receiver. Re-pair thermostat and receiver. Verify wiring connections. |
| 温度の測定値が不正確なようです。 | Thermostat placed in an unsuitable location (direct sunlight, draft). | サーモスタットをより中央の安定した温度エリアに移動します。 |
| Scheduled program not running. | Thermostat is in manual mode. Program not saved correctly. | Switch to AUTO mode. Re-enter and save the program. |
8. 仕様
| 特徴 | 詳細 |
|---|---|
| ブランド | イマーガス |
| モデル番号 | 7T.81.0.000.2301 |
| 色 | 白 |
| アイテム重量 | 1キログラム |
| 巻tage | 230ボルト |
| 接続技術 | 無線 |
| 電源 | Electric Cable (for receiver), Battery (for thermostat unit) |
| コントローラータイプ | プッシュボタン |
| 温度制御タイプ | Manual / Programmable |
| 製品の具体的な用途 | 空調設備 |
9. 保証とサポート
For warranty information and technical support, please refer to the documentation included with your product or contact Immergas customer service directly. Spare parts availability information is not provided at this time.
注意: 製品の仕様および機能は予告なく変更される場合があります。
Ask a question about this manual
Ask about setup, troubleshooting, compatibility, parts, safety, or missing instructions. Manuals+ will review the question and use this page’s manual context to help answer it.