
1. はじめに
This manual provides essential information for the safe and efficient operation of your OMNITRONIC PM-322P 3-Channel DJ Mixer. Please read these instructions thoroughly before using the device to ensure proper functionality and to prevent damage.
The OMNITRONIC PM-322P is a robust and versatile 3-channel DJ mixer designed for various audio mixing applications, featuring integrated Bluetooth connectivity and a USB MP3 player.

図1: 角度付き view of the OMNITRONIC PM-322P DJ Mixer, showcasing its compact design and accessible controls.
2. 安全に関する注意事項
- デバイスを操作する前に、すべての指示をお読みください。
- このマニュアルは将来の参照用に保管してください。
- デバイスを雨や湿気にさらさないでください。
- 適切な換気を確保し、換気口を塞がないようにしてください。
- Only connect to a grounded power outlet with the specified voltage (240 ボルト)。
- デバイスを開けないでくださいasing; すべてのサービスは資格を持った担当者に依頼してください。
- デバイスを熱源の近くや直射日光の当たる場所に置かないでください。
- 乾いた布でのみ清掃してください。
3. 主な特徴
- 3 入力チャンネル: Each channel features gain control, a 3-band equalizer (High, Mid, Low), a Cue button for pre-listening, and a smooth channel fader.
- 統合 Bluetooth オーディオ ストリーミング: Seamlessly stream music wirelessly from your Bluetooth-enabled portable devices directly to the mixer.
- DJ Microphone Channel: Dedicated microphone input with independent volume control and a 2-band equalizer for vocal adjustments.
- MP3 Player with USB Port: 音声を再生 files directly from a USB storage device, with track information displayed on a clear blue LCD.
- 堅牢な構造: 耐久性と信頼性の高いパフォーマンスを実現するように設計されています。
4. コントロールと接続
4.1 フロントパネルコントロール

図2: トップ view of the OMNITRONIC PM-322P DJ Mixer, highlighting the main control surface.
- USBポート: For connecting USB storage devices to the integrated MP3 player.
- MP3/Bluetooth Module: Includes LCD display, playback controls (Play/Stop, Skip), and Pairing button for Bluetooth.
- Channel Gain Controls (CH 1-3): 各チャンネルの入力レベルを調整します。
- 3-Band Equalizer (High, Mid, Low): Tone controls for each channel.
- Cue Buttons (CH 1-3): Activates pre-listening for the respective channel through headphones.
- Channel Faders (CH 1-3): Adjust the volume level of each channel in the mix.
- Microphone Level Control (MIC LEVEL): 接続されたマイクの音量を調整します。
- Microphone 2-Band Equalizer (MIC HIGH, MIC LOW): Tone controls for the microphone input.
- X-Fader Reverse Switch: クロスフェーダーの方向を反転します。
- X-Fader Curve Control: Adjusts the crossfader curve from sharp to smooth.
- Crossfader (CH 2/CH 3): Blends between channels 2 and 3.
- マスターレベルコントロール: 全体的な出力音量を調整します。
- Cue Level Control: ヘッドホン出力の音量を調整します。
- Cue Mix/PGM Control: Blends between the Cued signal and the Program (Master) signal in the headphones.
- LED レベルメーター: Visual indication of output levels.
- ヘッドフォン出力(1/4インチTRS): For connecting headphones for monitoring.
4.2 リアパネルの接続
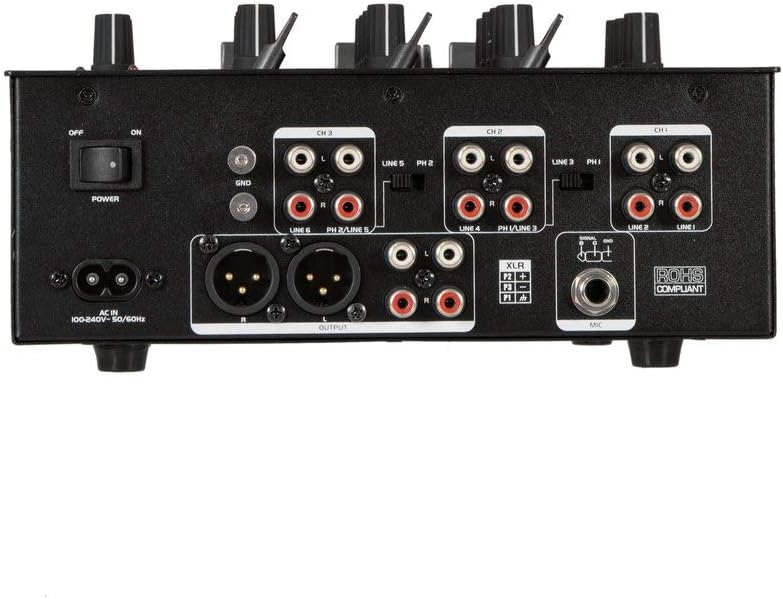
図3: Rear panel of the OMNITRONIC PM-322P DJ Mixer, showing all input and output ports.
- 電源スイッチ(オン/オフ): ミキサーをオンまたはオフにします。
- AC入力: Power input for the included power cable (100-240V AC, 50/60Hz).
- アース端子(GND): ターンテーブルのアース線を接続します。
- Channel 3 Inputs (LINE 5/PH 2, LINE 6): RCA inputs for line-level devices (CD players, media players) and phono-level devices (turntables).
- Channel 2 Inputs (LINE 3/PH 1, LINE 4): RCA inputs for line-level devices and phono-level devices.
- Channel 1 Inputs (PLAYER/LINE 1, LINE 2): RCA inputs for line-level devices.
- Master Output (XLR, RCA): Balanced XLR and unbalanced RCA outputs for connecting to a power ampライファまたはアクティブスピーカー。
- マイク入力(XLR): ダイナミック マイクを接続するためのバランス XLR 入力。
5. セットアップ
- 電源接続: Connect the provided power cable to the AC IN socket on the rear panel and then to a suitable grounded power outlet (240V).
- 出力接続: Connect the MASTER OUTPUT (XLR or RCA) to your amplifier or active speaker system.
- 入力デバイス:
- Connect turntables to the PHONO inputs (CH 2 or CH 3) and ensure the PH/LINE switch is set to PH. Connect the turntable's ground wire to the GND terminal.
- Connect CD players, media players, or other line-level devices to the LINE inputs (CH 1, CH 2, or CH 3). Ensure the PH/LINE switch is set to LINE for channels 2 and 3.
- Connect a microphone to the XLR MIC input on the rear panel.
- ヘッドフォン: Connect your headphones to the 1/4" TRS HEADPHONE output on the front panel.
- 初期設定: Before powering on, ensure all channel faders are down, gain controls are at minimum, and the Master Level is at minimum.
- 電源オン: 背面パネルの POWER スイッチを ON の位置に切り替えます。
6. 操作
6.1 Playing Audio from Input Channels
- Select the desired input source (LINE or PHONO) using the switch on the rear panel for Channels 2 and 3. Channel 1 is LINE only.
- Start playback on your connected audio source (turntable, CD player).
- Slowly increase the GAIN control for the selected channel until the LED level meter shows a strong signal without clipping (red LEDs).
- Adjust the 3-band EQ (HIGH, MID, LOW) to shape the sound of the channel.
- Raise the channel fader to bring the audio into the main mix.
- Adjust the MASTER LEVEL control to set the overall output volume.
- Use the CUE button to pre-listen to a channel through your headphones before fading it into the mix. Adjust CUE LEVEL and CUE MIX/PGM as needed.
6.2 Using the MP3 Player (USB)
- Insert a USB storage device (formatted as FAT32) containing MP3 filesUSBポートに接続します。
- The LCD display will show track information.
- Use the PLAY/STOP button to start or pause playback.
- Use the SKIP buttons (<< / >>) to navigate between tracks.
- The MP3 player typically routes to Channel 1. Adjust Channel 1's GAIN, EQ, and FADER controls as described above.
6.3 Bluetoothオーディオストリーミング
- Press the PAIRING button on the MP3/Bluetooth module. The Bluetooth indicator will flash, indicating it's in pairing mode.
- On your Bluetooth-enabled device (smartphone, tablet), search for available Bluetooth devices and select "OMNITRONIC PM-322P".
- ペアリングされると、Bluetooth インジケーターが点灯します。
- Start playing audio on your connected device. The Bluetooth audio will route to Channel 1.
- Adjust Channel 1's GAIN, EQ, and FADER controls to mix the Bluetooth audio.
6.4 マイクの使用
- Connect a dynamic microphone to the XLR MIC input on the rear panel.
- Speak into the microphone and slowly increase the MIC LEVEL control until the desired volume is achieved without distortion.
- Use the MIC HIGH and MIC LOW controls to adjust the tone of your voice.
7. メンテナンス
- クリーニング: Disconnect the device from power before cleaning. Use a soft, dry cloth to wipe the surface. Do not use liquid cleaners or solvents.
- ストレージ: When not in use for extended periods, store the mixer in a dry, dust-free environment.
- サービス: 内部にはユーザーが修理できる部品はありません。 すべてのサービスを資格のあるサービス担当者に依頼してください。
8。 トラブルシューティング
| 問題 | 考えられる原因 | 解決 |
|---|---|---|
| 電源なし | Power cable disconnected; Power switch off; Outlet fault. | 電源ケーブルの接続を確認し、電源スイッチがオンになっていることを確認し、別のデバイスでコンセントをテストします。 |
| 音声出力なし | Master Level too low; Channel fader down; Gain too low; Amp電源/スピーカーがオフまたは切断されています。 | Increase Master Level; Raise channel fader; Increase channel Gain; Check amplifier/speaker connections and power. |
| 歪んだ音 | Gain too high (clipping); Input signal too strong; Faulty cable. | Reduce channel Gain; Check input signal level; Replace cables. |
| Bluetoothがペアリングされない | Mixer not in pairing mode; Device too far; Device already paired to another unit. | Press PAIRING button; Move device closer; Disconnect from other Bluetooth devices. |
| USB MP3プレーヤーが動作しない | USB device not formatted correctly (FAT32); No MP3 files; USB device faulty. | Ensure USB is FAT32 and contains MP3s; Try a different USB device. |
9. 仕様
| モデル: | PM-322P |
| メーカー: | Steinigke Showtechnic GmbH |
| チャンネル数: | 3 |
| 接続技術: | ブルートゥース、USB |
| 電源: | 電気ケーブル |
| 巻tage: | 240ボルトAC |
| 商品の重量: | 3.18キログラム |
| オーディオ入力: | XLR (Microphone), RCA (Line/Phono) |
| 出力コネクタのタイプ: | XLR, TRS 1/4", RCA |
| Model Number (Manufacturer): | 8283410 |
| 国際コード: | 04026397653403 |
10. 保証とサポート
For warranty information and technical support, please contact the manufacturer, Steinigke Showtechnic GmbH, or your authorized dealer. Keep your proof of purchase for any warranty claims.
For further assistance, please visit the official OMNITRONIC webサイトをご覧いただくか、お近くの販売店にお問い合わせください。