Akozon Akozonxgzs306n9d-01
Akozon Motorcycle LCD Digital Tachometer Speedometer Odometer User Manual
Model: Akozonxgzs306n9d-01
1. はじめに
This manual provides comprehensive instructions for the installation, operation, and maintenance of your Akozon Motorcycle LCD Digital Tachometer Speedometer Odometer. This universal gauge is designed to provide essential vehicle information, including speed, engine RPM, and mileage, with a clear LCD display. Please read this manual thoroughly before installation and use to ensure proper function and safety.
2. 安全情報
Always prioritize safety during installation and operation.
- Ensure the motorcycle's power is off before beginning any installation or wiring.
- Incorrect wiring can damage the product or the motorcycle's electrical system. If unsure, consult a qualified technician.
- Mount the gauge securely to prevent vibration or detachment during operation.
- Do not attempt to disassemble or modify the gauge, as this may void the warranty and cause malfunction.
- The product is waterproof, but avoid prolonged submersion or high-pressure water jets directly on the display.
3 製品の特徴
- 多機能ディスプレイ: Integrates tachometer, speedometer, and odometer functions.
- 広い測定範囲: Tachometer 0-10000 RPM, Speedometer 0-199 KM/H.
- Clear LCD Digital Screen: Provides easy-to-read information in various lighting conditions.
- 単位切り替え: Supports display in both kilometers per hour (km/h) and miles per hour (mph).
- オイルレベルインジケーター: Includes an oil measurement function.
- 耐久性のある構造: Housing made of plated iron and glass lens for enhanced durability.
- 防水設計: Excellent waterproof performance for reliable use in various weather conditions.
- ユニバーサル装備: Compatible with most motorcycle types.

Image 3.1: Akozon Motorcycle LCD Digital Tachometer Speedometer Odometer. The image shows the plated silver gauge next to a red motorcycle, illustrating its universal design and appearance.

Image 3.2: The LCD digital screen displaying speed, RPM, odometer, and fuel level. The display is shown in a bright blue color, highlighting its clear readability.
4. セットアップとインストール
4.1 パッケージ内容
- 1 x Akozon Motorcycle Tachometer Gauge
4.2 インストール手順
- インストールの準備: Ensure the motorcycle's ignition is off and the battery is disconnected to prevent electrical shorts.
- ゲージを取り付ける: Securely attach the tachometer gauge to your motorcycle using the provided mounting hole (approximately 8mm / 0.31in diameter). Ensure it is firmly fixed and visible to the rider.

画像4.2.1:リア view of the gauge showing the mounting bracket and the wiring harness. The black button for ODO/TRIP function is also visible.
- 配線接続: Carefully connect the wires according to the instructions below. Refer to your motorcycle's wiring diagram if necessary.
- 黒ワイヤー: Connect to the positive (+) terminal of the power supply (12V DC).
- 緑のワイヤー: Connect to the negative (-) terminal or ground.
- Blue and White Wire: Connect to the oil level sensor wire.
- Yellow and Black Wire: Connect to the tachometer signal wire (engine RPM signal).

画像4.2.2: クローズアップ view of the multi-colored wiring harness, showing the individual wires for connection.
- 電源を再接続します: Once all connections are secure, reconnect the motorcycle battery.
- テスト機能: Turn on the motorcycle ignition and verify that the gauge powers on and displays information correctly.
5. 操作手順
5.1 電源オン/オフ
The gauge powers on automatically when the motorcycle ignition is turned on and powers off when the ignition is turned off.
5.2 Display Modes and Unit Switching
The LCD digital screen displays speed (km/h or mph), engine RPM, total odometer (ODO), trip odometer (TRIP), and fuel level.
- Switching ODO/TRIP: The ODO (total mileage) and TRIP (current trip mileage) functions can be toggled by pressing the black button located on the back of the meter.
- Unit Switching (km/h to mph): The gauge supports displaying speed in both kilometers per hour (km/h) and miles per hour (mph). Refer to the setting instructions for how to change this unit.
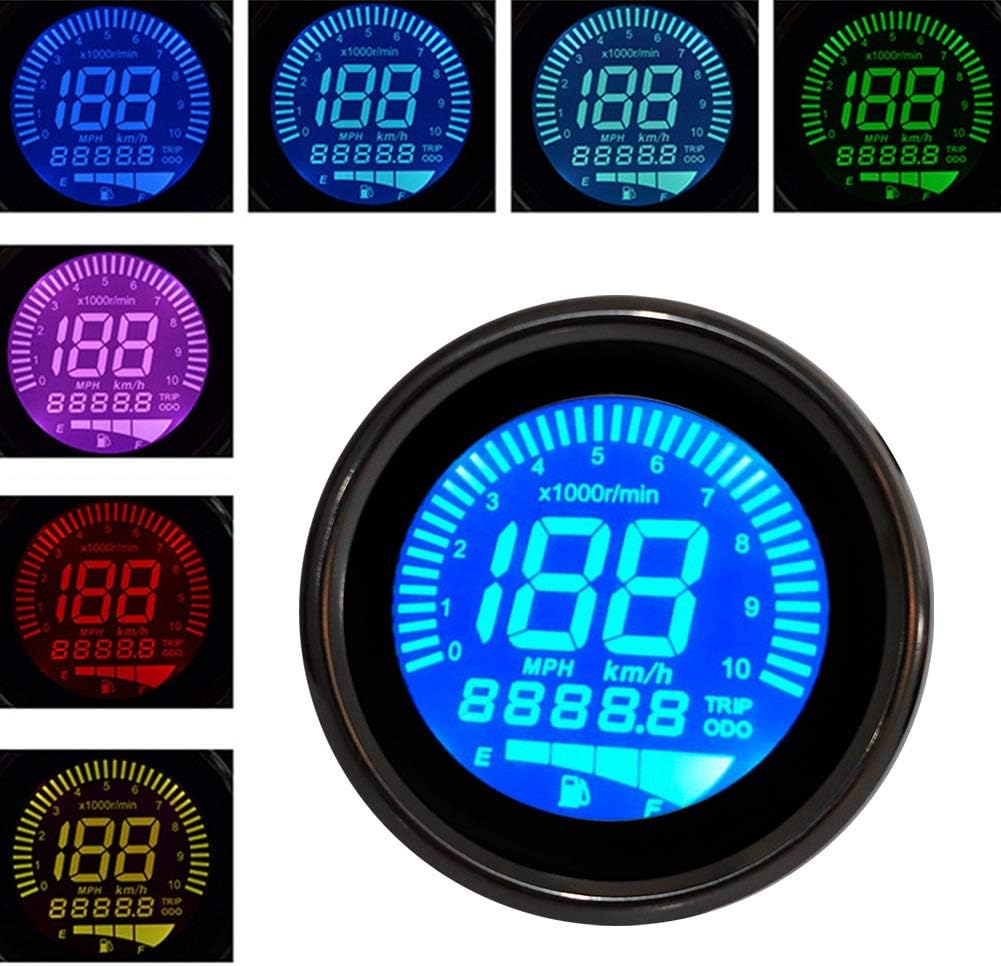
Image 5.2.1: The LCD display showing different color options and information layout, including speed, RPM, and odometer readings.
5.3 Setting Adjustments (Based on user reviews, as no official instructions are provided)
Note: Official setting instructions are not provided. The following information is based on user experiences and may vary. Proceed with caution.
- Entering Settings Mode: Press and hold the button on the back of the meter while turning on the ignition. This may display "P0000" or similar, indicating entry into setting mode.
- 設定のパスワード: Some users report a password like "P6610" to access advanced settings. Use the button to adjust values and confirm.
- Speedometer Pulse Setting: Within settings, you might find an option like "00466" which could relate to the speed pulse setting (e.g., 46.6Hz). Adjust this to calibrate the speedometer.
- Speed Unit Change: Short press the button to cycle through speed display units (e.g., "1-001" for km/h, "1-002" for mph). Long press to confirm and move to the next setting.
- Tachometer Setting: Options like "2-002" (every count) or "2-004" (2/1 count) might be available for tachometer calibration.
- Fuel Gauge Setting: Settings like "3-002" (100Ω) or "3-003" (500Ω) may correspond to different fuel sensor resistances. Select the one compatible with your motorcycle.
- Odometer Reset: Some users report that entering "P8810" in the initial "P0000" screen might reset the odometer. Use with caution as this may not be reversible.
- 設定を終了します: Long press the button to return to the main meter display after making adjustments.
6. メンテナンス
- クリーニング: 柔らかくてamp cloth to clean the display and housing. Avoid abrasive cleaners or solvents that could damage the surface.
- 検査: Periodically check the wiring connections for looseness or corrosion. Ensure the mounting is secure.
- 耐水性: While waterproof, avoid directing high-pressure water sprays directly at the gauge, especially during washing.
7。 トラブルシューティング
| 問題 | 考えられる原因 | 解決 |
|---|---|---|
| ゲージの電源が入りません。 | 電源が供給されていない、配線が間違っている、ヒューズが切れている。 | Check black wire connection to positive (+12V DC). Verify green wire is connected to ground. Inspect motorcycle fuse box. |
| Speedometer or Tachometer not working. | Incorrect signal wire connection; faulty sensor; incorrect settings. | Ensure yellow/black wire (tachometer) and blue/white wire (oil/speed, depending on model) are correctly connected. Check sensor functionality. Review setting adjustments (Section 5.3). |
| 不正確な速読。 | Incorrect speedometer pulse setting. | Access settings mode and adjust the speedometer pulse setting (e.g., "00466" value) to calibrate. |
| Fuel gauge not displaying correctly. | Incorrect oil level sensor wire connection; incompatible fuel sensor resistance setting. | Verify blue/white wire connection to the oil level sensor. Adjust the fuel gauge resistance setting (e.g., "3-002" or "3-003") in the settings menu. |
| LCD display flickering or blank. | Loose internal connection; product defect. | Check all external wiring connections. If the problem persists, contact customer support. |
8. 仕様
| 特徴 | 詳細 |
|---|---|
| 状態 | 100%新品 |
| アイテムタイプ | タコメーターゲージ |
| ハウジング材質 | Plated Iron + Glass Lens |
| 巻tage | 12V直流 |
| Speedometer Unit | km/h (switchable to mph) |
| Odometer Unit | km |
| 速度範囲 | 0~199 km/h |
| タコメーター範囲 | 0-10000 回転 |
| 取付穴径 | 約8mm / 0.31インチ |
| 重さ | 0.26キロ |
| モデル番号 | Akozonxgzs306n9d-01 |
| 欧州連合 | 753874657428 |
9. 保証とサポート
For warranty information or technical support, please contact your retailer or visit the official Akozon store on Amazon: アコゾンストア. Please have your model number (Akozonxgzs306n9d-01) and purchase details ready when contacting support.
Ask a question about this manual
Ask about setup, troubleshooting, compatibility, parts, safety, or missing instructions. Manuals+ will review the question and use this page’s manual context to help answer it.