Homtime C1
Homtime C1 Digital Alarm Clock User Manual
モデル:C1
1. はじめに
ご購入ありがとうございますasing the Homtime C1 Digital Alarm Clock. This device combines a digital alarm clock with dual USB charging ports, offering convenience and functionality for your bedside or office. Its user-friendly design, featuring a rotary button and dimmable LCD screen, ensures ease of use for all ages. Please read this manual thoroughly before operation to ensure proper use and maintenance.

Image: The Homtime C1 Digital Alarm Clock, turquoise in color, displayed on a wooden surface with a succulent plant in the background. The clock shows the time 20:08 and an alarm set for 15:00.
2. 安全情報
安全な操作を確保し、損傷を防ぐために、次の注意事項を守ってください。
- デバイスを水や過度の湿気にさらさないでください。
- ラジエーター、暖房口、ストーブ、その他の機器(電気製品を含む)などの熱源の近くにデバイスを置かないでください。 amp熱を発生する装置。
- Use only the power adapter and charging cable provided or recommended by Homtime.
- ご自身でデバイスの分解、修理、改造を試みないでください。すべてのメンテナンスは資格のあるサービス担当者にご依頼ください。
- デバイスを強い磁場から遠ざけてください。
- 乾いた布でのみ清掃してください。
3. パッケージ内容
パッケージに以下の項目が含まれているか確認してください。
- Homtime C1 Digital Alarm Clock
- 電源アダプター
- Charging Cable (Multi-connector for various mobile phones)
- ユーザーマニュアル

Image: A gold-colored multi-connector charging cable with USB-A, Micro USB, Lightning, and USB-C connectors, indicating its versatility for various mobile devices.
4.製品オーバーview
Familiarize yourself with the different parts of your Homtime C1 alarm clock:
- フロント: Large LCD display for time and alarm.
- トップ: Rotary button for setting time/alarm, snooze/dimmer button, alarm ON/OFF button.
- 戻る: 電源入力ポート。
- サイド(右): デュアルUSB充電ポート。

Image: A composite image showing various angles of the Homtime C1 Digital Alarm Clock, including front, top, side, and bottom views, highlighting its compact design and port locations.
5. セットアップ
- 接続電源: Plug the provided power adapter into the DC input port on the back of the alarm clock, then plug the adapter into a standard wall outlet. The display will light up.
- 初期時間設定: The clock will typically display a default time. To set the correct time, proceed to the 'Setting Time' section under Operating Instructions.
6. 操作手順
6.1 時間の設定
- Press and hold the rotary button on top of the clock until the hour digits start blinking.
- Rotate the button clockwise or counter-clockwise to adjust the hour.
- Press the rotary button once to switch to minute adjustment.
- Rotate the button to adjust the minutes.
- Press the rotary button again to confirm the time and exit time setting mode.
6.2 アラームの設定
- Press and hold the alarm setting button (bell icon) on top of the clock until the alarm hour digits start blinking.
- Rotate the rotary button to adjust the alarm hour.
- Press the alarm setting button once to switch to alarm minute adjustment.
- Rotate the rotary button to adjust the alarm minutes.
- Press the alarm setting button again to confirm the alarm time.
- To activate or deactivate the alarm, press the alarm ON/OFF button (next to the rotary button). An alarm icon will appear on the display when activated.

Image: A person's hand with green nail polish is shown pressing the large circular button on top of a white Homtime C1 alarm clock, demonstrating the interaction for setting time or alarm.
6.3スヌーズ機能
When the alarm sounds, press the large rotary button on top of the clock to activate the snooze function. The alarm will pause for a few minutes (default snooze time is typically 9 minutes) and then sound again. To turn off the alarm completely, press the alarm ON/OFF button.
6.4 Display Brightness (Dimmable)
The Homtime C1 features an auto-dimmable display. The brightness adjusts automatically based on ambient light conditions. You can also manually adjust the brightness by briefly pressing the snooze/dimmer button (usually the large rotary button or a dedicated button next to it) to cycle through different brightness levels.
6.5つのUSB充電ポート
The Homtime C1 is equipped with dual USB charging ports (5V/2.1A) on its side, allowing you to charge your mobile devices directly from the clock. Simply connect your device's USB charging cable to one of the ports. These ports are compatible with most smartphones and tablets, including iPhone and Android devices.
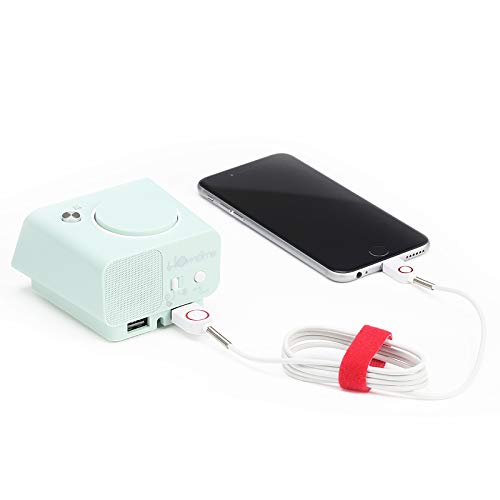
Image: The Homtime C1 alarm clock, turquoise in color, with a white charging cable connected to its side USB port, actively charging a black smartphone. This illustrates the dual USB charging capability.
7. メンテナンス
- クリーニング: Use a soft, dry cloth to clean the surface of the clock. Do not use liquid cleaners or aerosol sprays.
- ストレージ: 長期間保管する場合は、電源コンセントからプラグを抜き、涼しく乾燥した場所に保管してください。
- 衝撃を避ける: Do not drop or subject the clock to strong impacts, as this may damage internal components.
8。 トラブルシューティング
| 問題 | 考えられる原因 | 解決 |
|---|---|---|
| 時計の表示がオフになっています。 | 電源が接続されていません。 | Ensure the power adapter is securely plugged into the clock and the wall outlet. |
| アラームは鳴りません。 | アラームが作動していないか、または誤って設定されています。 | Check if the alarm icon is displayed. Re-set the alarm time. |
| USB充電が機能しません。 | ケーブルの問題またはデバイスの非互換性。 | 別のUSBケーブルをお試しください。デバイスが5V/2.1Aの充電に対応していることを確認してください。 |
| Display too dim/bright. | Auto-dimming or manual setting. | Briefly press the snooze/dimmer button to cycle through brightness levels. |
9. 仕様
- ブランド: ホムタイム
- モデル: C1
- 色: Turquoise (Green)
- 表示タイプ: デジタルLCD
- 特別な機能: Alarm, Auto Dimmable, Snooze, Dual USB Charging Ports
- 電源: コード式電気
- 材料: アクリロニトリルブタジエンスチレン、プラスチック
- 取り付けタイプ: テーブルトップ
- USB出力: 5V/2.1A (Total for both ports)
- 寸法: (正確な寸法については製品パッケージを参照してください)
- 原産国: 中国
10.保証とサポート
Homtime products are designed and manufactured to the highest quality standards. For information regarding warranty coverage, please refer to the warranty card included with your product or visit the official Homtime website. For technical support or service inquiries, please contact Homtime customer service through the contact information provided on the product packaging or webサイト。
保証のために購入証明として購入レシートを保管してください。
Ask a question about this manual
Ask about setup, troubleshooting, compatibility, parts, safety, or missing instructions. Manuals+ will review the question and use this page’s manual context to help answer it.