1. はじめに
The Fydun MPPT Solar Charge Controller is designed to efficiently manage power flow from your solar panels to your battery bank and connected loads. It features Maximum Power Point Tracking (MPPT) technology to optimize solar energy harvesting, automatic 12V/24V system voltage identification, and comprehensive safety protections. This controller is suitable for various applications, including home, industrial, commercial, car, and motorcycle battery systems.

Image 1.1: Fydun MPPT Solar Charge Controller shown in diverse application environments, including residential, portable, and large-scale solar installations.
2. 安全情報
Please read all instructions carefully before installation and operation. Failure to follow these instructions may result in damage to the unit, battery, or other components, and may cause personal injury.
- Ensure all connections are tight and correct to prevent excessive voltage drop and potential overheating.
- Always connect the battery to the controller first, then the solar panel, and finally the load. Disconnect in the reverse order.
- Do not attempt to repair or modify the controller. Refer to qualified personnel for service.
- コントローラーは、可燃性物質や直射日光を避け、換気の良い場所に設置してください。
- The controller is rated IP32, meaning it is protected from tools and wires greater than 2.5 millimeters and from spraying water. It is not waterproof and should not be exposed to heavy rain or submerged.
3.製品オーバーview
The Fydun MPPT Solar Charge Controller features a clear LCD display for monitoring system status, dual USB outputs for charging devices, and robust terminals for secure connections.

画像3.1: 角度付き view of the Fydun Solar Charge Controller, highlighting its compact design and terminal block.
3.1。 構成部品
- LCDディスプレイ: Shows real-time system parameters such as voltage, current, battery status, and load status.
- コントロールボタン: メニューを移動したり設定を調整したりします。
- デュアル USB 出力: Provides 2.4A max output for charging external devices.
- ソーラーパネル端子: Connects to your solar array.
- バッテリー端子: バッテリー バンクに接続します。
- 負荷端末: DC 負荷に接続します。
- 温度センサー: For accurate temperature compensation of charging parameters.

画像3.2:正面 view of the Fydun Solar Charge Controller, showing the LCD screen, control buttons, and USB ports.

Image 3.3: Diagram illustrating the physical dimensions of the Fydun Solar Charge Controller (17.5cm x 14cm x 4cm).
4. 仕様
| 特徴 | 仕様 |
|---|---|
| 現在 | 30A |
| 定格巻tage | 12V / 24V (Auto-identification) |
| USB出力 | 2.4A×2 |
| 過放電Voltage | 10.5V - 11V (for 12V system, adjustable) |
| 温度補正 | -3mv/℃/cell |
| 無負荷損失 | <45mA |
| ループボリュームtageドロップ | <200mV |
| 表示タイプ | 液晶 |
| 充電タイプ | マルチパス |
| 保護等級 | IP32 |
| 材料 | プラスチック |
| 寸法 | 17.5 x 14 x 4 cm |
| 重さ | 454グラム |
5. セットアップ
Follow these steps for proper installation of your solar charge controller. Incorrect wiring can damage the controller and other components.
5.1. 接続方法
- バッテリーを接続します。 Connect the battery to the controller's battery terminals (marked with a battery symbol). Ensure correct polarity (+ to + and - to -). The controller will automatically detect the battery voltage(12Vまたは24V)。
- ソーラーパネルを接続します。 Connect the solar panel to the controller's solar panel terminals (marked with a solar panel symbol). Ensure correct polarity.
- 負荷を接続する: Connect your DC loads to the controller's load terminals (marked with a light bulb symbol). Ensure correct polarity.
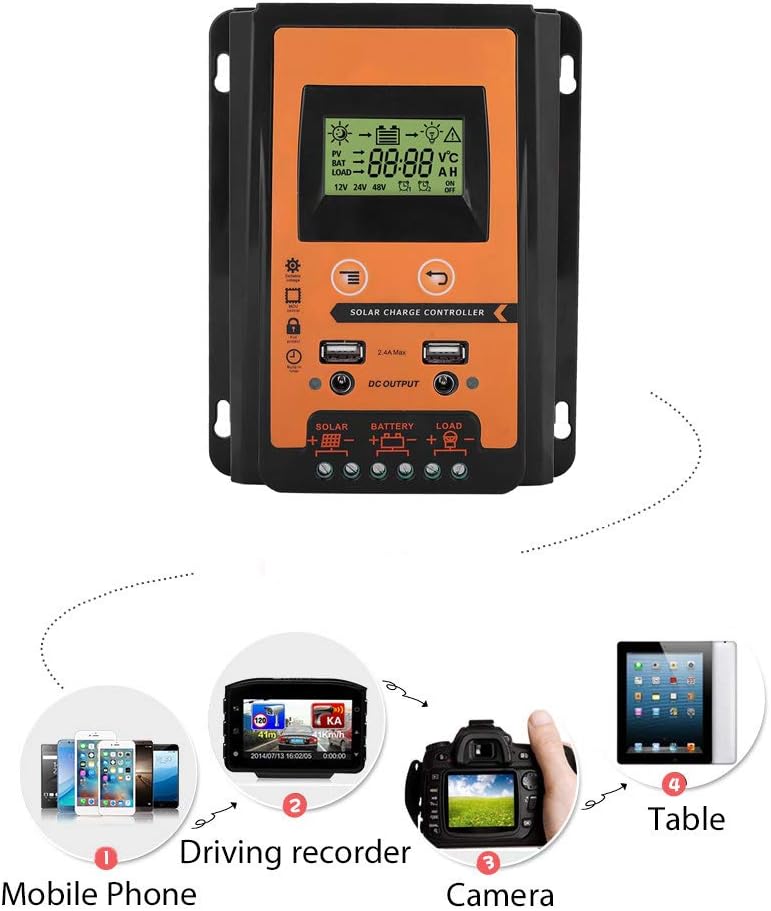
Image 5.1: Diagram illustrating the correct connection order for the solar panel, battery, and load to the Fydun Solar Charge Controller.
Important: Always connect the battery first and disconnect the load first, then the solar panel, and finally the battery when disassembling the system.
6. 操作手順
The controller features an LCD display and control buttons for monitoring and adjusting settings.
6.1.LCDディスプレイ
The LCD display provides real-time information about your solar system, including:
- ソーラーパネル量tageと充電状態。
- バッテリーvoltage と充電レベル。
- Load status (on/off) and current.
- システムvoltage(12Vまたは24V)。
6.2. ボリュームの調整tage設定
The controller allows for manual adjustment of certain voltage parameters, such as the over-discharge recovery voltage. If you encounter issues or need to fine-tune your system, you can adjust the voltage:
- Press and hold the MCU control button (usually the 'Menu' or 'Set' button) for approximately 3-4 seconds. This will bring up a management interface on the display.
- Use the 'Add' button (or 'Up' arrow) to navigate through the settings and increase the voltage value until it reaches your desired setting, for example, 13.7V for battery recovery.
- Press the MCU control button again to save the new setting. The display will stop flashing, indicating the data has been saved.
6.3. USB Output Usage
The dual USB ports can be used to charge various 5V devices, such as mobile phones, driving recorders, and cameras.

Image 6.1: Illustration of various portable electronic devices, such as mobile phones, driving recorders, and cameras, being charged via the controller's USB output.
7. メンテナンス
定期的なメンテナンスにより、ソーラー充電コントローラーの最適なパフォーマンスと寿命が確保されます。
- クリーニング: Periodically clean the controller's exterior with a dry cloth to remove dust and dirt. Ensure the display remains clear.
- 接続チェック: Annually inspect all wiring connections to ensure they are secure and free from corrosion. Loose connections can cause overheating and damage.
- 換気: コントローラーの過熱を防ぐために、設置場所の換気が十分であることを確認してください。
8。 トラブルシューティング
このセクションでは、一般的な問題とその解決策について説明します。
8.1. No Output from Load Terminals
- 症状: The load connected to the controller is not receiving power.
- 考えられる原因: バッテリーvoltage is too low. The controller automatically stops output when battery voltage drops below a certain threshold (e.g., 10.5V-11V for a 12V system) to protect the battery from over-discharge.
- 解決: Allow the solar panel to charge the battery. The controller will resume load output once the battery voltage recovers to 12.6V (for a 12V system).
8.2.ボリュームが間違っているtage Readings or Charging Behavior
- 症状: The display shows unexpected voltage values, or charging seems inefficient.
- 考えられる原因: 巻tage settings may be misconfigured or require adjustment. The normal operating voltage range for the controller is typically 10.7V to 13.7V (for a 12V system).
- 解決: Refer to Section 6.2 "Adjusting Voltage Settings" to manually adjust the voltage parameters, such as setting the recovery voltage to 13.7V if needed.
9. サポート
Fydun is committed to providing reliable products and customer satisfaction. If you have any questions regarding the installation, operation, or troubleshooting of your MPPT Solar Charge Controller, please contact our customer support. We are available to assist you with any inquiries.