1. はじめに
This manual provides comprehensive instructions for the installation, operation, and maintenance of the Chacon DI-O 54515 Universal Dimmer White. This device allows you to wirelessly control your lighting, integrating seamlessly with existing light switches and the DiO 1.0 ecosystem.
The DI-O 54515 micro-module is designed to be installed behind your existing light switch, enabling wireless ON-OFF control of your lights. It supports control via the physical switch, a remote control, or automatically through compatible motion or opening sensors. When connected to a LiteBox or DiO Home+ hub, it offers smartphone app control, timers, and scenario programming, including voice control via Amazon Echo or Google Home.
2. 安全情報
設置およびご使用の前に、すべての安全に関する指示をよくお読みください。指示に従わない場合、感電、火災、その他の危険が生じる可能性があります。
- 設置は資格のある電気技師が行うか、地域の電気工事規定に従って行う必要があります。
- デバイスの設置または保守を行う前に、必ず回路ブレーカーで電源を切ってください。
- 技術仕様に指定された最大荷重定格を超えないでください。
- このデバイスは屋内専用に設計されています。
- デバイスを水、湿気、極端な温度から遠ざけてください。
- すべての接続が安全かつ適切に絶縁されていることを確認してください。
3. パッケージ内容
パッケージには、次のアイテムが含まれている必要があります。
- Chacon DI-O 54515 Universal Dimmer White Module
- 取扱説明書(本書)

Image 1: The Chacon DI-O 54515 Universal Dimmer White module, showing its compact design and wiring terminals.
4 製品の特徴
- ワイヤレス制御: Enables wireless ON-OFF control of lights when installed behind an existing switch.
- Multi-Control Options: Compatible with existing physical switches, DiO 1.0 remote controls, wireless switches, motion sensors, and opening sensors.
- スマートホーム統合: Connects to LiteBox or DiO Home+ for smartphone app control, timers, and scenario programming.
- 音声コントロール: Supports voice commands via Amazon Echo or Google Home when integrated with DiO Home+.
- 簡単なインストール: Designed for simple connection behind an existing light switch, requiring no neutral wire.
- コンパクトなデザイン: Dimensions (L x W x H): 41 x 42 x 13 mm, allowing it to fit into standard electrical boxes.
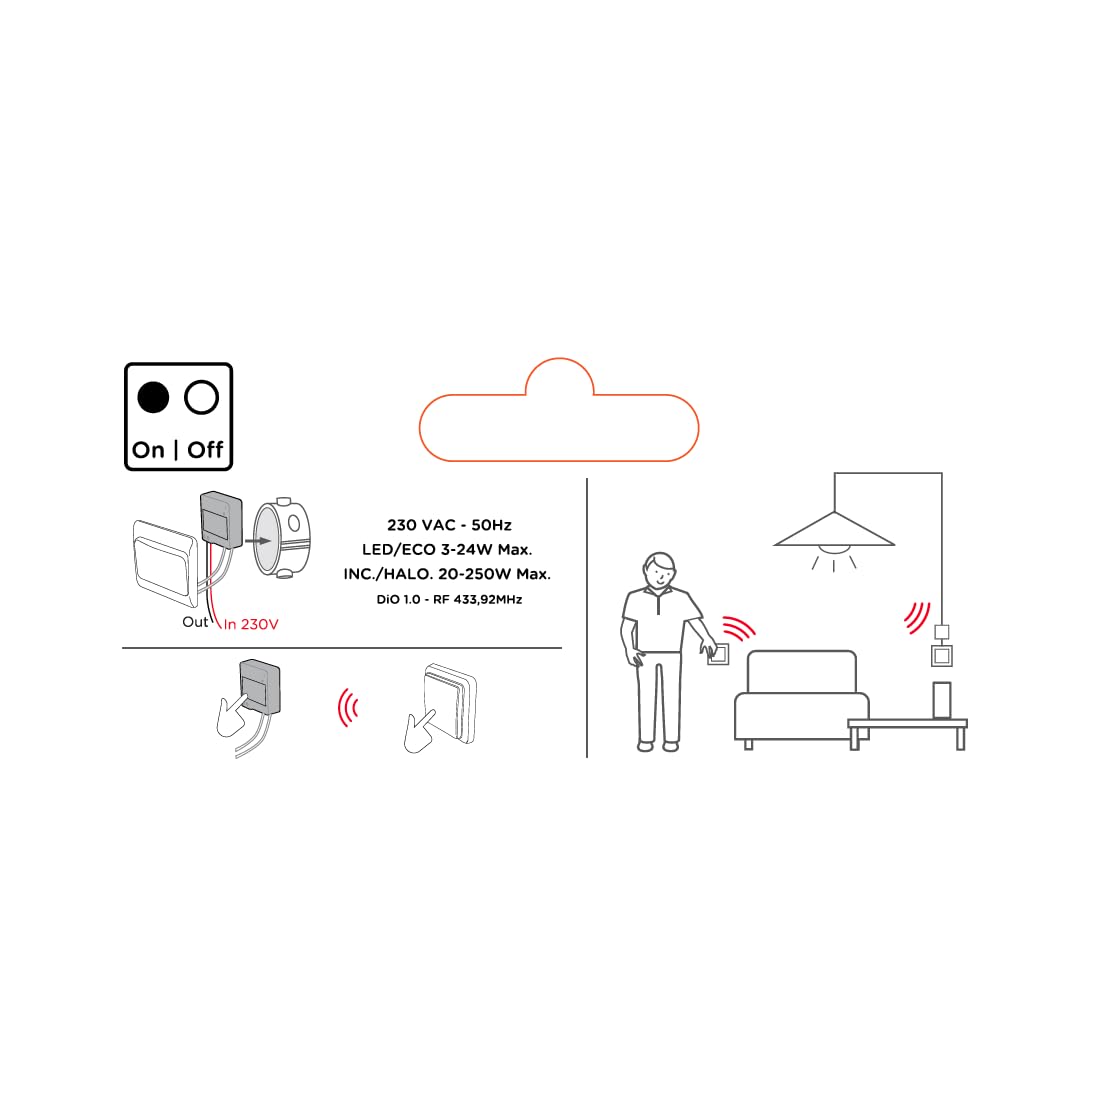
Image 2: An illustrative diagram detailing the wireless control capabilities and key electrical specifications of the module.
5. セットアップとインストール
The installation of the Chacon DI-O 54515 module is designed to be straightforward. However, if you are unsure, consult a qualified electrician.
5.1配線手順
- 電源を切る: Before starting any electrical work, ensure the power supply to the circuit is turned off at the main circuit breaker.
- アクセススイッチボックス: 既存の照明スイッチを壁のボックスから慎重に取り外します。
- 接続モジュール:
- Connect the Live (L) wire from your electrical supply to the 'L' terminal on the DiO module.
- Connect the wire going to your light fixture to the output terminal (often marked with a wave symbol or 'OUT') on the DiO module.
- Connect the two wires from your existing light switch to the designated switch input terminals on the DiO module. This module does not require a neutral wire for operation.
- 位置モジュール: Carefully place the DiO module into the wall box behind your existing light switch. Ensure wires are not pinched.
- スイッチを再インストールします: Reattach your existing light switch to the wall box.
- 電力を回復する: 回路ブレーカーで電源を再度オンにします。

Image 3: A visual representation of the DiO module being installed within a standard electrical wall box, positioned behind an existing light switch.

画像4: 詳細な view of the Chacon DI-O 54515 module, highlighting its wiring terminals for proper connection.
5.2 Pairing with DiO 1.0 Controls
To enable wireless control, you need to pair the module with a compatible DiO 1.0 remote control, wireless switch, or sensor.
- ペアリングモードに入る: Refer to the specific instructions for your DiO 1.0 control device to put it into pairing mode. Typically, this involves pressing a pairing button on the module or performing a specific sequence with the existing switch.
- コントロールをアクティブ化: Once the module is in pairing mode, activate your DiO 1.0 control (e.g., press the 'ON' button on a remote or wireless switch).
- 確認: The light connected to the module should flash or turn on/off to confirm successful pairing.
- Repeat for Multiple Controls: You can pair multiple DiO 1.0 controls to the same module if desired.
6. 操作手順
Once installed and paired, the Chacon DI-O 54515 module offers several ways to control your lighting:
- Existing Light Switch: You can continue to use your traditional wall switch to turn the lights on and off.
- DiO 1.0 Remote Control/Wireless Switch: Use any paired DiO 1.0 remote control or wireless switch to toggle the lights.
- DiO 1.0 Sensors: If paired with a DiO motion or opening sensor, the lights can be triggered automatically based on detected activity.
- Smartphone App (via DiO Home+ / LiteBox):
- Connect your DiO module to a DiO Home+ or LiteBox hub (sold separately).
- Download the free DiO smartphone app.
- Follow the app's instructions to add and configure your module.
- From the app, you can turn lights on/off, set timers, and create custom scenarios.
- Voice Control (via DiO Home+ and Smart Speaker):
- Ensure your DiO Home+ hub is integrated with Amazon Echo or Google Home.
- Use voice commands such as "Alexa, turn on the living room light" or "Hey Google, turn off the kitchen light."
7. メンテナンス
The Chacon DI-O 54515 module requires minimal maintenance. Follow these guidelines to ensure optimal performance:
- クリーニング: 必要に応じて、乾いた柔らかい布でモジュールを優しく拭いてください。液体クリーナーや溶剤は使用しないでください。
- 検査: Periodically check the wiring connections to ensure they remain secure. Always disconnect power before inspection.
- ファームウェアの更新: If using with a DiO Home+ or LiteBox, ensure your hub's firmware and the smartphone app are kept up to date for the best performance and security.
8。 トラブルシューティング
| 問題 | 考えられる原因 | 解決 |
|---|---|---|
| ライトが点灯/消灯しません。 | No power to the module, incorrect wiring, module not paired, faulty bulb. | Check circuit breaker. Verify wiring according to Section 5.1. Re-pair the module with the control device (Section 5.2). Test with a known working bulb. |
| ワイヤレス制御が機能しません。 | Module not paired, control device out of range, battery low in remote/sensor. | Ensure module is correctly paired (Section 5.2). Move control device closer to the module. Replace batteries in remote/sensor. |
| Module indicator light flashing red. | 過負荷または短絡が検出されました。 | Immediately disconnect power. Check the connected load does not exceed specifications. Inspect wiring for any short circuits. Consult a qualified electrician if the problem persists. |
| 音声コントロールが応答しません。 | DiO Home+ hub not connected, incorrect voice command, smart speaker issue. | Ensure DiO Home+ is online and linked to your smart speaker account. Verify the correct device name is used in commands. Check smart speaker's internet connection. |
9. 仕様
| 特徴 | 詳細 |
|---|---|
| モデル番号 | 54515 |
| ブランド | ディオ |
| 操作モード | オンオフ |
| 現在の評価 | 10 Amps |
| スイッチタイプ | 調光スイッチ |
| 取り付けタイプ | 壁掛け |
| アクチュエータタイプ | リモートコントロール |
| 国際保護格付け | IP44 |
| コントローラータイプ | アマゾンアレクサ |
| 制御方法 | リモート |
| 色 | 白 |
| 寸法(長さ×幅×高さ) | 41 x 42 x 13 ミリメートル |
| 保証 | 2年 |
Note on Dimming Functionality: While the product title includes "Dimmer" and "Switch Type" is listed as "Dimmer Switch", the official specifications list "Operation mode: ON-OFF". Some user reviews also indicate that newer versions of this module function as a simple ON/OFF switch rather than a dimmer. Please verify the specific functionality of your module upon receipt.
10. 保証とサポート
This Chacon DI-O 54515 Universal Dimmer White module comes with a 2年間保証 購入日から製造上の欠陥をカバーします。
For technical support, troubleshooting assistance, or warranty claims, please contact your retailer or visit the official Dio website for contact information. Please have your proof of purchase and model number (54515) ready when contacting support.