導入
This manual provides essential information for the safe and efficient operation, maintenance, and troubleshooting of your Sealey SAC5020A 50L Direct Drive Air Compressor. The compressor features an aluminium cylinder head with a cast iron cylinder for enhanced wear resistance, making it suitable for general-purpose workshop applications. Its pump head is directly coupled to a heavy-duty induction motor, ensuring reliable and quiet operation. The precision-welded receiver tank complies with the Pressure Vessel Directive. It is equipped with a fully automatic pressure cut-out switch and twin gauges to display both tank and working pressures. The unit is supplied with a 3-pin plug.
安全情報
人身傷害や機器の損傷を防ぐために、常に次の安全上の注意事項を守ってください。
- コンプレッサーを操作する前に、すべての指示を読んで理解してください。
- Ensure the compressor is placed on a level, stable surface in a well-ventilated area.
- 目の保護具や聴覚保護具などの適切な個人用保護具 (PPE) を着用してください。
- コンプレッサーをdで操作しないでくださいamp または湿気の多い場所、または可燃性の液体やガスが存在する場所で使用しないでください。
- Always disconnect the compressor from the power supply before performing any maintenance or adjustments.
- 圧縮空気を人や動物に向けて発射しないでください。
- Regularly inspect the air tank for signs of corrosion or damage. Do not use a damaged tank.
- 操作前に、すべての接続が安全で漏れがないことを確認してください。
- コンプレッサーまたはその安全装置を改造しないでください。
開梱とセットアップ
Carefully remove the compressor from its packaging. Inspect the unit for any signs of shipping damage. If damage is found, contact your supplier immediately.
Component Identification and Dimensions

図1: Overall dimensions of the Sealey SAC5020A 50L Direct Drive Air Compressor. The image shows the compressor with its tank, motor, handle, wheels, and control panel, indicating a width of 705mm, a height of 600mm, and a depth of 300mm.
Familiarize yourself with the main components of your compressor. Refer to Figure 1 for an overview of the unit's dimensions and general layout.
組み立て
- ホイールを取り付ける: Securely attach the wheels to the compressor base using the provided hardware.
- ハンドルを取り付ける: Mount the transport handle to the designated points on the compressor body.
- ポジショニング: Place the compressor on a firm, level surface. Ensure there is adequate space around the unit for ventilation.
電気的接続
Connect the compressor to a suitable grounded power outlet. Ensure the power supply matches the voltage and frequency specifications of the compressor (typically 230V, 50Hz for this model). The unit is fitted with a 3-pin plug.
Initial Run-in Procedure
Before first use, or after extended storage, perform a brief run-in:
- Open the air outlet valve completely to allow air to escape freely.
- Switch on the compressor and let it run for approximately 15-20 minutes without building pressure. This helps to lubricate internal components.
- Switch off the compressor and close the air outlet valve.
操作手順
Controls and Gauges

図2: 閉じる view of the twin pressure gauges. One gauge displays the tank pressure, and the other displays the regulated working pressure.
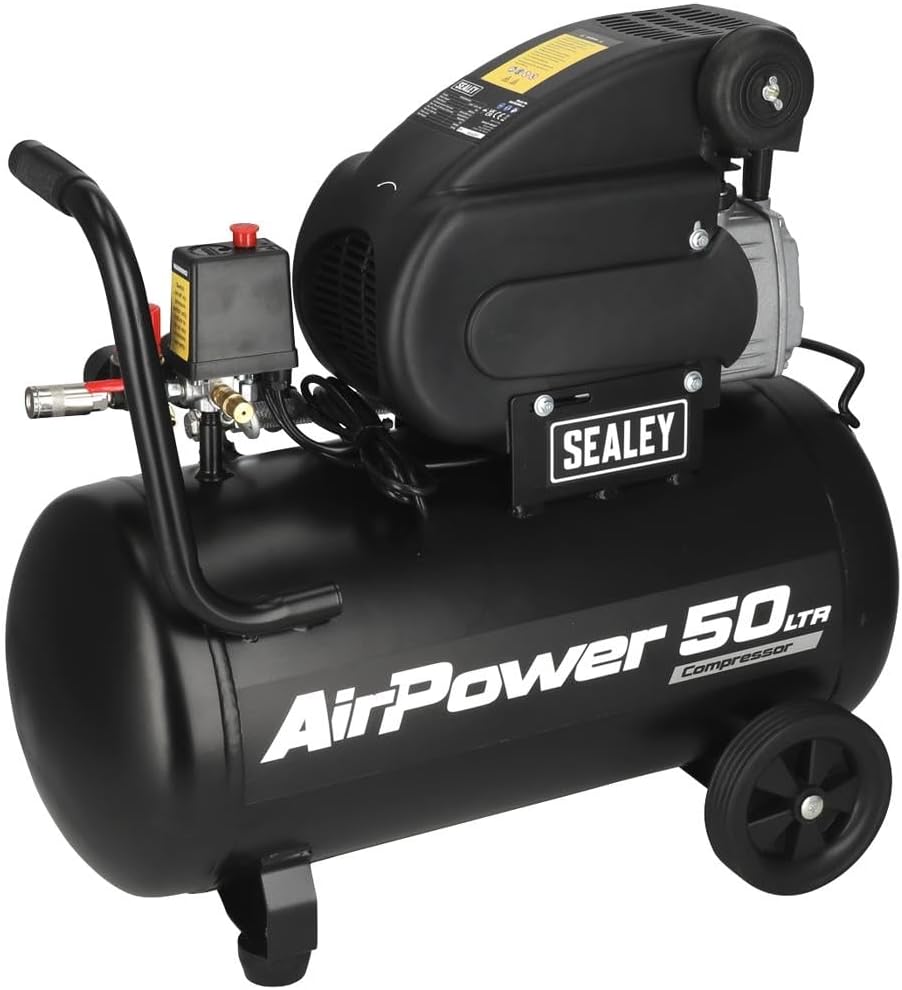
図3: The pressure cut-out switch (black box with yellow warning label) and the red pressure regulator knob, along with the quick-connect air outlet.
- 圧力スイッチ: The black box (Figure 3) automatically turns the compressor on and off to maintain tank pressure.
- タンク圧力計: Displays the current pressure inside the air tank (Figure 2).
- Working Pressure Gauge: Displays the pressure of the air being supplied to your tools, adjustable via the regulator (Figure 2).
- 圧力調整器: The red knob (Figure 3) allows you to adjust the working pressure. Turn clockwise to increase pressure, counter-clockwise to decrease.
- Quick-Connect Air Outlet: For attaching air hoses and tools (Figure 3).
コンプレッサーの始動
- タンクの底にある排水バルブが閉じていることを確認してください。
- コンプレッサーを適切な電源コンセントに差し込みます。
- Turn the main power switch to the "ON" position. The compressor will start to build pressure.
- Once the tank reaches its maximum pressure, the compressor will automatically shut off.
Connecting and Using Air Tools
- Connect your air hose to the quick-connect air outlet.
- Attach your air tool to the other end of the hose.
- Adjust the working pressure using the red regulator knob to suit the requirements of your air tool. Monitor the working pressure gauge.
- Begin using your air tool. The compressor will cycle on and off automatically to maintain pressure as needed.
シャットダウン
- 主電源スイッチを「OFF」の位置にしてください。
- エアホースと工具を外します。
- Slowly open the drain valve at the bottom of the tank to release any condensed moisture and residual air pressure. Close the valve once the tank is empty.
メンテナンス
定期的なメンテナンスにより、エアコンプレッサーの寿命が長くなり、安全に動作することが保証されます。
毎日/使用後
- 凝縮水を排出する: After each use, or daily if used frequently, open the drain valve at the bottom of the air tank to release accumulated moisture. This prevents rust and corrosion inside the tank.
Weekly/Monthly
- エアフィルターの点検: Check the air filter for dirt and debris. Clean or replace if necessary to ensure proper airflow to the pump.
- 漏れがないか確認する: Listen for any air leaks around fittings, hoses, and valves. Tighten connections as needed. A soapy water solution can help identify small leaks.
- ホースと継手を点検する: Examine air hoses for cracks, cuts, or wear. Replace damaged hoses immediately. Ensure all quick-connect fittings are functioning correctly.
- 電源コードを点検する: Check the power cord for any damage, fraying, or exposed wires.
毎年
- タンク検査: Visually inspect the air tank for any signs of external corrosion, dents, or damage. If any damage is found, do not use the compressor and seek professional inspection.
- 安全弁チェック: Briefly pull the ring on the safety relief valve to ensure it operates freely and reseats properly.
For any maintenance beyond these basic steps, it is recommended to consult a qualified service technician.
トラブルシューティング
This section provides solutions to common issues you may encounter with your air compressor.
| 問題 | 考えられる原因 | 解決 |
|---|---|---|
| コンプレッサーが起動しません。 |
|
|
| コンプレッサーが連続的に動作したり、頻繁にサイクル動作したりします。 |
|
|
| 出口の空気圧が低い。 |
|
|
| 過度の騒音または振動。 |
|
|
仕様
| 特徴 | 詳細 |
|---|---|
| ブランド | シーリー |
| モデル番号 | SAC5020A |
| 電源 | AC |
| 最大出力 | 2馬力 |
| モーター馬力 | 2馬力 |
| タンク容量 | 50リットル |
| 風量 | 6.8 立方フィート/分 (CFM) |
| アイテム重量 | 32980グラム(約33kg) |
| 特集 | 静音操作 |
| 含まれるコンポーネント | 50ltr Direct Drive Compressor 2hp |
| 推奨用途 | Bolting, Drilling, Spraying, Sanding, Grinding, Tire Inflation |
保証情報
This Sealey product is covered by a manufacturer's warranty against defects in materials and workmanship. The specific terms and duration of the warranty may vary by region and purchase date. Please retain your proof of purchase for warranty claims.
For detailed warranty information, please refer to the warranty card included with your product or visit the official Sealey webサイト。
サポートとお問い合わせ
Should you require technical assistance, spare parts, or have any questions regarding your Sealey SAC5020A air compressor, please contact Sealey customer support or your authorized dealer.
シーリー公式 Webサイト: www.sealey.co.uk
Please have your model number (SAC5020A) and serial number (if applicable) ready when contacting support.