
1. はじめに
Thank you for choosing the Protmex PT2800U Weather Station. This device provides accurate indoor and outdoor temperature and humidity readings, barometric pressure, and a weather forecast. It features a colorful LCD display for easy readability. Please read this manual carefully before operating the device to ensure proper use and to maximize its lifespan.
2. パッケージ内容
- Protmex PT2800U Main Unit (Receiver)
- Wireless Outdoor Sensor (Transmitter)
- 電源アダプタ(DC 5V)
- ユーザーマニュアル
3.製品オーバーview
3.1 Main Unit and Wireless Sensor
The Protmex PT2800U Weather Station consists of a main display unit and a wireless outdoor sensor. The main unit displays all weather data, time, and forecast, while the sensor collects outdoor temperature and humidity data and transmits it wirelessly to the main unit.
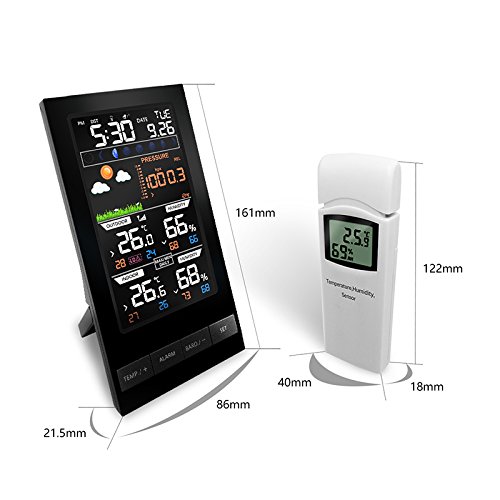
図1: Protmex PT2800U Weather Station main unit and wireless sensor with dimensions. The main unit measures approximately 161mm in height and 86mm in width. The sensor measures approximately 122mm in height and 40mm in width.
3.2 Main Unit Features (Rear View)
The rear of the main unit includes essential ports and features for operation and placement.
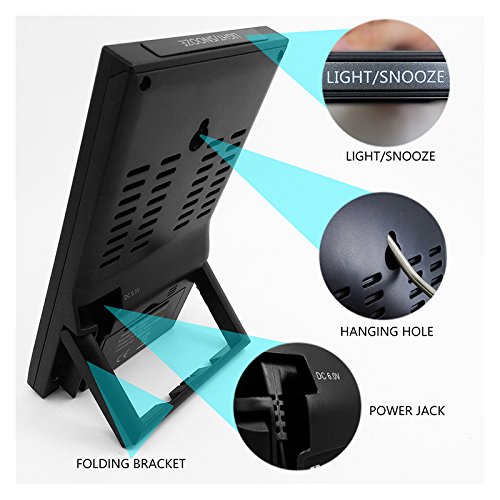
図2: 後方 view of the main unit. Key features include the DC 5V power jack, a folding bracket for tabletop placement, and the LIGHT/SNOOZE button located on the top edge. A hanging hole is also visible for wall mounting.
3.3 Battery Compartments and Hanging Holes
Both the main unit and the wireless sensor require batteries for operation and feature hanging holes for flexible placement.
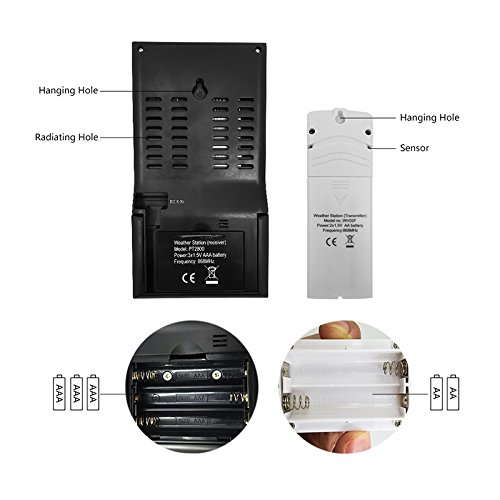
図3: 戻る view of the main unit and wireless sensor. The main unit requires 3x AAA batteries, and the sensor requires 2x AA batteries. Both units have hanging holes for wall mounting.
3.4 LCD Display Layout
The colorful LCD display provides a comprehensive overview of all weather data and time information.
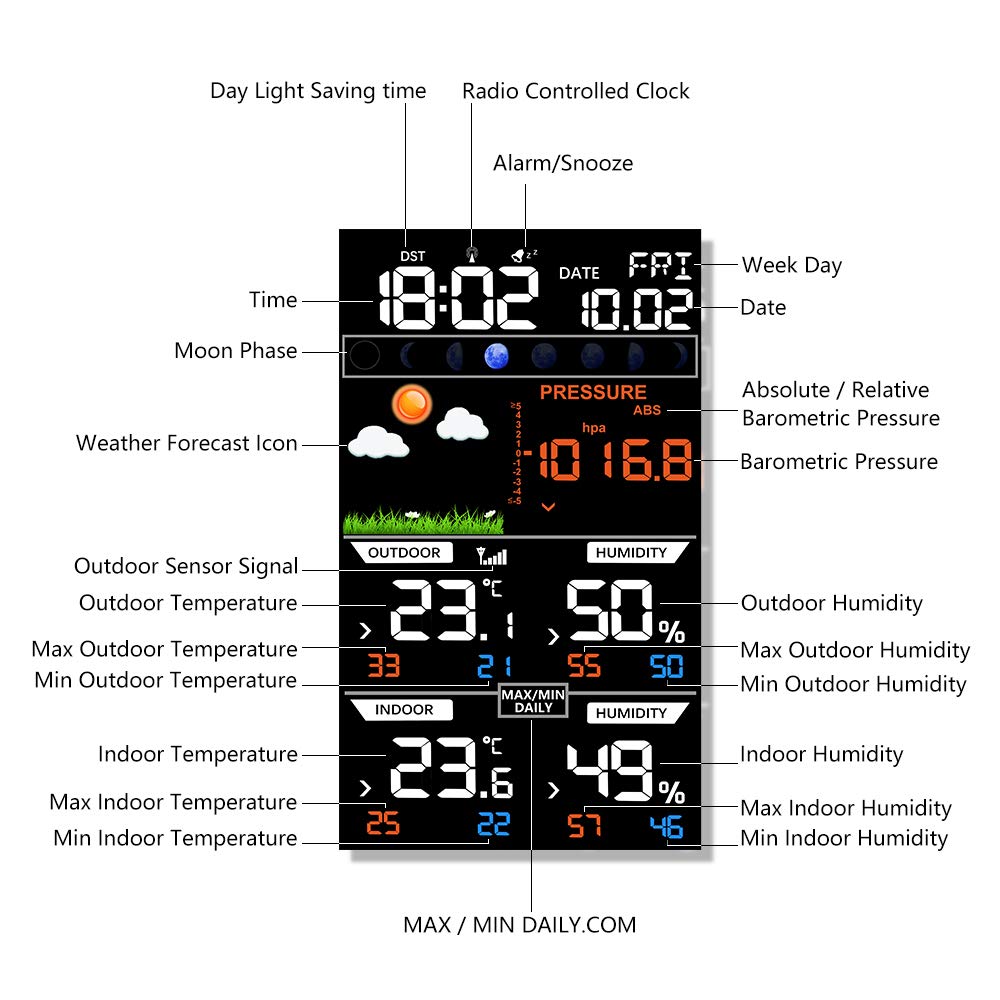
図4: Detailed LCD display layout. Sections include Day Light Saving time (DST), Radio Controlled Clock (RCC), Time, Moon Phase, Weather Forecast Icon, Absolute/Relative Barometric Pressure, Barometric Pressure value, Outdoor Sensor Signal, Outdoor Temperature, Max/Min Outdoor Temperature, Outdoor Humidity, Max/Min Outdoor Humidity, Indoor Temperature, Max/Min Indoor Temperature, Indoor Humidity, Max/Min Indoor Humidity, Alarm/Snooze indicator, Date, and Week Day.
4. セットアップ
4.1 ユニットの電源供給
- ワイヤレス屋外センサー: Open the battery compartment on the back of the sensor. Insert 2x AA batteries, observing the correct polarity (+/-). Close the compartment.
- 本体: Open the battery compartment on the back of the main unit. Insert 3x AAA batteries, observing the correct polarity (+/-). Close the compartment. For continuous display and backlight, connect the provided DC 5V power adapter to the power jack on the back of the main unit and plug it into a wall outlet.
4.2 センサーの配置
Place the wireless outdoor sensor in a shaded, dry location away from direct sunlight and precipitation to ensure accurate readings. Ensure it is within the transmission range of the main unit (typically up to 60 meters in open air). Avoid placing it near large metal objects or electronic devices that could interfere with the signal.
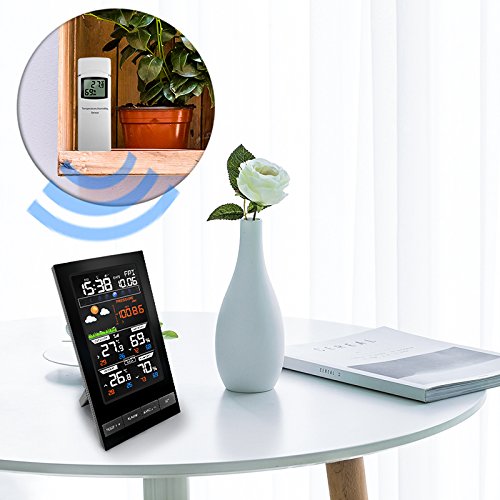
図5: Example placement of the main unit indoors and the wireless sensor outdoors (or in a suitable location like a balcony or window sill) to ensure optimal signal reception.
4.3 初期同期
Once both units are powered on, the main unit will automatically search for and connect to the outdoor sensor. This may take a few minutes. The outdoor temperature and humidity readings will appear on the main unit's display once connected. If synchronization fails, ensure both units are within range and try re-inserting batteries in both units.
4.4 時刻と日付の設定
Refer to the 'Operating Instructions' section for details on how to manually set the time, date, and other preferences using the control buttons.
5. 操作手順
The main unit features several buttons for configuration and display adjustments:
- TEMP/+ Button: Used to switch between Celsius (°C) and Fahrenheit (°F) temperature units. In setting mode, it increases values.
- アラームボタン: 慣れている view またはアラーム時間を設定します。
- BAND/- Button: Used to switch between absolute and relative barometric pressure. In setting mode, it decreases values.
- SETボタン: Used to enter and confirm settings for time, date, and other parameters.
- ライト/スヌーズボタン: Activates the backlight temporarily. When an alarm sounds, press to activate snooze function.
5.1 時刻と日付の設定
- を押し続けます セット button for 3 seconds to enter time setting mode. The hour digit will flash.
- 使用 TEMP/+ or BAND/- 時間を調整するボタン。
- プレス セット to confirm and move to the next setting (minute, year, month, day, 12/24 hour format, DST, RCC).
- Repeat steps 2 and 3 until all settings are configured. Press セット 設定モードを終了します。
5.2 アラーム設定
- を押す アラーム ボタンをXNUMX回押します view 目覚まし時間。
- を押し続けます アラーム button for 3 seconds to enter alarm setting mode. The hour digit will flash.
- 使用 TEMP/+ or BAND/- 時間と分を調整するボタン。
- プレス アラーム 確認して終了します。
- アラームをオン/オフにするには、 アラーム アラームアイコンがディスプレイに表示/消えるまでボタンを繰り返し押します。
5.3 温度と湿度の表示
- ディスプレイには現在の室内と屋外の温度と湿度が表示されます。
- を押す TEMP/+ ボタンで摂氏 (°C) と華氏 (°F) を切り替えます。
- The display also shows maximum and minimum recorded values for indoor and outdoor temperature and humidity. These values typically reset daily.
5.4 気圧と天気予報
- The weather station displays current barometric pressure.
- を押す BAND/- button to switch between absolute and relative barometric pressure.
- The weather forecast icons (e.g., sunny, cloudy, rainy) are based on changes in barometric pressure over time. These are predictions and may not always perfectly match actual weather conditions.
6. メンテナンス
- バッテリー交換: Replace batteries in both the main unit and the sensor when the low battery indicator appears on the display. Always replace all batteries at the same time.
- クリーニング: ディスプレイと本体の表面を柔らかくて乾いた布で拭いてください。amp 布で拭いてください。研磨剤や溶剤は使用しないでください。
- センサーのケア: Ensure the outdoor sensor remains protected from extreme weather conditions. Regularly check for any obstructions around the sensor that might affect readings.
- ストレージ: デバイスを長期間保管する場合は、液漏れを防ぐためにすべての電池を取り外してください。
7。 トラブルシューティング
| 問題 | 考えられる原因 | 解決 |
|---|---|---|
| 本体にディスプレイが表示されない | 電池が切れているか正しく挿入されていない、電源アダプターが接続されていないか故障している。 | 電池の極性を確認し、必要に応じて交換してください。電源アダプターがしっかりと接続され、正常に機能していることを確認してください。 |
| 屋外の温度/湿度が表示されない、または不正確です | Sensor out of range; Low sensor battery; Interference; Sensor exposed to direct elements. | Move sensor closer to the main unit. Replace sensor batteries. Relocate sensor away from electronic interference. Place sensor in a shaded, dry area. |
| 天気予報は不正確 | Forecast is a prediction based on barometric pressure changes, not real-time observation. | Understand that the forecast is an estimation. Allow 24-48 hours for the station to calibrate after initial setup. |
| 時刻/日付が正しくありません | Manual setting error; RCC signal not received. | Manually set time and date as per instructions. Ensure the unit is placed where it can receive RCC signal (if applicable). |
8. 仕様
- ブランド: プロトメックス
- モデル: PT2800U
- 表示タイプ: Digital, Colorful LCD
- 電源(本体): DC 5V Power Adapter (included) or 3x AAA Batteries (not included)
- 電源(センサー): 単三電池2本(別売)
- スタイル: モダンな
- 形: 長方形
- 機能: Indoor/Outdoor Temperature, Indoor/Outdoor Humidity, Barometric Pressure, Weather Forecast, Time, Date, Alarm, Snooze, Moon Phase, DST, RCC.
9. 保証とサポート
Protmex products are designed for reliability and performance. This product comes with a standard manufacturer's warranty against defects in materials and workmanship. For specific warranty details, please refer to the warranty card included in your package or contact Protmex customer support.
If you encounter any issues or have questions regarding the operation of your PT2800U Weather Station, please contact Protmex customer support through the retailer where the product was purchased or visit the official Protmex webサポートサイト。