XENOCAM A6708NH
XENOCAM 8CH 1080N Hybrid 5-in-1 AHD DVR User Manual
Model: A6708NH
1. はじめに
This manual provides comprehensive instructions for the installation, configuration, and operation of your XENOCAM 8-channel 1080N Hybrid 5-in-1 AHD Digital Video Recorder (DVR). This DVR supports multiple video input formats including Analog, AHD, HD-TVI, CVI, and IP (NVR) cameras, offering versatile surveillance solutions. Please read this manual thoroughly before operating the device to ensure proper usage and optimal performance.
2. 安全情報
- 電源のボリュームを確認してくださいtage matches the DVR's requirements.
- Do not expose the DVR to moisture, rain, or extreme temperatures.
- DVR を直射日光の当たる場所や熱源の近くに置かないでください。
- DVRを開けないでくださいasing; すべてのサービスは資格を持った担当者に依頼してください。
- Install the DVR in a well-ventilated area to prevent overheating.
3. パッケージ内容
パッケージにすべてのアイテムが揃っていることを確認します。
- XENOCAM 8CH 1080N Hybrid 5-in-1 AHD DVR Unit
- 電源アダプター
- USBマウス
- ハードドライブ取り付け用ネジ
- ユーザーマニュアル(クイックスタートガイド)
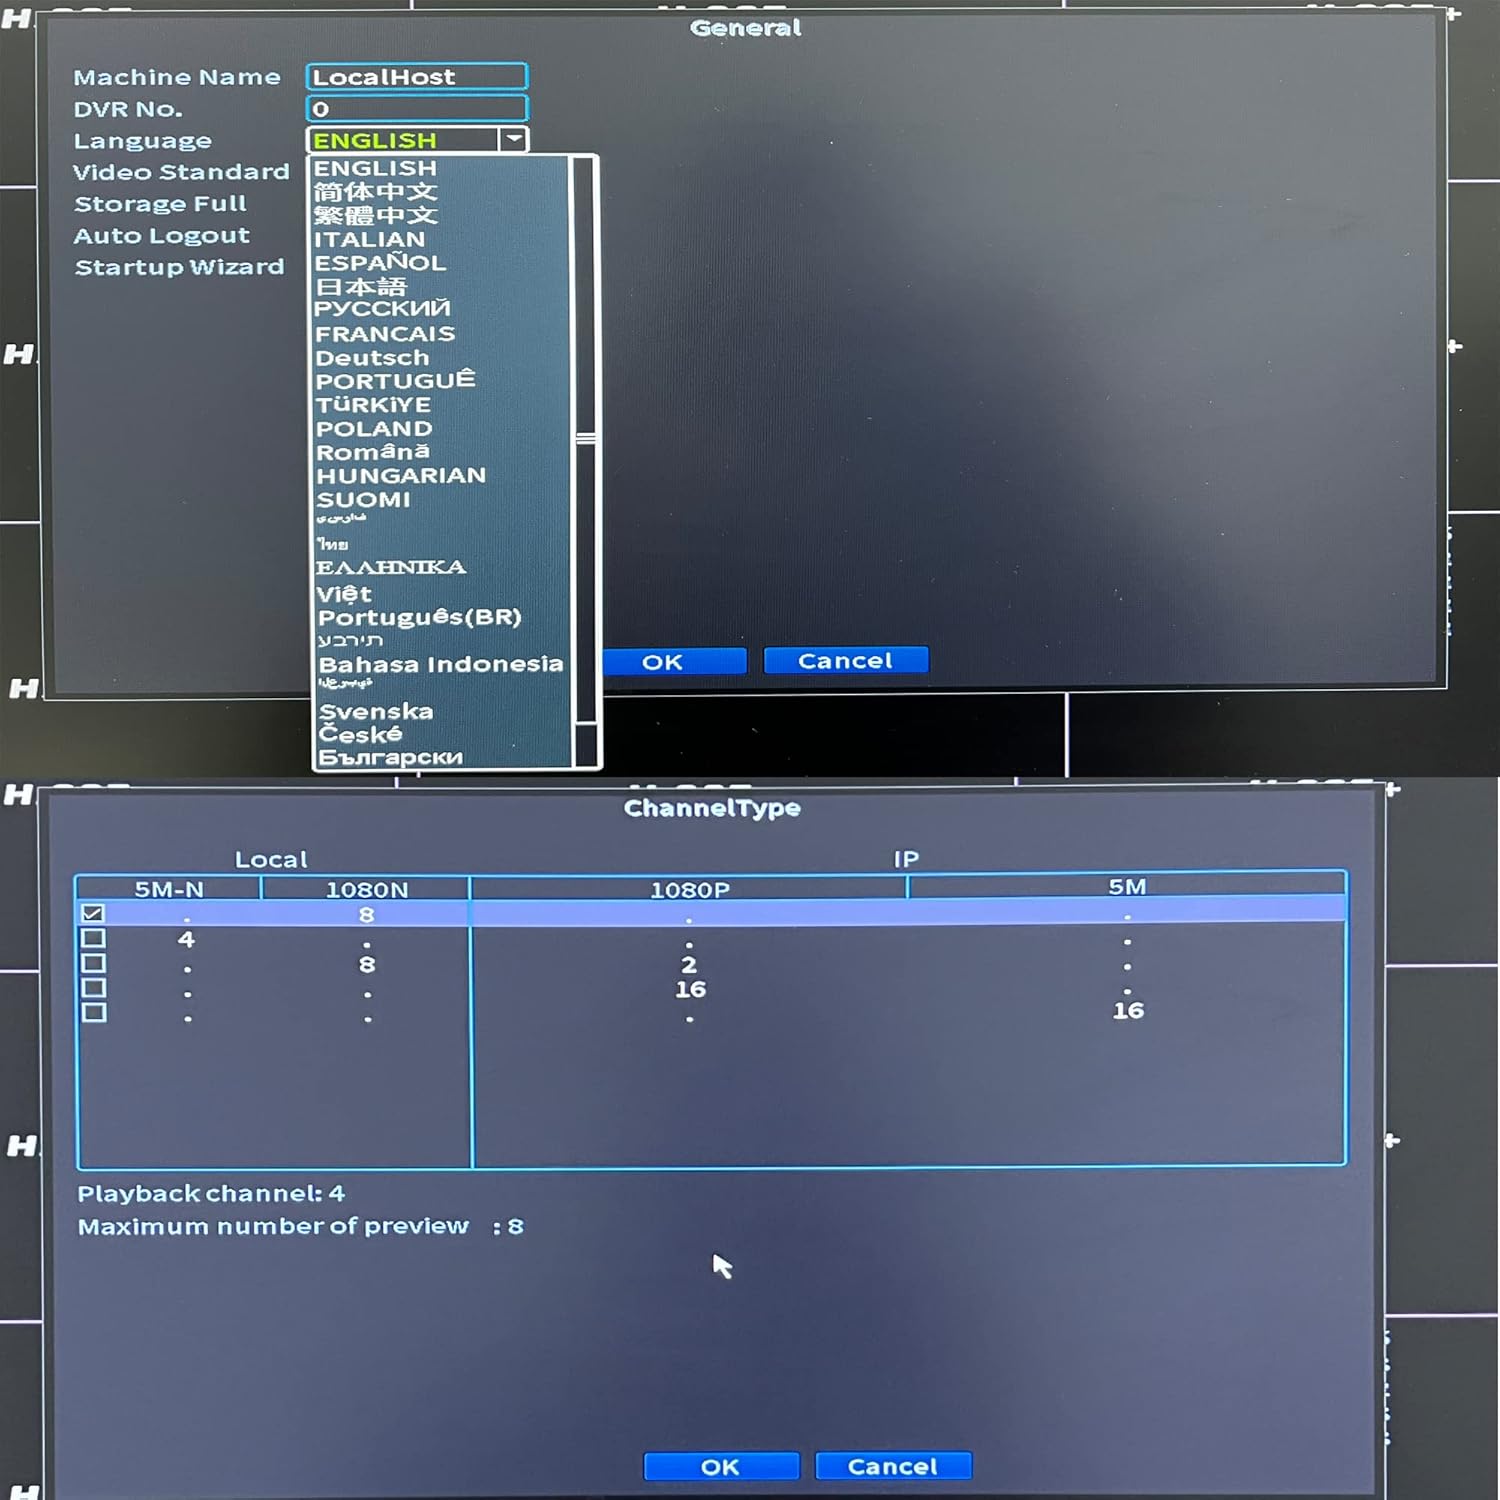
図3.1: Included accessories for the XENOCAM DVR system.
4.製品オーバーview
4.1 フロントパネルとリアパネル
Familiarize yourself with the ports and indicators on the DVR unit.

図4.1: Front and Rear Panels of the DVR.
- フロントパネル: Power indicator, HDD activity indicator, Alarm indicator, IR receiver, Navigation buttons (ESC, Enter, Menu).
- 後面パネル:
- VIDEO IN (1-8): BNC connectors for analog, AHD, HD-TVI, CVI camera inputs.
- オーディオ入力/出力: RCA connectors for audio input and output.
- HD-port (HDMI): Video output to monitor/TV.
- VGA: Video output to monitor/TV.
- USB: Ports for mouse, USB backup devices.
- ネット(RJ45): ネットワーク接続用のイーサネット ポート。
- DC 12V: 電源入力。
4.2製品の寸法
The physical dimensions of the DVR unit are important for installation planning.

図4.2: DVR Dimensions (Length: 9.96 in, Width: 9.37 in, Height: 1.65 in).
5. セットアップ
5.1 Hard Drive Installation (HDD not included)
A hard drive is required for recording video footage. Ensure the DVR is powered off before installation.
- DVR の上部カバーをネジを外して取り外します。
- Connect the SATA power and data cables from the DVR to the hard drive.
- 付属のネジを使用してハードドライブを DVR シャーシに固定します。
- 上部カバーを取り付けて、ネジで固定します。
5.2 Camera and Monitor Connection
Connect your cameras and a monitor to the DVR as illustrated below.
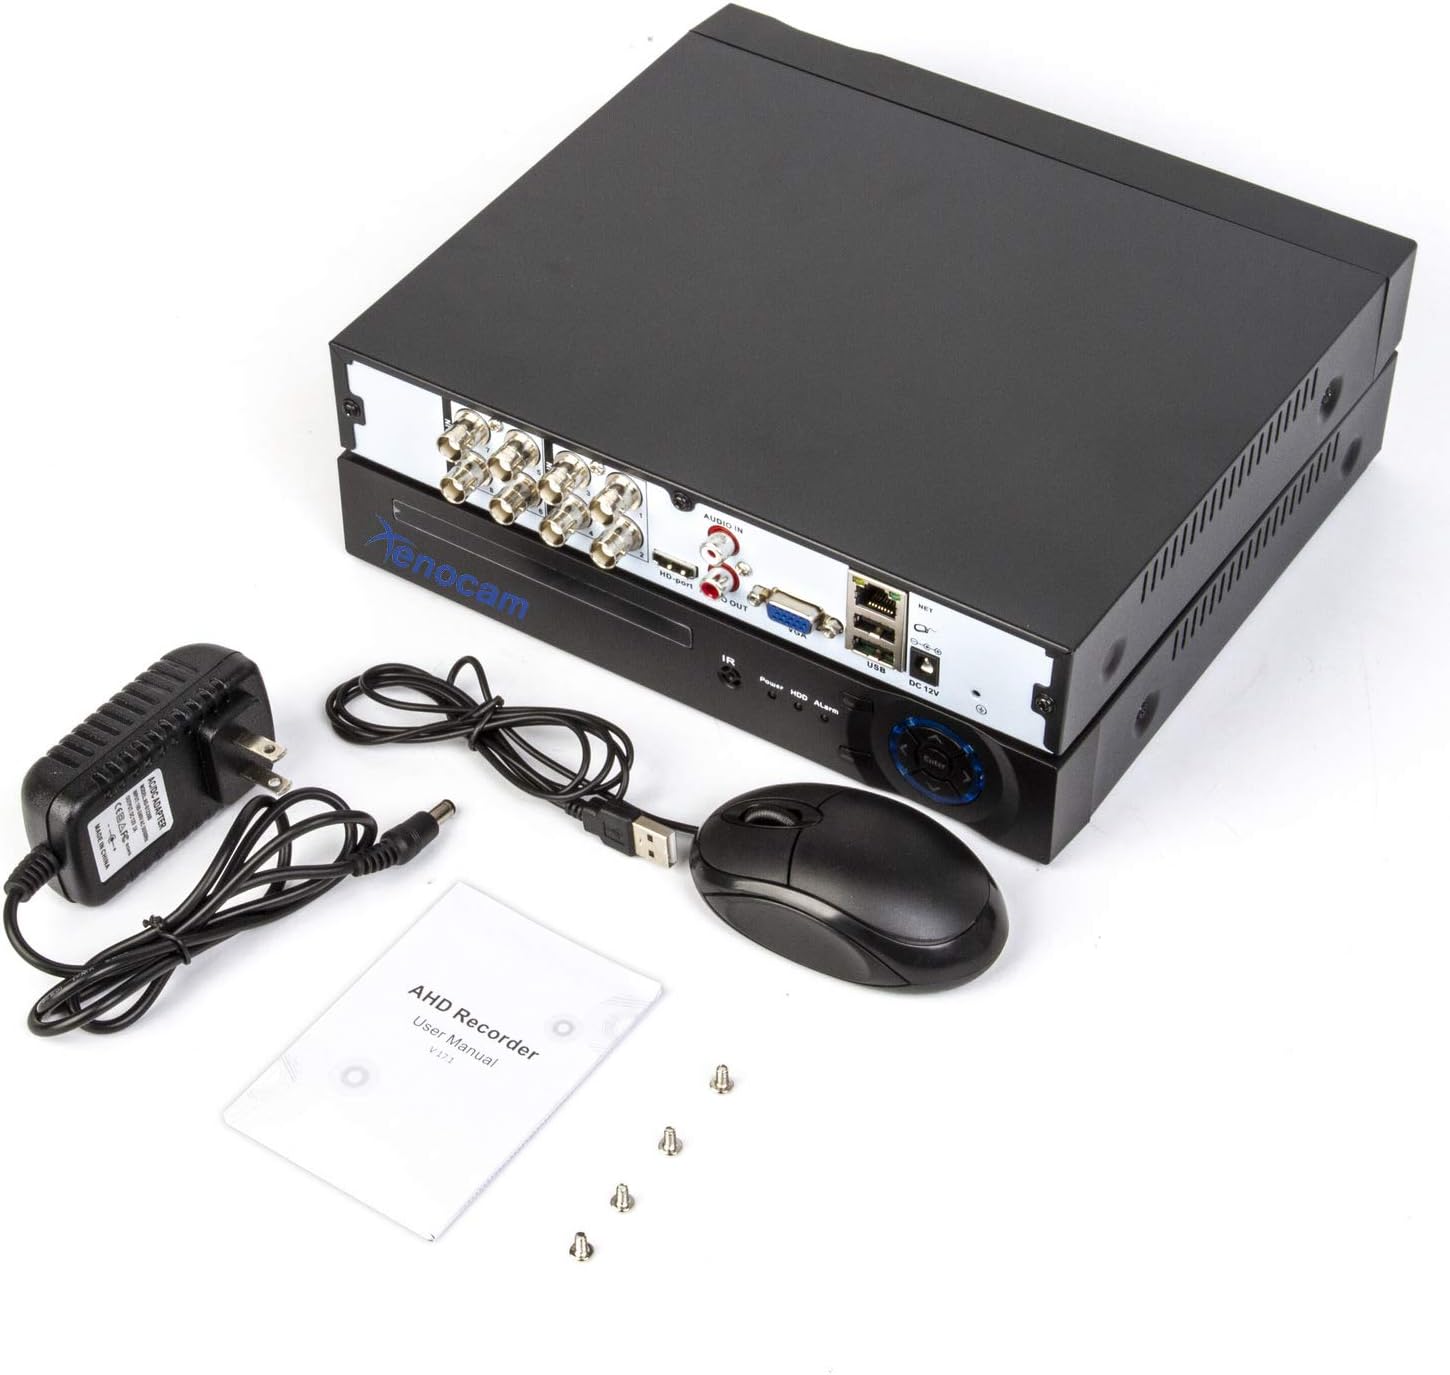
図5.1: System Connection Diagram.
- Connect BNC cables from your cameras to the "VIDEO IN" ports (1-8) on the DVR.
- HDMI または VGA ポートを使用して、モニターまたはテレビを DVR に接続します。
- USB マウスを DVR の USB ポートに接続します。
- リモート用 viewing, connect an Ethernet cable from the DVR's "NET" port to your router.
- Connect the power adapter to the "DC 12V" input and then to a power outlet.
5.3 初期電源投入と設定
Upon first power-up, the DVR will guide you through an initial setup wizard.
- DVRの電源をオンにします。
- Follow the on-screen prompts to set the language, date/time, and network settings.
- If a new hard drive is installed, the system may prompt you to format it. Confirm to proceed.
- Configure the channel type to match your connected cameras (Analog, AHD, TVI, CVI, IP).

図5.2: Language and Channel Type Configuration Interface.
注記: To enable IP cameras (NVR mode), you may need to select a hybrid channel type that supports IP inputs. Refer to the on-screen options for specific configurations like "IP" or "Hybrid" modes.
6. 操作手順
6.1 ユーザーインターフェースナビゲーション
Use the connected USB mouse to navigate the DVR's graphical user interface (GUI).

図6.1: メイン メニュー インターフェイス。
- 右クリック: メインメニューにアクセスするか、前の画面に戻ります。
- 左クリック: オプションを選択するか、アクションを確認します。
- メインメニュー: Provides access to system settings, recording, playback, network, and advanced features.
6.2 ライブ View
After successful camera connection, the live view will display video feeds from all active channels. You can switch between single-channel view and multi-channel grid views.
6.3 記録設定
Access "Record Conf" from the main menu to set up recording schedules and motion detection.

図6.2: System Menu Interface.
- スケジュールの記録: Set continuous recording or specific time periods for each channel.
- モーション検出: Enable motion-triggered recording for selected channels. Configure sensitivity and detection areas. This feature can significantly extend recording times.
- アラーム: Configure alarm actions such as email notifications or mobile push alerts upon motion detection.
6.4 再生
Select "PlayBack" from the main menu to review 記録されたfootage.
- Choose the date and time range for playback.
- Select the desired channels to view.
- 再生コントロール(再生、一時停止、早送り、巻き戻し)を使用して、fooをナビゲートします。tage.
6.5 Remote Access (Xmeye App)
The Xmeye app allows live viewing and playback on smartphone devices via Wi-Fi, 2G, 3G, or 4G networks.
- Download the "Xmeye" app from your smartphone's app store.
- アカウントを登録するか、ログインしてください。
- Add your DVR device by scanning the QR code (usually found in the DVR's network settings) or manually entering the device ID.
- Ensure your DVR is connected to the internet via the Ethernet port.
バックアップしない
ビデオfooをバックアップするにはtage, connect a USB flash drive to one of the DVR's USB ports. Navigate to the "Backup" option in the main menu to select footage and initiate the transfer.
7. メンテナンス
- ハードドライブ管理: Regularly check the hard drive status in the system settings. Format the hard drive periodically if needed, ensuring important footage is backed up first.
- クリーニング: Keep the DVR unit clean and free from dust. Use a soft, dry cloth. Do not use liquid cleaners.
- ファームウェアの更新: Periodically check the XENOCAM official website for available firmware updates. Follow the provided instructions carefully for any updates.
8。 トラブルシューティング
| 問題 | 考えられる原因 | 解決 |
|---|---|---|
| モニターにビデオが表示されません。 | ビデオ ケーブルが緩んでいる、モニターの入力が正しくない、DVR の電源がオンになっていない。 | HDMI/VGAケーブルの接続を確認してください。モニターの入力が正しいことを確認してください。DVRの電源を確認してください。 |
| カメラ画像がありません。 | Camera power issue, faulty cable, incorrect channel type setting. | Check camera power supply. Inspect BNC cables. Verify DVR channel type matches camera type. |
| DVRにリモートでアクセスできません。 | ネットワーク接続がない、アプリの設定が正しくない、ファイアウォールに問題がある。 | Ensure DVR is connected to router. Check network settings on DVR and app. Verify router firewall settings. |
| DVR が録画しません。 | No hard drive, hard drive full/faulty, recording schedule not set. | Install/check HDD. Format HDD if necessary (backup data first). Configure recording schedule. |
9. 仕様
- モデル: A6708NH
- ビデオ入力: 8 Channels (Analog, AHD, HD-TVI, CVI, 1080P NVR)
- ビデオ解像度: 1080N (1080P Lite), 960H, 720P, 1080P (IP)
- ビデオ出力: HDMI、VGA
- 音声入出力: RCA
- Hard Disk Support: 最大6 TB(HDDは含まれません)
- 接続性: Ethernet (RJ45), USB, Wi-Fi (via USB Wi-Fi adapter, if supported)
- リモート アクセス: Xmeye App (iOS/Android)
- 電源: DC12V
- 製品寸法: 長さ9.96インチ x 幅9.37インチ x 高さ1.65インチ (25.3 cm x 23.8 cm x 4.2 cm)
- 商品の重量: 2.53ポンド(1.15kg)
10. 保証とサポート
XENOCAM products typically come with a limited warranty. For specific warranty terms, technical support, or service inquiries, please refer to the warranty card included with your product or visit the official XENOCAM webサイトでご確認ください。購入証明として購入レシートを保管してください。
For further assistance, you may contact XENOCAM customer support through their official channels.
Ask a question about this manual
Ask about setup, troubleshooting, compatibility, parts, safety, or missing instructions. Manuals+ will review the question and use this page’s manual context to help answer it.