
Alecto DVM-75C
Alecto DVM-75C 補助カメラ取扱説明書
Model: DVM-75C | Brand: Alecto
導入
This manual provides comprehensive instructions for the installation, operation, maintenance, and troubleshooting of your Alecto DVM-75C supplementary camera. This camera is designed to expand your existing Alecto DVM-73 baby monitor system, allowing you to monitor multiple rooms or children simultaneously.
Please read this manual carefully before using the product to ensure proper function and safety.
製品終了view
The Alecto DVM-75C is an additional camera unit for the Alecto DVM-73 baby monitor. It features night vision, two-way talk-back functionality, and a secure, private connection. The system supports up to four cameras, making it ideal for monitoring multiple areas.

図1: フロント view of the Alecto DVM-75C supplementary camera. It shows the camera lens, infrared LEDs, power indicator, and control buttons for pairing and volume.
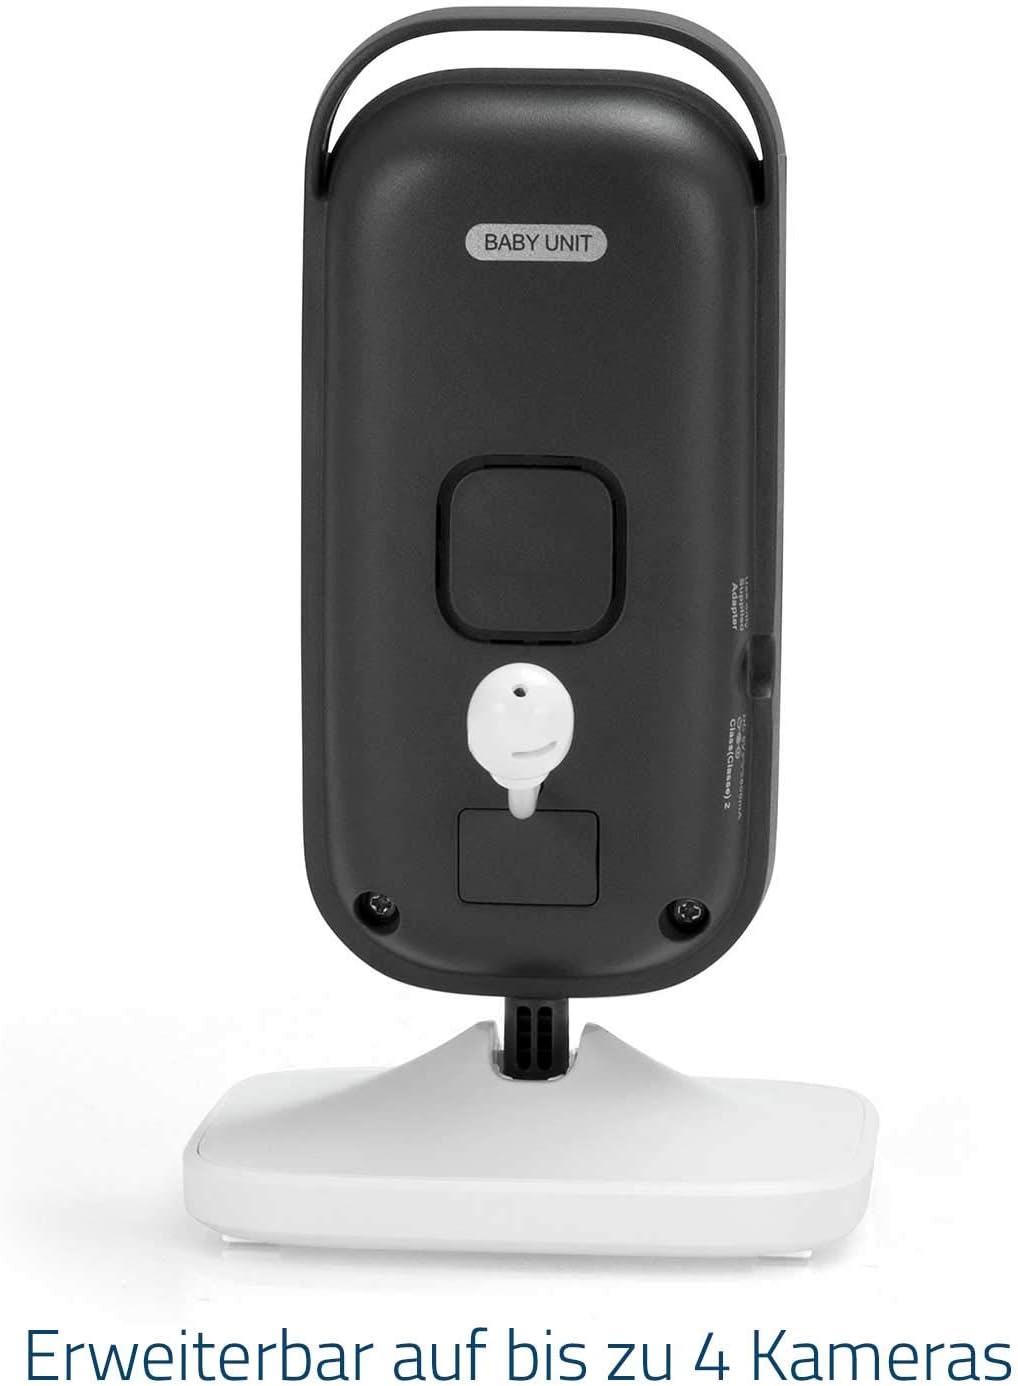
図2: 戻る view of the Alecto DVM-75C supplementary camera. This view highlights the power adapter port and the channel selection switch, indicating the unit's expandability.
セットアップとインストール
This section guides you through connecting your new DVM-75C camera to your existing Alecto DVM-73 baby monitor system.
パッケージ内容
- Alecto DVM-75C Baby Unit (Camera)
- 電源アダプター
- Instruction Manual (EN / FR / DE / NL / IT / ES)
Pairing the Supplementary Camera
The DVM-75C camera needs to be paired with your DVM-73 parent unit. The DVM-73 system supports up to four cameras.
- Place the DVM-75C camera in the desired location, ensuring it has a clear view 監視したいエリアの
- Connect the power adapter to the DVM-75C camera and plug it into a power outlet. The power indicator light on the camera will illuminate.
- Ensure your DVM-73 parent unit is turned on and within range of the camera.
- On the DVM-75C camera, locate the ペア ボタン。
- On the DVM-73 parent unit, navigate to the camera pairing menu (refer to your DVM-73 manual for specific steps, usually found under 'Camera Settings' or 'Add Camera').
- While the parent unit is in pairing mode, press and hold the ペア button on the DVM-75C camera for approximately 3 seconds until the camera's power indicator starts flashing.
- The parent unit should detect and pair with the new camera. Once successfully paired, the power indicator on the camera will stop flashing and remain solid, and the image from the new camera will appear on the parent unit's screen.
If pairing fails, ensure both units are close to each other and repeat the steps. You may need to reset the camera or parent unit if issues persist.

図3: 側 view of the DVM-75C camera, illustrating the simplicity of the one-touch pairing process for adding new cameras to the system.
操作手順
Once paired, the DVM-75C camera operates in conjunction with your DVM-73 parent unit. All primary controls are managed via the parent unit.
カメラ機能
- ナイトビジョン: The camera automatically activates infrared LEDs in low-light conditions, providing a clear black-and-white image of your baby, even in complete darkness.
- Two-Way Talk-Back: Use the microphone on your parent unit to speak to your baby through the camera's built-in speaker. This feature allows you to soothe your baby from another room.
- デジタルズーム: The parent unit allows you to digitally zoom in on the camera's image for a closer view あなたの赤ちゃんの。
- 調整可能な角度: The camera unit can be manually tilted and swiveled on its stand to achieve the optimal view角度。

図4: The DVM-75C camera, highlighting its two-way talk-back and automatic night vision capabilities for continuous monitoring.

図5: The DVM-75C camera's adjustable design, allowing for manual swivel and tilt to optimize the viewing angle, complemented by digital zoom functionality controlled via the parent unit.
Switching Between Cameras (Multi-Camera Setup)
If you have multiple cameras paired with your DVM-73 parent unit, you can switch between them or use the scan mode:
- 手動切り替え: On the parent unit, use the designated camera selection buttons or menu options to manually switch between the paired cameras.
- スキャンモード: Activate the scan mode on the parent unit. The unit will automatically cycle through all paired cameras, displaying each camera's feed for a few seconds before moving to the next.
メンテナンスとケア
Proper maintenance ensures the longevity and optimal performance of your DVM-75C camera.
- クリーニング: Use a soft, dry cloth to clean the camera unit. Do not use abrasive cleaners or solvents. For the lens, use a lens cleaning cloth.
- ストレージ: カメラを長期間保管する場合は、電源を外して涼しく乾燥した場所に保管してください。
- 環境: Avoid placing the camera in direct sunlight, near heat sources, or in areas with high humidity. The camera is designed for indoor use only.
- 電源アダプター: Only use the original power adapter supplied with the camera.
トラブルシューティング
If you encounter issues with your DVM-75C camera, refer to the following common problems and solutions.
| 問題 | 考えられる原因 | 解決 |
|---|---|---|
| No image on parent unit from the new camera. | Camera not powered on, not paired, or out of range. | Ensure camera is plugged in and power indicator is on. Re-attempt pairing as per 'Setup' section. Move camera closer to parent unit. |
| Poor image quality or flickering. | Interference from other electronic devices, camera too far from parent unit, or low light conditions. | Move camera or parent unit away from other electronics (e.g., Wi-Fi routers, microwaves). Reduce distance between units. Ensure sufficient lighting or check night vision activation. |
| Two-way talk-back not working. | Volume on parent unit too low, or microphone/speaker issue. | Increase volume on parent unit. Ensure parent unit's microphone is not blocked. Check DVM-73 manual for talk-back activation. |
| Camera loses connection frequently. | Out of range, excessive interference, or structural obstacles. | Reduce distance between camera and parent unit. Avoid placing units near large metal objects or thick walls. Identify and remove sources of interference. |
For further assistance, please refer to the complete DVM-73 baby monitor system manual or contact Alecto customer support.
仕様
| モデル名 | DVM-75C |
| ブランド | アレクト |
| 互換性あり | Alecto DVM-73 Baby Monitor System |
| 接続技術 | Proprietary Wireless (Non-Wi-Fi, 2.4 GHz FHSS for secure, private connection) |
| 屋内/屋外での使用 | 屋内 |
| 電源 | Electric Cable (Adapter included) |
| 巻tage | 6ボルト |
| 色 | 白 |
| 材料 | プラスチック |
| 商品の寸法 (長さ x 幅 x 高さ) | 9.4 x 8.3 x 15 cm(3.7 x 3.3 x 5.9インチ) |
| 重さ | 228 グラム (0.5 ポンド) |
| 暗視範囲 | Up to 50 meters (Note: Effective range may vary based on environmental factors) |
| 屋内最大範囲 | Up to 300 meters (Note: Optimal range achieved in open areas without obstacles) |
| 最大屋外範囲 | Up to 50 meters (Note: Optimal range achieved in open areas without obstacles) |
| 特集 | Portable, Two-Way Talk-Back, Automatic Night Vision |
| メーカー | Hesdo B.V. |

図6: The DVM-75C camera emphasizes its secure, non-Wi-Fi connection, ensuring privacy and reliability for baby monitoring.
保証とサポート
Information regarding warranty coverage for the Alecto DVM-75C supplementary camera is typically provided with the original DVM-73 baby monitor system or can be found on the manufacturer's official webサイトでご確認ください。保証請求のために購入証明書を保管してください。
For technical support, product inquiries, or warranty service, please contact Alecto customer support directly. Contact details can usually be found in the main DVM-73 manual or on the Alecto official webサイト。
Manufacturer: Hesdo B.V.
Ask a question about this manual
Ask about setup, troubleshooting, compatibility, parts, safety, or missing instructions. Manuals+ will review the question and use this page’s manual context to help answer it.