Reloop RP-1000-MK2
Reloop RP-1000 MK2 Professional Belt Drive Turntable System
ユーザーマニュアル
1. はじめに
This user manual provides comprehensive instructions for the setup, operation, and maintenance of your Reloop RP-1000 MK2 Professional Belt Drive Turntable System. Please read this manual thoroughly before using the product to ensure proper function and to prevent damage.
The Reloop RP-1000 MK2 is designed for both aspiring DJs and HiFi enthusiasts, offering high-quality audio reproduction through its belt-driven mechanism. This design effectively isolates the platter from motor vibrations, ensuring clear, distortion-free sound. The MK2 version features an enhanced top panel construction, improved metallic buttons, and a pre-fitted Ortofon OM Black pick-up system for immediate playback.
2. 安全に関する注意事項
To ensure safe operation and prolong the life of your turntable, please observe the following safety guidelines:
- 電源: Connect the unit only to an AC outlet with the correct voltage as indicated on the product. Ensure the power cord is not pinched or walked on.
- 水分: 本製品を雨、湿気、または過度の湿度にさらさないでください。花瓶など、液体の入った物を本製品の上に置かないでください。
- 換気: ユニット周囲の換気を十分に確保してください。通気口を塞がないでください。
- 熱源: ユニットをラジエーター、暖房口、ストーブ、その他の機器(電気を含む)などの熱源から遠ざけてください。 amp熱を発生する装置。
- クリーニング: 乾いた布でのみ清掃してください。液体洗剤やエアゾールの使用は避けてください。
- サービス: Do not attempt to service the unit yourself. Refer all servicing to qualified service personnel. Servicing is required when the apparatus has been damaged in any way, such as power-supply cord or plug is damaged, liquid has been spilled or objects have fallen into the apparatus, the apparatus has been exposed to rain or moisture, does not operate normally, or has been dropped.
- 配置: Place the turntable on a stable, level surface to prevent vibrations and ensure proper tracking.
3. パッケージ内容
下記のすべてのアイテムがパッケージに含まれていることを確認してください。
- ターンテーブルプラッター
- OM Blackピックアップシステム(オルトフォン製)
- ヘッドシェル
- スリップマット
- カウンターウェイト
- 電源コード
- 取扱説明書(本書)
不足または破損した商品がある場合は、すぐに販売店またはReloopカスタマーサポートにご連絡ください。
4.製品オーバーview
Familiarize yourself with the main components of your Reloop RP-1000 MK2 turntable.

図4.1: 角度付き view Reloop RP-1000 MK2ターンテーブル、asing the platter, tonearm, and control panel.
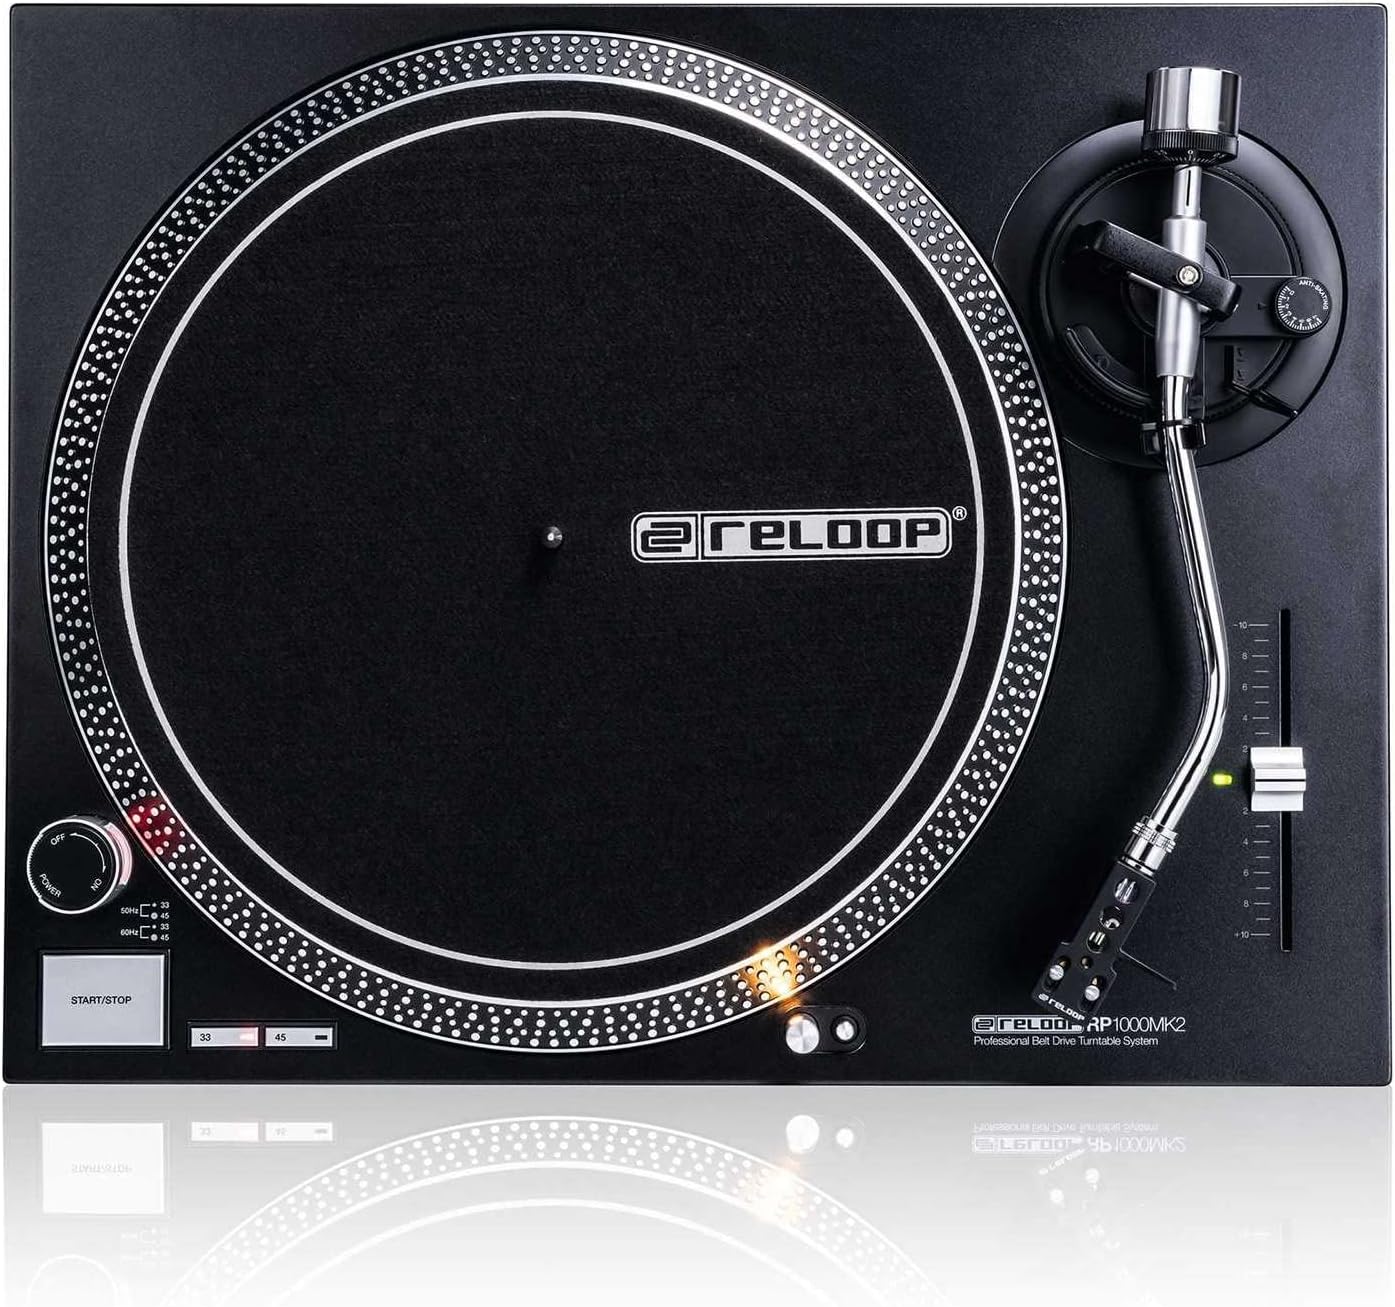
図4.2: トップダウン view highlighting the platter, slipmat with Reloop logo, S-shaped tonearm, and pitch control slider.

図4.3:詳細 view of the S-shaped tonearm, headshell, and the pre-fitted Ortofon OM Black pick-up system.

Figure 4.4: Close-up of the power knob, start/stop button, and speed selection buttons (33/45 RPM).
主要コンポーネント:
- プラッター: Precision-engineered, die-cast aluminum platter for stable rotation.
- トーンアーム: Statically balanced S-shaped tonearm with hydraulic lift and anti-skating mechanism.
- カートリッジ: High-quality OM Black pick-up system by Ortofon, pre-fitted to a headshell.
- ピッチコントロール: Adjustable slider with a range of +/-10% for fine speed adjustments.
- Speed Select Buttons: Buttons for selecting 33 1/3 RPM and 45 RPM playback speeds.
- 開始/停止ボタン: プラッターの回転を制御します。
- ターゲットライト: Extendable aluminum target light to illuminate the needle position in dark environments.
- Shock-absorbing Feet: Improve isolation from unwanted vibrations.
5. セットアップ
5.1開梱と配置
- すべての部品をパッケージから慎重に取り出してください。パッケージは、将来の輸送や保管のために保管しておいてください。
- Place the turntable on a flat, stable, and level surface, away from direct sunlight, heat sources, and strong magnetic fields.
- Ensure there is sufficient space around the unit for ventilation.
5.2 プラッターとベルトの取り付け
- プラッターをセンタースピンドルに置きます。しっかりと固定されていることを確認してください。
- Locate the drive belt. Carefully stretch the belt around the inner rim of the platter and hook it onto the motor pulley, which is visible through one of the platter's openings.
- フェルト製のスリップマットをプラッターの上に置きます。
5.3 トーンアームのセットアップ
The OM Black pick-up system is pre-fitted to the headshell. Follow these steps to balance the tonearm:
- Attach the headshell with the pre-fitted cartridge to the front end of the tonearm. Secure it by turning the locking ring clockwise.
- Place the counterweight onto the rear of the tonearm and rotate it until it is approximately centered.
- トーンアームclを解放しますamp and lower the tonearm lift.
- Carefully adjust the counterweight by rotating it forwards or backwards until the tonearm is perfectly balanced and floats horizontally.
- Once balanced, hold the counterweight steady and rotate only the numbered ring on the front of the counterweight to '0' (zero).
- Rotate the entire counterweight (including the numbered ring) counter-clockwise to set the recommended tracking force for the Ortofon OM Black cartridge, typically between 1.5 to 2.0 grams. Refer to the cartridge manufacturer's specifications for the precise recommended tracking force.
- Set the anti-skating dial to the same value as your tracking force.
- トーンアームを元の位置に戻し、クランプで固定します。amp.
5.4 オーディオと電源の接続
- RCAオーディオケーブルをターンテーブルの出力からPHONO入力に接続します。 amplifier or mixer. Ensure correct left (white) and right (red) channel connections.
- ターンテーブルからのアース線を、 amplifier or mixer to minimize hum.
- Plug the power cord into the turntable's power input and then into a suitable AC power outlet.
6. 操作手順
6.1 基本操作
- 電源オン: Turn the power knob clockwise to the "ON" position. The platter will not start spinning until the START/STOP button is pressed.
- 速度を選択します: Press the "33" or "45" button to select the desired playback speed according to the record you are playing. The corresponding LED will illuminate.
- 順位記録: Carefully place a vinyl record onto the platter.
- スタートプラッター: Press the START/STOP button. The platter will begin to rotate.
- トーンアームの位置: トーンアームclを解放しますamp. Use the tonearm lift lever to raise the tonearm. Carefully move the tonearm over the desired track on the record.
- 下部トーンアーム: Gently lower the tonearm lift lever to allow the stylus to descend onto the record groove.
- プレイ中: The audio will now play through your connected audio system.
- 再生を停止します。 At the end of the record, or when you wish to stop, use the tonearm lift lever to raise the tonearm, return it to its rest, and secure it with the clamp. Press the START/STOP button to stop the platter rotation.
- 電源を切る: Turn the power knob counter-clockwise to the "OFF" position when not in use.
6.2 Using Pitch Control
The pitch control slider allows you to finely adjust the playback speed by +/-10%. Move the slider up or down to increase or decrease the speed. The center detent indicates 0% pitch adjustment (nominal speed).
6.3 Target Light
Press the aluminum target light button to extend the light, illuminating the needle position. This is particularly useful in low-light environments. Press it again to retract the light.
7. メンテナンス
7.1 ユニットのクリーニング
- 清掃する前に、必ず電源コードを抜いてください。
- Use a soft, dry, lint-free cloth to wipe the surface of the turntable.
- 頑固な汚れには、軽くamp 布で拭いた後、すぐに乾いた布で拭いてください。研磨剤入りの洗剤や溶剤は使用しないでください。
7.2 スタイラスのお手入れ
- The stylus (needle) is a delicate component. Handle it with extreme care.
- Clean the stylus regularly using a soft brush designed for stylus cleaning, brushing gently from back to front.
- A worn or dirty stylus can damage your records and degrade sound quality. Replace the stylus when signs of wear are apparent (e.g., distorted sound, skipping).
7.3 ベルトの交換
The belt is a wear-and-tear part. If you notice inconsistent speed or the platter not spinning, the belt may need replacement. Contact Reloop support or an authorized service center for replacement belts and instructions.
7.4 Dust Cover Care (if applicable)
If your turntable includes a dust cover, clean it with a soft, damp cloth. Avoid using dry cloths as they can scratch the acrylic surface. Do not use harsh chemicals.
8。 トラブルシューティング
Before contacting support, please refer to the following common issues and their solutions:
| 問題 | 考えられる原因 | 解決 |
|---|---|---|
| No power / Platter not spinning | Power cord not connected; Power switch off; Belt not installed or broken. | Ensure power cord is securely plugged in. Turn power switch ON. Check if the drive belt is correctly installed around the platter and motor pulley. Replace belt if broken. |
| 音が出ない、または非常に小さい音 | RCA ケーブルが正しく接続されていません。 Amplifier/mixer input incorrect; Stylus damaged or dirty; Cartridge not properly seated. | Check RCA connections to amplifier/mixer (PHONO input). Ensure ground wire is connected. Clean stylus. Re-seat cartridge in headshell. |
| Distorted sound / Skipping | Stylus dirty or worn; Tracking force incorrect; Anti-skating incorrect; Turntable not level; Record dirty or damaged. | Clean or replace stylus. Re-adjust tracking force and anti-skating. Ensure turntable is on a level surface. Clean record. |
| 速度が一定でない | Worn or stretched belt; Motor issue. | Inspect the drive belt for wear and replace if necessary. If the issue persists, contact service. |
9. 仕様
| 特徴 | 説明 |
|---|---|
| モデル名 | RP-1000 MK2 Professional Belt Drive Turntable System |
| ドライブタイプ | ベルト駆動 |
| モーターシステム | Powerful belt-drive motor system absorbs unwanted vibration and noise |
| 大皿 | Precision-engineered, die-cast aluminum platter with stable rotation |
| 速度 | 2 selectable speeds (33 1/3 & 45 RPM) |
| ピッチコントロール | Adjustable range of +/-10% |
| トーンアーム | Statically balanced S-shaped tonearm with hydraulic lift and anti-skate |
| 工事 | Redesigned metal top panel, tactile buttons, reinforced housing construction, optimized damping features, shock-absorbing feet |
| 寸法(幅×奥行き×高さ) | 17.72 x 13.86 x 5.67インチ(約45 x 35.2 x 14.4 cm) |
| 重さ | 16.06ポンド(約7.3kg) |
| 接続性 | Analog RCA output, Ground terminal |
| 電源 | Corded Electric, 220 Volts (check local voltage要件) |
10. 保証とサポート
10.1 保証情報
Reloop products are manufactured to the highest quality standards. This product comes with a manufacturer's warranty. Please refer to the warranty card included in your package or visit the official Reloop webお住まいの地域に適用される詳細な保証条件については、こちらのサイトをご覧ください。
保証請求の際に必要となるため、購入証明(領収書または請求書)を保管してください。
10.2 カスタマーサポート
Should you encounter any issues not covered in the troubleshooting section, or require further assistance, please contact Reloop customer support or your authorized dealer. Contact information can typically be found on the official Reloop webサイトまたは製品パッケージに記載されています。
For the latest information, FAQs, and support resources, please visit the official Reloop webサイト: www.reloop.com
Ask a question about this manual
Ask about setup, troubleshooting, compatibility, parts, safety, or missing instructions. Manuals+ will review the question and use this page’s manual context to help answer it.